API hooking and DLL injection on Windows
Note: all the code examples can be found on my Github profile under visual-studio-projects accessible here: https://github.com/proteansec.

Become a certified reverse engineer!
In this tutorial, we'll take a look at various methods that we can use to inject a DLL into the process' address space. For injecting a DLL into the process's address space, we must have administrator privileges on the system so that we've completely taken over the system at that time. This is why these methods cannot be used in a normal attack scenario where we would like to gain code execution on the target computer. The methods assume we already have complete control over the system. But you might ask why would we want to do anything to the system or processes running on the system if we already have a full access to it? There is one single reason: to avoid detection. Once we've gained total control over the system, we must protect ourselves from being detected by the user or system administrator. That would defeat the whole purpose of the attack, so it's best to remain undetected as long as possible. By doing so, we can also track what user is doing and possibly gather more and more information about the user or the network in which we're located.
First, let's talk a little about API hooking. We must understand that there are various methods to hook an API:
Let's take a look at the third option in the above list—the injection of the DLL into the address space of the process. We're talking about an already running process, and not an executable which we're about to run. By injecting a DLL into an already running process, we leave less footprint on the system and make the forensic analysis somewhat harder to do. By injecting a custom DLL into an already running process, we're actually forcing the load of a DLL that wouldn't otherwise be loaded by the process. There are various ways we can achieve that:[1]
Remember that the IAT import table is part of the executable and it populated during the build time. This is also the reason why we can only hook functions written in IAT (with the method we'll describe). This further implies that IAT hooking is only applicable when talking about load-time dynamic linking, but couldn't be used with run-time dynamic linking where we don't know in advance which DLLs the program will use.
Creating the DLL
Here we'll describe the process of creating the DLL. We'll be injecting into some process using various options. First, we have to create a new project in Visual Studio and choose "Win32 Console Application" as seen on the picture below:
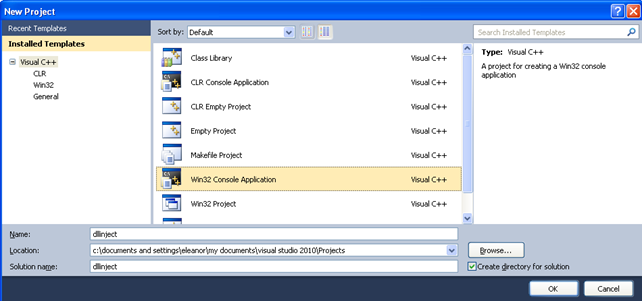
We named the project dllinject, which will also be the name of the created DLL once we compile the source code. When we click on the OK button, a new window will appear where we must select that we're building a DLL not a console application (which is the default). This can be seen on the picture below (notice that the DLL is checked):
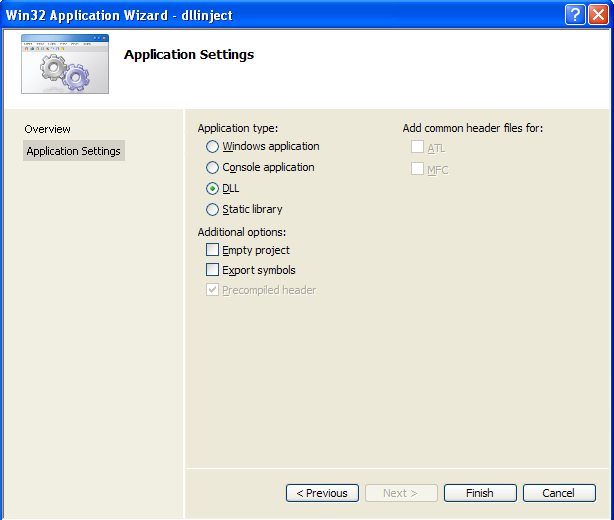
When we click on the Finish button, the project will be created. There will be two header files named stdafx.h and targetver.h and three source files named dllinject.cpp, dllmain.cpp, and stdafx.cpp. The initial project will look like the picture below:

The dllmain.cpp defines the entry point for the DLL library we'll be using (it says in the comment at the top of the dllmain.cpp file). When the DllMain() function starts, it decides what to do based on the reason for calling it. The DLL can be called for four reasons: when attaching a DLL, when attaching a thread, when detaching a thread and when detaching a process. Let's check the source code of the dllmain.cpp file, which can be seen below:
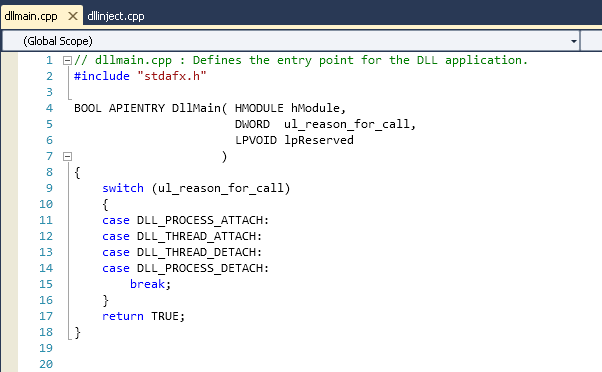
The DllMain is an optional entry point into a DLL. When a system starts or terminates a process or a thread, it will call that function for each loaded DLL. This function is also called whenever we load or unload a DLL with LoadLibrary and FreeLibrary functions [3]. The DllMain takes three parameters as parameters, which can be seen below (the picture was taken from [3]):

The parameters of the DllMain function are as follows:
- hinstDLL: a handle to the DLL module, which contains the base address of the DLL.
-
fdwReason: a reason why the DLL is entry point function is being called. There are three possible constant that defined the reason [3]:
- DLL_PROCESS_ATTACH: DLL is being loaded into the address space of the process either because the process has a reference to it in the IAT or because the process called the LoadLibrary function.
- DLL_PROCESS_DETACH: DLL is being unloaded from the address space of the process because the process has terminated or because the process called the FreeLibrary function.
- DLL_THREAD_ATTACH: the current process is creating a new thread; when that happens the OS will call the entry points of all DLLs attached to the process in the context of the thread.
- DLL_THREAD_DETACH: the thread is terminating, which calls the entry point of each loaded DLL in the context of the exiting thread.
- lpvReserved: is either NULL or non-NULL based on the fwdReason value, and whether the DLL is being loaded dynamically or statically.
The DllMain function should return TRUE when it succeeds and FALSE when it fails. If we're calling the LoadLibrary function, which in turn calls the entry point of the DLL and that fails (by returning FALSE), the system will immediately call the entry point again, this time with the DLL_PROCESS_DETACH reason code. After that the DLL is be unloaded.
Let's present the whole code that we'll be using for our DLL. The code is presented below:
[cpp]
#include <windows.h>
#include <stdio.h>
INT APIENTRY DllMain(HMODULE hDLL, DWORD Reason, LPVOID Reserved) {
/* open file */
FILE *file;
fopen_s(&file, "C:temp.txt", "a+");
switch(Reason) {
case DLL_PROCESS_ATTACH:
fprintf(file, "DLL attach function called.");
break;
case DLL_PROCESS_DETACH:
fprintf(file, "DLL detach function called.");
break;
case DLL_THREAD_ATTACH:
fprintf(file, "DLL thread attach function called.");
break;
case DLL_THREAD_DETACH:
fprintf(file, "DLL thread detach function called.");
break;
}
/* close file */
fclose(file);
return TRUE;
}
[/cpp]
We're calling the DllMain function normally, but right after that, we're opening the C:temp.txt file where some text is written based on why the module was called. After that, the file is closed and the module is done executing.
After we've built the module, we will have the dllinject.dll module ready to be injected into the processes. Keep in mind that the DLL doesn't actually do anything other than saving the called method name into the C:temp.txt file. If we would like to actually do something, we have to change the DllMain() function to change some entries in the IAT table, which will effectively hook the IAT. We'll see an example of this later. For now, we'll only take a look at the previously mentioned methods of DLL injecting.
The AppInit_DLLs method
The Appinit_DLLs value uses the following registry key [2]:
HKEY_LOCAL_MACHINESoftwareMicrosoftWindows NTCurrentVersionWindows
We can see that by default the Appinit_DLLs key has a blank value of the type REG_SZ, which can be seen on the picture below:
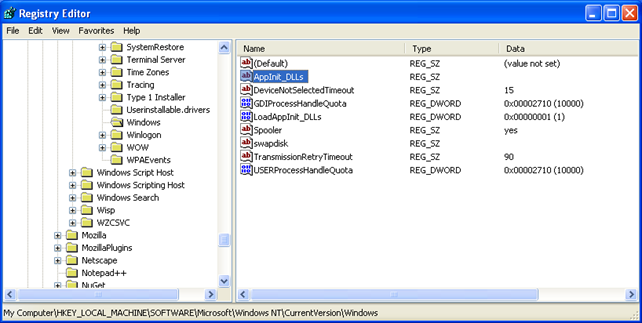
The AppInit_DLLs value can hold a space separated list of DLLs with full paths, which will be loaded into the process's address space. This is done by using the LoadLibrary() function call during the DLL_PROCESS_ATTACH process of user32.dll; the user32.dll has a special code that traverses through the DLLs and loads them, so this functionality is strictly restricted to user32.dll. This means that the listed DLLs will be loaded into the process space of every application that links against the user32.dll library by default. If the application doesn't use that library and is not linked against this library, then the additional DLLs will not be loaded into the process space. A careful reader might have notices another similar registry key LoadAppInit_DLLs, which is by default set to 1. This field specifies whether the AppInit_DLLs should be loaded when the user32.dll library is loaded or not; the value of 1 means true, which means that all the DLLs specified in AppInit_DLLs will also be loaded into the process's address space when it's linked against user32.dll.
The article at [2] suggests that we should use only the kernel32.dll functions when implementing the DLL that we're going to link to the process's address space. The reason for this is because the listed DLLs will be loaded early in the loading process where other libraries might not be available yet, so calling their functions would result in segmentation fault (most probably), because those functions are not available at that time.
The next picture shows how we have to specify the AppInit_DLLs in order to inject the C:driversdllinject.dll module into every process that uses user32.dll library:

Note that before this will work, we have to actually copy the module built by the Visual Studio to the specified location or change the location of the module. It's better to copy the module into a folder that doesn't contains spaces in its path, so keep that in mind when configuring the AppInit_DLLs registry key value.
After we've done this, it's relatively easy to test whether the DLL will be injected into the processes address space. We can do that by downloading Putty program, which uses user32.dll library and loads it into Olly. Then we have to inspect the loaded modules, which can be seen on the picture below:
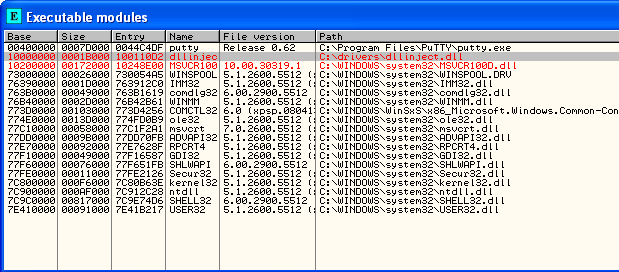
Notice that the dllinject.dll library is also loaded? Keep in mind that this DLL is only loaded when the executable program also uses the user32.dll, which we can also see on the picture above. We've just shown how an attacker could inject an arbitrary DLL into your process address space.
Conclusion
We've seen the basic introduction to IAT hooking and described the first method that can be used to inject the DLL into the processes address space. The method is somehow limited, because it only works when the launched program imports the functions from user.dll library. Nevertheless almost any program nowadays uses that library, so the method is quite successful. In the next article, we'll take a look at the other two methods that can be used to inject a DLL into the processes address space.


