Reverse engineering virtual machine protected binaries
In code obfuscation, a virtual machine is a mechanism used to execute a different instruction set than the one used by machine that runs the program. For example, a virtual machine can support executing the ARM instruction set on a 32-bit x86 architecture. Virtual machines used in code obfuscation are completely different than common virtual machines that are able to run operating systems (e.i : VMware ...), they are very specific to the task of executing a limited set of instructions in order to achieve their goal disregarding all other tasks that virtual machines do.

Become a certified reverse engineer!
The task of reverse engineering a virtual machine protection would be easy of the architecture that it executes is known to us. Thus, it would take a small amount of time to search for the opcodes in the architecture instruction set reference. Sadly, most of code obfuscators today use a custom instruction set. In other words, each instruction is given a custom opcode (often chosen at random) and custom format that obliges the reverse engineer to manually decode each instruction and that's tiring. For the sake of example, let's look at the difference between the 32-bit x86 instruction set and the custom instruction set we're going to work on in this article:
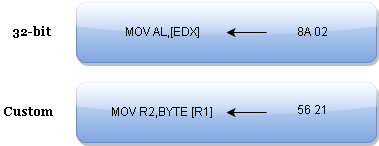
It's clear that each one of these instructions moves a byte from the memory location pointed by the second operand to the register in the first operand. However, the binary representation of the two instructions is different mostly in the opcode part in which 0x56 was a completely random choice. The second byte in both instructions represents the two registers concerned by the opcode where a nibble (4 bits) indicates a register.
Before we get into reverse engineering the example, it's crucial to know how this code obfuscation technique really works behind the scenes. The virtual machine first starts by setting its "address space" in the executing process's virtual address space. In other words, it allocates the needed space for its memory, stack and registers then starts executing the code. Code execution is done within what is called a virtual machine loop. Inside this loop, the virtual machine plays the processor part by parsing each of its predefined opcodes and their operands then using the mother architecture to execute the instructions. Iterating through the VM loop will continue until reaching a special exit opcode.
Example
For the sake of example, I took the time to build a virtual machine with a custom instruction set in C language. The complete source code on github is available right below the conclusion of this article. As you might have guessed, a virtual machine alone won't be of good use for this article without opcodes that it can execute, that's why I wrote a small program that prompts the user for a password and perform checks to verify the validity of the password. I also invite you to play with it and why not add more functionality to the VM!
As mentioned in the introduction, this virtual machine uses a custom instruction set and starts by reading the opcodes from a file into the "address space" set by the VM after the initialization phase.
Let's start by making sure that the opcodes file is in the same directory as the VM executable, and then run our program. Let's also give the program a random password and see what it will say:

Fair enough! Therefore, our goal is to find the right password to make the program output the right password message. Before looking at the binary let's start by examining the opcodes file (vm_file) using a hex editor:
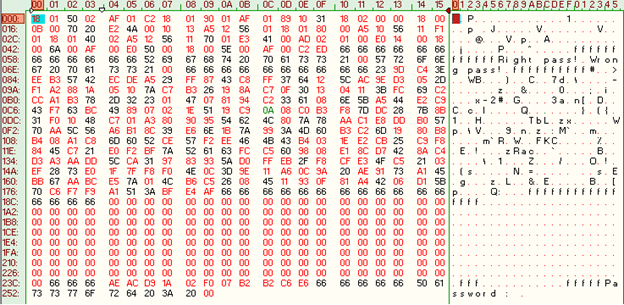
We can already recognize some strings in the vm_file like "Right pass!", "Wrong pass!" and "Password:" In order to locate where the instructions and the data are, reverse engineering the virtual machine is necessary. So let's fire up IDA and start reversing.
After opening the executable in IDA we go directly the VM loop located at the virtual address : 0x00401334. The graph view shows us a function of a considerable size but we can manage to crack our program if we approach it the right way.

Let's see what instructions are executed when entering the function:
push ebp
push edi
push esi
push ebx
sub esp, 2Ch
mov esi, [esp+3Ch+arg_0]
mov ebx, [esp+3Ch+arg_4]
mov ax, [ebx+0Ah]
lea ebp, [esi+1200h]
loc_40134D: ; This is where the loop starts
movzx edx, ax
mov cl, [esi+edx]
lea edx, [eax+1]
mov [ebx+0Ah], dx
sub ecx, 10h
cmp cl, 0E1h ; switch 226 cases
jbe short loc_40136C
This instruction "mov cl, [esi+edx]" tells us that the program reads a byte and puts it into CL. It's clear that CL contains nothing but the opcode to execute. To access this opcode, two registers are used ESI and EDX. We can clearly see by looking at previous instructions that EDX contains a word (16-bit value) while ESI contains a double word (32-bit value). Thus, ESI is actually pointing at the code section of the VM whereas DX is actually the instruction pointer value of our VM (The opcode index in the file).
Right after reading the byte we notice an incrimination and storage of the DX register [EBX+0Ah], which is where the VM allocated space for its registers. We know by now that EBX indicates where the registers are and ESI where the file data resides in memory.
Just before the comparison, we can notice that the compiler performed an optimization and the code now subtracts 0x10 from each opcode value before accessing the switch table.
loc_40136C:
movzx ecx, cl
jmp ds:switchTable[ecx*4] ; switch jump
The switch table is quite huge and it's better to execute the program dynamically to get the calculated address directly. You can do so by running the program under IDA win32 debugger or under OllyDbg.
The first instruction:
The first switch jump directly takes us to this small routine:

So basically we are now at "case 0x18 :" since the compiler chose to do some optimization and add a subtract operation. Now if you go back and check the Hex visualization of the vm_file you'll notice that the very first byte is 0x18. This opcode seems to need some operands that's why the VM will read one more bytes using the DX register. Next the VM's instruction pointer at [EBX+0Ah] is updated to EAX+2, this basically means that IP has moved to the next byte. After that, the read byte is compared to 3 and if it's above it then the program leaves the loop, you can see it as an exception to the VM. In our example, we're safe from that check since the second byte in the file is equal to 0x1. Thus, we won't take the jump and we'll land here:
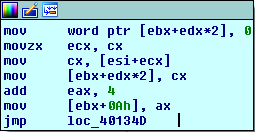
Let me remind you that EBX is a pointer to the memory where registers are stored, so in our case the first instruction initializes [ebx+1*2] to 0 , which is the second register in the registers' array.
So now we have sufficient information to conclude that our VM contains 4 registers; let's call them R0, R1, R2, and R3.
Then the rest of the code reads 2 bytes from the data loaded from the file (0x250 in big endian) and store them in the R1 register. As a result, the VM's instruction pointer is incremented to point to the next instruction, which is at offset 0x4 of the file (check the hex dump). Finally, the jump will take us to the loop check at loc_40134D again.
Until now, we've only been able to know what the first instruction does and it's only a simple move instruction that moves an absolute value to a register. The instruction can be written in the following manner:
MOV R1,250h
The second instruction:
Let's now see what the next opcode 0xFA does:
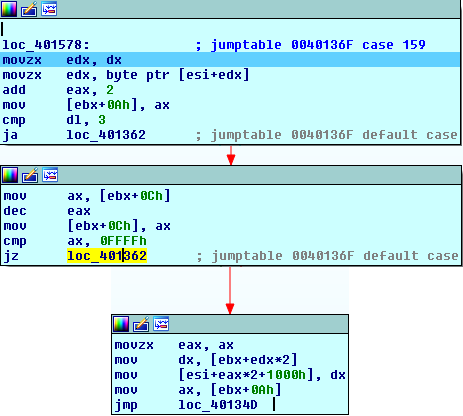
The first code block is identical to what we've seen in the MOV instruction. Apparently, this opcode takes a register as an operand and in our case that register is R1 (0x1). What it does next is access a register at [EBX+0Ch]. We know that this register isn't one of R0, R1, R2, or R3 because R3 is located at address EBX+6. We also know that it's not the instruction pointer since IP is located at EBX+0Ah. So to figure out what this register really does, we need to go back and check the initialization of this registers in the main function:
.text:00402703 mov word ptr [eax+0Ch], 256
Back to our routine we notice that the register is decremented and then checked against 0xFFFF. Since it was initialized to 256, this register won't take 0xFFFF until its value before decrementing is 0. If it's indeed the case then the VM exits the loop. However, since it's our first time executing this routine we are sure that [EBX+0Ch] is equal to 255.
The next two instructions after the jump read the value of R1 (0x250) and store it into DX register. Now for the interesting instruction:
mov [esi+eax*2+1000h], dx
If you remember, ESI points to where the code and data are stored. In addition, ESI+1000h is 4 KB away from that location. As a result, we can assume that ESI+1000h is pointing to a different "section" of the VM's allocated "address space".
If we want to represent the code executed above as a pseudo-code it would look like this:
WORD section[256];
[...]
section[ --reg ] = R1;
This seems like a stack where the stack pointer is decremented first then the value is stored. We can safely assume that the opcode 0xAF represents a PUSH instruction. Thus, the instruction that the VM just executed can be written is: PUSH R1.
Now we know that the register at [EBX+0Ch] is the VM's stack pointer and the section is nothing but a stack of size 256*sizeof(uint16_t). In addition, if you try to compare the virtual machine's stack pointer with an x86 architecture machine's stack pointer you'll see that the VM's stack pointer is actually an index to an array whereas the x86 machine's stack pointer is an address.
The third instruction:
The next opcode is 0xC2, let's see what it does :
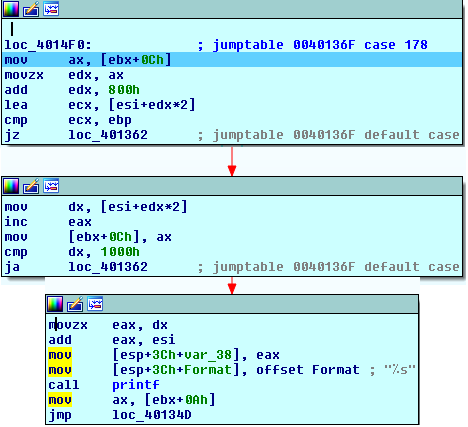
This opcodes seems to access the stack and read its top WORD, but before doing so, it checks whether the stack is empty. If it is indeed empty, it gets out of the VM loop (exception). Since a value has been already pushed, we know that the stack isn't empty! After the WORD has been read in DX, the stack pointer is incremented. We know that the value of DX is 0x250 and it's part of the section containing code and data. Therefore, the "address" (offset) doesn't have to exceed 0x1000 or the VM would be reading/writing into the stack space. The next thing that is done is the use of ESI+DX as a string pointer, the string is subsequently printed using printf. In our example, the string stored at offset 0x250 in the vm_file is: "Password :" and that's what printf will show on the screen.
We can conclude that 0xC2 opcode expects a string offset pushed onto the stack, pops it then prints it.
As you can see, after all this work we've only reached the instruction where the "Password :" is printed and it's no doubt that you've noticed how long it can take to reverse engineer one single instruction. Unfortunately, we won't be able to speak about the program instruction by instruction. However, by now you should be able to reverse engineer a virtual machine protection or even create one of your own.
Finding a working password:
Here is a quick walkthrough on how to get the right password.
Opening vm_file in the hex editor, bytes from offset 0x80 to 0x17F represent an array of 256 random generated bytes. Let's call it Random. Each byte from the password entered by the user is XORed with Random[byte] and then compared to a predefined array of bytes stored at offset 0x240.
I coded a solution script in C that you can find in the references below. The script searches and prints the valid password for the program:

Conclusion:
The task of reverse engineering a virtual machine's code isn't a short task especially if the obfuscation is based on a custom instruction set. The example VM we worked on implements more functionalities like comparison (uses allocated flag bits: ZF and CF), conditional and unconditional jumps, memory access ...etc. Therefore, I leave it to you to discover them on your own. In order to do that you can simply access the source code of the VM (link in references below), search for the instruction hex code and you'll find the instruction mnemonic with an example in a comment just above the case statement.


