Decrypting SSL/TLS traffic with Wireshark [updated 2021]
The internet wasn’t designed to be secure from the start. Many protocols (such as HTTP and DNS) were designed to serve their purpose of conveying information over the network without spending time on security.
However, in the modern Internet, privacy and security are major priorities. As a result, the Transport Level Security (TLS) protocol (and its predecessor SSL) are designed to encrypt traffic as it travels over the network. This allows computers to use the same underlying protocols for formatting data (like HTTP) but add a level of security (transforming it to HTTPS).
The issue with SSL/TLS for cybersecurity professionals is that it works. While the encryption standards were developed for good purposes, the bad guys use them too. In this article, we’ll describe how to perform SSL/TLS decryption in Wireshark.

FREE role-guided training plans
What you’ll need
Wireshark is a commonly-known and freely-available tool for network analysis. The first step in using it for TLS/SSL encryption is downloading it from here and installing it.
The other thing that you’ll need to do before decrypting TLS-encrypted traffic is to configure your Web browser to export client-side TLS keys. Since TLS is designed to protect the confidentiality of the client and the server during transmissions, it’s logical that it’s designed so that either of them can decrypt the traffic but no one else can. Since we’re acting as an eavesdropper on the network (the exact thing that TLS is designed to prevent), we need to have one of the trusted parties share their secrets with us.
In Firefox and Chrome, this can be accomplished by setting an environment variable called SSLKEYLOGFILE. If this variable is set, both browsers are configured to save a copy of the client’s secrets to the indicated file location. On Linux, this variable can be set using the Export command. On Windows, it can be set by opening Advanced System Settings, selecting Environment Variables and then adding a new System Variable. An example of this variable in Windows is shown below.
Once the environment variable has been set, it’s advisable to restart the system to ensure that the new settings are active. Once this is complete, we have everything that we need for decrypting TLS traffic.
Performing traffic decryption
If you want to decrypt TLS traffic, you first need to capture it. For this reason, it’s important to have Wireshark up and running before beginning your web browsing session.
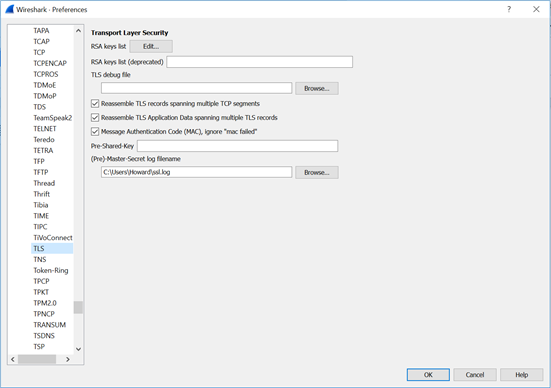
Before we start the capture, we should prepare it for decrypting TLS traffic. To do this, click on Edit → Preferences. Select Protocols in the left-hand pane and scroll down to TLS. At this point, you should see something similar to the screen below.
At the bottom of this screen, there is a field for (Pre)-Master-Secret log filename. As shown above, you need to set this value to the same location as the SSLKEYLOGFILE for your browser. When done, click OK.
Now on the main screen of Wireshark, it will show a list of possible adapters to capture from. In this example, I’ll be using WiFi 2 as it has traffic flowing over it (shown by the black line).
Clicking on an adapter will start capturing traffic on it.
At this point, you’re ready to create some TLS-encrypted traffic. Go to Chrome or Firefox and browse to a site that uses HTTPS (we used Facebook for this example). Once it’s loaded, return to Wireshark and stop the capture (red square).
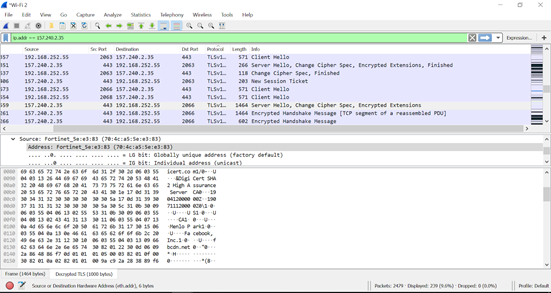
Looking through the capture, you’ll probably see a lot of traffic. What we’re looking for now are packets related to your TLS-encrypted browsing session. One method is to find the DNS lookup and filter by the provided IP address (shown below). The image below shows a packet from our browsing session to Facebook.
As shown, Wireshark shows a couple of different tabs at the bottom of the window. In addition to the Frame tab, one is labeled Decrypted TLS. Looking in the ASCII representation of the packet, we see the website’s certificate (including the word Facebook). At this point, we’ve successfully decrypted TLS traffic in Wireshark.
Free hour-long hacking course!
Learn how to hack and use AI in this free 1-hour course, led by Keatron Evans, 20-year cybersecurity veteran and VP of Portfolio Product and AI Strategy at Infosec!
Applications and limitations
TLS traffic decryption has multiple applications for the enterprise. Many threat actors have moved on to using encrypted transmissions in an attempt to increase the privacy of their command and control communications and believability to their victims. (People have been trained to trust the green padlock.) Using TLS decryption, enterprises can decrypt and perform deep packet inspection on the traffic moving through their enterprise.
The main limitation of TLS decryption in Wireshark is that it requires the monitoring appliance to have access to the secrets used for encryption. While we accomplished this by exporting keys from Chrome and Firefox, many enterprises choose to implement a proxy that breaks the TLS connection into two halves. While this is effective for monitoring, it has significant privacy and security implications.
The privacy issue is that users cannot opt out of monitoring under certain situations (e.g., checking banking information). From the security side, it creates a single point of failure where all traffic is viewable (decrypted) by an attacker and also prevents the user from seeing the server’s certificates (which may indicate a malicious site). As a result, enterprise TLS decryption at scale can be dangerous and should be performed in a secure fashion.
Sources
Download Wireshark, Wireshark
Decrypting TLS Browser Traffic With Wireshark – The Easy Way!, Red Flag Security


