PHP: Build Your Own Mini Port Scanner

We all have used a port scanner some day or the other while performing reconnaissance and information gathering regarding a target host. We listed out various port scanners and decided which one to use on the basis of set of what varied features they provided.
Every hacker has his or her own favorite port scanner; we have our favorites like Nmap, A-map, Angry Port Scanner, Yet Another Port Scanner, etc... But have you ever thought of building a scanner of your own?

What should you learn next?
Today, we will build our own basic port scanner in PHP. Yes you heard it right, PHP. By this time you must be wondering why the article is focusing on creating a port scanner in a scripting language like PHP and not in any other language like Java?
The answer is plain and simple; the author likes working in PHP (just kidding). The real reason is that we can host this scanner on a server and make it accessible to all the clients residing in the same network so that any user who wishes to use a port scanner can access the scanner just by typing out the IP of the server in the browser URL. So basically we are building a port scanner which runs in the browser window of the user and does not require any plug-in like Java does. Sounds interesting? Let's get to it.
The basics:
You need to know some basics before you start working on the script. We know that you want to get to the main part of it but it is recommended that you read this first so that if you have any additional improvements, you can work on the script by your own.
If you are new to the subject of web technology (i.e PHP, CSS, HTML/5), I recommend you to take a look at www.w3schools.com and www.php.net to get used to the languages and get a firm knowledge, at least on the basics.
1. Sockets
Sockets are just an abstraction of a low-level feature of the operating system. It is a software endpoint that establishes a bi-directional communication between the server and client program with a specific port on a machine where it runs so many client programs anywhere in the network with the socket associated with the same port. Network communication using sockets is similar to performing file I/O (a socket handle is treated like a file handle).
Creating sockets in PHP:
resource socket_create ( int $domain , int $type , int $protocol )
Refer to http://www.php.net/manual/en/function.socket-create.php for a detailed description on creating a socket string.
Initiate a connection on a socket:
bool socket_connect ( resource $socket , string $address [, int $port = 0 ] )
Refer to http://www.php.net/manual/en/function.socket-connect.php for detailed description on initializing a socket connection.
Close a socket:
void socket_close ( resource $socket )
Refer to http://www.php.net/manual/en/function.socket-close.php for detailed description on closing socket connections. Why close a connection? Well, because to create every new socket connection to a client we need to disconnect or close the previous session.
Why sockets? Since, sockets are used for communication over network and has the ability to connect to the IP address and the specific port, we will use this feature to our advantage in creating a port scanner. Something like connecting a IP along with the port number and testing if the script was able to establish a connection with the target IP and target port, thereby allowing us to find open ports on the target host machine.
We will be limiting the script to TCP socket connections and IP v4 addresses.
2. Port address
According to http://www.thetechnicalstuff.com/, a port number is part of the addressing information used to identify the senders and receivers of messages. Port numbers are most commonly used with TCP/IP connections and they are associated with network addresses. For example, in TCP/IP networking, both TCP and UDP utilizes their own set of ports that work together with IP addresses. They range from 0-65,535.
How will this matter in our script? Simple, We will be addressing a range of port numbers ( a starting port number and an ending port number) for our script to detect open ports on the target. We will be incorporating the range within a 'for' loop. You will get a better understanding when take a look at the script later.
3. CSS/3
CSS or Cascading Style Sheet deals with the UI part of the script. Basically, it is used to give our script a little look so that the script does not look pale while we use it. Check out www.w3schools.com/css/
to get an understanding of CSS. You can check out CSS3, which allows users to create animations and 3D /2D transforms which will make your web app look classy.
4. HTML
We will use this to make a form to take user inputs. In our case, it will be input of the IP address of the target host and a port range; and the form will be sent to a PHP to process the request.
5. Ping
We generally use ping for testing the connectivity between different hosts. The main purpose is to check the IP stack of the target machine. Ping stands for Packet Internet Gopher.
Okay, now enough of the theory part. Let us get started with the tutorial right away and get our hands working on the mini script.
What we require:
- WAMP server- To host our PHP port scanner script.
- Download from here: http://www.wampserver.com/en/
- A browser (preferably Firefox/Opera/Chrome)
- Notepad++ (Any other text editor will do just fine)
- A LAN environment
Note: In case if you are interested in making your PHP port scanner portable, you can use XAMPP; download from here: http://portableapps.com/apps/development/xampp .
Installation of the server:
Where to install it?
First of all, we need to decide whether we will hosting the script on the same machine as the client or we will be hosting it on a different system all together?
If you want to make it available to large number of users (somewhat like a client-server model), it is advisable to select a machine which will work as a server in your LAN environment and install WAMP on that machine.
However, if you wish to use it all by yourself, you can install WAMP on your machine and thus making the client and server machine the same.
How to install it?
Refer to the link below for detailed instructions on installation from the scratch:
After you've completed with installation, click on the icon on lower right corner of the taskbar and select Apache > Service > Install Service.

The icon may turn red followed by orange and finally green again.
Now, click on the same icon again and select 'Put Online'. The icon will change color, like previous step, and that option will now look like this:
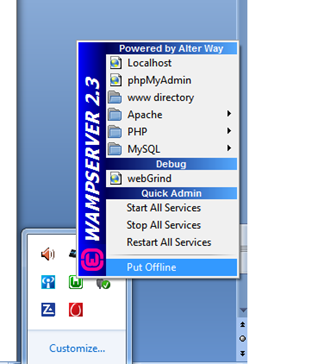
Similarly, you have to enable sockets by going to PHP > PHP extensions > PHP_Sockets.

Now you have to change a few settings in the php.ini file.

Clicking on the php.ini option will open a text editor. Press Ctrl+F and search the entry 'default_socket_timeout'.
Change the value followed by the default_socket_timeout to 100.
Changing it to 100 will allow your PHP script to scan roughly 48-50 ports at a given time. You can change the timeout accordingly to your requirement.
Okay, the good news is that you have installed the WAMP server. But what if you want the port scanner to be accessible to other users in your LAN network like making a host as a server to host the scanner? For that, you need to assign a static private (internal) IP address. You can ignore this step if you are the only user who will accessing the scanner.
Open network and sharing center > go to change adapter settings > right click Local Area Connection > Select properties > under networking tab select Internet Protocol V4 > properties > select use following IP and enter the IP address and the subnet mask > OK > OK. Now your server is accessible to others on the network and a script can now be used.
Copy and paste the following script onto your text editor and save the script as port3.html and port3.php respectively.
You have to save the PHP file and the HTML file in C:wampwww .
Port3.html
[html]
<html>
<head>
<title>PORT SCANNER</title>
<meta http-equiv="Content-Type" content="text/html; charset=UTF-8">
</head>
<body>
<h1>Port Scanner</h1>
<div>
<center style="{background:grey;
font-size:20px;
box-shadow:10px 10px 5px #888888;
border:8px solid #ffcc00;
padding:8px 5px;
border-style:inset;
}">
<form name="form1" method="post" action="port3.php">
ENTER TARGET IP:
<input type="text" name="ip" style="{
background:BLACK;
color:white;
font-size:20px;
box-shadow:10px 10px 5px #888888;
border:8px solid #ffcc00;
padding:8px 5px;
border-style:inset;
}">
<br>
<br>
FROM:
<input type="text" name="from" style="{
background:BLACK;
color:white;
font-size:20px;
box-shadow:10px 10px 5px #888888;
border:8px solid #ffcc00;
padding:8px 5px;
border-style:inset;
}">
<br>
<br>
ENDING PORT:
<input type="text" name="to" style="
background:BLACK;
color:white;
font-size:20px;
box-shadow:10px 10px 5px #888888;
border:8px solid #ffcc00;
padding:8px 5px;
border-style:inset;
}">
<br>
<br>
<input type="submit" value="Scan" style="{
background:#ADFF2F;
box-shadow:10px 10px 5px #888888;
border:8px solid #ffcc00;
padding:8px 5px;
border-style:outset;
font-weight:bold;
}">
</div>
</body>
</html>
Port3.php
[php]
<!DOCTYPE html>
<html>
<head>
<meta http-equiv="Content-Type" content="text/html; charset=UTF-8">
<style>
#field
{
margin:10px 250px;
box-shadow:10px 10px 5px #888888;
opacity:0.9;
position:absolute;
background:#FFFFCC;
border:8px solid #ffcc00;
padding:8px 5px;
border-radius:10px 10 10 10px;
border-style:outset;
}
<title>Port Scan Completed..</title>
</head>
<body>
<center>
<h1>SCAN RESULT....</h1>
<br>
<br>
<br>
<input type="button" value="Go_back" onclick="history.go(-1)">
<fieldset id="field">
<legend style="color:red;">
<b> Port Scan Details : </b>
</legend>
<?php
// Main Script begins here
//ip port range and ip
$host=$_POST['ip'];
$from = $_POST['from']; //48 connections supported for now, change php.ini default_socket_timeout for more
$to = $_POST['to'];
//validation
if (empty($_POST["ip"]) || empty($_POST['from']) || empty($_POST['to']))
{
echo"<b> Incomplete data, Go back! </b>";
}
elseif (!(filter_var($host, FILTER_VALIDATE_IP,FILTER_FLAG_IPV4)))
{
echo "<b>This IP address is not valid ! </b>";
}
elseif (!(is_numeric($from)) || !(is_numeric($to)))
{
echo "<b>Entered data is not a Port numeber</b>";
}
elseif ($from > $to || $from==$to)
{
echo "<b>Please enter lower value in the <i>FROM</i> field !</b>";
}
else
{
//Creating Socket
$socket = socket_create(AF_INET , SOCK_STREAM , SOL_TCP);
for($port = $from; $port <= $to ; $port++)
{
//connect to the host and port
$connection = socket_connect($socket , $host , $port);
if($connection)
{
//display port open warning on connect
echo "port $port Open (Warning !) <img src='warning.png' height=30px width=30px alt='open port'> ".'<br>';
//close the socket connection
socket_close($socket);
//Create a new since earlier socket was closed , we need to close and recreate only when a connection is made
//otherwise we can use the same socket
$socket = socket_create(AF_INET , SOCK_STREAM , SOL_TCP);
}
else
{
}
}
?>
</fieldset>
</body>
</html>
To access this HTML file go to your favorite browser and type http://localhost/port3.html.
You'll see the output shown below.
For users who are accessing it over the network , they can type the IP of the server into their browser URL.
For example, http://192.168.2.1/port3.html.
[caption id="" align="alignnone" width="600"] Click to Enlarge[/caption]
If you have this output on your browser, you have installed your WAMP server and saved the script correctly.
Enter the target IP address and the port range. For this example we will scan our own machine (localhost).
Type the IP address as 127.0.0.1 and port starting from 79 and ending in: 82 and click the scan button.
The output which I got was something like below:
[caption id="" align="alignnone" width="604"] Click to Enlarge[/caption]
The script displays the ping response followed by the list of open ports. In my case it was Port 80 (default port for the http web service).
Well now we have the script, we know how it works and it's time for you to try it on other machines on your network.
You can modify this script to store IP addresses and open ports on a MySQL database. You can refer to "The Complete Reference PHP" book for more information regarding backend connectivity via MySQL.
Take your hacking to the next level
Learn how to pentest and be an ethical hacker with expert-guided training, or learn more about the world of ethical hacking.
References:
- The Complete Reference PHP (Edition 2008) – Steven Holzner
- http://www.instructables.com/id/Installing-WAMP-Server/
- http://portableapps.com/apps/development/xampp
- http://compnetworking.about.com/od/networkprotocols/f/port-numbers.htm
- http://www.php.net/manual/en/function.socket-close.php
- http://www.php.net/manual/en/function.socket-connect.php
- http://www.php.net/manual/en/function.socket-create.php
- http://onlamp.com/pub/a/php/2001/03/29/socket_intro.html
- http://php.net/manual/en/ref.sockets.php
- http://nmap.online-domain-tools.com/
- http://www.thetechnicalstuff.com/protocols-port-numbers/
- http://phpmaster.com/form-validation-with-php/
- http://php.net/manual/en/filter.filters.validate.php
- http://php.net/manual/en/filter.examples.validation.php


- 12 pre-built training plans
- Employer-requested skills
- Personalized, hands-on training
In this series
- PHP: Build Your Own Mini Port Scanner
- CompTIA CySA+ Salary: What to expect in 2025
- How to become a cybercrime investigator
- CEH version comparison: V12 to V13 evolution guide
- SecurityX (CASP+) certification: Overview and career path [2025 update]
- Network+ certification: Overview and career path [2025 update]
- ISC2 CSSLP certification overview: What you need to know
- ISC2 CGRC: Overview & career path
- CRISC certification: Overview & career path [updated 2021]
- PMP certification: Overview and career path [updated 2021]
- ISACA CDPSE certification: Overview of the new ISACA privacy certification
- CGEIT certification: Overview and career path [updated 2021]
- What is a cyber range?
- Microsoft azure certification: Overview And career path
- CEH salary guide: What Certified Ethical Hackers really earn
- Average SecurityX (CASP+) salary [2025 update]
- CompTIA Network+ certification — A 2025 salary analysis
- CompTIA CySA+ exam (CSO-003): Your guide
- CCSP salary: How much can you make as a cloud security professional?
- Average Security+ salary (2025): Your guide to a prosperous cybersecurity career
- Average CGRC (Certified in Governance, Risk and Compliance) salary
- CRISC Frequently Asked Questions (FAQ) [updated 2022]
- Average CSSLP Salary in 2021
- ISACA CDPSE exam details and process
- How To Become CGEIT Certified – Certification Requirements [updated 2021]
- How to pick the best cyber range for your cybersecurity training needs and budget
- CEH exam eligibility: Application process & requirements guide
- SecurityX (CASP+) frequently asked questions (FAQ) [2025 update]
- CISSP domains overview: Your complete preparation guide
- CCSP exam and CBK changes in August 2024
- Comprehensive guide to CompTIA Security+ domains (2025)
- Average CRISC Salary [2023 update]
- CGRC certification job titles and career outlook
- ISC2 CSSLP exam details and process
- ISACA CDPSE certification exam: Overview of domains
- An Introduction to the PMP: Exam Details and Process [updated 2021]
- CGEIT certification exam: overview of domains [Updated 2021]
- 10 Success Tips: How to Pass Your Certified Ethical Hacker (CEH) Exam
- Network+: Exam details and process [2025 update]
- SecurityX (CASP+): Exam details and process [2025 update]
- How to become CCSP certified: Certification requirements
- Certified in Risk & Information Systems Control (CRISC) Exam Overview [updated 2022]
- ISC2 CGRC exam details and process
- Best CSSLP study resources and training materials
- ISACA CDPSE domain 1: Privacy governance
- 10 Tips for PMP Certification Exam Success [updated 2021]
- CGEIT certification exam details and process [updated 2021]
- Certified Ethical Hacker (CEH) study guides & resources [updated 2025]
- CompTIA SecurityX resources: Videos, books, tests and more!
- How to get the CompTIA Network+ certification: Requirements and step-by-step instructions [2025 update]
- CySA+ exam objectives: The 4 domains that will be covered
Get certified and advance your career!
- Exam Pass Guarantee
- Live instruction
- CompTIA, ISACA, ISC2, Cisco, Microsoft and more!
CompTIA CySA+
Discover the latest salary trends for CompTIA CySA+ certified professionals in 2024. Learn what factors influence your earning potential in the cybersecurity field.

Cybercrime investigator
Cybercrime has hit record levels, with an expected $7 trillion USD to be made from cybercriminal activity by 2021. Investigating these sorts of crimes can be

EC-Council CEH
CEH v13 is the world's first AI-powered ethical hacking certification. Discover what's new, how it compares to v12/v11 and why it's a career game-changer.

CompTIA SecurityX
Explore the expert-level CompTIA SecurityX certification, what to expect on the exam, the career benefits and more.
