Cracking Android App Binaries
In this article, we will see how a developer can perform basic checks to programmatically detect if the app is running on an emulator and stop executing the app if an emulator is detected. We will then see how an attacker can easily bypass these checks by using some freely available tools on the Internet. The main focus is to demonstrate how attackers can modify an app in order to change existing functionality.

FREE role-guided training plans
Reverse Engineering
Reverse engineering in computer programming is a technique used to analyze software in order to identify and understand the parts it is composed of, usually to recreate the program, to build something similar to it, to exploit its weaknesses or strengthen its defenses.
In Android, understanding reverse engineering is essential to perform many attacks. It gives us the luxury of understanding the source code of the app to go further and perform vulnerability assessments.
Detecting the emulator
There may be scenarios where a developer wants to stop users from running his app on an emulator for some reason. Developers can do it in a variety of ways. To make it simple, I am going to use a very simple check and stop the application if an emulator is detected.
I am checking for the BRAND of the device using Build.BRAND.
If we run the above line of code on an emulator with ARM CPU, it returns a string value "generic". Intel based emulators return "generic_x86". So I am checking for these values, and if they are matching we confirm that an emulator is detected. So, we will stop running the application and exit by displaying a toast message as shown in the figure below.

The app is available in the download section.
Cracking Android Apps using APKTOOL
In this section, we will see how to crack Android app binaries using a popular tool called APKTOOL.
Setting up things
- I am using a machine running Ubuntu.
- Download JDK -- It includes keytool and jarsigner – required for app signing.
- Download APKTOOL from the following link:
http://code.google.com/p/android-apktool/downloads/list
- Download the vulnerable app and place it in the same directory where APKTOOL is located, as shown below.

I created a directory called "reverseme" and kept everything at one place. Make sure that you have a similar setup to follow the steps along with me. Fill out the form below to download the directory.
Decompiling the App
We can decompile the app using various tools available. In this article, the objective is to decompile the app and understand where it is making emulator checks. Then, we need to make certain modifications and finally recompile the modified code. To accomplish this, we need to have APKTOOL, as recompiling is not possible with tools like dex2jar.
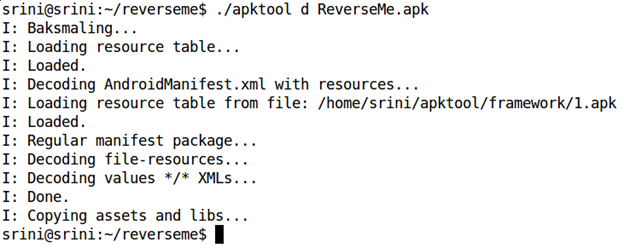
We can decompile the app with APKTOOL using the following command.
./apktool d [appname].apk

The above command creates a new directory with the decompiled contents. It includes AndroidManifest.xml file as well as smali code. This is shown below.

Smali code is byte code version of Java code written in Android apps. This is known as baksmaling. Smali is similar to Assembly language. We will have a look into smali code basics later in this series. Right now our goal is to crack our target app. So, let us look at the smali code we got in the previous step. Below is the folder structure we get after decompiling.

The location of smali code after decompiling the app is shown below.
ReverseMe -> smali -> com -> androidpentesting -> reverseme
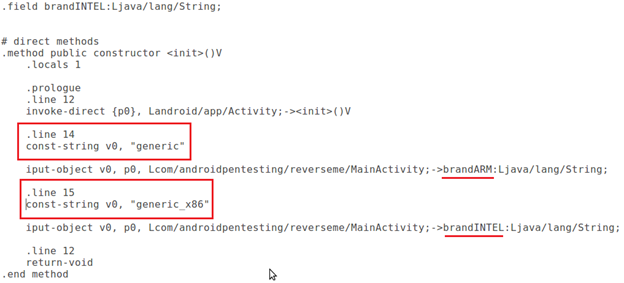
Let us examine the MainActivity.smali file in pieces.

As we can see in the above code snippet, there are two strings defined in this activity.
brandARM = "generic"
brandINTEL = "generic_x86"
If we scroll down a bit, we can see the following line, which clearly shows that the app is using a method checkifemulator() to see if it is running on an emulator.
[plain]
.method private checkifemulator()V
[/plain]
Inside this method, it is reading the BRAND of the device using a Build class. This is method is shown below.
[plain]
.method private checkifemulator()V
.locals 5
.prologue
.line 29
sget-object v1, Landroid/os/Build;->BRAND:Ljava/lang/String;
.line 30
.local v1, output:Ljava/lang/String;
iget-object v2, p0, Lcom/androidpentesting/reverseme/MainActivity;->brandARM:Ljava/lang/String;
invoke-virtual {v1, v2}, Ljava/lang/String;->contentEquals(Ljava/lang/CharSequence;)Z
move-result v2
if-nez v2, :cond_0
iget-object v2, p0, Lcom/androidpentesting/reverseme/MainActivity;->brandINTEL:Ljava/lang/String;
invoke-virtual {v1, v2}, Ljava/lang/String;->contentEquals(Ljava/lang/CharSequence;)Z
move-result v2
if-eqz v2, :cond_1
.line 32
:cond_0
new-instance v0, Landroid/os/Handler;
invoke-direct {v0}, Landroid/os/Handler;-><init>()V
.line 33
.local v0, handler:Landroid/os/Handler;
new-instance v2, Lcom/androidpentesting/reverseme/MainActivity$1;
invoke-direct {v2, p0}, Lcom/androidpentesting/reverseme/MainActivity$1;-><init>(Lcom/androidpentesting/reverseme/MainActivity;)V
.line 43
const-wide/16 v3, 0x64
.line 33
invoke-virtual {v0, v2, v3, v4}, Landroid/os/Handler;->postDelayed(Ljava/lang/Runnable;J)Z
.line 45
invoke-virtual {p0}, Lcom/androidpentesting/reverseme/MainActivity;->getBaseContext()Landroid/content/Context;
move-result-object v2
const-string v3, "We are sorry, terminating"
const/16 v4, 0x64
invoke-static {v2, v3, v4}, Landroid/widget/Toast;->makeText(Landroid/content/Context;Ljava/lang/CharSequence;I)Landroid/widget/Toast;
move-result-object v2
invoke-virtual {v2}, Landroid/widget/Toast;->show()V
.line 49
.end local v0 #handler:Landroid/os/Handler;
:cond_1
return-void
.end method
[/plain]
In the above code, the app is reading the BRAND of the device using "android.os.Build.BRAND".
And then it is checking if the value is equal to "generic" or "generic_x86". If any of these two are equal to the string read from the device, the app throws a message to the user and quits.
In the above code, we can also see the message "We are sorry, terminating" loaded into a string as shown below.

The above string is getting displayed as a toast message as shown below.

Making changes
Now, let us modify the control flow of the app. The easiest way is to change the string values to something else. In our case, I modified both the strings as shown in the following screenshot.

It is pretty clear that the app will check for the string values "generic0x00" and "generic_x86-64". These are some random names which will never be equal to the value read from the device. So, we can bypass the check.
Recompiling the application
This is one of the most important features of APKTOOL. After making certain changes to the application's smali code, we can recompile the app with the modified code.
To recompile the app, we can simply use the following command.
apktool b [path to the folder with app contents]
apktool uses "aapt" to build these resources into an apk. This is shown below.

As we can see in the above figure, APKTOOL builds everything into an APK file.
The modified APK file will be saved in "dist" directory by default. This is shown below.

Reinstalling the app
Let us reinstall this modified APK on an emulator. Before that, uninstall the app which was installed earlier.
We can use the following command to install the modified app:
adb install [filename].apk

As shown in the above figure, it throws an error [INSTALL_PARSE_FAILED_NO_CERTIFICATES] since it is not signed after recompiling.
Free hour-long hacking course!
Learn how to hack and use AI in this free 1-hour course, led by Keatron Evans, 20-year cybersecurity veteran and VP of Portfolio Product and AI Strategy at Infosec!
Android requires that all the apps be digitally signed before we install them on a device.
To get rid of this error, we can sign the application with a self-signed certificate.
Application signing – the command line way
Application signing is the process where we will generate a certificate and sign the application using the certificate we generated. We can use "keytool" to generate the certificates and "jarsigner" to sign the app. These two tools come preinstalled with Java Development Kit.
I created a directory called "sign", inside which I am going to run all my commands.
So, let us begin with the steps to sign our target app.
Generating a private key
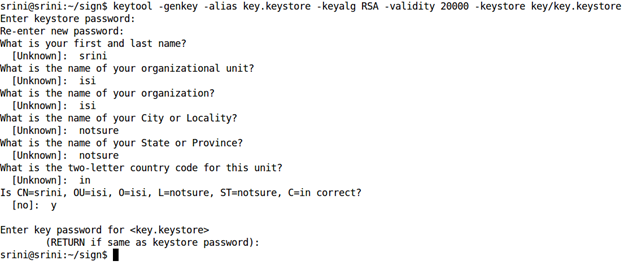
First, create a directory called "key" and run the following command.
Keytool –genkey –alias key.keystore –keyalg RSA –validity 20000 –keystore key/key.keystore
This command will prompt the user to enter a few details, including the password for the keystore and the key.
This is shown below.

The above command creates a file called "key.keystore" inside the folder "key" as shown below.

This key.keystore is file which is known as keystore. It contains the private key. This is valid for 20000 days.
Now, we have the key to sign the app.
Signing the app
We can now use "jarsigner" to sign the app using the key generated in the previous step. We can do it by running the following command.
Jarsigner –verbose –sigalg SHA1withRSA –digestalg SHA1 –keystore key/key.keystore ReverseMe.apk key.keystore

As you can see in the above figure, jarsigner prompts the user to enter the password for the keystore and key. Once after entering the password, the APK file will be signed and is ready to be distributed.
We can now check if the app is signed or not using "jarsigner" with the following command.
jarsigner -verify -verbose -certs my_application.apk
[plain]
srini@srini:~/sign$ jarsigner -verify -verbose -certs ReverseMe.apk
772 Mon Dec 08 00:53:08 IST 2014 META-INF/MANIFEST.MF
893 Mon Dec 08 00:53:08 IST 2014 META-INF/KEY_KEYS.SF
894 Mon Dec 08 00:53:08 IST 2014 META-INF/KEY_KEYS.RSA
sm 5964 Mon Dec 08 00:41:22 IST 2014 res/drawable-hdpi/ic_launcher.png
X.509, CN=srini, OU=isi, O=isi, L=notsure, ST=notsure, C=in
[certificate is valid from 8/12/14 12:49 AM to 10/9/69 12:49 AM]
sm 3112 Mon Dec 08 00:41:22 IST 2014 res/drawable-mdpi/ic_launcher.png
X.509, CN=srini, OU=isi, O=isi, L=notsure, ST=notsure, C=in
[certificate is valid from 8/12/14 12:49 AM to 10/9/69 12:49 AM]
sm 9355 Mon Dec 08 00:41:22 IST 2014 res/drawable-xhdpi/ic_launcher.png
X.509, CN=srini, OU=isi, O=isi, L=notsure, ST=notsure, C=in
[certificate is valid from 8/12/14 12:49 AM to 10/9/69 12:49 AM]
sm 17889 Mon Dec 08 00:41:22 IST 2014 res/drawable-xxhdpi/ic_launcher.png
X.509, CN=srini, OU=isi, O=isi, L=notsure, ST=notsure, C=in
[certificate is valid from 8/12/14 12:49 AM to 10/9/69 12:49 AM]
sm 1176 Mon Dec 08 00:41:22 IST 2014 res/layout/activity_main.xml
X.509, CN=srini, OU=isi, O=isi, L=notsure, ST=notsure, C=in
[certificate is valid from 8/12/14 12:49 AM to 10/9/69 12:49 AM]
sm 464 Mon Dec 08 00:41:22 IST 2014 res/menu/main.xml
X.509, CN=srini, OU=isi, O=isi, L=notsure, ST=notsure, C=in
[certificate is valid from 8/12/14 12:49 AM to 10/9/69 12:49 AM]
sm 1728 Mon Dec 08 00:41:22 IST 2014 AndroidManifest.xml
X.509, CN=srini, OU=isi, O=isi, L=notsure, ST=notsure, C=in
[certificate is valid from 8/12/14 12:49 AM to 10/9/69 12:49 AM]
sm 579200 Mon Dec 08 00:41:22 IST 2014 classes.dex
X.509, CN=srini, OU=isi, O=isi, L=notsure, ST=notsure, C=in
[certificate is valid from 8/12/14 12:49 AM to 10/9/69 12:49 AM]
sm 2284 Mon Dec 08 00:41:22 IST 2014 resources.arsc
X.509, CN=srini, OU=isi, O=isi, L=notsure, ST=notsure, C=in
[certificate is valid from 8/12/14 12:49 AM to 10/9/69 12:49 AM]
s = signature was verified
m = entry is listed in manifest
k = at least one certificate was found in keystore
i = at least one certificate was found in identity scope
jar verified.
srini@srini:~/sign$
[/plain]
Reinstalling the app
After signing the app as shown in the previous section, we can install it on the device. It should be installed without throwing any errors. This is shown in the following screenshot.

If we run the app on the emulator now, it should show the following screen and should comfortably work without quitting.


FREE role-guided training plans
Conclusion
This article has described a way to modify the app functionality using a popular tool called APKTOOL. We have seen how an attacker can modify app functionality and repackage the app with the modified contents. Similar approach can be used to infect legitimate apps with malicious code. Developers must go for some strict checks on modified apps. Though it is not impossible to break the checks, we can make an attacker's life harder. One such example would be to check if the signature of the app is modified. End users should be very careful when installing apps from third party app stores.
References
http://developer.android.com/tools/publishing/app-signing.html
http://www.techopedia.com/definition/3868/reverse-engineering


