Translating virtual to physical address on Windows: physical addresses
Getting the physical address manually
So far we've figured that the virtual address is the same as linear address, so in the next part of the article we can use virtual addresses because they are the same as linear. Let's take a look at the 0x0012ff60 virtual/linear address and try to figure out how to get physical address out of it. First, we must obtain the address of the page directory table, which contains the PDEs. To get the base address of the page directory table, we can simply read the contents of the CR3 register, which acts as the page directory base registers (PDBR) and points to the physical address of the first table (if PAE is enabled, we're talking about the PDPT table, otherwise PDT page directory table). We can view the contents of the CR3 register by executing the "r cr3" command as can be seen in the picture below:

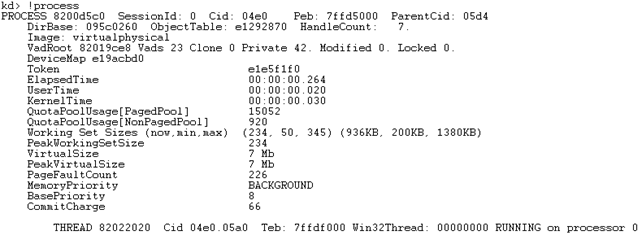
The physical address of the page directory table is thus 0x095c0260. To verify that we're looking at the right base physical address, we can run the !process command, which displays the DirBase value. This also contains the base address of the PDTD table. The result of running the !process command can be seen on the picture below:

Notice that the DirBase specifies the 0x095c0260 physical address? This confirms that we're talking about the right address. The same information can also be obtained from the EPROCESS structure. To display the EPROCESS structure of a particular process, we can use the "dtnt!_EPROCESS addr" command as seen below. The 0x8200d5c0 is the address of the process structure in memory, which was obtained by the previous !process command.

We're looking for the DirectoryTableBase element, which is further contained in the Pcb KPROCESS element. To dump that element, we can use the "dtn!_KPROCESS<addr>" command. This can be seen below, where the 0x018 is the entry we're looking for and again the address 0x95c0260 is displayed.

If we try to dump memory from the 0x095c0260 address, we won't receive anything useful (the data at those addresses is not defined). The result of running the "dd 095c0260" command can be seen on the picture below:

What's happening? There should be a PDPT table with defined PDPTE entries or page directory table with defined PDE entries at that address!It's true, the PDPTE or PDE entries should be present, and indeed they are. We've just made a mistake that often pops-up. The address in the CR3 register is the physical address, while the dd command dumps the values from virtual addresses, so what we've actually done is dump memory at virtual address 0x94401a0. To dump physical memory from that address, we need to prepend the character '!' to the ddcommand . The actual command to dump from physical address thus becomes !dd and can be seen on the picture below:

Now we see some values defined, which is very cool and just what we wanted to get. Since in our case PAE is enabled, we've just dumped the four entries from the PDPT table: each of those entries is 64-bits long. The actual PDPTE entries are the following (taken from the first two lines from the above picture):
- 1ad40001
- 1aabf001
- 1aa3e001
- 1a8a1001
Let's now take our linear addresses and split them into four parts corresponding to the format when PAE is enabled: the first part is an index into the PDPT table, the second part is an index into the page directory table, the third part is the index into the page table, and the fourth part is the last 12-bits of the actual physical address. Let's use the .formats command to display our linear addresses in different representations:
- 0x0012ff60 : 00 | 000000000 | 100101111 | 111101100000
- 0x00345988 : 00 | 000000001 | 101000101 | 100110001000
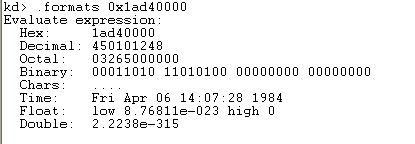
I've separated the linear addresses into the four parts separated by character '|'. The first part is 0x00 in both cases, which means that the first entry from the PDPT table is used to resolve both of the linear addresses into physical addresses. The first entry in the PDPT table is: 0x1ad40001. The first 12 bits in the address must be discarded, because those bits are used for offset only, so the 001 bits become 000 and the base physical address of the second table is thus 0x1ad40000 (this is the base address into the PDT table). Now that we have the base address of the PDT table, we must again use the .formats command to display it in different representations (the binary form). The PDE entry must be split in a couple of elements, but for now we're only interested in the base physical address of the page table, which is contained in the 12-31-bits (again the binary representation is splitted with the '|' character). We also need to present the right PDE entries, based on the index into the PDT table. Since both linear addresses use the first PDPTE entry 0x1ad40000, a binary representation of that address is in order:

Since the lower 12-bits are discarded, the rest of the bits areas follows: 00011010 11010100 0000. We can transform the binary number back into the hexadecimal representation with the "? 0y00011010110101000000" command:

The base address of the PDT table is then 0x1ad40000. Then we need to get the address of the PDE, where we must add the index number 0x00000000 and 0x00000001 multiplied by 8 to the base address of the PDT table (for both linear addresses), which is in this case. Since the indexes from the linear address specify 0x0 and 0x1, we must read the first and the second index entry from the PDT table. This can be seen on the picture below:

We have just gotten two base addresses of the page table, so we must again apply the right indexes to read the appropriate PTE. The first index into the page table located at 0x1abf5067 is 100101111 and the second index into the page table located at 0x1aaea067 is 101000101 (check out the linear address binary representation if you don't know what we're talking about). Now we know the addresses of two base page tables: 0x1abf5000 and 0x1aaea000 and we also know the indexes (the lower bits needs to be zeroed out). It's time to calculate the corresponding PTE entries:

We have obtained the physical base addresses to the pages in memory and we only need to apply the offset from the linear address to get to the actual physical value in memory. The two pages in memory have addresses 0x1aaf6000 and 0x1a851000 (again the lower 12-bits need to be zeroed out).

And finally we've gotten the physical addresses of the variable x and y. The physical address of the variable x is 0x1aaf6f60, while the physical address of the variable y is 0x1a851988. We can see that the values haven't been initialized to 0xA and 0x14 yet. Now we need to step through the following instructions from the example:
[plain]
004113f5 c745f80a000000 movdwordptr [ebp-8],0Ah
004113ff c70014000000 movdwordptr [eax],14h
[/plain]
The first instruction saves the number 10 to the address of the variable x, while the second instruction saves the number 20 to the address of the variable y. We need to set breakpoints on them and run the program, but pause it right after the second instruction has been executed. Then we can observe values that have been written into the virtual and physical addresses. On the picture below, we can see that we first used the g command to run the program till the first breakpoint was hit and then stepped through the program until after the execution of the second instruction. This can be seen on the picture below:

Let's now use the dd command to display the values from the virtual addresses:

The result is expected, the variable x located at address 0x0012ff60 contains the value 0xA, while the variable y located at address 0x00345988 contains the value 0x14. But what will happen if we dump the contents of the previously calculated physical addresses?In a best-case scenario the same numbers should be printed, which would mean that we didn't make a mistake in the translation process. If the same numbers are not displayed, you've probably made a mistake when translating the virtual address to the corresponding physical address. On the picture below we've dumped the contents of the physical addresses and we can see that the values are the same, which proves that we've successfully calculated the physical addresses:

Getting the physical address automatically
Above, we've walked all the tables that are used to translate the virtual memory into physical memory manually. At the end we've been able to get the actual physical addresses to the corresponding virtual addresses, but we had to do a lot of work to translate one single address. Isn't there a better way of doing this? Of course there is!Windbg provides two commands that can help us with that:the !pte and !vtop commands. To display the whole translation routine, we can execute the "!vtop 0 0x0012ff60" command, where the first argument 0 specifies that we would like to use the currently debugged process's context. The first parameter to !vtop command is the page frame number, which is the same number as DirBase without the trailing three bytes. The second parameter specifies the virtual address to translate into physical address. Before being able to use the !vtop command, we must use the "!process 0 0" command to display the environmental variables – particularly DirBase– of the current process, and then use .process command to set the current index into the process's context switch structure in memory. After that we can use the !vtop command successfully, as can be seen below:


Notice that !vtop command finds the base addresses of PDPE, PDE, PTE and also the resulting physical address. Now we can check whether the resulting physical addresses are the same as we identified in the previous section where we've manually inspected the translation process.
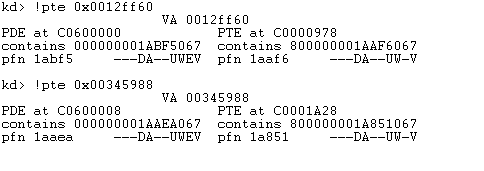
But there's another command named !pte that can also be used to automatically convert between virtual and physical addresses. Before using it we must set the process context with "!process 0 0" as was already established. After that we can normally use the !pte command passing it the virtual address we would like to transform into a physical address:

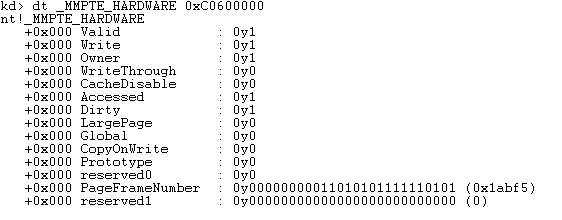
The last row of the output from the !pte command displays the page frame number (note the pfn string) of the PTE. We know that this can be calculated from the DirBase variable that we get if we run "!process 0 0" by shifting the value to the right by 12 bits. To get the actual physical address, we need to shift the PFN to the left for 12-bits, and then add the last 12-bits of the virtual address to the newly gotten address and the result is the physical address. The last 3 bytes of the virtual address 0x0012ff60 are 0xf60, which we must add to the 1aaf6<<12 that constructs the physical address 0x1aaf6f60. The !pte command also displays the state of the flags in the PDE and PTE entries, which can be quite useful so we don't have to inspect the memory manually. We can also apply the MMPTE_HARDWARE structure to the PDE entry and display it on the screen, which is visible on the picture below:

The 0xC0600000 is the PDE entry, which was used when translating the 0x0012ff60 virtual address.
Conclusion
In this series of articles, we've been able to manually translate the virtual address to a linear address and further into the physical address by navigating the directory and page tables. We've seen that the translation process is too complicated.All we need to know are the details about a few pages that are stored in memory, take their entries, inspect them, and examine them further. If you're serious about kernel debugging, you should really understand how the virtual addresses get translated into physical addresses. Once you truly understand it, you can use the !pte or !vtop commands in Windbg that do the translation automatically.
Sources
[1] x86 memory management and linux kernel, accessible at http://manavar.blogspot.com/2011/05/x86-memory-management-and-linux-kernel.html.
[2] http://www.intel.com/content/www/us/en/processors/architectures-software-developer-manuals.html.
[3] W4118: segmentation and paging, accessible at http://www.cs.columbia.edu/~junfeng/os/Flectures/l05-mem.pdf.
[4] Common WinDbg Commands, accessible at http://www.windbg.info/doc/1-common-cmds.html.
[5] Understanding !PTE , Part 1: Let's get physical, accessible at http://blogs.msdn.com/b/ntdebugging/archive/2010/02/05/understanding-pte-part-1-let-s-get-physical.aspx.
[6] Understanding !PTE, Part2: Flags and Large Pages, accessible at http://blogs.msdn.com/b/ntdebugging/archive/2010/04/14/understanding-pte-part2-flags-and-large-pages.aspx.

Become a certified reverse engineer!
[7] Part 3: Understanding !PTE - Non-PAE and X64, accessible at http://blogs.msdn.com/b/ntdebugging/archive/2010/06/22/part-3-understanding-pte-non-pae-and-x64.aspx.


