Solutions to Net-Force steganography CTF challenges
Steganalysis refers to the process of locating concealed messages inside seemingly innocuous 'containers'. The idea behind steganography is embedding plaintext messages in places where an unsuspecting user would not think them to be present. During steganalysis, our objective is to discover where and how these plaintext messages are hidden within the provided files or data. Steganalysis is a process of trial-and-error. The solutions provided below offer only the correct approaches to solving particular steganographic challenges, while skipping the unsuccessful attempts for the sake of brevity.
About Net-Force steganography challenges

What should you learn next?
These challenges require that you locate passwords concealed in a variety of file types. Note that the password itself is never 'encrypted' since we are dealing with steganography, not cryptography. In fact, the password is in plaintext and the challenge lies in locating it in the provided file.
Spoiler Alert!!
Please be advised that the following content provides solutions to the intriguing steganographic challenges on Net-Force. It would be unavailing to read further without having tried your absolute best at the challenges first
Solutions to steganographic challenges 1 to 7
Steganography challenge 1, level 801: "Can you see me?"
This is a starter challenge to get one acquainted with the concept of steganography and is therefore quite straightforward.
The first clue is the text that is written in 'color: white' over a white background and is therefore invisible. Selecting the whole page (CTRL+A) would reveal the hidden clue [Figure 1].

Figure 1
So we need to access the file 'password.gif' at the following location:
https://www.net-force.nl/challenge/level801/password.gif
Notice that the image does not open in the browser. This is our first clue that it is not a GIF image as advertized. We download this file on our local machine and analyze the file using the Linux 'file' utility that reads Magic Numbers in the file to determine the file type. In our case, we notice that this file contains ASCII text, and so we use the 'more' command to print its content on the screen, which reveals the password [Figure 2].

Figure 2
Password: stegano
Steganography challenge 2, level 802: "Go Holland Go!"
This one is even simpler than the previous one. The password is clearly visible in the binary pattern on the screen [Figure 3].
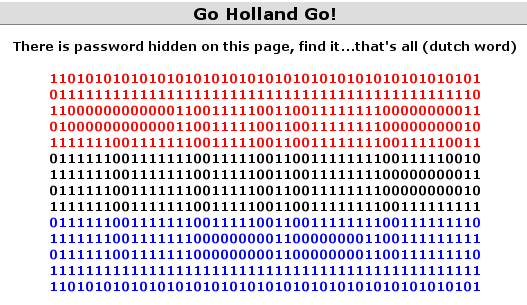
Figure 3
Password: TULP
Steganography challenge 3, level 805: "Another picture!"
This challenge offered us a simple JPEG image and asked us to locate the password within it. The 'file' utility that we discussed earlier shows us that it really is a JPEG image, not a text file as in challenge 801. So we focus our attention on the bytes stored within the image. To view the hexadecimal bytes within the image file, a hex editor is required. You can use 'hexedit' or 'hexeditor' on a Linux machine, and 'Hiew' (Hacker's view) on a Windows machine. Here, when we view the raw data inside the image, wenotice a binary sequence in the ASCII view of the data [Figure 4].
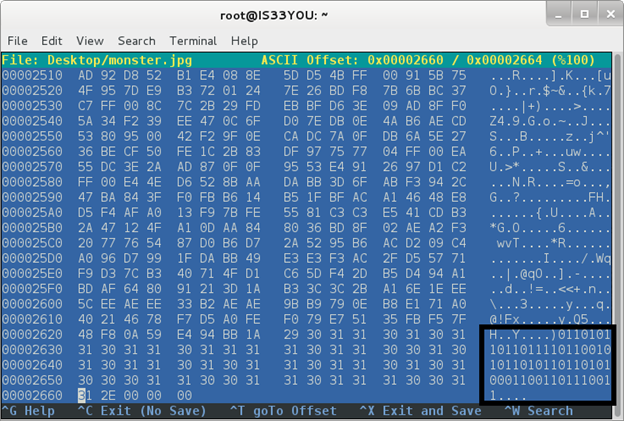
Figure 4
This binary sequence immediately stands out from the rest of the 'garbage' ASCII dump. Consequently, we convert this binary sequence to ASCII and we get the password. For this, we use Perl's pack function to derive ASCII text corresponding to the binary sequence [Figure 5]:
[perl]
echo 01101011011011110110010101101011011010100011001101110011 | perl -lpe '$_=pack"B*",$_'
[/perl]

Figure 5
Note: Alternatively, you can open this image file in 'notepad.exe' to view the raw ASCII dump and scroll to the end of the file to locate the binary sequence that stands out [Figure 6].

Figure 6
Password: koekj3s
Steganography challenge 4, level 803: "Words, words, words..."
This challenge is a little different in that it presents us with something that seems more like a riddle rather than a file [Figure 7]. However, bear in mind that this is a steganography challenge and so the password must be hidden in plain sight within these words. You could try all words as possible passwords, but such mindless brute forcing would be cheating and no fun. We need to discover the logic in the challenge. If you look closely, the words in the text are rather oddly placed. This provokes us to either re-arrange the words until a pattern emerges, or to simply skip certain words. We notice the title which states 'words' 3 times. If we start from 'The', at the beginning, and read the text skipping 3 words, we get: "The password that You Need for the challenge page is Again."

Figure 7
Password: Again
Steganography challenge 5, level 804: "Nice colors eh?"
Once more, we are provided with an image file and we need to extract the password out of it. Our first clue is that the image contains vertical lines separating certain colors. The first intuition is that each of these colors may represent a letter in the password. We need to determine how the alphabets were mapped to these particular colors. To reverse the process, we open the given image in an image editor such as GIMP. Next, we use the 'color picker' tool in GIMP to study the particular colors. For example, GIMP shows us the following details corresponding to the first color from the left [Figure 8]. Notice the HTML notation of the color.
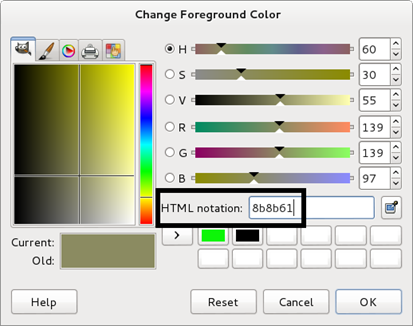
Figure 8
For all the colors in the image, we have:
Color 1: 8b8b61 Color 2: 8b8b61 Color 3: 8B8B70
Color 4: 8B8B6A Color 5: 8B8B65 Color 6: 8B8B73
These patterns are clearly hexadecimal representations. To obtain the password, we convert them to ASCII text [Figure 9].

Figure 9
Password: aapjes
Steganography challenge 6, level 806: "Just a flag…"
In this challenge, we are provided a small icon image that contains a hidden password. To commence steganalysis, we first make sure that it really is an icon image file. We use the 'file' utility to verify this [Figure 10].

Figure 10
As evident from the result, the file really is an 'MS Windows icon resource'.
Next, we take a look at raw hex bytes of the file to detect any anomalies or patterns. It is easy to browse through all of these hex bytes in the hex editor since the file is very small in size. We notice the 'PK' header that indicates the presence of a ZIP archive. Hence, we reach the conclusion that a ZIP archive is embedded inside the icon resource file. This ZIP archive contains a text file, 'file.txt', which most likely contains the password. Our task is to first extract the raw bytes germane to the ZIP archive, and then extract the text file from the archive.
The start of a file is marked by the 'Magic numbers'. These numbers tell Operating Systems and programs about what sort of data to expect inside the file. In our case, the 'PK' header of the ZIP archive corresponds to hexadecimal values '50 4B', and this serves as the starting point of our extraction. First, we use the 'xxd' utility in Linux to extract a raw hex dump from the original icon file [Figure 11].
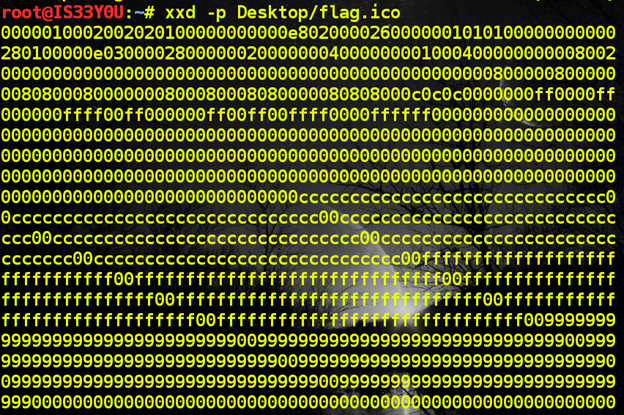
Figure 11
Next, we locate the hex pattern '50 4B' (PK header) in the hex dump and copy these and all of the following bytes into a new file.
Note: Simply creating a new file and then copying these bytes into that new file in text mode will not accomplish our objective. The file hence created will be a simple ASCII text file and not the ZIP archive we are trying to build. You need to ensure that you copy these bytes into a new file in hexadecimal editing mode [Figure 12].

Figure 12
Moving forward with the steganalysis, we created a new ZIP archive using these raw hex bytes extracted from the icon resource image. This ZIP archive, which we named 'pass.zip', contained an encrypted text file [Figure 13].

Figure 13
As we do not know the password to the ZIP archive—and we cannot take a stab at guessing either—we think of brute forcing the password. 'fcrackzip' is one of the popular tools for brute forcing ZIP archives on a Linux box and we use it in order of increasing complexity.
Note: By order of increasing complexity, we mean that we start with assuming that the password is very simple and then increase the complexity after failure in locating the password within the current character set. This is especially important while solving CTF challenges since we know that creators want us to locate the flag and so would not have set a very complex password.
We first 'benchmark' to see the cracking method that would perform best on our machine, and then use 'fcrackzip' to brute force the password [Figure 14]:
[perl]
fcrackzip "/root/Desktop/pass.zip" -u -v -m zip2 -l1 -c a
[/perl]

Figure 14
During brute forcing, the simplest character set is when we assume the password to be lowercase and a single character in length. We used the following parameters:
-
-u: unzip to avoid false passwords
-
-v: verbose mode
-
-m: method (zip2 according to our benchmark test)
-
-l: length (1 character)
-
-c: character set ('a' implies lowercase alphabets, no special characters)
The password to the ZIP archive was found to be 'a', the simplest password possible. We use this to unzip the text file inside the ZIP archive and read it to locate the password [Figure 15].
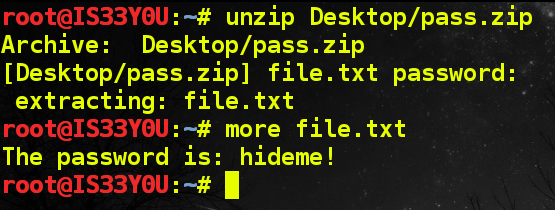
Figure 15
Password: hideme!
Steganography challenge 7, level 807: "Learn See Become"
The first clue to solving this challenge is noticing the hint embedded in the slightly odd title. Notice that the first letter of each word is capitalized which indicates an acronym. Ultimately, you would need to arrive at this association in your mind: Learn See Become—LSB—Least Significant Bit. Least Significant bit in a binary sequence is the bit that is farthest to the right. In our case, it would be the 8th bit in each byte. We focus our attention on extraction of the last bit from each byte of the text given to us.
Since we are dealing with bits, our first task is the derivation of binary data from the given text [Figure 16]. In order to do this, we use Perl's unpack function in this manner:
[perl]
echo "2C7CBi*66iC6C2BBB3i6B36i<;][XJD>AQJ>Q7[C;|Q[M]>917,.E.|G]B>S.2X3YXYXXY./YY.2Y3XY32.X.Yl//lmml.63mm2*l6.+7lml622336*26/" | perl -lpe '$_=unpack"B*"'
[/perl]
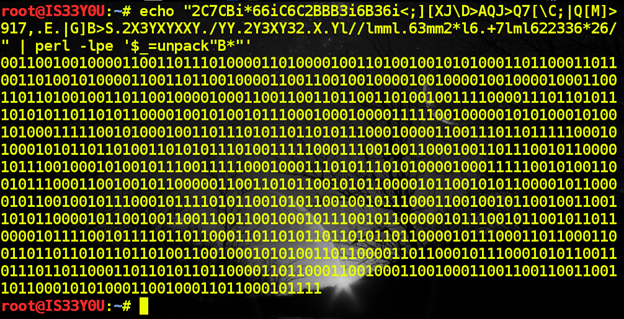
Figure 16
After obtaining this binary sequence, we need to extract the least significant bit from each byte. We could manually extract LSB from this sequence, but that would be tedious. Hence, after storing the bits into variable 'binary', we use Python's strip function to obtain the LSB in the following manner:
print binary.strip()[7::8]
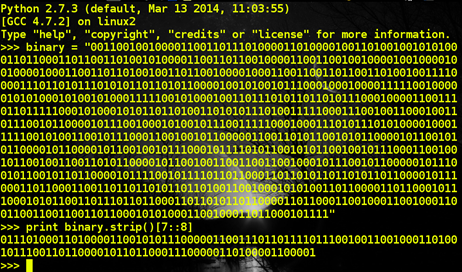
Figure 17
Consequently, we obtain the LSB sequence:
[perl]
011101000110100001100101011100000110011101101111011100100110010001101001011100110110000101101100011100000110100001100001
[/perl]
As in a previous challenge, we use Perl to pack this into corresponding ASCII text and obtain the password [Figure 18]:
[perl]
echo 011101000110100001100101011100000110011101101111011100100110010001101001011100110110000101101100011100000110100001100001 | perl -lpe '$_=pack"B*",$_'
[/perl]

Figure 18
Password: alpha
Conclusion

What should you learn next?
These steganographic challenges at Net-Force were well thought out and intriguing. If you are new to steganalysis, these exercises put you on a rapid learning curve with challenges that increase in complexity as you move forward. Each challenge uses different logic and requires analytical thinking to arrive at the hidden flag. Your preliminary analysis should begin with a careful study of the data or file provided to locate any anomalies such as unexpected magic numbers. As previously stated, steganalysis is a process of trial-and-error, and normally it would take several attempts before you comprehend patterns in complex challenges.


