SecurityIQ, AwareEd, and PhishSim User’s Manual, Pt. 7: Account Settings
Objectives
Once you have completed this section, you will be able to:

Strengthen security awareness with human risk management
Infosec HRM, powered by Right-Hand Cybersecurity, provides alert-based training nudges to minimize human risk at your organization.
- Apply custom branding to your SecurityIQ portal
- Set the default education asset used in PhishSim Templates
- Add custom domains to be used for sending PhishSim notifications
- Enable the suppression of footers in PhishSim emails (Enterprise version only)
- Customize PhishNotify Plugin messages
- Select the default domain used for sending AwareEd learner notifications
- Add additional administrators to your SecurityIQ portal
- Download email logs
Overview
The SecurityIQ platform can be customized in many ways. This section describes how to manage the customizable options available to SecurityIQ administrators.
Figure: Account Setting Page
Branding
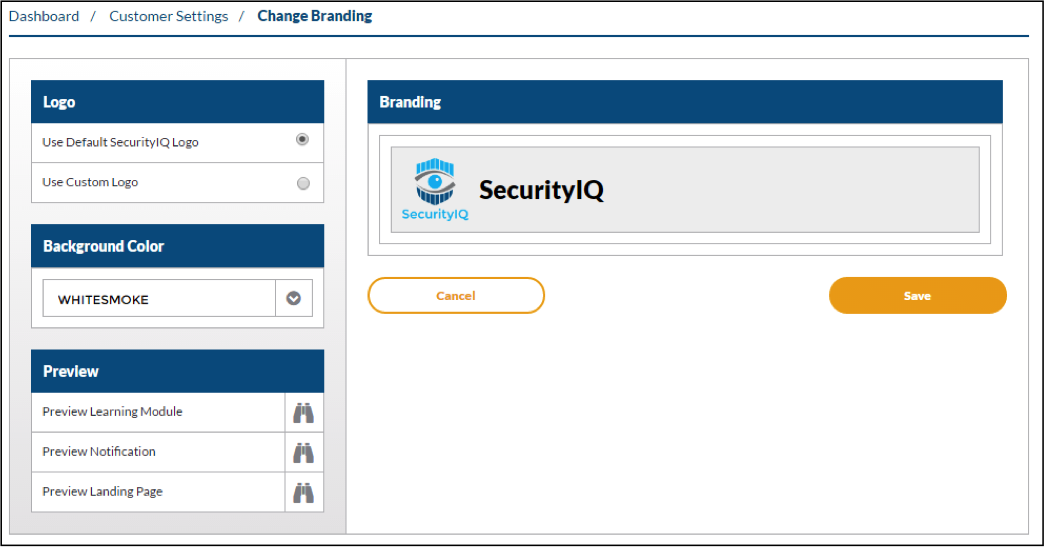
Many areas of SecurityIQ can be branded to include your organization's logo, name, and color scheme.
To display a custom logo on SecurityIQ pages, education assets, and email notifications:
- From the main menu, click your name at the right side of the screen
- Click “Change Branding” in the branding section
- Click “Use Custom Logo” in the Logo section
- Click “Choose File”
- Select a jpg image file with dimensions between 420x420 and 1280x1280 pixels
- Click “Save”
To modify the background color of SecurityIQ pages:
- From the main menu, click your name at the right side of the screen
- Click “Change Branding” in the branding section
- In the Background Color section, choose your desired color. The background of the Branding section will update in real-time so you can easily determine how the color will look.
- Once you have chosen a color, click “Save”
To preview your branding changes:
- From the main menu, click your name at the right side of the screen
- Click “Change Branding” in the branding section
- In the preview section, click the “Binocular” icon to the right of the item you wish to preview
To update the name which is displayed on SecurityIQ pages, education assets, and email notifications:
- From the main menu, click your name at the right side of the screen
- Update the “Customer Name” in the User Information section
- Click “Save” at the bottom of the page
Figure: Change Branding Page
PhishSim Settings
PhishSim Email Templates will display a default education module if one isn’t specified when the template is created.
To change the default PhishSim Education Module:
- From the main menu, click your name at the right side of the screen
- Click the “Gear” icon to the right of Default Education in the PhishSim section
- Select the desired education asset to be used as the default education for PhishSim templates
- Click “Save”
To suppress the footer from being included in PhishSim emails (Enterprise version only):
- From the main menu, click your name at the right side of the screen
- Click the “Gear” icon to the right of My Domains in the PhishSim section
- Click the “Suppress Footer” checkbox to the right of the domains you would like to enable this feature for
- Click “Save”
PhishNotify Plugin Settings
To modify the configuration of the PhishNotify plugin:
- From the main menu, click your name at the right side of the screen
- Click the “Gear” icon to the right of Messages and Behavior in the PhishNotify section
- To enable uploading of message contents when a user reports a suspicious message, click the checkbox to the right of “Upload Email Contents” in the Email Options section
- To enable uploading of email attachments when a user reports a suspicious message, click the checkbox to the right of “Upload Email Attachments” in the Email Options section
- If you wish to move an email after it has been reported, select the appropriate action from the dropdown box in the Email Actions section
- To customize the messages displayed to the learner after they have reported a potentially suspicious email, update the text in the appropriate section
- Click “Save”
AwareEd Settings
To add custom domains to be used for sending AwareEd notification emails:
- From the main menu, click your name at the right side of the screen
- Click the “Gear” icon to the right of My Domains in the PhishSim section
- In the new window that appears, click the “Add Domain” button
- Enter the domain you wish to use
- Click “Save”
To select a default domain to send AwareEd notification email from:
- From the main menu, click your name at the right side of the screen
- Click the “Gear” icon to the right of “Send notifications from” in the AwareEd section
- Select the desired domain and click “Save”
Add Additional Administrators
To invite a new administrator to manage your SecurityIQ portal:
- From the main menu, click your name at the right side of the screen
- Click “New Administrators” in the Account Administrators section
- Enter the email address of the person you would like to share administrative access with
- Click “Add”
Download Email Logs
To download a log of all email sent from SecurityIQ to your learners in the past seven days:
- From the main menu, click your name at the right side of the screen
- Click “Download Log” from the Email Log section.
Supplementary
Template Variables

Get six free posters
Reinforce cybersecurity best practices with six eye-catching posters found in our free poster kit from our award-winning series, Work Bytes.


