Kali reporting tools
Penetration testing report is the key deliverable in any security assessment activity. In Penetration testing, the final deliverable is the report which shows the service provided, the methodology used, findings/results and the recommendation. Many penetration testers find the report making as a boring process because it takes a lot of time and effort. In this article, we will discuss the tools available in Kali Linux to simplify the task of report making. These tools are useful for storing your result for quick reference while making the report, sharing your data with your team, etc. We will learn how to use the tools to upload the result from some of the well-known scanners like nmap, Burp, Nikto, OWASP Zap, etc.
In this article we will cover the following tools:
- Dradis
- Magic Tree
- Metagoofil
Let us look into more details for each tool:

What should you learn next?
Dradis
The Dradis framework is an open source collaboration and reporting platform for IT security experts. It is a platform independent tool developed in Ruby. In the next few steps, we will learn how to use Dradis.
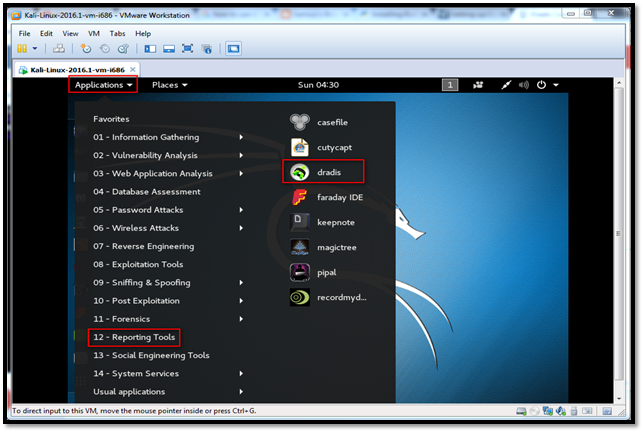
Launch the Kali-Linux tool. Click on "Applications", go to "Reporting Tools" and click on "Dradis".
Dradis is a self-contained web application. Hence, it will automatically open in the browser. The URL is https://127.0.0.1:3004.
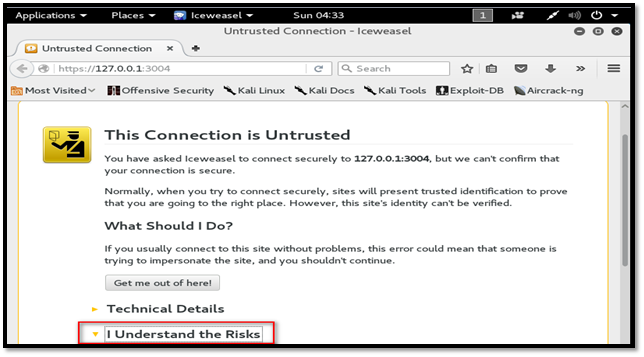
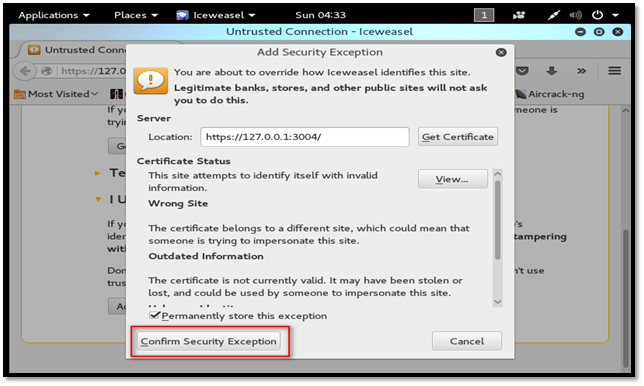
Avoid the certificate error and click the "I Understand the Risks" button to add an exception for Dradis. The certificate error comes because Dradis is using a self-signed certificate.
Since it is a first-time access, we are served with the Wizard page.
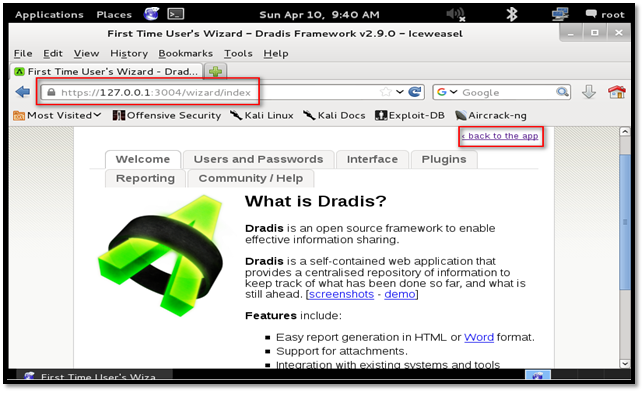
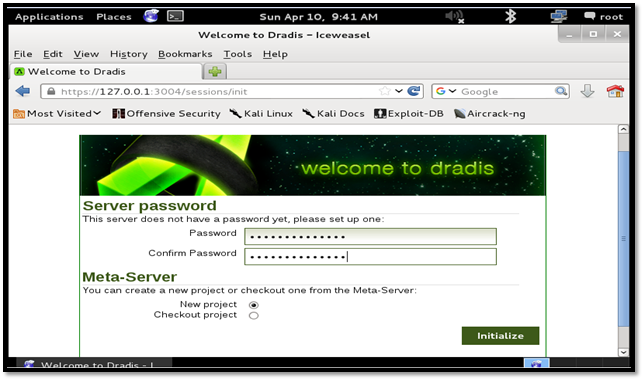
Next step is to create a server password to access the application. Click the "Back to the app" link to access the password setup page. Enter the password and click the "Initialize" button.
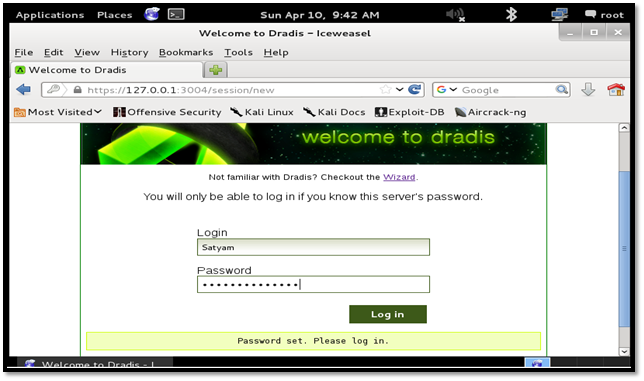
Enter the username and password which we configured in the previous step.
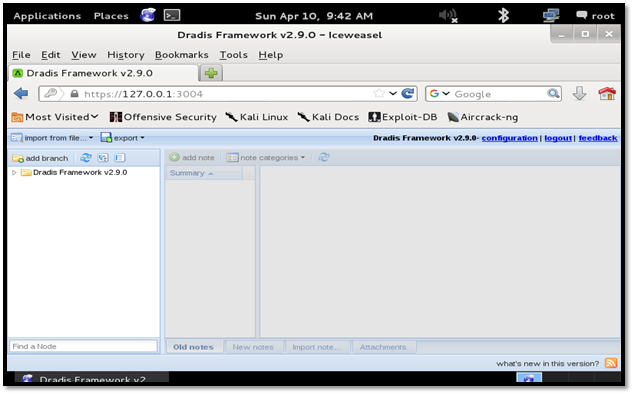
We are logged into the Dradis framework successfully.
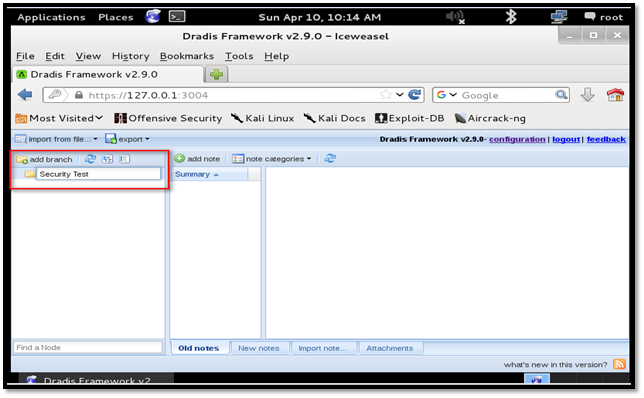
Now we can start using Dradis by creating a new branch. Click the "add branch" button and name it as "Security Test."
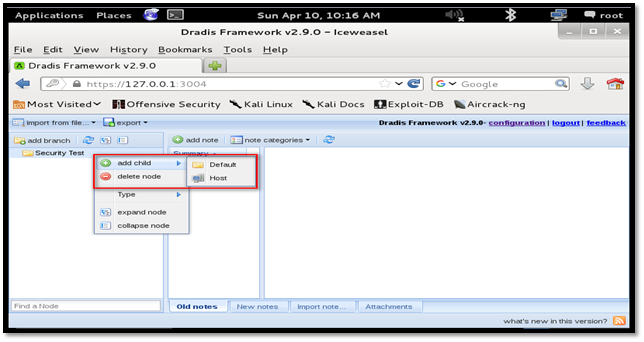
Now, right-click on the newly created branch and click the "add child" option to add sub-branch under a newly created branch. There are two options available. First, one is to create new sub-branch and the second one is to add the host.
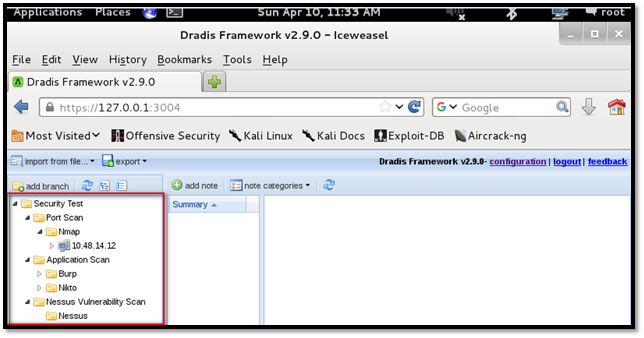
We can create a tree as per our convenience. In the below screenshot, "Security Test" is divided into three sub-branch namely "Port Scan", "Application Scan" and "Nessus vulnerability scan". Each sub-branch is further divided by different tools.
We can add host under each branch or sub-branch. For example, We have added IP 10.48.14.12 under Nmap folder. Our aim here is to put Nmap scan result for 10.48.14.12.
Click the "import file from..." button, select "NmapUpload" from the drop-down box, browse to the file and select the file to upload.
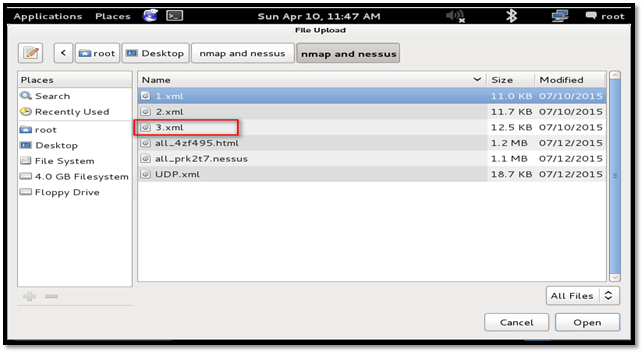
Click the "Open" button and Dradis will start validating and parse the file.
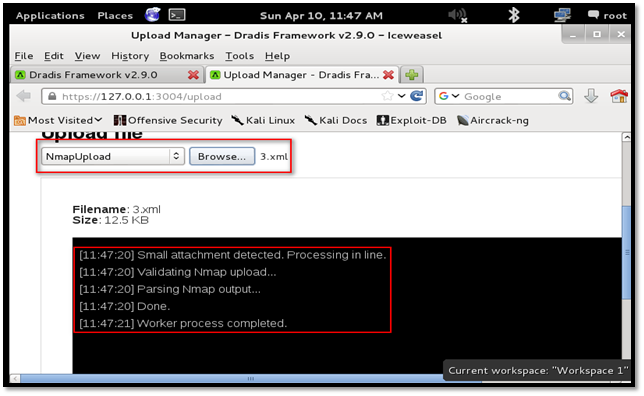
Upon successful parsing, the result is uploaded. All the open ports can be seen on the given host.
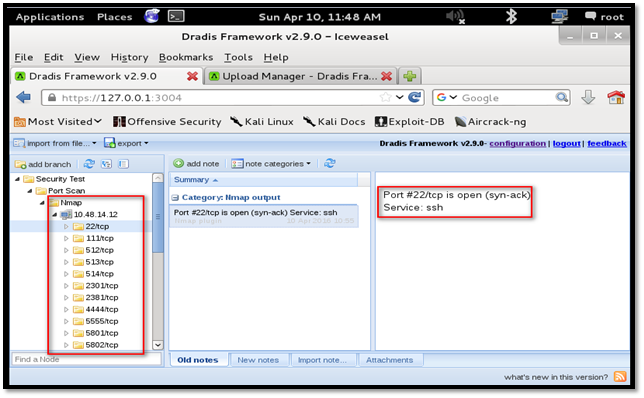
We can add an additional note for any of the port by clicking "add note" button.
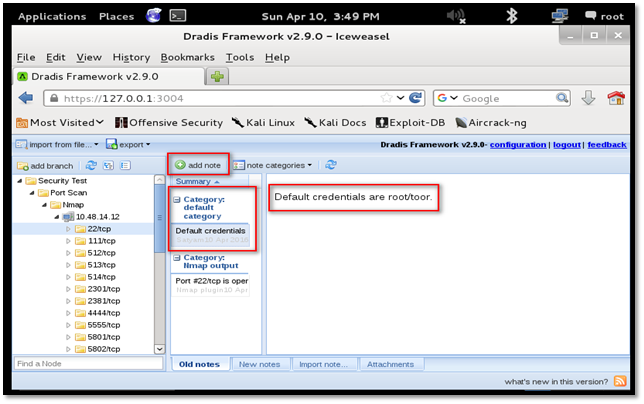
Similarly, we add a screenshot for any port or service. Go to the "Attachment" tab, Click the "Add" button and select a file to upload.
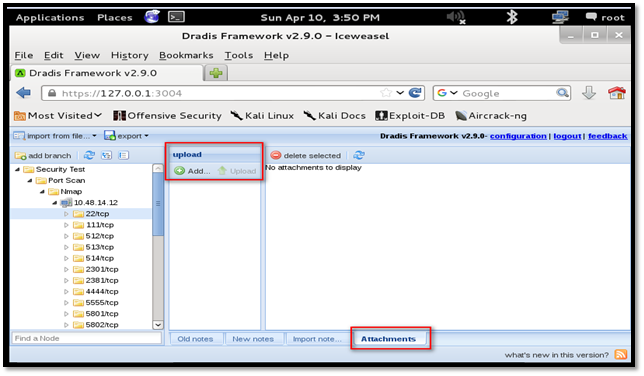
Now, click the "Upload" button to upload the file to Dradis.
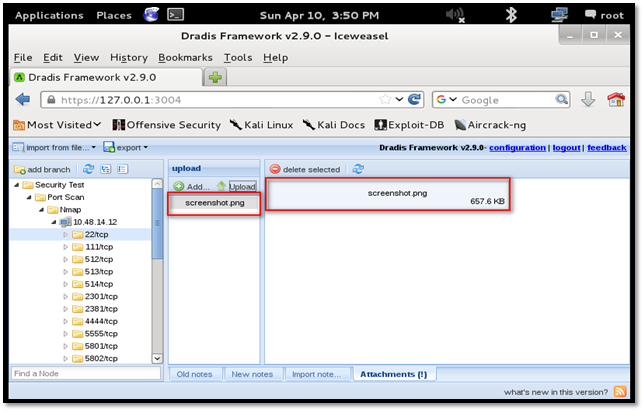
To view the file, double-click the uploaded image and a new tab will be open in the browser to display the uploaded screenshot.
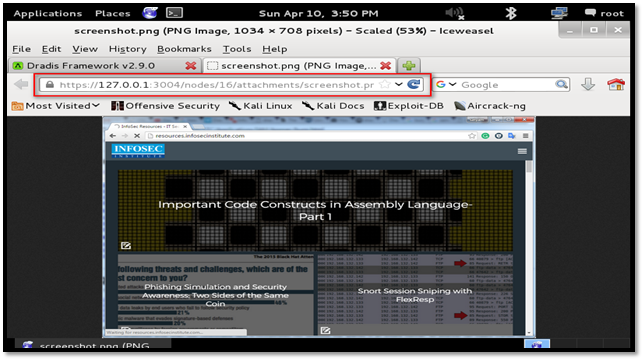
Similarly, we can upload scan results of other tools like Nessus, Burp, Nikto, Owasp ZAP, etc.
To upload Burp scan result to Dradis, Click the "import file from..." button, select "BurpUpload" from the drop-down box, browse to the file and select the file to upload.
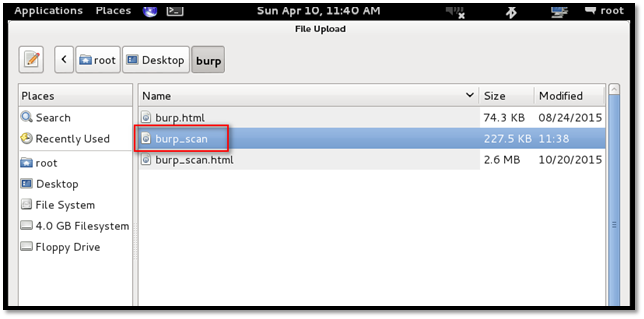
Click the "Open" button and Dradis will start validating and parsing the file.
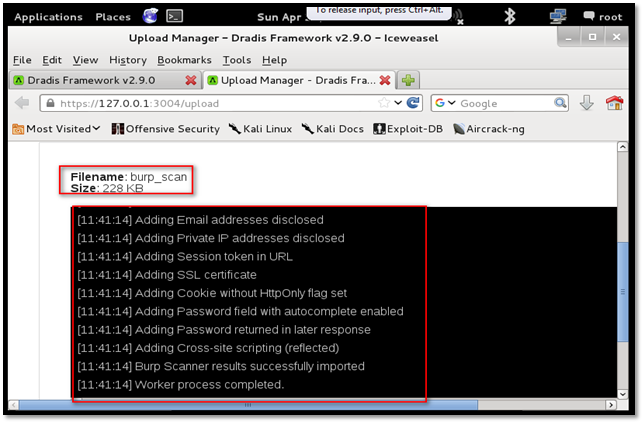
Upon successful parsing, the result is uploaded. All the vulnerabilities reported by the scanner can be seen under the "Burp Scanner results" folder.
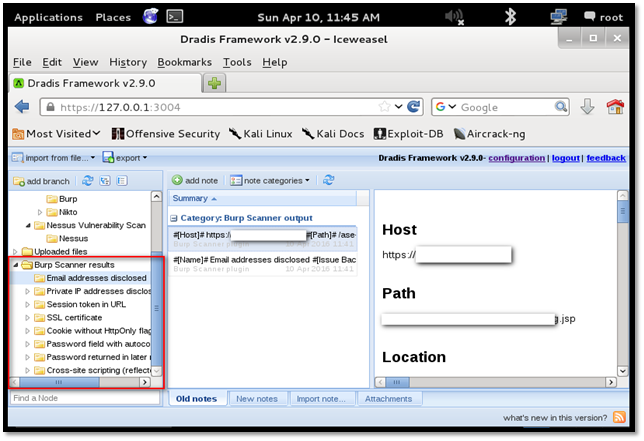
We can move the entire folder to "Burp" subfolder created by us under "Application Scan" folder.
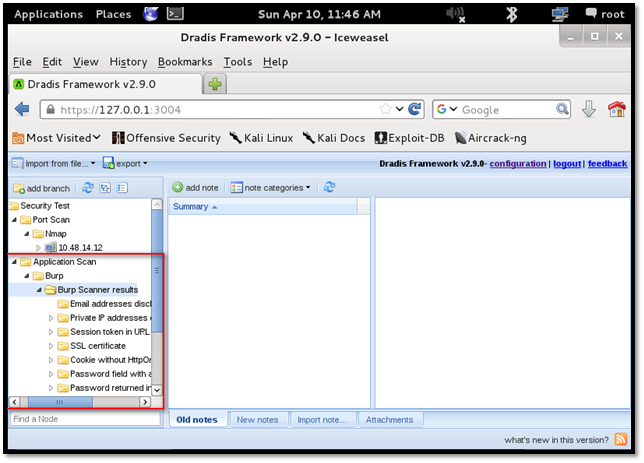
The same process can be followed for uploading Nessus scan result.
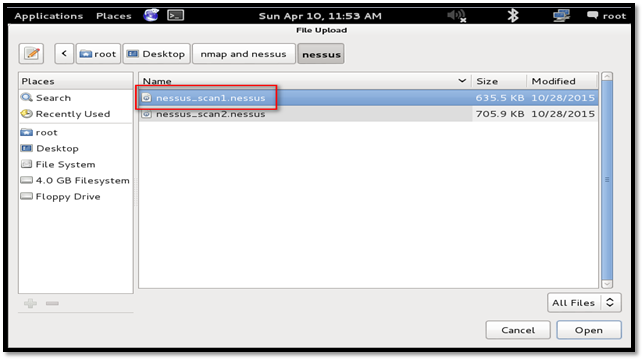
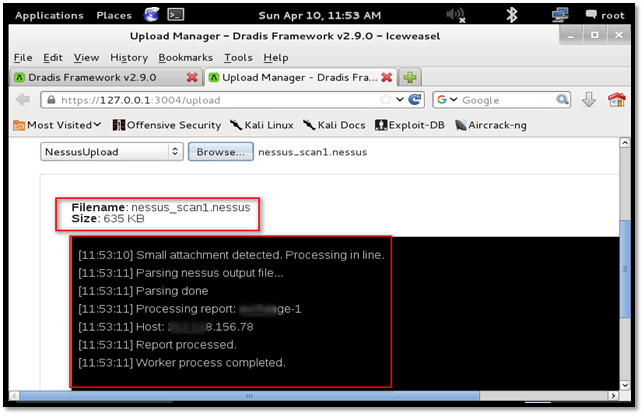
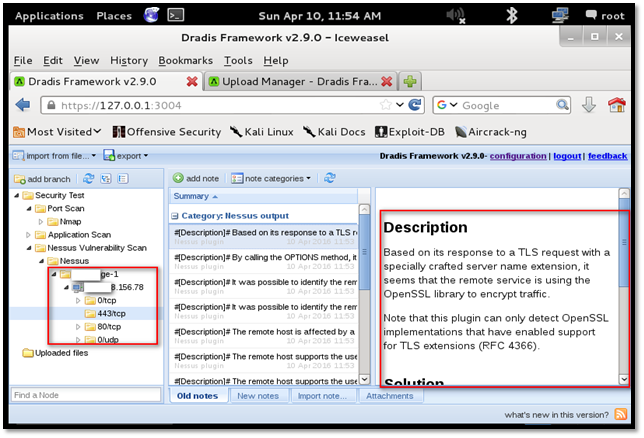
We can add screenshots and notes as explained earlier.
In the below screenshot, we can see all the data consolidated as per the activity performed.
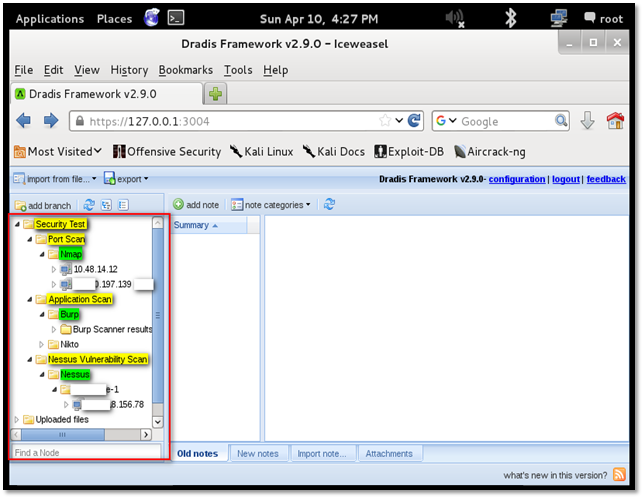
Dradis has the option to export the report where a user can have a single report of all the activities. Unfortunately exporting the report in doc or pdf format is not allowed in "Community version" and available for "pro" version only.
More about other features which are available in professional version but not in Community version can be found at http://securityroots.com/Dradispro/editions.html
We will see how we can generate HTML report.
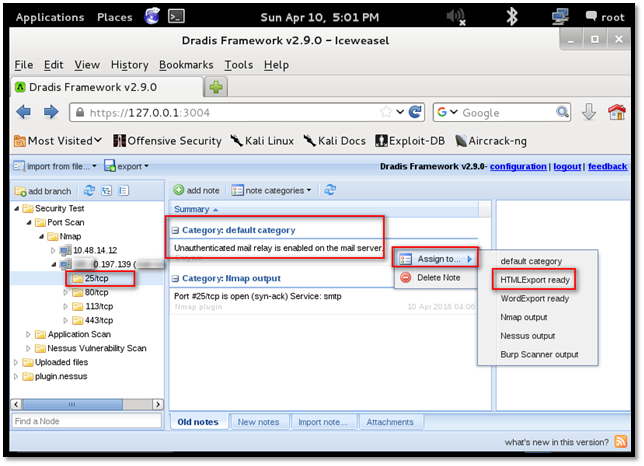
Step 1: Select the issue you want to include in the report. Right click on the "Category", select "Assign to..." and click the "HTML Export ready" option. This is shown in the below screenshot.
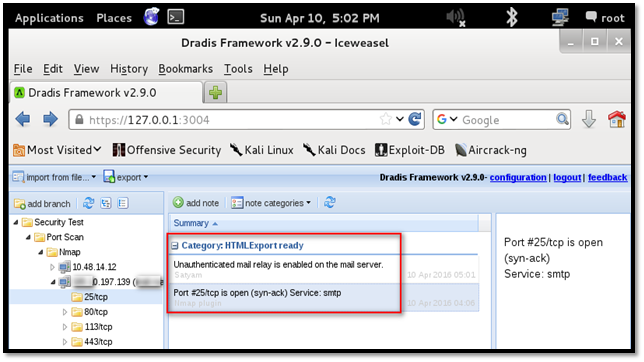
The Category of the issue is changed to "HTML Export ready", as shown in the following screenshot.
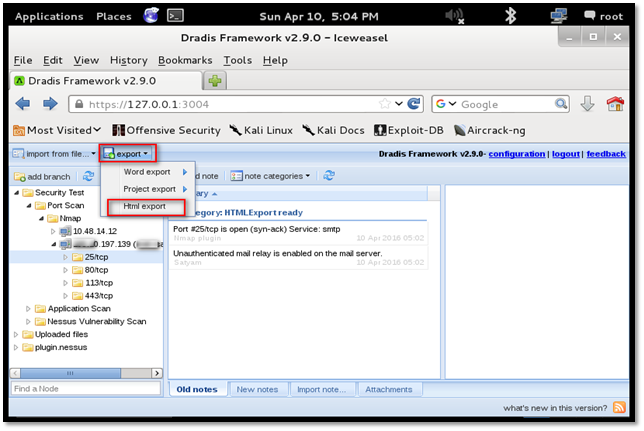
Step 2: Once you have included all the issue which you want to include in the report, Click the "export" button and select "Html export" option. A new tab will open with the HTML report.
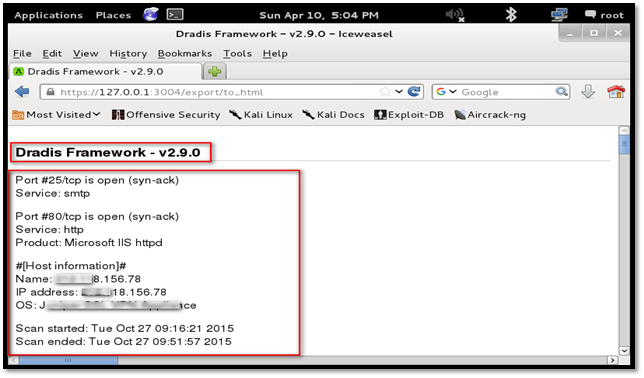
The following table shows the list of tools supported and report format accepted by Dradis.
Name
Expects
Burp Scanner output (.xml) file upload Burp Scanner XML output. Go to the Scanner tab > right-click item > generate report
NeXposeSimpleXML file upload [undefined]
Nessus output (.nessus) file upload Nessus XML (V2) format.
Nikto XML file upload Nikto results XML. Use the -o switch with a file name ending in .xml
Nmap output (.xml) file upload Nmap results file in XML format. Generate with -oX
OpenVAS XML file upload [undefined]
Project package upload A Dradis project archive (.zip) generated through Export > Project export > Full project
Project template upload A Dradis template XML file generated through Export > Project Export > As template
Retina Network Security Scanner (.xml) file upload Retina XML Vulnerability Export
SureCheck SQLite3 file upload Expects an .sc file from SureCheck which is in SQLite3 format
Typhon III vulnerability scanner output file upload Warning: this plugin is not implemented yet
Web Exploitation Framework (wXf) file upload wXf output in XML format
ZAP Upload plugin ZAP Proxy XML reports. Generate through Report > Generate XML Report ...
w3af file upload w3af output in XML format

FREE role-guided training plans
Magic Tree
Magic Tree is a data management and reporting tool similar to Dradis. It is designed to allow easy and straightforward data consolidation, querying, external command execution and report generation. This tool is pre-installed on Kali Linux and located under the "Reporting Tools" category. It follows the tree node structure to manage host and related data. In the next few steps, we will learn how to use Magic Tree.
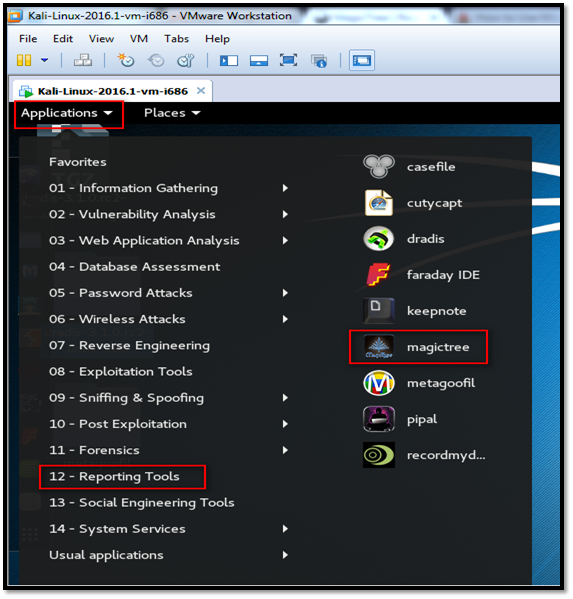
Launch the Kali-Linux tool. Click on "Applications", go to "Reporting Tools" and click on "Magic Tree".
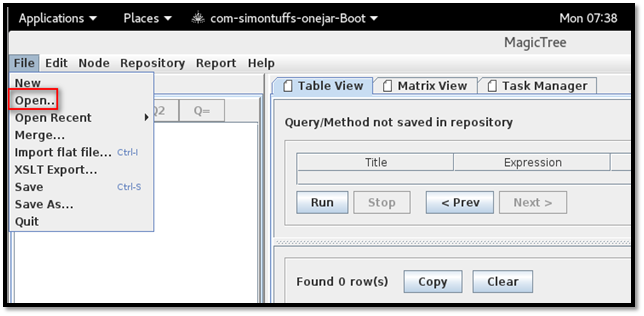
Navigate to "File", "Open" and select the files to upload.
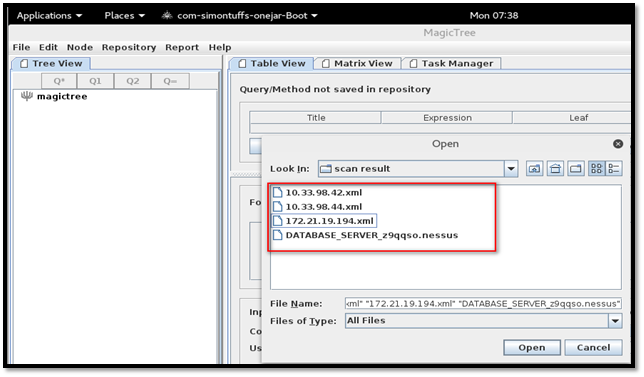
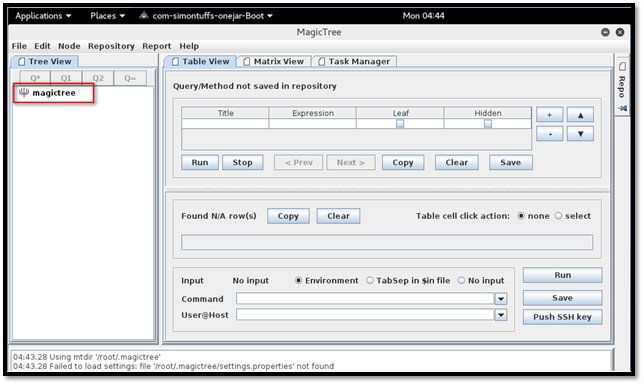
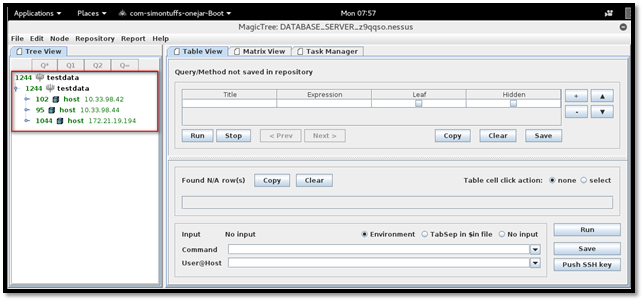
Magic Tree will map all the data into the tree node structure.
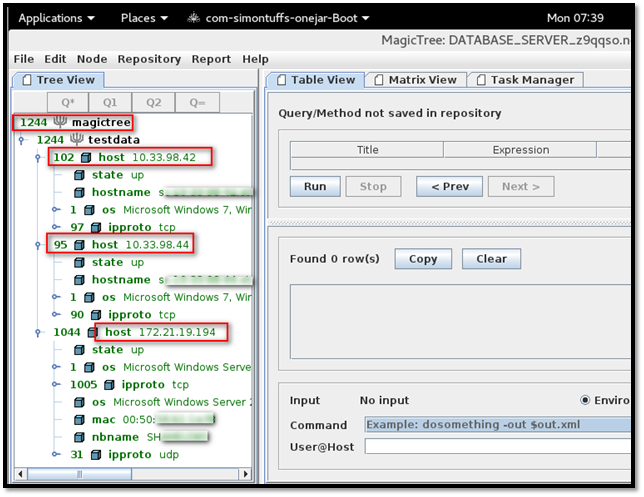
On expanding individual nodes, we can see the data further.
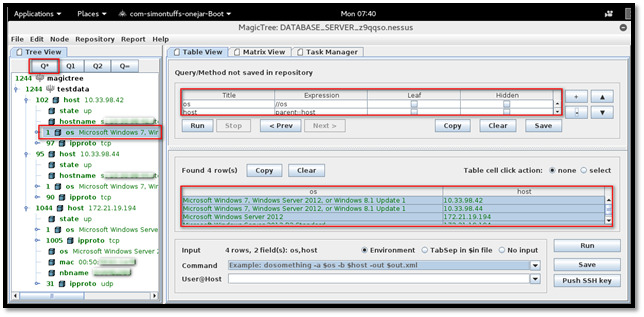
MagicTree allows querying the collected data and feeding it to shell commands. Select any data from the above table. There are different queries available:
Q*: Run a query that selects all node of the same type as the currently selected node. For example, if we select OS and click the "Q*" button, it will list all node with type "OS". From the below screenshot, we can see all the nodes with OS details.
The query ran to fetch the data is present under "Query" field (Highlighted in red under "Table View" tab). We can modify the query as per our requirement.
Similarly, if we select OS and click the "Q1" button, it will list all the nodes with type "OS" and text "Microsoft Windows 7". From the below screenshot, we can see all the hosts with same OS.
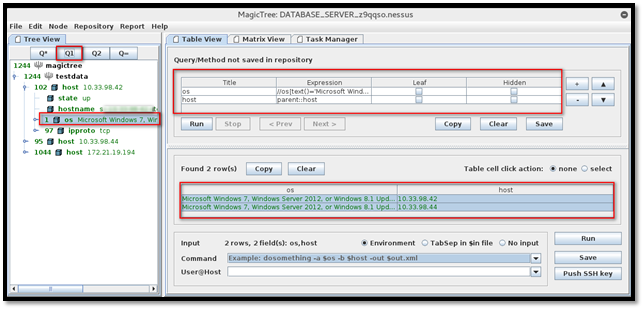
In this way, we extract the necessary data from the tree and feed it to command-line tool.
One more unique feature of Magic Tree is to be able to run Nmap from the user interface. Right click on the "test data" note, go to "Create child" and click the "Simple node" option.
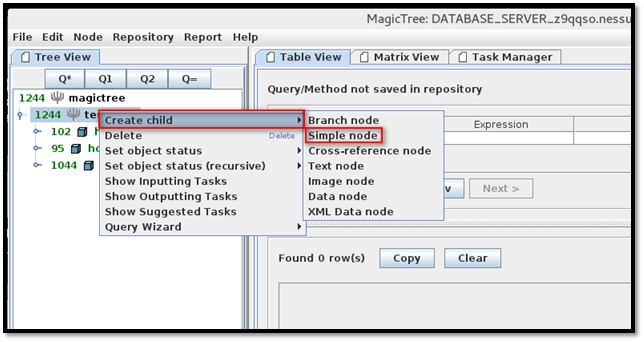
Enter the host details and press enter.
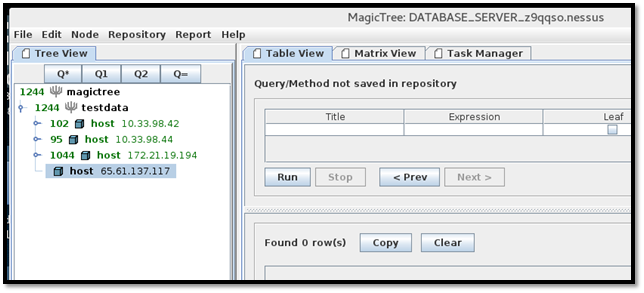
Now, click the "Q1" query button, enter the following Nmap command in "Command" field and click the "Run" button.
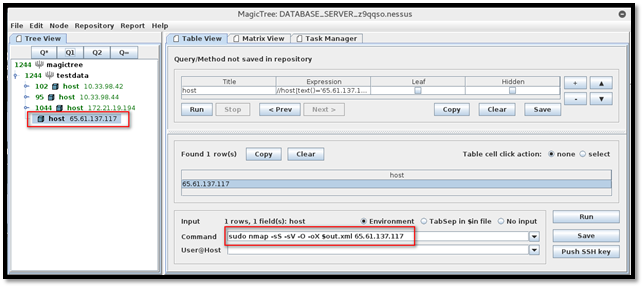
The Nmap scan has started now. We can see a newly created task at the bottom left of the screen while upper highlighted part shows the status of the task.
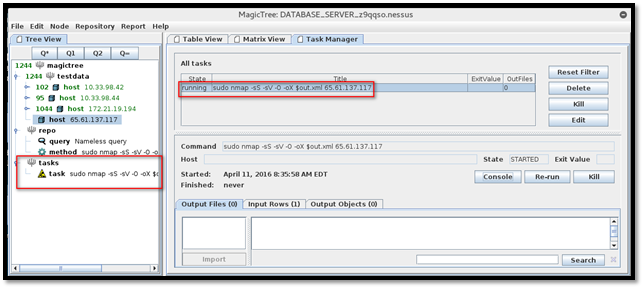
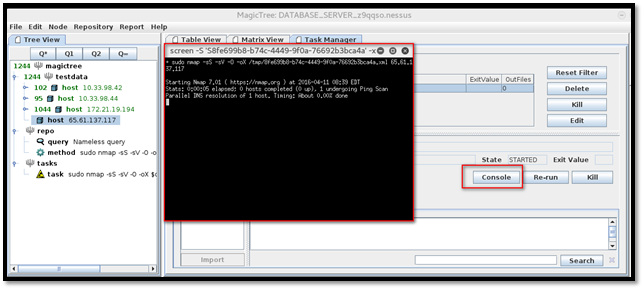
We can access the console and check the scan status by clicking the "Console" button.
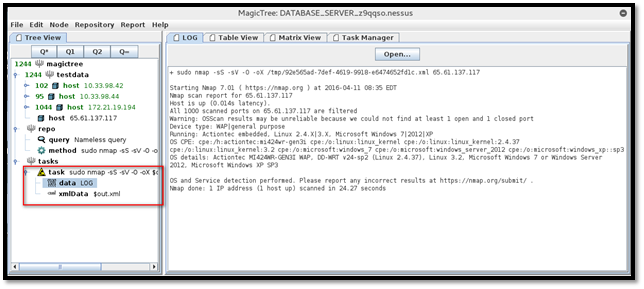
Once the scan is finished, we can see the log and XML output under "task" node.
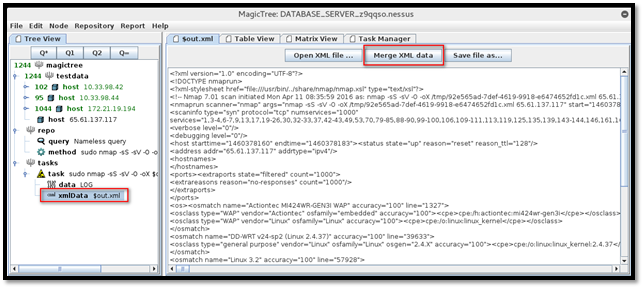
To merge the result into the current tree, click on the "xmlData" and then click the "Merge XML data" button.
The result of the scan is added to the host "65.61.137.117," as shown in below screenshot.
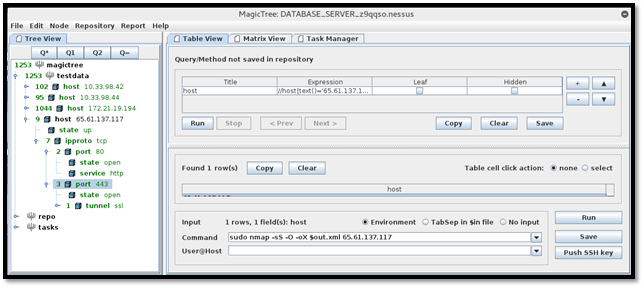
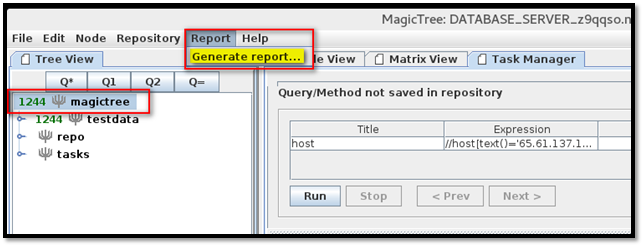
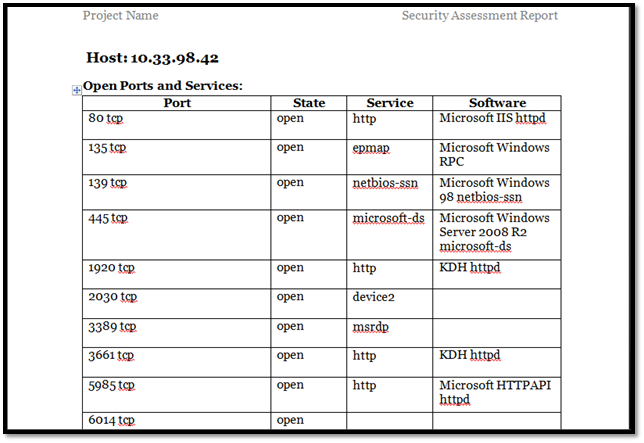
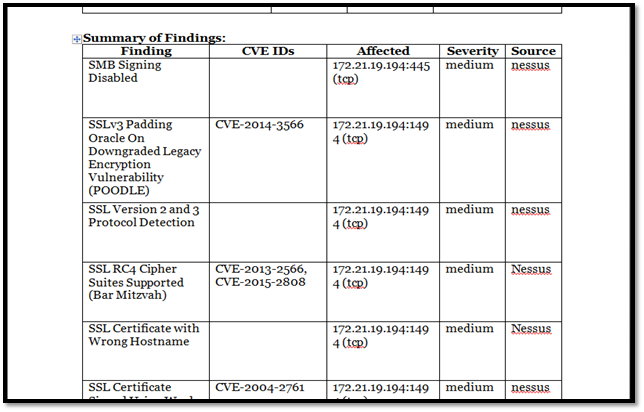
Magic Tree has the option to generate the report in Word format. To generate the report, select a node, navigate to "Report" and click the "Generate report..." option.
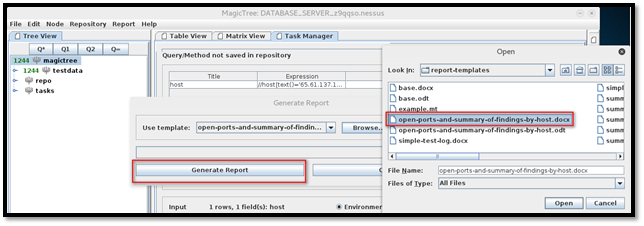
Browse through the available report templates, select one and click the "Generate Report" button.
Navigate to a location to extract the report.
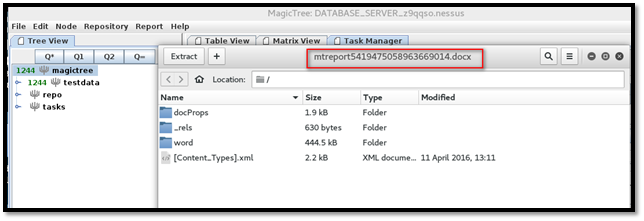
Word report is downloaded and can be access
Magic Tree vs. Dradis
Both the tools are developed to solve the similar set of problems i.e. consolidating the data and report generation. Both Magic Tree and Dradis allows importing the data produced by different penetration testing tools, adding the data manually and report generation. Both the tools follow the tree structure to store the data.
The detailed difference between these two tools is given below.
Magic Tree
Dradis
General
Platform support Multi-platform: Java Multi-platform: Ruby
Architecture Desktop application Client-server. A fat client and a web interface are available
License Proprietary. Distributed free of charge Open source. GNU GPL.
Supported import formats
Nmap Yes Yes
Nikto Yes Yes
Nessus Yes Yes
Burp Yes Yes
OpenVAS Yes Yes
Qualys Yes No
Imperva Scuba Yes No
Typhon No Yes
NeXpose No Yes
Netsparker No No. User-contributed plug-in exists
W3af No Yes
ZAP No Yes
Supported report formats
Microsoft Word Yes Yes
OpenOffice Yes No
HTML No Yes
Other features
Adding file attachments to nodes Yes Yes
Searching data in the tree Yes Yes
Dradis-only features
Vulnerability data import: Dradis supports importing vulnerability information from OSVDB and MediaWiki
Online collaboration: Dradis supports multiple testers accessing the same project database on-line
MagicTree-only features
Task execution: MagicTree supports running shell commands straight from the GUI, capturing command output
Data analysis: MagicTree allows querying the collected data and feeding it to shell commands
Metagoofil
Metagoofil is an information gathering tool designed for extracting metadata of public documents (pdf,doc,xls,ppt,docx,pptx,xlsx) belonging to a target company. It is a part of reporting tools under Kali Linux framework. It can give a lot of important information by scanning the obtained files. It can generate an HTML page with the result of the metadata extracted, plus a list of potential usernames, very useful for preparing a brute force attack on open services like ftp, web application, VPN, pop3, etc. These type of information help penetration tester during the information gathering phase of the security assessment.
Metagoofil uses the following steps:
- Searching the given file type in the target website using the Google search engine.
- Downloading all the documents found.
- Extracting the metadata from downloaded documents.
- Saving the result in HTML file.
Here, we will learn how to use Metagoofil and generate the report for penetration testing.
Step 1: Launch Kali Linux virtual machine. By default metagoofil is not present in Kali Linux. Enter the following command to install metagoofil on Kali Linux.
apt-get install metagoofil
Step 2: Once installed, run the following command to see the options available in metagoofil.
metagoofil
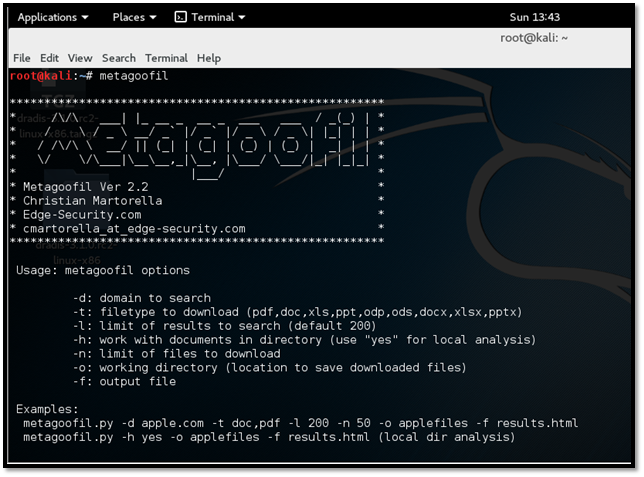
Step 3: We can run metagoofil using the following command
metagoofil -d target.com -t pdf,doc,ppt -l 200 -n 5 -o /root/Desktop/metagoofil/ -f /root/Desktop/metagoofil/result.html
Let us understand details of the command:
-d to specify the target domain.
-t to specify the file type you want metagoofil to locate and download.
-l to limit the results to a search. By default, it is set to 200.
-n to specify the number of files to download.
-o to specify a directory to save download file.
-f output file name and location.
Step 4: Let us try this command on a live website. We will run metagoofil on https://www.owasp.org
Enter the following command in the terminal and hit enter:
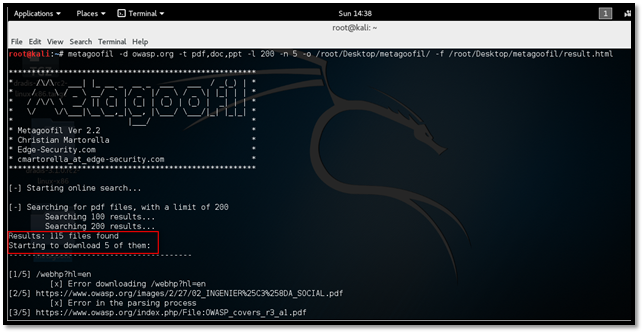
metagoofil -d owasp.org -t pdf,doc,ppt -l 200 -n 5 -o /root/Desktop/metagoofil/ -f /root/Desktop/metagoofil/result.html
As shown below, the tool is started searching for the given type of files. The tool has found total 115 files with .pdf extension. Since the number of files to download is set to 5, metagoofil will download only five files for each extension.
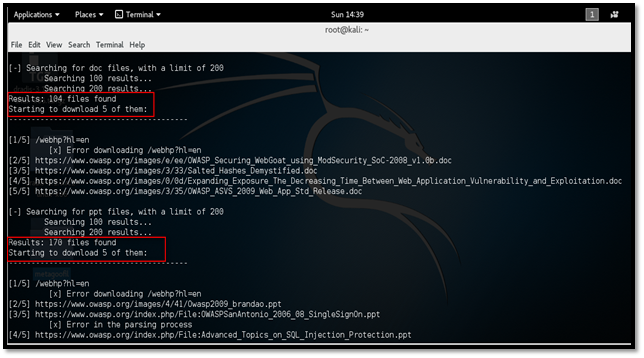
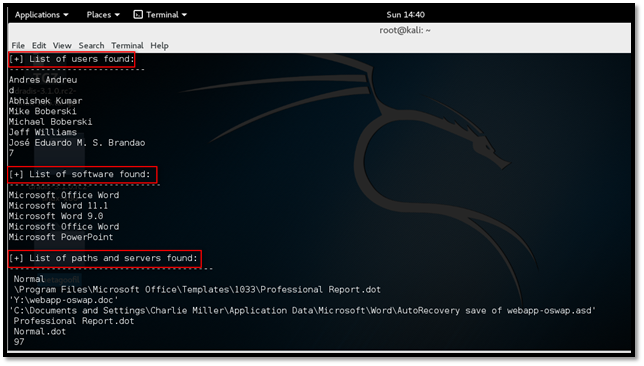
Step 5: Access the "/root/Desktop/metagoofil" directory to locate the downloaded files.
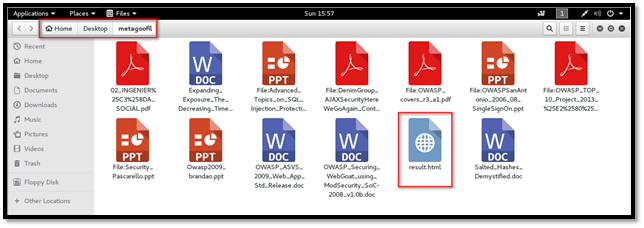
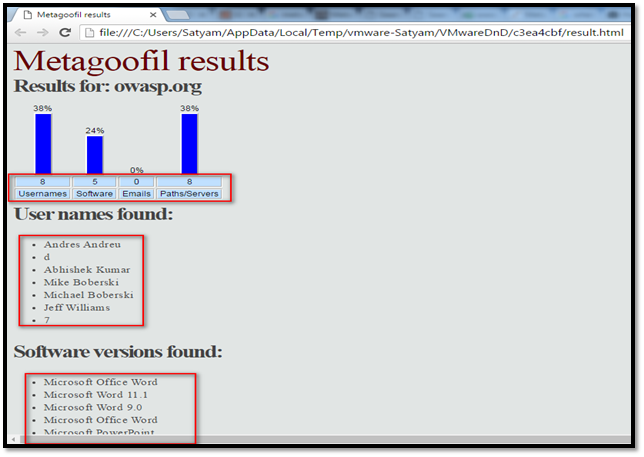
Step 6: Open the result.html file. This file contains the data extracted from the given website.
This includes the following data:
- Username
- Software version to develop the files
- Server and path
- File analyzed
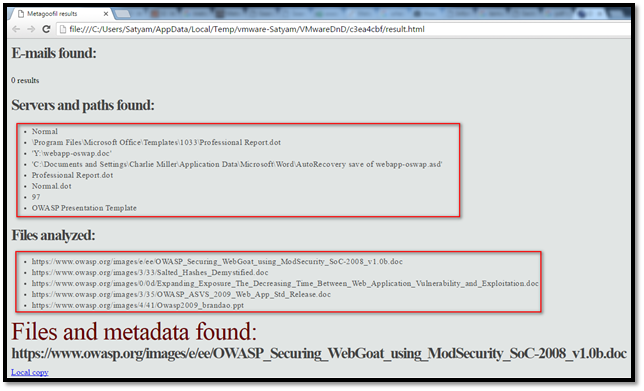
The result.html file can be opened with a command line tool like w3m. w3m is a terminal web browser for Linux. By default, it is not present in Kali Linux. To install w3m use the following command:
apt-get install w3m
Once installed, run the following command to open the HTML report in command terminal using w3m:
w3m /root/Desktp/metagoofil/result.html

Here /root/Desktop/metagoofil/result.html is the path of result.html file. Press enter, and we can see the content of the result.html file in the terminal.
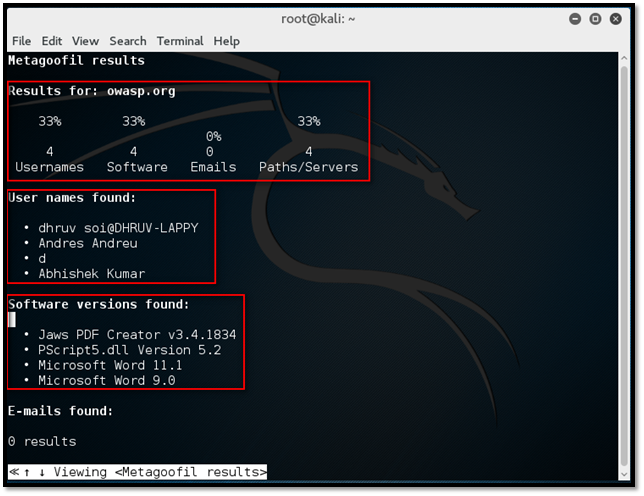
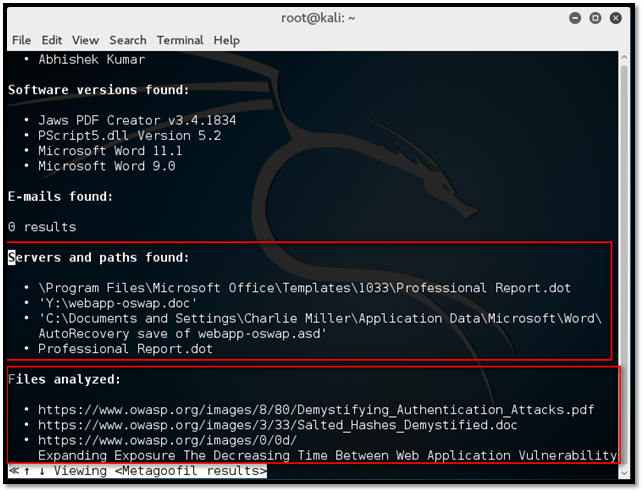
From the above result, we got a lot of sensitive information like username to brute force the password, software version to exploit any software related vulnerability and path information can be used to guess the operating system used by the target.
Become a Certified Ethical Hacker, guaranteed!
Get training from anywhere to earn your Certified Ethical Hacker (CEH) Certification — backed with an Exam Pass Guarantee.
Conclusion
Although Magic Tree and Dradis are performing a similar set of tasks, they have their own pros and cons. The decision to choose the tool is based on the individual requirements. Both the tools could be combined for very good project management. On the other hand, Metagoofil is a very powerful tool to extract the metadata from publicly available documents and generate a report containing important information like username, path of the document, software version, email id, etc. which can be used in different phases of penetration testing.
Sources


