Python for active defense: Network
MITRE ATT&CK is a well-known cybersecurity tool that breaks the lifecycle of a cyberattack into discrete goals that the attacker may pursue (called “tactics”). For each tactic, ATT&CK defines several techniques for accomplishing these goals.
MITRE Shield is a newer tool in the same vein as MITRE ATT&CK. Instead of focusing on offensive cybersecurity, it describes tactics and techniques that defenders can employ to proactively defend against an attacker via active defense.
When implementing active defense, network-level data collection and deception is a critical part of this strategy. Network-level techniques are represented across many tactics of the MITRE Shield framework.

FREE role-guided training plans
PCAP collection for active defense
Many of an attacker’s activities during a campaign are performed over the network. Initial access is often gained over the network, and network traffic is created when an attacker is exploring and expanding their foothold within an organization’s environment.
This makes visibility into the network level essential for active defense.
PCAP collection
An organization might want to collect network traffic data for a variety of different purposes. Analyzing network traffic at an enterprise scale can enable a company to detect known threats or identify anomalies within an organization’s network.
Alternatively, network traffic collection can be used as part of a deceptive strategy for active defense. After setting up decoy systems and applications on the network, an organization can monitor the traffic to these decoys to detect and monitor attack traffic.
PCAP collection with Python
Python’s scapy library makes it easy to monitor and analyze network traffic.
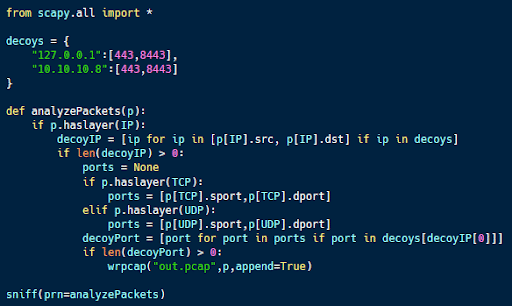
The code sample above (available on Github) is designed to look for network traffic to particular ports at certain IP addresses. This is ideal for monitoring traffic to decoy applications that are running on a honeypot or other system.
The code uses the built-in capabilities of scapy to easily parse network traffic. The sniff function at the bottom calls analyzePackets for each packet. If traffic has an IP layer, the code checks if the source or destination IP is in the packet. If so it extracts the port numbers, compares them to the list of decoy ports, and if there is a match, prints the packet to a packet capture file for future analysis.
Protocol decoding for active defense
Network protocols can be complex. One of the reasons that Wireshark is such a popular tool for network traffic analysis is its powerful array of built-in protocol decoders. These make it possible to easily understand the purpose and field values of the packet.
Protocol decoder
Protocol decoders can be invaluable for active defense, especially custom ones. With knowledge of a particular type of malicious traffic (such as malware command and control traffic), it is possible to monitor and automatically decode the traffic for analysis.
Protocol decoding with Python
Python is an ideal tool for protocol decoding.
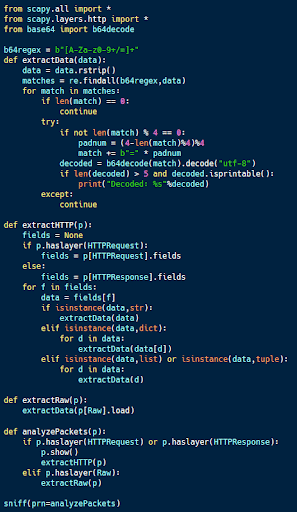
The code sample above (available here) is designed to decode commands and control traffic that is tunneled over HTTP.
In this case, the protocol tunneling uses the cookie value in requests and the data of responses to exchange information. All data is Base64 encoded to make it less visible to an analyst.
Using scapy, it is trivial to decode the traffic used for protocol tunneling. The analyzePackets function checks to see if a particular packet is an HTTP packet or carries data. If HTTP, all fields are extracted and sent for analysis, and the payload of any raw packet is analyzed as well.
This analysis looks for data that is Base64 encoded using a regex and attempted decoding. If decoding is successful, the data is printed. If not, it is assumed to be a false positive.
This code should identify any Base64 encoded data contained within HTTP packets or packets containing a payload. This identifies the C2 traffic from the blog referenced above as well as any other C2 protocols using similar techniques.
Burn-in for active defense
Burn-in refers to the process of making a decoy look more realistic. For example, a honeypot should have realistic-looking files, perform periodic communications over the network and demonstrate other normal-looking functionality.
Burn-in
Burn-in can be accomplished in a few different ways; however, they can have their pros and cons. Fully manual burn-in is time-consuming. Creating a “gold image” for decoys means that content can easily grow stale.
Burn-in can also be automated to an extent. However, the level of realism of the burn-in depends on the quality of the automation.
Burn-in with Python
Python can be used to burn in several different types of content and can encode very sophisticated algorithms for burn-in.
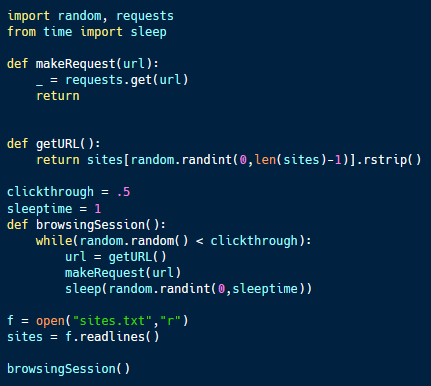
The code sample above (available here) is an example of a simple automated burn-in for network traffic on a honeypot. The goal is to make a computer look like a real employee workstation from someone observing its network traffic.
To do this, the code draws from a list of URLs that the employee may visit. At random intervals, the code will request a site from the list. The code also has a probability of clickthrough or visiting multiple sites during a session. When a session is complete the program sleeps for a random period until the next session starts.
This program relies on the fact that HTTPS conceals all but the DNS record and IP address visited, meaning that google.com and a particular Google search can be indistinguishable. The code could be made more sophisticated by using a better content list and/or developing an algorithm based on real browsing patterns.
Using Python for network defense
The network provides numerous opportunities for defenders to collect information or engage in deception.
Python can be used to automate many of these activities, including traffic collection, protocol decoding and “burning in” a decoy.

What should you learn next?
Sources
- MITRE ATT&CK, MITRE
- MITRE Shield, MITRE
- Python for Cybersecurity, GitHub


