Building your own pentesting environment
Ethical hacking is a term used to describe hacking done by a person/individual to identify the potential vulnerabilities or weakness in the system that could be exploited by a malicious hacker. Hacking without knowledge and permission of the target is illegal. It is always recommended to set up our own lab and practice hacking. In this lab, we will see how we can set up our own hacking environment to practice various hacking attacks. We will look into the different type of virtualization systems available to host the virtual networks, finding and running the trial version of operating systems in virtualized environment, setting up the vulnerable web applications and how to install Kali Linux to perform penetration testing.
Things required
- VMware Workstation
- Windows XP OS virtual image
- Kali Linux virtual image
Details about each requirement are given in the respective exercise.

What should you learn next?
Virtual environment
When we talk about ethical hacking, the best and safest method is to practice within a virtual environment. The virtual environment can be created in virtual machines. Virtual machines are fake machines running inside real machines. In the virtual world, the actual Operating System running on a computer is called "host" and every virtual machine that is run is called "guest." Virtual machines are safe because if a guest VM gets hacked, the host machine will remain safe.
Some of the virtualization systems are VMware Workstation, VMware Workstation Player, Oracle VirtualBox, etc. In this lab, we will be using a VMware workstation. The main difference between these two (VMware Workstation and VMware Workstation Player) is that Player can only play the virtual machines while Workstation can both create and play the virtual machines.
Some other difference include:
Snapshot: Snapshot is a copy of the virtual machine disk file at a given point of time. It preserves the state of the virtual machine so that we can return/ restore to the same state later. So if something goes wrong in the VM, we can revert to that snapshot at any time. The state captured by snapshot includes:
- The content of virtual machine's memory
- The settings of virtual machine
- The state of virtual machine's disk
This feature is present in VMware Workstation.
Clone: A clone is a copy of an existing virtual machine. The existing virtual machine is called the parent of the clone. When the cloning operation is complete, the clone is a separate virtual machine — though it may share virtual disks with the parent virtual machine.
This feature is present in VMware Workstation.
Do not get confused with clone and snapshot. Snapshot is saving a current state of the virtual machine, so you can revert to that state in case you make some mistake whereas Clone is making a copy of a virtual machine for separate use.
Free vs. Commercial: VMware Workstation Player is available for free for personal use whereas VMware Workstation Pro is a paid software for commercial use.
Both the product can be downloaded from here.
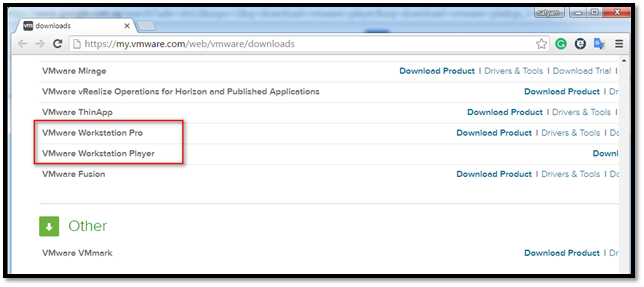
Exercise 1: Running the trial versions of Windows OS in VMware Workstation
Once we have downloaded and installed VMware Workstation, our next step is to download a VMware image of Windows OS on which we can practice our attacks. We can install Windows XP, Vista, Server 2003, as these systems have many known security issues. The images can be downloaded from here or here.
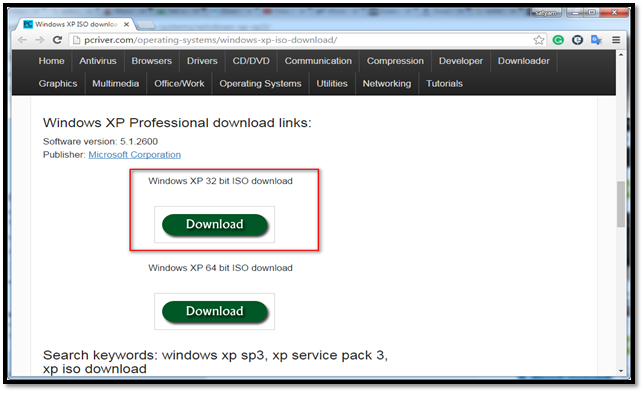
After downloading the ".iso" file, open VMware workstation, go to "File" and click "New virtual machine". Select the ".iso" file from the download location.
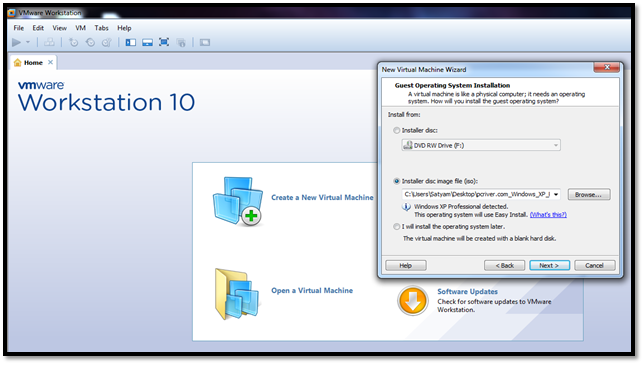
Follow the onscreen instruction to install windows XP on the workstation.
Click the "Customize Hardware" button to configure the other settings like memory, USB settings, etc. The RAM allocation can be increased or decreased as per requirement.
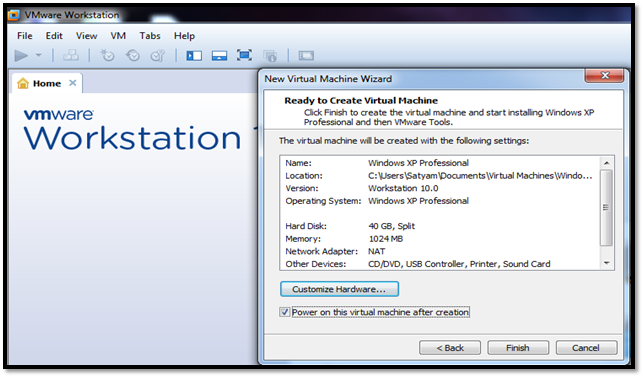
Select "Power on this virtual machine after creation" option and click the "Next" button, as shown in the above screenshot.
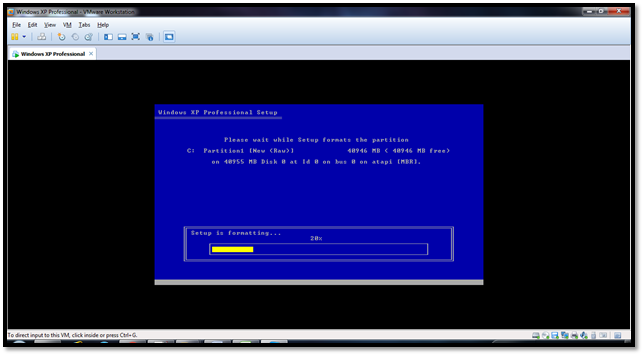
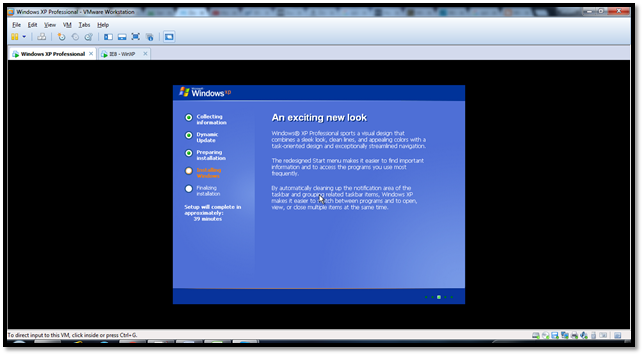
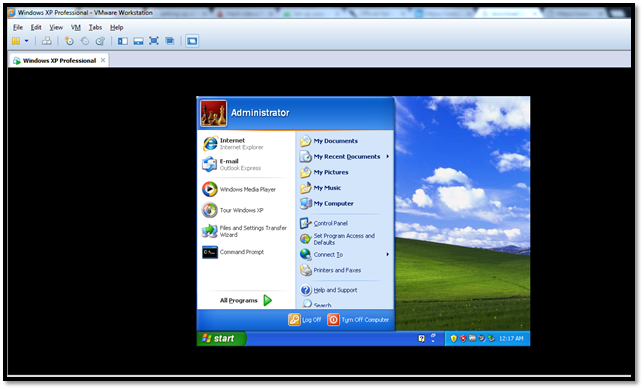
Now, we have our Windows XP virtual machine up and running.
Exercise 2: Finding and configuring the vulnerable web applications
There are multiple vulnerable applications on which we can perform the actual testing for the learning purpose. Some of the applications are as follows:
Damn Vulnerable Web Applications (DVWA): Based on PHP, Apache and MySQL. Need to be hosted locally.
OWASP WebGoat: J2EE web application and need to be hosted locally.
Hack This Site: Online website to learn the penetration testing.
Testfire: Online website to learn the penetration testing.
Here, we will learn how to host a vulnerable application in the virtual machine. Since we have one Windows XP virtual machine up and running, we will see how to host vulnerable application on the same. For this exercise, we will configure Damn Vulnerable Web Application (DVWA). This application is vulnerable to several web-based vulnerabilities like Cross-site scripting (XSS), SQL Injection, CSRF, Command injection, etc.
The following steps will help us in setting up the web server to host the application:
1. Download and install XAMPP. For Windows XP, XAMPP can be downloaded from here.
2. Once XAMPP is installed, go to the control panel and click the "Start" button to start Apache and MySql services.
3. Download DVWA application from here. Extract the files into a new folder and name it as "dvwa".
4. Open the "C:xampphtdocs" folder and move the contents of the folder to a different place.
5. Copy the "dvwa" folder into "C:xampphtdocs".
6. Access the following URL in the Address bar of the browser: http://127.0.0.1/dvwa/login.php
The database setup page will be displayed.
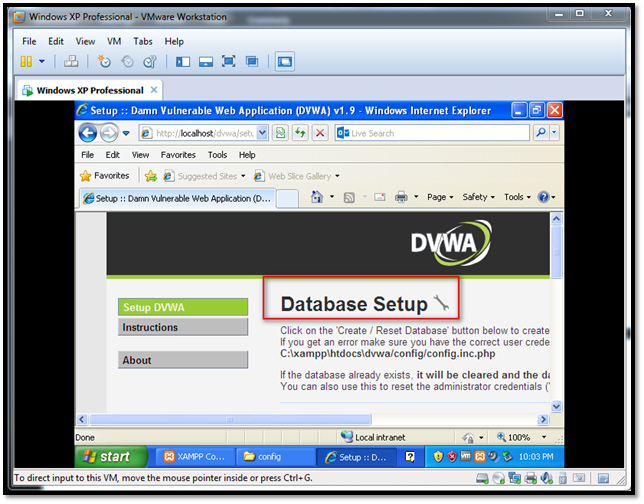
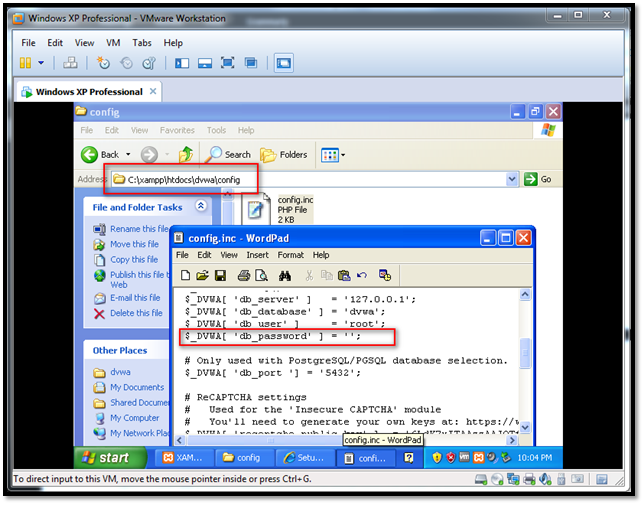
7. Go to the "C:xampphtdocsdvwaconfig" folder and open the "config.inc" file in Notepad.
8. Remove the value of "db_password", as shown in the following screenshot.
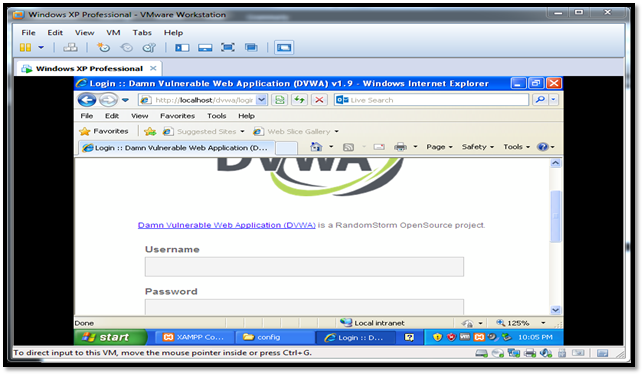
9. Go back to the browser and refresh the page. The login page is displayed.
10. Enter the default credentials, i.e. "admin/password", to log into the application.
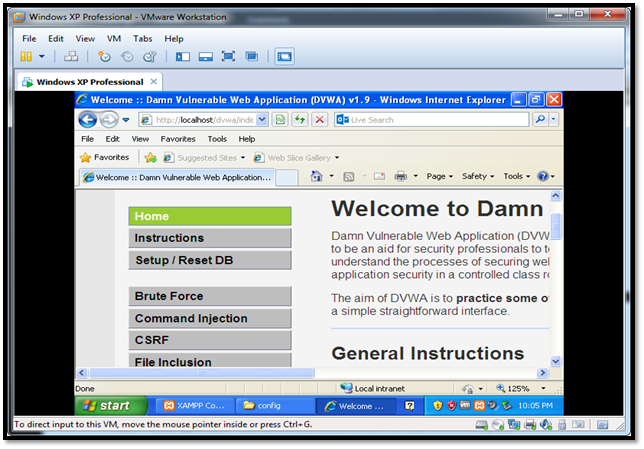
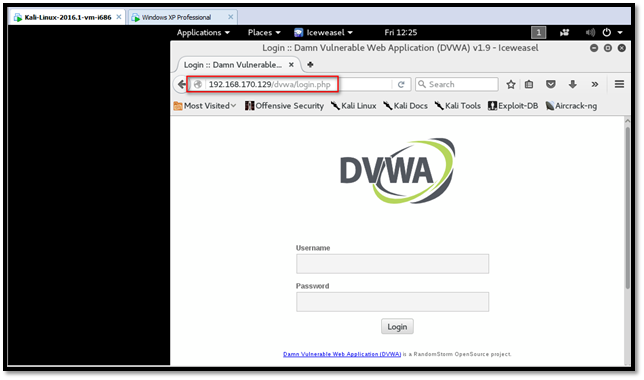
We have successfully configured a web server and hosted an application on the same. Now, we can access this application from Kali Linux or BackTrack using the http://ip-address-of-windows-xp-machine/dvwa/login.php URL and practice the attacks.
In case while accessing the DVWA application from Kali Linux or BackTrack, you encounter the "Access forbidden" error like this:
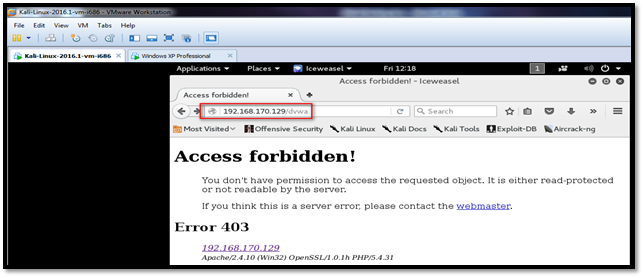
Go to " C:xampphtdocsdvwa " folder, open the "HTACCESS File", locate the "allow from" line and enter the IP address of the Kali Linux machine here, as shown in the following screenshot.
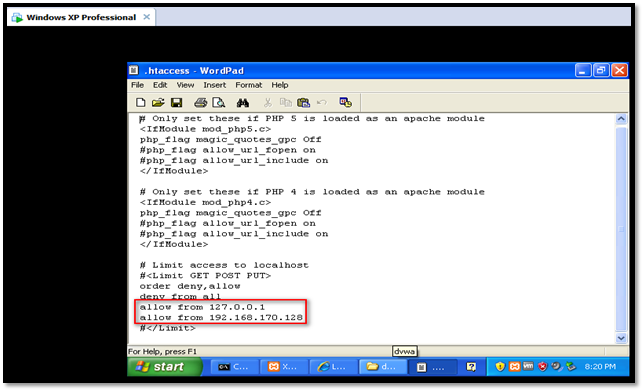
Now access the URL again and you should be able to see the login page of DVWA.
Exercise 3: Downloading and installing Kali Linux
Kali Linux is a Debian-based powerful penetration testing platform used worldwide by the penetration testing professionals. Kali contains many tools which can be used for information security related tasks. Virtual Image of Kali Linux can be downloaded from here.
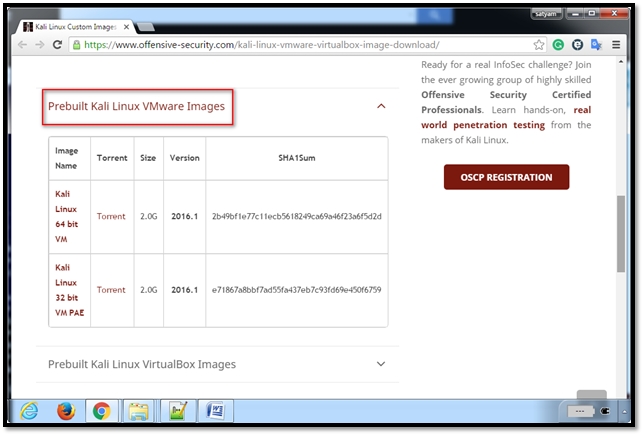
Once downloaded, follow the steps below to run Kali Linux:
Step 1: Launch VMware Workstation.
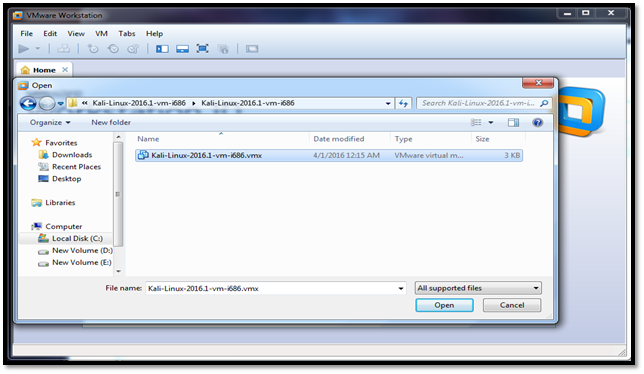
Step 2: Go to "File" and click the "Open...".
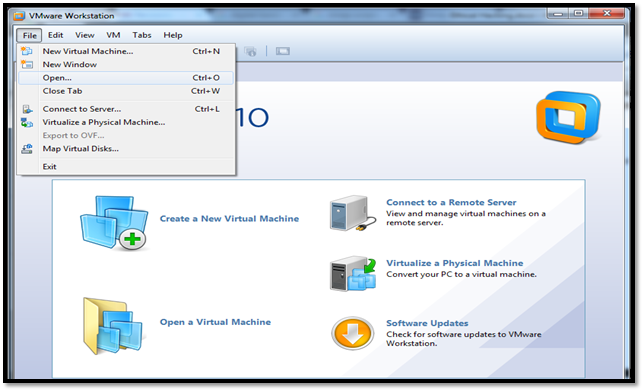
Step 3: Locate the downloaded folder, select the "Kali_Linux-2016.1-vm-i686.vmx" file and click the "Open" button.
Step 4: The virtual machine details can be seen.
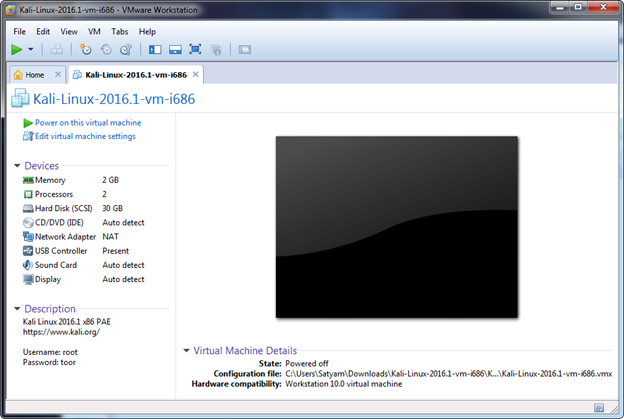
Step 5: Click the "Edit virtual machine settings" button to configure the other settings:
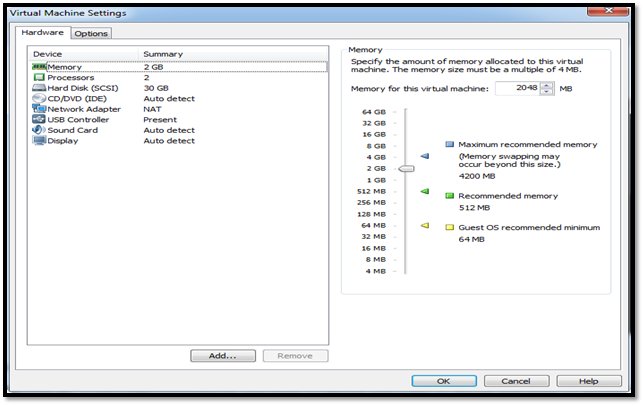
- Memory: You can allocate memory to the virtual machine. The RAM allocation can be increased or decreased as per requirement. The preferable RAM for Kali is 2 GB.
- Processor: This allows you to configure number of processors to be assigned to the VM. Similarly, Number of core per processor allows you to select the number of CPU cores you want to assign to the VM.
- Hard Disk: This allows you to allocate a space for hard disk where virtual machine stores the operating system, programs and data files.
- Network adapter: We can add virtual Ethernet adapter to our virtual machine and change the configuration of existing adapters. Following are the available options under the Network adapter setting:
- Bridged: In a bridged network, the guest OS shares the host OS network adapter in connecting to the physical network. This means the virtual machine will appear as a separate machine in the network. This connection allows the virtual machine to share the resources on the network. The guest OS shares the same DHCP server and DNS server with host OS.
- NAT: NAT stands for Network Address Translator. In this network, the virtual machine is behind the host and access the network through the default connection of the host. In the network, the traffic will appear to come from the host. This means that the virtual machine should be able to access the network or internet, but it will not be able to share the resource to the network. The IP to this connection network is assigned through the DHCP server. This is the most common and default configuration for newly created virtual machines.
- Host-only: A Host-only virtual network is a private and most restrictive network configuration. This is not a public network and does not provide access to the outside world or internet meaning; there is no default gateway. The IP to this connection network is assigned through the DHCP server.
While setting up the penetration test lab for personal use, it is recommended to use "Host-only" option as a network adapter setting as we have to communicate within the VM network.
Step 6: Select the "OK" button. Click the "Play" button to start the VM.
Step 7: Now, the virtual machine will start, and you should be able to see a boot screen, as shown in the screenshot below. Click the mouse anywhere in the virtual machine and then press Enter.
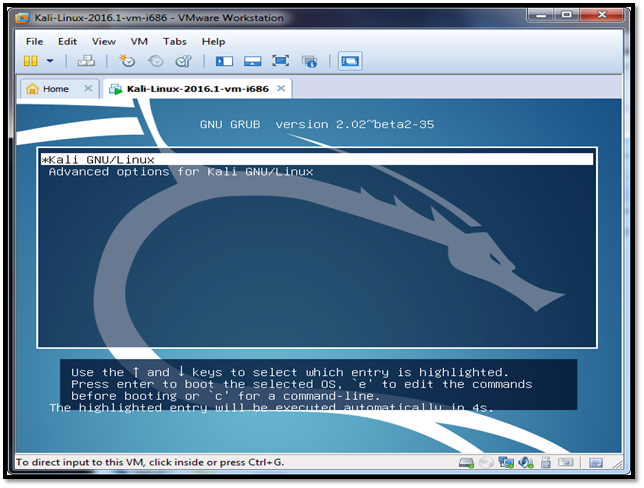
Step 8: When prompted for credentials, you can use "root" and "toor" as the username and password respectively.
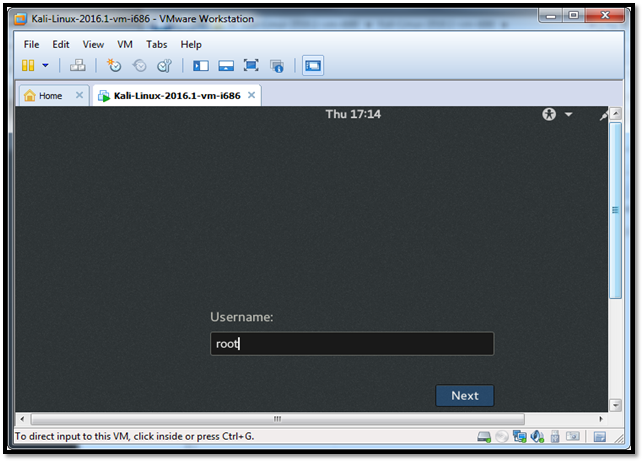
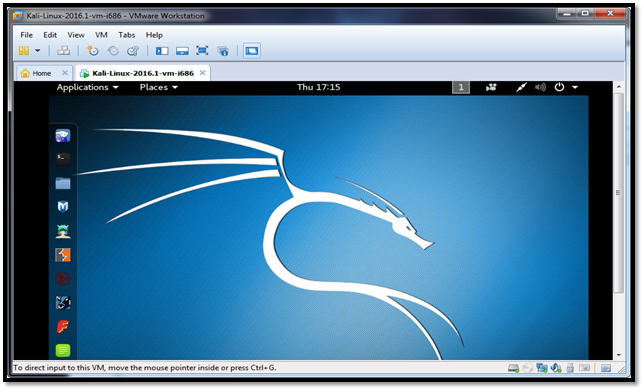
So, now we have gained access to Kali Linux virtual machine and can use this for further hacking. We can open the browser and access the DVWA application hosted by us in Exercise 2.
Windows-based tools:
Some of the important Windows based tools which are most commonly used in penetration testing are:
- Nmap - Nmap is a free tool for network discovery and security auditing. It can be used for host discover, open ports, running services, OS details, etc. Nmap send specially crafted packet and analyzes the response. Nmap can be downloaded from sources section below
- Wireshark - Wireshark is a free open source network protocol and packet analyzer. It allows us to monitor the entire network traffic by putting network interface into promiscuous mode. Wirehsark can be downloaded from sources section below
- PuTTY - PuTTY is a free and open source SSH and telnet client. It is used for remote access to another computer. Putty can be downloaded from sources section below
- SQLmap - SQLmap is a free and open source tool mainly used for detecting and exploiting SQL injection issues in the application. It has options for hacking the vulnerable database as well. SQLmap can be downloaded from sources section below
- Metasploit Framework - Metasploit is a popular hacking and pentesting framework. It is developed by Rapid7 and used by every pentester and ethical hacker. It is used to execute exploit code against vulnerable target machine. Metasploit can be downloaded from sources section below
- Burp Suite - Burp Suite is an integrated platform for performing security testing of web applications. It has multiple tools integrate in it. Two main tools in free version are Spider and Intruder. Spider is used to crawl the pages of the application and Intruder is used to perform automated attacks on the web application. Burp Has professional version in which there is a additional tool present called Burp Scanner to scan the applications for the vulnerabilities. Burp Suite can be downloaded from sources section below
- OWASP Zed Attack Proxy - OWASP zap is one of the OWASP project. It is a penetration testing tool for web applications having similar features of Burp Suite. It has automated scanner to discover the vulnerabilities in application. Additional feature include spider for Ajax based application. OWASP zap can be used as a intercepting proxy also. OWASP zap can be downloaded from sources section below
- Nessus - Nessus is a Vulnerability, configuration, and compliance assessment tool. It has free and paid version. Free version is for personal use. It uses the plugins for scanning. Simply feed the IP address of the target machine and run the scan. There is an option to download the detailed report as well. Nessus can be downloaded from sources section below
- Nikto - Nikto is a open source Web server vulnerability scanner. It detects the outdated installation of software and configuration, potentially dangerous files/CGIs, etc. It has a feature of report creation as well. Nikto can be downloaded from sources section below
- John the Ripper - It is a password cracking pentesting tool and commonly used to perform dictionary based brute force attack. John the Ripper can be downloaded from sources section below
- Hydra - Another password cracker similar to John the Ripper. Hydra is a fast network logon cracker. It can perform rapid dictionary attacks against more than 50 protocols, including telnet, ftp, http, https, smb, several databases, and much more. Hydra can be downloaded from sources section below
- GetIf - Getif is a free multifunctional Windows based GUI tool to collect information about SNMP devices. Getif can be downloaded from sources section below
Some more windows based tool along with the details can be found at https://pentestlab.wordpress.com/2013/01/07/windows-tools-for-penetration-testing.
Tools repository
There is a penetration testing repository available on internet which contain online resources for learning penetration testing, exploit development, social engineering resources, Penetration testing tools and scanners, wireless network tools, Hex editors, password cracker , reverse engineering tools, references to other important online resources related to penetration testing, etc. The repository is available at https://github.com/enaqx/awesome-pentest

FREE role-guided training plans
Conclusion
This lab can be customized as per requirement. We can host other flavors of operating systems as virtual machines and try to hack them or we can increase the difficulty of hacks by installing and enabling firewall or intrusion detection system.
Sources


