Web Services Penetration Testing, Part 6: Fuzzing Parameters with Burp
In the previous article we discussed in what cases we might face challenges performing manual web services penetration testing and how SoapUI will help in those circumstances. Now, what are the logical and business logic test cases when testing a web services, how do we test them, and what are limitations of SoapUI?
Though SoapUI is a very powerful tool while performing a manual Web services penetration testing, it does not allow a tester to fuzz a parameter. It's very important in case of a black box testing to fuzz. Let's take an example: if a Web service provides a login method, and you want to bypass the login method with SoapUI, you want to repeat the authentication request many times to brute force the credentials. But is it that easy with SoapUI? The answer is "NO". So that's why we will integrate SoapUI with other tools which provide us an interface to fuzz the parameters of a soap request generated by SoapUI. The tool we are going to use to perform the same is a very popular integrated platform to perform manual as well as automated testing: Burp Suite.

What should you learn next?
Burp Suite
Most security professionals use Burp Suite. It is a very popular tool to perform Web application penetration testing. It is an integrated platform for performing security testing of Web applications, and in most of the cases we can use the same to test Web services and mobile applications by proper configuration and integration with some other tools. Its various tools give you full control to enhance and automate the testing process.
Key Components of Burp
- Proxy runs on port 8080 by default. It intercepts the request and let you inspect and modify traffic between your browser and the target application.
- Spider is used for crawling content and functionality by auto submission of form values.
- Scanner is used for automating the detection of numerous types of vulnerabilities. The type of scanning can be passive, active or user-directed.
- Intruder can be used for various purposes, such as performing customized attacks, exploiting vulnerabilities, fuzzing different parameters, etc.
- Repeater is used for manipulating and resending individual requests and to analyze the responses in all those different cases.
- Sequencer is mainly used for checking the randomness of session tokens.
- Decoder can be used for decoding and encoding different values of the parameters.
- Comparer is used for performing a comparison between two requests, responses or any other form of data.
- Extender allows you to easily write your own plugins to perform complex and highly customized tasks within Burp. Or you can also include different types of Burp extensions created by different developers or security professionals.
Burp Suite comes in two different editions.
- Free Edition
- Professional Edition
The major difference between these two is that in the Free Edition, some features like Scanner and Extender are not present. And also you can find that Intruder has certain limitations.
Though Burp Suite Professional Edition is one of the widely used tools for its unique features (which we will discuss in forthcoming articles), right now we will use Burp Suite Free Edition to fuzz different parameters of the request by integrating it with the SoapUI.
Burp Suite integration with SoapUI:
Burp Suite Free Edition is a fine product of Portswigger. You can download it from the below mentioned URL: http://portswigger.net/burp/downloadfree.html
Before running it, make sure that you have installed Java in your system. After downloading the Burp Suite Free Edition, you will get a jar file. Just click on that to open your Burp Suite. It will show as shown in Img1.

Img1: Burp Suite Free Edition starting banner
After this banner, you will find that your Burp is running properly, and with a little configuration it will be ready to fuzz parameters. The Burp window is shown in Img2.
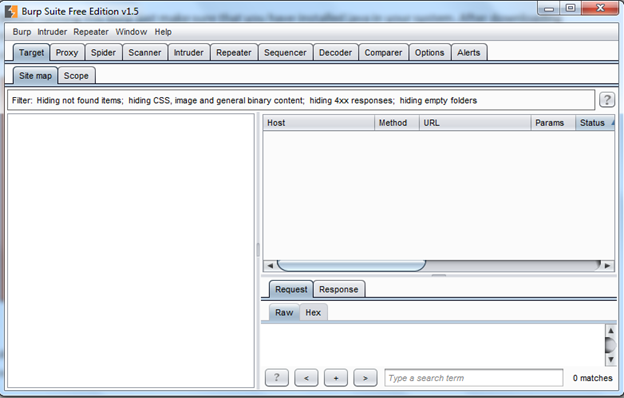
Img2: The burp window
For initial configuration, click on the Proxy tab on the top and then on the Options sub tab as shown in Img3.
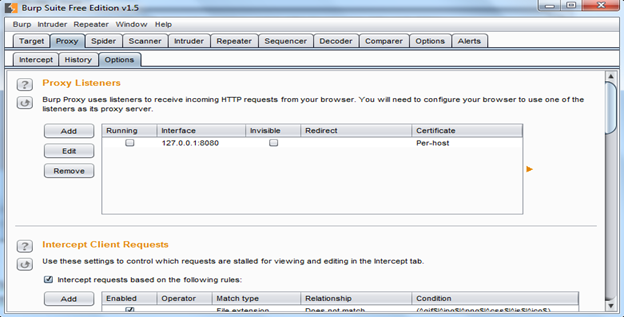
Img3: Options tab to configure settings
As shown in Img3, Burp Listen uses local host IP and 8080 port number by default. If you want to change the port or IP, click on Edit or just check the running checkbox to run the Listener as shown in Img4.
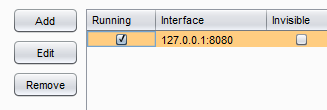
Img4: Start the Listener
We started the Listener but still we need to check a couple of things in the Options tab, such as Intercept Client Request and Intercept Server Response. By default, Intercept Client Request is enabled in Burp Suite Free Edition, and we can see that in the bottom part of Img3. But the Intercept Server Response is disabled by default, so we need to enable that as shown in Img5.
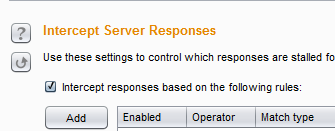
Img5: Enabling Intercept Server Response
Now Burp is ready to be integrated with the SoapUI. Open SoapUI. The initial creating project in SoapUI is discussed in the previous article. So I will not discuss the same again here. I will use the same URL http://www.testfire.net/bank/ws.asmx?WSDL to test Web services, and once you create a project for this WSDL file in SoapUI it will look like Img5.
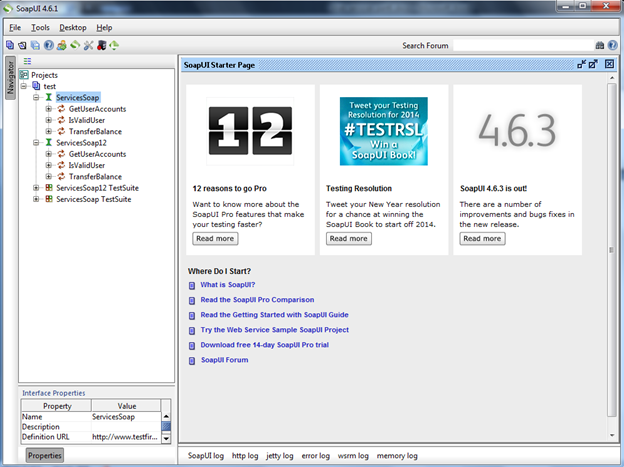
Img6: SoapUI window with all the methods of Web service
Now as everything is ready, to start with let's integrate the Burp Suite Free Edition with the SoapUI. To do so, you have to click on the Settings icon present in third position from right side in the left top corner on Img6, and you will get a new window as shown in Img7.
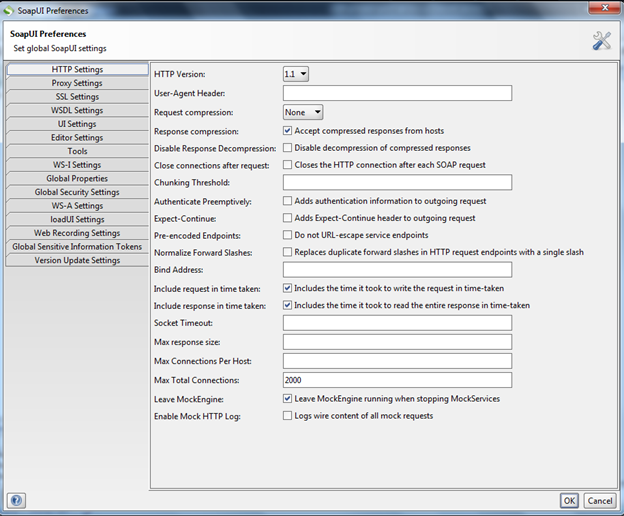
Img7: The settings window
To change the proxy settings, click on the Proxy Settings tab, and another new window opens as shown in Img8.
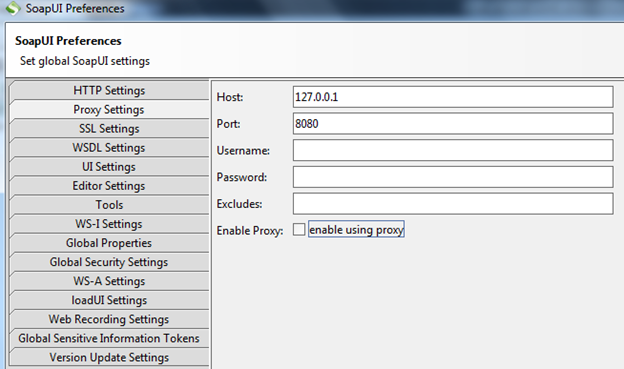
Img8: Proxy Settings
You can set your proxy listener IP and port number here, as in my case my proxy is running on 127.0.0.1:8080 I used the same. Then you can either enable using proxy from here or from the home page. Click OK and save the settings.
To enable the proxy, click on the proxy icon directly, this is present in the second position from right side in the left top corner of Img6. The icon in red means interception is off, and the icon in green means the interception is on. As shown in Img9.
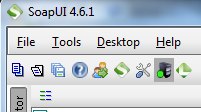
Img9: Proxy icon
Now the integration part is complete. Just check your Burp proxy if the intercept is on or not, if not just make that on, then go to the SoapUI to send a request to check whether both are integrated properly or not. So I will use "GetUserAccounts" method in SoapUI and change the value of the parameter "UserId" to one to generate a proper soap request and check if the request is getting intercepted by the Burp Suite or not, as shown in Img10.
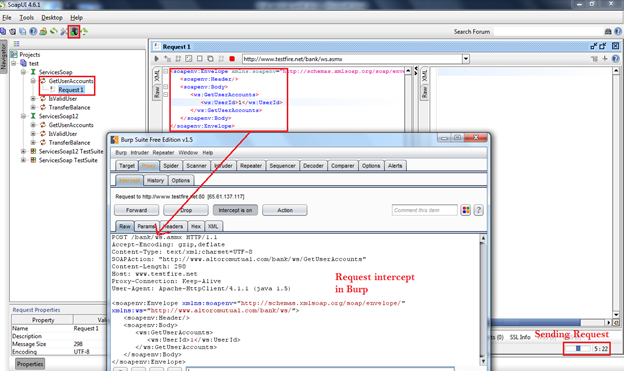
Img10: Burp Suite integration with SoapUI to intercept request
Testing the soap request with Burp Repeater
As we are able to integrate Burp Suite Free Edition with SoapUI successfully and able to intercept the request, now let's test for some test cases. First we need to send the request to the repeater as shown in Img11.
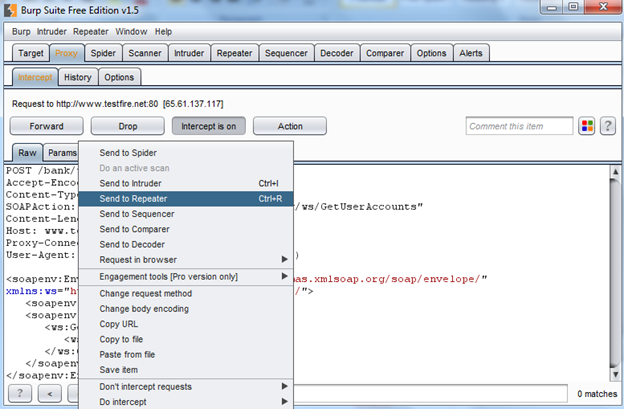
Img11: Sending request to Repeater
It's very simple, right click on the request and choose the option "Send to Repeater". Now go to the Repeater tab to check the response as shown in Img12.
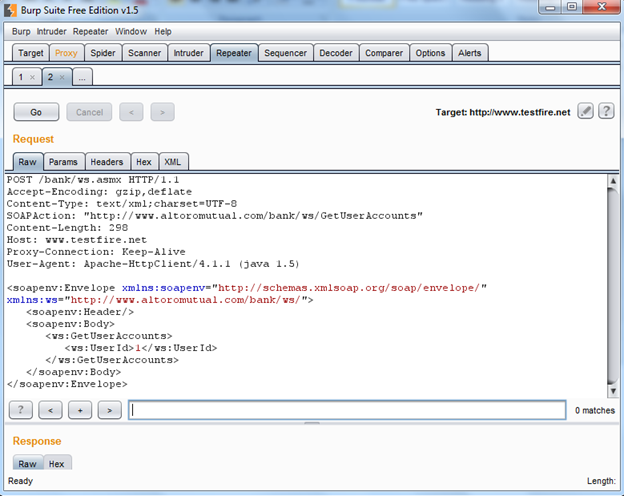
Img12: Request in Burp repeater
Now send that request to get the response and to check whether we are getting anything special or not, as shown in Img13.
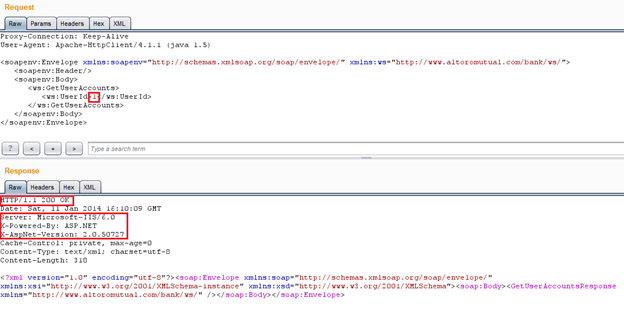
Img13: Soap Request and Response
As we can see in Img13, we have executed the soap request properly because we get a 200 OK response, but nothing interesting found in the body of the response. Though we get the version disclosed in the response header. What it states is that we used the proper data format; that's why it did not generated any error, so now we have to repeat the same process to get more information.
As the "UserId" is an integer type (As by providing an integer value it does not return any error, we can assume that it is an integer type parameter) or else by visiting the WSDL we can confirm it as shown in Img14.
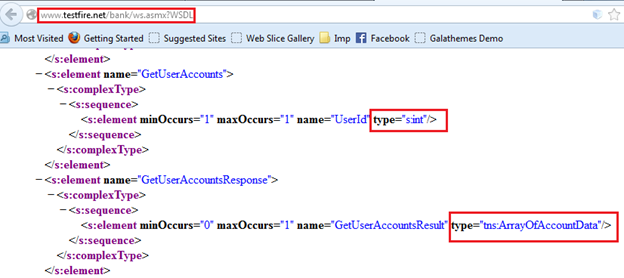
Img14: Data types of Request and Response
By looking at the WSDL file, we confirmed that the "UserId" parameter is an integer type parameter, and by providing a proper value we might get an array of account data. Now we need to fuzz the parameter to enumerate user data. To do so, send the request to the Intruder by right clicking on the request as shown in Img15.
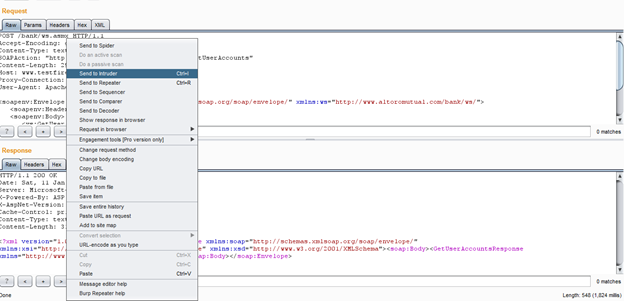
Img15: Sending request to intruder
By clicking on the Intruder tab in Burp, you will find following details as shown in Img16.
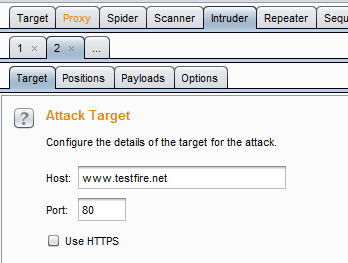
Img16: Target details of the request in intruder tab
Click on Position tab to select the proper position to fuzz or insert your payload as shown in Img17.
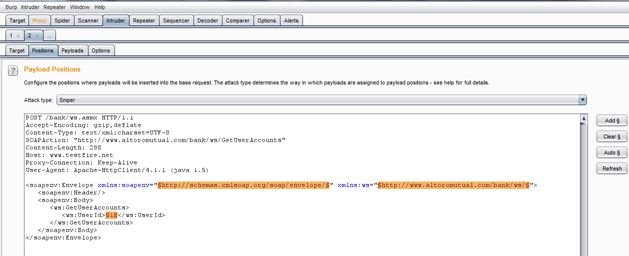
Img17: Positions to insert payload
The best thing about this Intruder is that it always auto selects all the possible insertion points present in a request. But in this case we only need to fuzz the "UserId" parameter, so now remove the other two selected options with the clear button present in the right side by selecting only those two as shown in Img18.
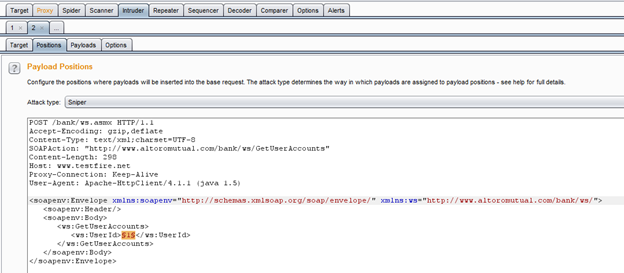
Img18: Selecting only the required parameter
Now move to the payload window to provide payloads as shown in Img19.
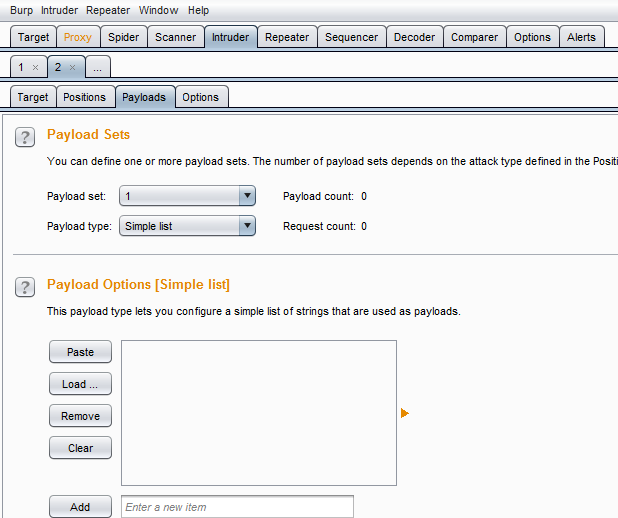
Img19: Payload window
We can specify the payloads manually by adding one by one, or we can create a list of payloads in a text file one below another and add it with the load option. Do whatever you want to do, but add some payloads as shown in Img20.
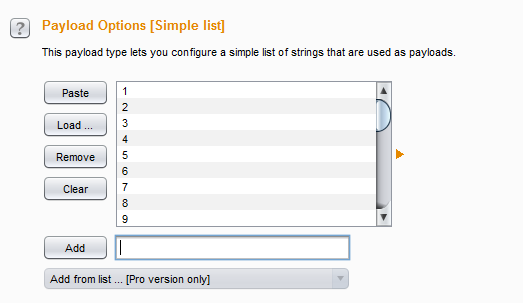
Img20: Specifying payloads
I inserted 1 to 30 to fuzz the "UserId" parameter and to check whether I am able to enumerate some user data or not. To do so, click on the Intruder menu in the top of your Burp Suite, and click on start attack as shown in Img21.
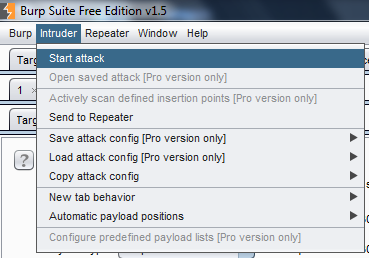
Img21: Start fuzzing with intruder
Now it will open an attack window to fuzz all the payloads in "UserId" parameter as shown in Img22.
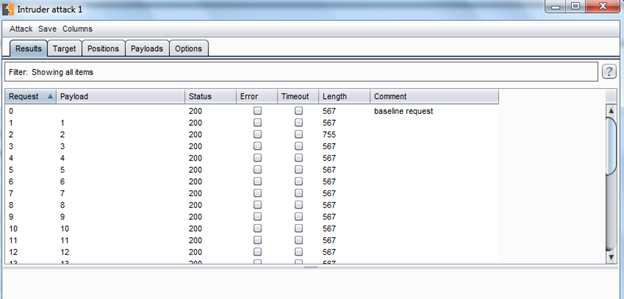
Img22: Summery of Intruder attack
Now it is a very important part of the Intruder, you need not to go to each and every request to check the response. Just check in this window that if the status code or content length differs from all in any request, if yes then we are interested in that request. You can see clearly in the second request that the content length increased from 567 to 755. Double click there to open a new tab and click on the Response tab to check that data as shown in Img23.
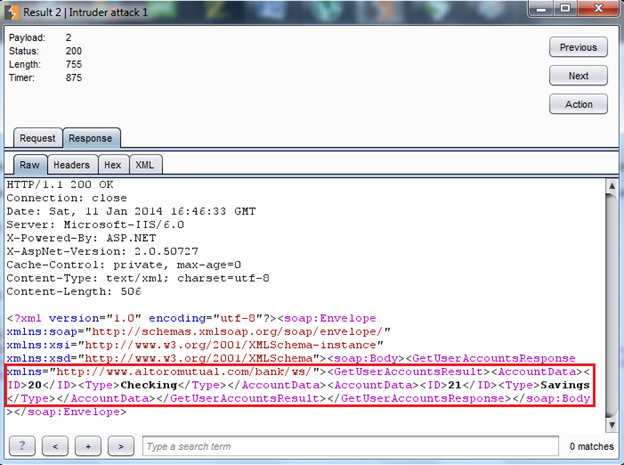
Img23: The intruder response
You can see in Img23 that we enumerated certain user details. It is very critical information disclosed here. We got a vulnerability called "Sensitive information disclosure". An attacker might use the information to create any other critical and sophisticated attack.
-
The user Id 2 is a valid user id.
-
It contains two accounts.
-
Account ID 20 is a checking account.
-
Account ID 21 is a saving account.
Conclusion:
We learned how to integrate Burp Suite Free Edition with SoapUI to fuzz different parameters of a soap request, how to configure Burp, and how to use different features like Burp Repeater and Intruder. And we also learned how to fuzz different parameters to collect different data or test some other test cases. In the next installment, we will cover how the sensitive information we got here leads us to other critical attacks and the challenges and limitations of Burp Suite Free Edition integration with the SoapUI tool.
Reference:

What should you learn next?
https://resources.infosecinstitute.com/burp-suite-walkthrough/


