SNMP pentesting
In the previous article about SNMP, we have discussed how to set up your own vulnerable lab where we have configured pfSense and VyOS with SNMP misconfigurations. You can find this article here.
In this article, we will discuss how to assess the security of hosts with SNMP misconfigurations from a penetration tester's viewpoint.

FREE role-guided training plans
In the previous article, we have set up two different scenarios where the first scenario consists of configuring VyOS as one of our target devices with SNMP misconfigurations. We have configured VyOS with "public" as its community string with "rw" authorization as shown below.
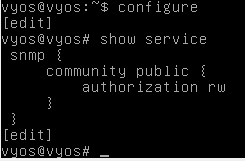
Following is the lab setup for testing these devices.
Information gathering with nmap
SNMP service runs on UDP port 161 by default. So, let's begin with scanning the target using nmap for port 161. This is shown below.
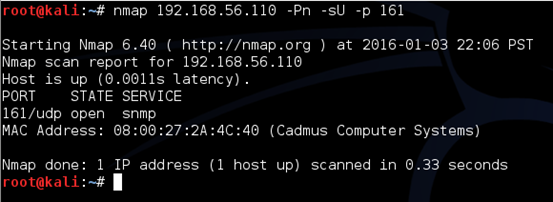
-sU is to specify that we are performing UDP scanning
-p is to specify the port
As you can see in the above figure, port 161 is open.
Let's add "-sV" flag to the previous command and perform service enumeration. This is shown below.
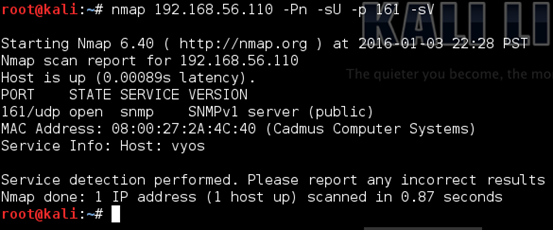
As we can see in the above output, the SNMP service version is v1, and it appears to have the community string public.
nmap NSE scripts
NMAP has a bunch of NSE scripts that can be used against hosts where SNMP service is running.
We can navigate to "/usr/share/nmap/scripts/" directory in Kali and do a "grep" on "ls" command's output to list out the SNMP nmap NSE scripts.
This is shown in the figure below.
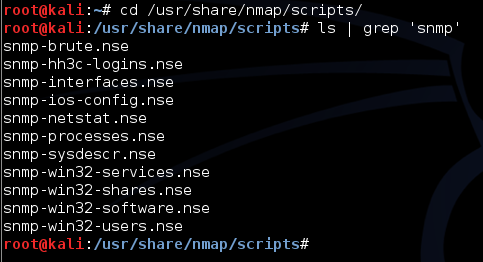
As we can see in the above figure, there are multiple NSE scripts for testing SNMP service. Let's use snmp-brute.nse to bruteforce the SNMP community strings.
We can use the nmap script using "--script" flag as shown in the figure below.
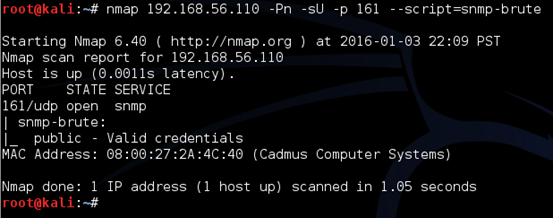
Nice! We have got SNMP community string as "public". Many devices come with default SNMP community strings as public, private, etc. These community strings are used as credentials to read and write SNMP information depending on the configuration. When an attacker, finds an SNMP community string, he can read lots of juicy information from the target machine if the configuration is read-only(ro). An attacker can also make modifications if the configuration is read-write(rw).
In a later section, we will identify what kind of configuration our target system has.
Now, let's run another NSE script "snmp-interfaces" to view the available interfaces on the target machine. This is shown below.
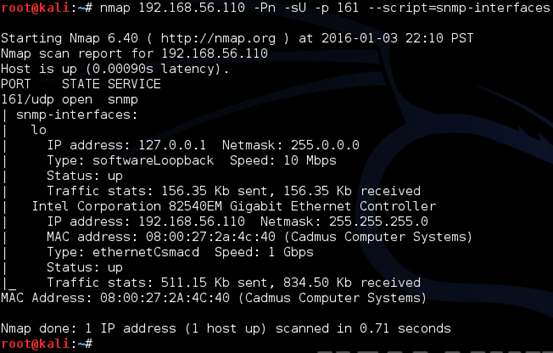
Nice! We can see that the target host has two interfaces one being the interface with the IP address we are using in our scans.
Similarly, we can use other NSE scripts available for SNMP testing.
Onesixtyone for the win
onesixtyone is another tool that can be used to bruteforce snmp community strings.
The following figure shows how we can use onesixtyone and brute force community strings.

In the above example, we are using the dictionary file from onesixtyone tool itself. As we can see in the above output, onesixtyone has found "public" community string.
Using snmpwalk
Snmpwalk is a popular tool for testing SNMP. This tool acts as SNMP client, and we can use it for our penetration testing where we require making requests to the SNMP service on the target host.
We can also use this tool to check if a specific community string exists or not. Let's try to see if "public" community string exists. We can send an snmp request to display the output on the terminal using "public" community string.
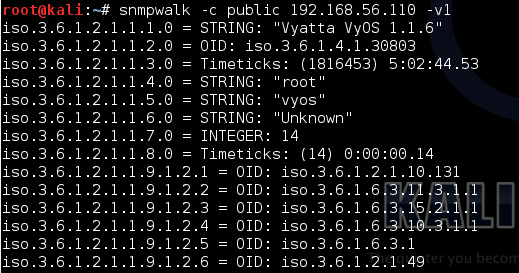
If "public" community string is supported, we will be able to see the output as shown in the above figure.
Now, let's try another community string "private". Let's send a request as shown below.

As you can see, there is no response from the target host as this community string is not supported. This is how we can determine if a specific community string is allowed or not.
Attacking SNMP service
This section shows how one can abuse a misconfigured SNMP host.
Let's use snmpwalk to extract the snmp data and display it on the terminal. The following command can be used to filter the value of sysName.

-c is to specify the community string
-v1 is snmp version
1.3.6.1.2.1.1.5 is used here to get the sysName value
As we can see in the above output, sysName is "vyos."
If the SNMP service is misconfigured with "rw" authorization, an attacker can modify these values using snmpset utility. The following figure shows how we can change the sysName value from "vyos" to "HACKED".

We can verify it once again using snmpwalk as shown below.


FREE role-guided training plans
As we can see, the value now has been changed. Similarly, we can change the values of any object.
Recommendations
- Disable SNMP service if it is not required.
- If SNMP service is required, make sure that the default community strings are made complex.
- Make sure that SNMP service is not misconfigured with read-write authorization.


