Practical thick client application penetration testing using damn vulnerable thick client app: An introduction
Though, thick client applications are not new, penetration testing process for thick clients is not as straight as Web Application Penetration testing. It is commonly seen enterprises using thick client applications for their internal operations. Even today, we can find a lot of legacy thick client applications being used by big companies.

FREE role-guided training plans
In this series of articles, we will learn various tools and techniques used to perform thick client application penetration testing by using a vulnerable application developed by the author. In this first part of this series, we will start with discussing the basics of thick client applications and learn the information gathering techniques by setting up a custom lab.
Thick client applications
According to Wikipedia, a fat client/heavy client/rich client/thick client is a computer (client) in client–server architecture or networks that typically provides rich functionality independent of the central server".
Though, web applications are ruling the world we still see thick client applications being used by a lot of computer users. Applications such as Gtalk is a classic example of thick client applications. Traditionally, thick client applications are developed using some of the following technologies.
- .NET
- C /C++
- Microsoft Silverlight
- Java applets etc.
Common thick client application designs
We usually see two types of thick client application designs as discussed in the following section.
2-tier applications
In this type of design, we typically see a client and a database communicating with each other. Most of the application processing will be done on the client side, and the database stores all the data processed by the client.
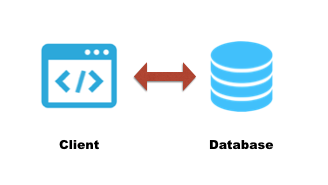
This design is considered as insecure due to various possibilities of gaining access to database credentials along with exploiting other traditional thick client vulnerabilities within the application.
3-tier applications
The 3-tier architecture is a client-server architecture, where it consists of 3 different tiers as shown in the following figure.
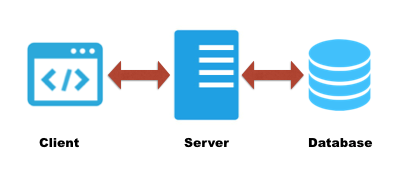
In this type of design, most of the processing is done on the server side and thus the risk is relatively lesser when compared to applications built using 2-tier architecture.
Setting up the lab
To learn the Thick Client Application Penetration Testing concepts by practicing, it is important to have a lab where we can practice everything in a legal environment.
Vulnerable Application Design:
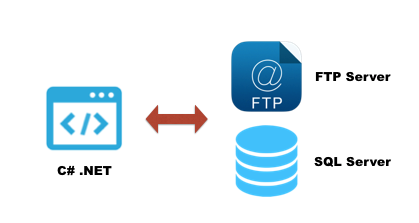
DVTA application is developed using C#.NET in Microsoft Visual Studio. This client communicates with SQL Server and an FTP Server that are running on the remote Windows host.
Tools Required to setup the lab:
- Virtual Box: Download Virtual Box and install it on your host machine.
- Virtual Box can be downloaded from https://www.virtualbox.org/wiki/Downloads
- Windows Machine 1:
- Create a new instance of Virtual Machine with Windows (Preferably Windows 7).
- Download Damn Vulnerable Thick Client (DVTA) application developed by the author from https://github.com/secvulture/dvta.
- The folder with compiled binaries can be found at https://github.com/secvulture/dvta/tree/master/DVTA/DVTA/bin/Release
Once downloaded, your application should look as shown following:
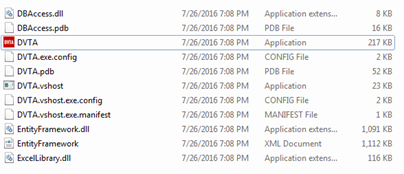
Note 1: This application requires .NET Framework v4.5 to be installed on the window machine.
Note 2: Instead of creating a virtual instance, you can also use your host machine as Windows Machine 1. But, creating a virtual instance is recommended.
- Windows Machine 2:
- Create another instance of Virtual Machine with Windows (Preferably Windows 7). This machine acts as a database for DVTA application. You need to download SQL Server 2008 express edition and install it in this virtual instance.
Following are the requirements to be met while installing the SQL Server. It is important to follow them if you are using the compiled binary.
Username: sa
Password: p@ssw0rd
After the installation is completed, create a database named DVTA.
Now, we need to create two tables in DVTA database as shown in the following figures.
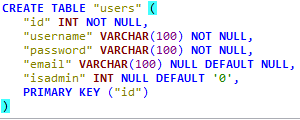
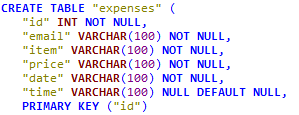
Finally, run the following SQL queries to insert data into the users table. These accounts can be used as test data while testing the application.
INSERT INTO USERS values('rebecca','rebecca','rebecca@test.com',0)
INSERT INTO USERS values('raymond','raymond','raymond@test.com',0)With this, SQL Server setup is complete.
- Download and install XAMPP and set up an FTP server using FileZilla available within XAMPP. Use the following credentials to a root directory of your choice (Make sure that the directory is writable).
Username: dvta
Password: p@ssw0rd
Note: Please note that the network settings in Virtual Box for both the machines should be as follows:
Adapter 1: NAT (for the internet)
Adapter 2: Host Only Adapter (To create a LAN).
The Windows Machine where SQL Server is running should have the IP 192.168.56.110 on Host Only Adapter (This is hard coded in DVTA Application, but you can recompile it if you wish to change).
Information gathering
Information Gathering is a crucial step in penetration testing. In this phase, we need to gather all the possible information about the target application.
Some of the common things that we need to do during information gathering phase of thick client penetration test are as follows.
Exploring the complete functionality of the application
It is essential to understand the complete functionality of the application during a pentest. So navigate through all the UI elements possible using the credentials provided (users: rebecca, raymond, admin). We will discuss the features and vulnerabilities of DVTA later in this series.
How is the application built?
Understanding how an application is built is useful in lot many ways, one of them is in reversing the binary. CFF EXPLORER can be used to identify the technology used to build the application.
Download the tool using the following link provided below.
http://www.ntcore.com/exsuite.php
Load DVTA.exe using CFF EXPLORER and you will find the details about the binary as shown in the following window.
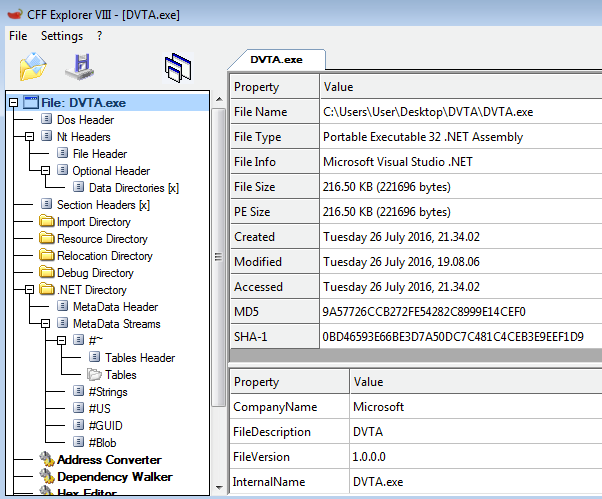
As you can see in the preceding screenshot, the binary is built using Microsoft Visual Studio .NET. This is good news for us as there are many .NET decompilers available out there to get the source code for further analysis if no obfuscation is implemented.
What are the servers the client is communicating with?
It is also essential to find out the servers that the application is communicating with, while it is running. This information can be useful to assess the security of the remote host directly that the application is communicating with. TCPView which comes with Sysinternals suite can be used to view the connections between the remote host and the local machine.
Sysinternals suite can be downloaded using the following link:
https://technet.microsoft.com/en-us/sysinternals/bb842062.aspx
To view the connections, launch TCPView and run the application.

As you can see in the screenshot, the test application DVTA is communicating with the remote host which has the IPaddress 192.168.56.110.
Another way of finding out the same information is to use "Wireshark." We can use it for capturing the packets while the application is running. Download Wireshark using the following link:
https://www.wireshark.org/download.html
Run Wireshark and capture the packets on Host Only Adapter's interface while the application is running.

The preceding window shows that the local machine is making communication with the remote host 192.168.56.110.
Files being accessed
Applications might access files on the filesystem to read/write sensitive data from/to those files while the application is running. For this reason, it is important to understand which files are being accessed by the application. We can use Process Monitor from Sysinternals suite to accomplish it.
Run process monitor and apply a filter as shown in the figure below.
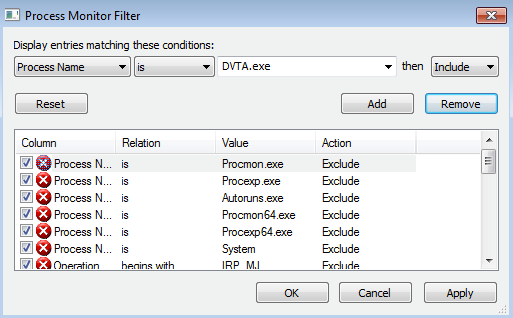
After applying the above filter, run DVTA application once using the test credentials. This will provide us all the actions performed by DVTA. Now scrolling down through the results, we can see the following entries in process monitor where the application is accessing some registry keys.
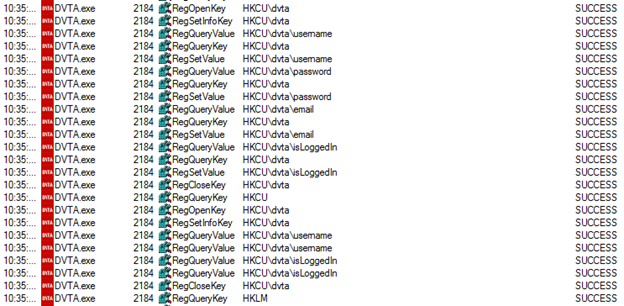
The application appears to store/retrieve user credentials within the registry. This is an interesting piece of information, which needs to be explored further. We will discuss more about data storage issues later in this series.
Any interesting files bundled with the application?
Sometimes, searching for the application directories may also provide us valuable information such as config files to proceed further with the assessment.
So let's see if we can find anything interesting in DVTA's current folder.
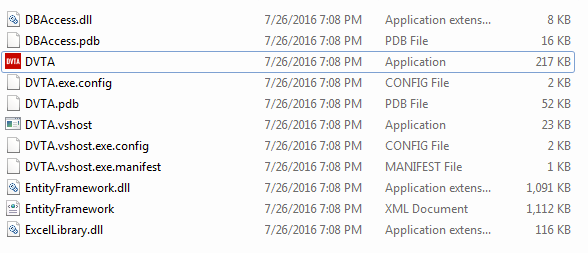
The preceding figure shows the current directory where DVTA and all its dependencies are located. If you closely observe, there is a config file with the name DVTA.exe.config.
Open it using any text editor of your choice.

Interesting! As you can see in the above figure, we have got interesting information from the config file which is located within the DVTA folder. Typically, this information is used by the application to connect to the database by forming a connection string. Though the database password is encrypted, there are multiple ways to get the clear text password. Decrypting the encrypted password using AES key and IV found in the config mentioned above file is one way to do it. We will discuss more about the concept of obtaining clear text database password in later articles.

What should you learn next?
Conclusion
In this article, we have set up a lab to practice thick client application penetration testing and then we discussed various information gathering techniques. In the next article, we will discuss traffic interception techniques for thick client applications.


