Gaining Shell Access via UART Interface Part 2
This is the 2nd post in IoT-Hacking-Shell-via-UART series. I hope you have gone through the first part. If not, please go through it.
In this post, I will cover Baud Rate, lab setup for performing UART exploitation and how one can identify UART pins for exploitation. This part aims to cover the remaining theory of UART exploitation, and the practical aspect of UART exploitation will be covered in next part.

FREE role-guided training plans
Let's Continue.
Baud Rate – Baud Rate is the speed/rate at which two devices communicate with each other over UART Interface. At the hardware level, all the communication and data transfer is handled using clock cycle. Since there is no concept of the clock cycle in UART; all the communication is handled using Baud Rate. Let's try to understand Baud Rate in simple words. When there is no clock cycle, two devices are programmed in such a way that they will exchange and share data with each other at a particular speed. This speed is technically termed as Baud Rate. If the Baud Rate of both the device is same, they can understand what is being shared between them else they do not understand what is being sent or received and cannot communicate. Thus, knowing Baud Rate beforehand is of utmost importance.
Common Baud Rates used in serial communication are 4800, 9600, 19200, 38400, 57600, 115200, etc. To identify the correct Baud Rate, widely a script written by Craig Heffner is used. The script is named as baud rate.py. The file/script can be downloaded at https://github.com/devttys0/baudrate/blob/master/baudrate.py. This script allows us to change the Baud Rate to a different value while maintaining the existing serial connection with another device.
Tools and Software Needed – To perform UART exploitation, following tools and Software along with their explanation is mentioned below –
- Camera – We need a live device to perform UART exploitation. UART Exploitation will be performed on this camera.
- Multimeter – For identifying various pins like GND, Tx, Rx, and Vcc. A multimeter is an all-in-one device which can measure Voltage, Current and Resistance. Multimeter = Voltmeter + Ammeter.
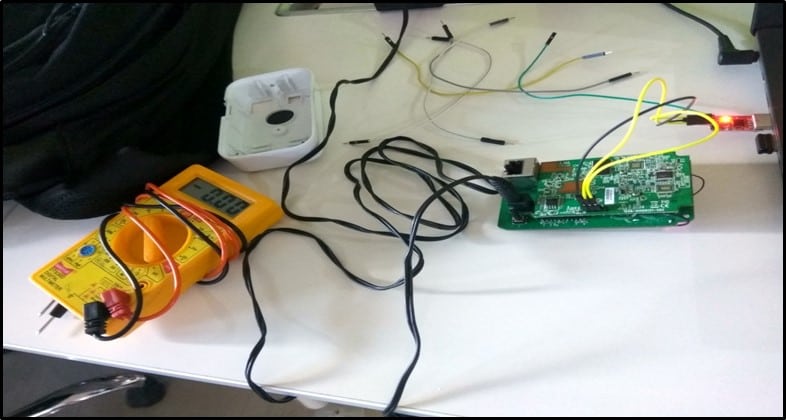
- USB-TTL or BusPirate – For connecting the camera and the laptop for monitoring everything. UART pins of the camera must be connected to the laptop for monitoring the serial communication which happens when the device boots up. To achieve this, UBS-TTL or BusPirate is used. One end of UBS-TTL or BusPirate goes to a laptop in the form of USB, and the other end is connected to the camera as shown below –

I am using UBS-TTL. One end is connected to the laptop as shown and another end to the camera as shown above.
- Headers and Jumper Wires – For connecting Camera and USB-TTL/BusPirate as shown above.
- Baud rate Script – For identifying Baud Rate. The importance of Bud Rate has been already discussed.
- Minicom – For monitoring and communicating with Serial Communication. Minicom is software which helps us in monitoring and reading all the communication which happens when the device boots up. It is in minicom we feed baud rate and using the baud rate, minicom tries reading the communication. If the baud rate is correct, we read everything in plain text else we get garbage value. I hope this is clear.
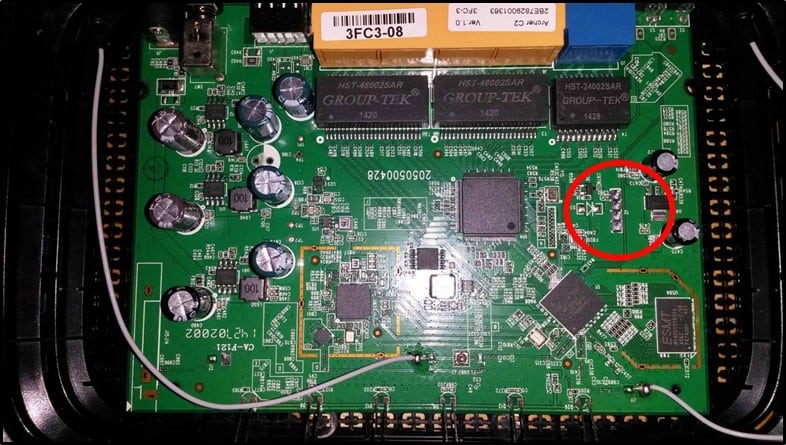
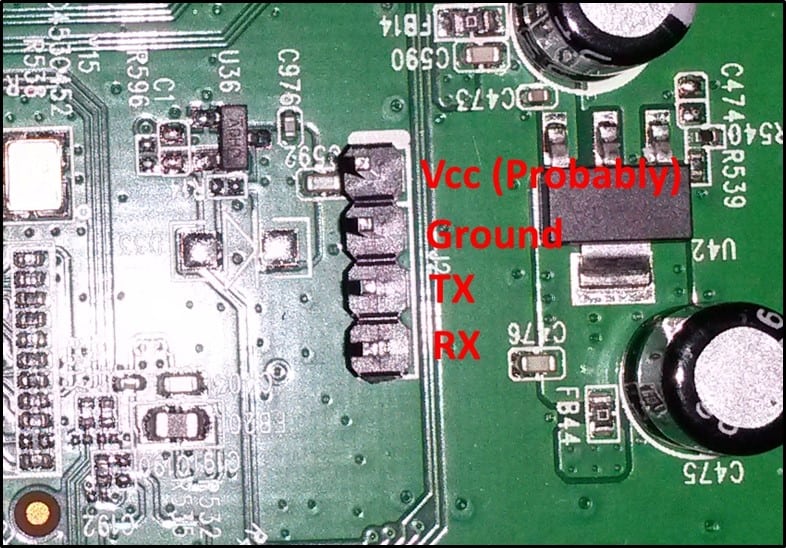
Identifying UART Pins – The best way to identify UART pins on any circuit is to look for 3-4 pins together or next to each other on the circuit board. Here are some of the pics showing UART pins –


These pictures will give you a small idea of identifying UART Pins. Once you have identified the UART Pins, one should identify GND, Vcc, Tx and Rx pins. It can be easily done using Multimeter and few sets of wires.
Procedure for UART Exploitation – This section explains the procedure for UART Exploitation. Using this procedure, one can easily monitor and log all the communication which happens when the device boots up.
Steps –
- Open the Device and have a look at the various components of the board.
- Have a look at the whole circuit to identify UART pins. One of the tricks is to look for 3-4 pins next to each other as shown in the image above.
- If you come across UART pins, using multimeter try identifying GND, Vcc, Tx and Rx pins.
- Once the pins are identified, connect the GND of the device to the GND of USB-TTL/BusPirate, Rx of the device to the Tx of USB-TTL/BusPirate, Tx of the device to the Rx of USB-TTL/BusPirate.
- Run Baudrate.py for identifying the correct Baud Rate. Note down the correct Baud Rate.
- Once the baud rate has been identified, run minicom and feed the identified baud rate to minicom.
- Start the device and monitor the communication which happens when the device boots up.
I know it was hard to grasp the steps mentioned above. All the steps mentioned will be performed practically in the next part on the live device.
That's it for this part. In the next part, I will explain how to perform UART Exploitation on a camera. Also, I will show the steps followed for gaining shell access on the camera.
Thanks.
References
http://www.devttys0.com/2012/11/reverse-engineering-serial-ports/

FREE role-guided training plans


