Android Application Penetration Testing: Setting up, Certificate Installation and GoatDroid Installation

To begin with mobile application penetration testing on the Android platform, we have multiple tools available that can be easily downloaded and installed to prepare the environment testing.These tools will help us to set up a virtual device serving as a smart phone using Android and the mobile application that is installed will undergo security testing.
In this article we will discuss:
What should you learn next?
- Setting up the emulator
- Setting up the proxy (Burp Suite)
- Installing the certificate
- Installing the test application (Goatdroid).
Setting Up the Emulator
The Android SDK can be downloaded from the following link: http://developer.android.com/sdk/index.html. Depending on what operating system you are working on, you can download it for Linux or Windows. I will be using Windows 7 for the demonstration.
After downloading it, you can extract the bundle and, as you can see, inside the bundle there are SDK manager.exe and other folders. Right now, we want to set up an emulator, so we will launch Android SDK manager to create our AVD (Android virtual device); this will be our virtual Android phone, on which we will be installing apps.

After launching the Android manager, go to Manage AVDs and add new. You can create a new AVD by giving it a name like Myandroid. You can select any device; I have selected it as Nexus 4. Select the target as the Android version that you are interested in. Other options are very clear and you can select accordingly. You can assign RAM and make sure to give some space for an SD card, as it will be useful later on in this post. Also, don't forget to select the snapshot option so it will save the state of the AVD.

As you can see, MyAndroid appears in the list of AVDs and it is ready for use. Let us start the device.

The virtual device is launched, as we can see the Nexus 4 virtually.

To test the mobile that will be installed in this emulator, we will need an intercept proxy like Burp Suite to capture the requests/response. I am using the free version of Burp Suite for this demo. First, we will configure Burp Suite to listen on external interfaces. In Proxy → Options → Proxy Listeners → Edit → Binding select "Specific address" or you can also select it to listen on "All interfaces." This will allow the virtual device to connect to Burp Suite.

To connect to Burp Suite inside the virtual device, go to Settings → Wireless and networks → more →VPN → Mobile networks →Access Point Names → Select the default APN of the device and Edit Access point. Set the proxy and port as the IP of the main system and the port on which Burp is running. Refer to the screenshot below:

This will allow Burp Suite to intercept all the requests generated by this virtual device. As you can see in the screenshot below, when we launched the browser, the request generated to Google was intercepted by the Burp Suite proxy in the middle, which confirms that our settings are correct and are working fine.

Also, you may notice that, when we browse a site hosted over HTTP, it generates a pop-up notifying us that the connection is untrusted.

To avoid this pop-up every time we browse a site hosted over HTTPS, we will install the Burp certificate in the device so that browser of the VD will trust the Burp Suite and will smoothly allow the communication. This will save our time while we perform security testing. To install the Burp Suite certificate, first we will import it.
Let us browse any web application hosted over HTTPS from the browser of our main system (Firefox, in my case), which has a proxy configured as Burp Suite. Please note that I have configured my Firefox browser to use Burp as proxy by changing the settings at Tools → Options → Network → Settings → Manual Proxy configuration. Refer to this screenshot:

As you browse the website, the browser will generate the alert saying the connection is untrusted. Click on "Add Exception" and then you can go to the "View." To import the certificate, see the "Details."
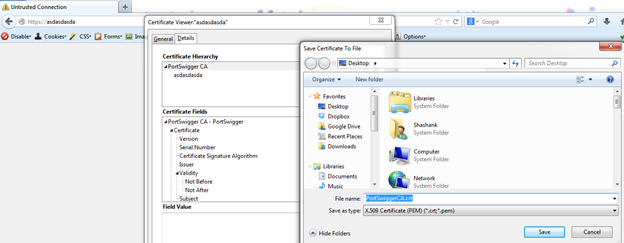
You can select "PortSwigger CA," export it, and save it on your system. The saved certificate will be in the .crt format.

Our next task is to install this certificate in the virtual device. Let us first push this certificate inside the virtual device. Here we will be pushing the certificate into the SDcard. One way to push it is by using the "adb push " command to transfer the certificate to the sdcard of the VD.

As we see in the sdcard folder, the PortSwiggerCA.crt is successfully saved.

So our certificate is inside our virtual device. Now it is time to install the certificate. Go to Settings → Security → Install from SD card.
After clicking OK, the PortSwiggerCA certificate will be successfully installed.

Also to verify the installation, Go to Settings → Security → Trusted Credentials. You can see in USER that the installed certificate is successfully displayed.

So we are all set for mobile app penetration testing.
The next step is to install the application in the virtual device that will undergo security testing. The test application we will be using is Goatdroid (https://www.owasp.org/index.php/Projects/OWASP_GoatDroid_Project) by owasp.
The application can be downloaded from the following link:
https://github.com/downloads/jackMannino/OWASP-GoatDroid-Project/OWASP-GoatDroid-0.9.zip
This Android application is purposefully made vulnerable for educational purposes. We will be pushing this application in the AVD. Let us download this zip file and extract the contents.

Let us have a look what it contains.
goatdroid_apps contains two vulnerable apps:
- FourGoats
- HerdFinancial
We will be installing these two apps in the AVD. Also, goatdroid-0.9.jar will launch the server for these two apps to communicate with.
Let us launch goatdroid-0.9.jar:

You can specify the location of the virtual device and the SDK path in order to identify the virtual device that this application is going to access. As you can see, it can also push the apk files (FourGoats and HerdFinancial) into the virtual device and install these vulnerable apps. Just make sure that the path specified for the virtual device and SDK path is correct.
Let us push the app into the device.

And, as you can see, the app is successfully installed in the device and will be displayed in the VD.

Start the web service, as we are going to log in to the FourGoats. Let us first provide some destination info to the FourGoats application, to access Burp Suite (IP 192.168.4.9 port 8082) and the port on which the web service will be accessed(9888).

What should you learn next?
Now you are set to log in. Use the username goatdroid and password goatdroid and you are ready to test this application, with a successful login and Burp Suite in the middle to capture and modify the request. In the same way, you can push the other app, HerdFinancial, and test it.


- 12 pre-built training plans
- Employer-requested skills
- Personalized, hands-on training
In this series
- Android Application Penetration Testing: Setting up, Certificate Installation and GoatDroid Installation
- CompTIA CySA+ Salary: What to expect in 2025
- How to become a cybercrime investigator
- CEH version comparison: V12 to V13 evolution guide
- SecurityX (CASP+) certification: Overview and career path [2025 update]
- Network+ certification: Overview and career path [2025 update]
- ISC2 CSSLP certification overview: What you need to know
- ISC2 CGRC: Overview & career path
- CRISC certification: Overview & career path [updated 2021]
- PMP certification: Overview and career path [updated 2021]
- ISACA CDPSE certification: Overview of the new ISACA privacy certification
- CGEIT certification: Overview and career path [updated 2021]
- What is a cyber range?
- Microsoft azure certification: Overview And career path
- CEH salary guide: What Certified Ethical Hackers really earn
- Average SecurityX (CASP+) salary [2025 update]
- CompTIA Network+ certification — A 2025 salary analysis
- CompTIA CySA+ exam (CSO-003): Your guide
- CCSP salary: How much can you make as a cloud security professional?
- Average Security+ salary (2025): Your guide to a prosperous cybersecurity career
- Average CGRC (Certified in Governance, Risk and Compliance) salary
- CRISC Frequently Asked Questions (FAQ) [updated 2022]
- Average CSSLP Salary in 2021
- ISACA CDPSE exam details and process
- How To Become CGEIT Certified – Certification Requirements [updated 2021]
- How to pick the best cyber range for your cybersecurity training needs and budget
- CEH exam eligibility: Application process & requirements guide
- SecurityX (CASP+) frequently asked questions (FAQ) [2025 update]
- CISSP domains overview: Your complete preparation guide
- CCSP exam and CBK changes in August 2024
- Comprehensive guide to CompTIA Security+ domains (2025)
- Average CRISC Salary [2023 update]
- CGRC certification job titles and career outlook
- ISC2 CSSLP exam details and process
- ISACA CDPSE certification exam: Overview of domains
- An Introduction to the PMP: Exam Details and Process [updated 2021]
- CGEIT certification exam: overview of domains [Updated 2021]
- 10 Success Tips: How to Pass Your Certified Ethical Hacker (CEH) Exam
- Network+: Exam details and process [2025 update]
- SecurityX (CASP+): Exam details and process [2025 update]
- How to become CCSP certified: Certification requirements
- Certified in Risk & Information Systems Control (CRISC) Exam Overview [updated 2022]
- ISC2 CGRC exam details and process
- Best CSSLP study resources and training materials
- ISACA CDPSE domain 1: Privacy governance
- 10 Tips for PMP Certification Exam Success [updated 2021]
- CGEIT certification exam details and process [updated 2021]
- Certified Ethical Hacker (CEH) study guides & resources [updated 2025]
- CompTIA SecurityX resources: Videos, books, tests and more!
- How to get the CompTIA Network+ certification: Requirements and step-by-step instructions [2025 update]
- CySA+ exam objectives: The 4 domains that will be covered
Get certified and advance your career!
- Exam Pass Guarantee
- Live instruction
- CompTIA, ISACA, ISC2, Cisco, Microsoft and more!
CompTIA CySA+
Discover the latest salary trends for CompTIA CySA+ certified professionals in 2024. Learn what factors influence your earning potential in the cybersecurity field.

Cybercrime investigator
Cybercrime has hit record levels, with an expected $7 trillion USD to be made from cybercriminal activity by 2021. Investigating these sorts of crimes can be

EC-Council CEH
CEH v13 is the world's first AI-powered ethical hacking certification. Discover what's new, how it compares to v12/v11 and why it's a career game-changer.

CompTIA SecurityX
Explore the expert-level CompTIA SecurityX certification, what to expect on the exam, the career benefits and more.
