Computer Forensics with P2 Commander
Introduction
Computer Forensics is the methodical series of procedures and techniques used for procuring evidence from computer systems and storage media. This evidence can then be analyzed for relevant information that is to be presented in a court of law. Computer Forensics has frequently been listed as one of the most intriguing computer professions, however beginners may find themselves overwhelmed quickly, as practical step-by-step procedures on this subject may be hard to come by.
This paper seeks to address IT professionals who are interested in Computer Forensics Investigations. However, registry hives explored in this case study hold a plethora of information that would be of use to everyone. To keep things interesting and practical, we will be simulating a 'real-life' scenario where you will assume the role of a forensics investigator and attempt to locate incriminating digital evidence in the disk. While doing so, here is what you will learn:
-
How to obtain and replicate evidence disks (Acquire)
-
How to verify the integrity of the evidence media (Authenticate)
-
How to search for relevant information in the evidence disk (Analyze)
-
How to explore the Windows registry hive structure and why it holds relevance to Computer Forensics Investigations
Scenario: A complaint was made to the authorities describing alleged Wi-Fi hacking activity. When the authorities arrived on the spot, they found a Dell laptop and an Alfa Card (wireless USB adapter) abandoned in the vicinity. Witnesses recall seeing a person with such equipment lingering in the vicinity of Wi-Fi access point. This abandoned equipment is seized as possible evidence.
Role: Computer Forensics Investigator
Purpose: Locate inculpatory or exculpatory evidence in the disk so that it may be presented in a court of law.
Evidence Disk: The seized Dell laptop disk can be downloaded here: part1 and part2. A 'dd' copy can be downloaded here: 1, 2, 3, 4, 5, 6, 7, 8
Tools used: The tool we have chosen for the purposes of this investigation is Paraben's 'P2 Commander', however you are free to use other tools of your choosing ('EnCase', 'FTK', 'Prodiscover', etc).
Tasks performed: During the course of investigation, analysis of the evidence would require performing the 12 basic tasks of computer forensics:
-
Generating an image hash and confirming the integrity of the image
-
Determining the Operating System used on the disk
-
Determining the date of OS installation
-
Determining the registered owner, account name in use and the last recorded shut down date and time
-
Determining the account name of the user who mostly used the computer and the user who last logged into it
-
Determining the hacker handle of the user and tying the actual name of the user to his hacker handle
-
Determining the MAC and last allocated IP address of this computer
-
Locating the programs installed in this computer that could have been used for hacking purposes
-
Collecting information regarding the IRC service that was used by the owner
-
Searching the Recycle Bin for relevant information
-
Listing the Newsgroups that the owner of the computer has registered to
-
Determining the SMTP email address in use
Obtaining and replicating evidence disks
As a forensics investigator, when you arrive at the crime scene, it is your foremost responsibility to acquire evidence without contamination. In the case of digital media, you need to ensure that the evidence disk is not corrupted in any manner. If the computer in question is turned off, seize it (and any other peripherals in the vicinity). However if the computer is turned on:
-
Take pictures of the computer screen using a high resolution camera; if any windows are minimized, it is OK to maximize them and take pictures.
-
For precautions, write down the contents of these windows.
-
Often proper shutdown procedure should be used to turn off the computer but volatile (RAM) data may be lost after shutdown; if in doubt, take a senior's advice on what procedure would be best.
Before starting any kind of analysis, make sure you have made at least two bit-by-bit copies of the evidence media. It is suggested that the two copies be made using different tools. If one copy fails, having another copy will be worth the effort. Hardware write-protectors may be used to ensure that the integrity of the original evidence disk is preserved at all times.
Acquiring an image of the evidence disk (Acquire)
To acquire an image of the disk in we will use the 'dd' command, in the following manner:
In Linux:
dd if=/dev/hda of=/home/user/Wireless_Hacking_Case.dd bs=512 conv=noerror,sync
In Windows:
dd.exe if=.PhysicalDrive0 of=C:Pranshu_Case_ImagesPhysicalDrive0.img --md5sum --verifymd5 --md5out=C:Pranshu_Case_ImagesPhysicalDrive0.img.md5
Note: Here, 'if' refers to input file; 'of' refers to output file; '/dev/hda' is the physical drive. Read more about the 'dd' command here.
Investigating 'New Case' and 'Adding Evidence' in P2 Commander
Click 'New Case' [Figure 1]
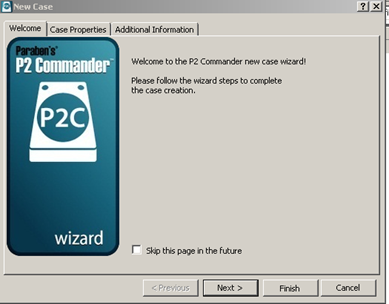
Figure 1
(Enter Details of the Case) [Figure 2]
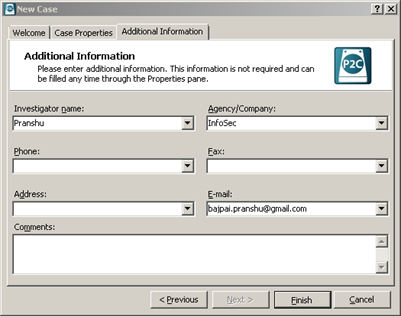
Figure 2
Click 'Add Evidence'->Choose 'Image File'->'Auto-detect Image' [Figure 3]
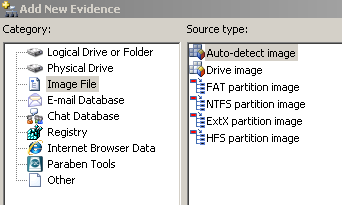
Figure 3
Now load the Evidence Disk Image that you have downloaded earlier.
Note: Paraben's P2 Commander has a lot of windows where it displays relevant information about the case evidence. [Figure 4]
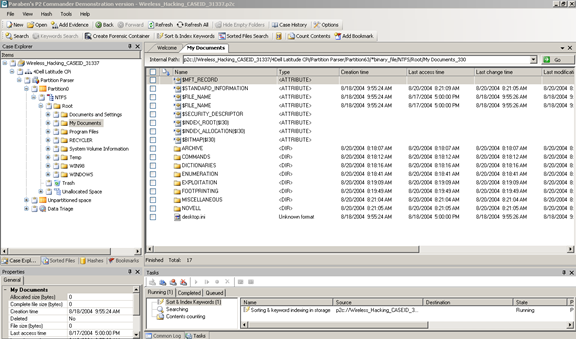
Figure 4
Generating a hash value of the evidence media
Before commencing Analysis of the evidence media, it is mandatory to ensure that integrity of evidence is preserved. So for Authentication purposes, we generate a hash value of the media. As you probably know, this hash is a one-way function that serves to detect any modifications in the data. Therefore, if even a single bit is flipped in the evidence media (corruption), the hash value would differ and the corruption would be detected.
To generate a hash value using P2 Commander, follow these steps:
Right click a file and click 'Add MD5 to hash database'. [Figure 5]
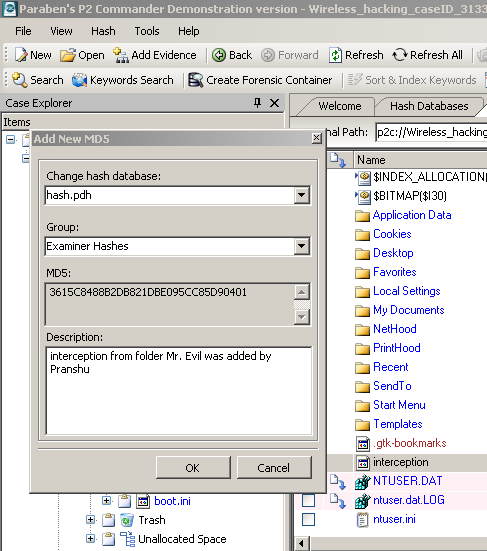
Figure 5
You will notice that these hashes get added to the hash database of your choosing (in this case, 'hash.pdh'). [Figure 6]

Figure 6
Matching the Acquisition Hash to the Verification Hash (Authenticate)
Before commencing any future investigations or analysis, hash value should be verified. The investigator would generate a hash of the evidence media (called the Verification Hash) and match it with the Acquisition Hash.
Beginning Analysis of the evidence media (Analyze)
Now the investigator begins the process of locating inculpatory or exculpatory evidence in the disk.
Note:
Inculpatory evidence proves that the suspect is guilty of the crime while Exculpatory evidence proves that he/she is innocent of it.
Note: At this point it is important to discuss: What are 'hives'? Hives are hierarchical structures where Windows stores a wealth of information. You have probably used 'regedit' in Windows to do some minor Registry tweaking and have seen the 5 root keys (hives). These are:
- HKEY_LOCAL_MACHINE (HKLM)
- HKEY_CURRENT_CONFIG (HKCC)
- HKEY_CLASSES_ROOT (HKCR)
- HKEY_USERS (HKU)
- HKEY_CURRENT_USER (HKCU)
The locations of keys and sub-keys within these hives may differ depending on the version of the Operating System in use. As we move with the 'Analysis' part of the investigation, the importance of these hives will become clear to you.
Determining the Operating System used on the computer
Although as soon as we view the files and folders on the evidence disk it becomes clear that a Windows OS was in use, we can know the exact version [Figure 7] at the following path:
WINDOWS/SYSTEM32/CONFIG/SOFTWARE/MICROSOFT/WINDOWS NT/CURRENT VERSION/PRODUCT NAME
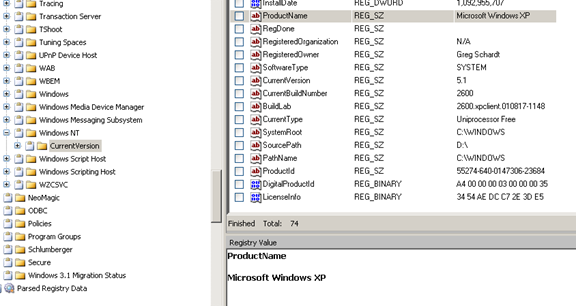
Figure 7
OR
C:/boot.ini
Note: In P2 Commander, you would have to expand 'config->software' and then expand '$DATA' and then 'Registry File'. This would take you to '…/MICROSOFT/WINDOWS
NT/CURRENT VERSION/' [Figure 8]
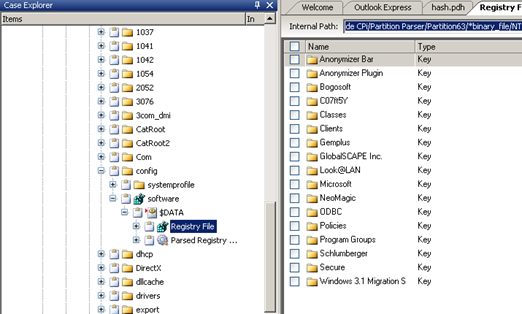
Figure 8
Determining the date of installation
This information can be uncovered from the following path [Figure 9]:
WINDOWS/SYSTEM32/CONFIG/SOFTWARE/MICROSOFT/WINDOWS NT/CURRENT VERSION/INSTALL DATE
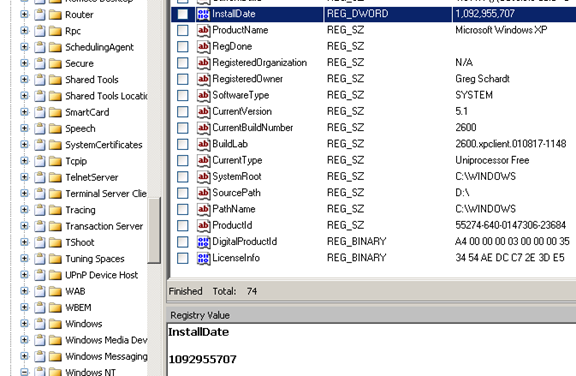
Figure 9
Determining the Registered owner of this computer
This information will help us determine the actual name of the criminal (if the crime is proven). [Figure 10] It can be uncovered at the following path:
WINDOWS/SYSTEM32/CONFIG/SOFTWARE/MICROSOFT/WINDOWS NT/CURRENT VERSION/REGISTERED OWNER
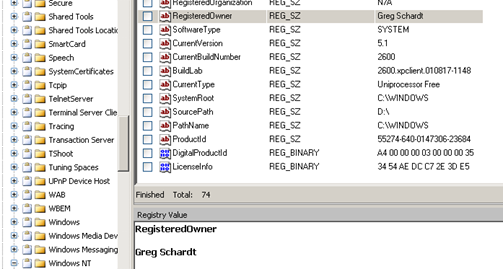
Figure 10
Determining the default domain name
This information can be uncovered at the following path [Figure 11]:
WINDOWS/SYSREM32/CONFIG/SOFTWARE/MICROSOFT/WINDOWS NT/CURRENT VERSION/WINLOGON/DEFAULT DOMAIN NAME
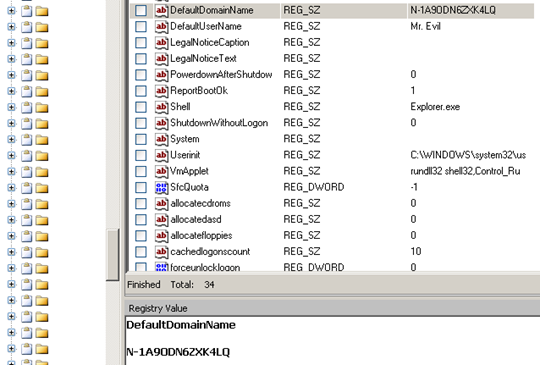
Figure 11
Determining the default user name
This information would help us determine the username that is used to log into this computer. It can be located at the following path [Figure 12]:
WINDOWS/SYSTEM32/CONFIG/SOFTWARE/MICROSOFT/WINDOWS NT/CURRENT VERSION/WINLOGON/DEFAULT USER NAME
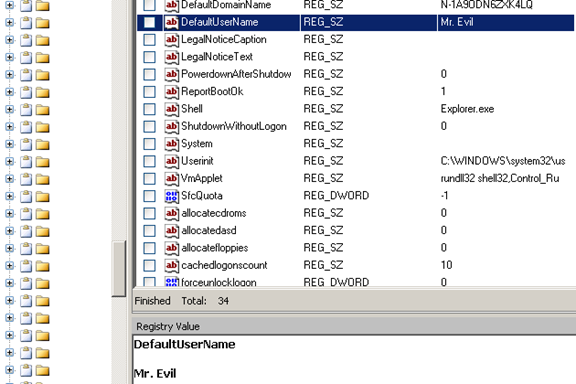
Figure 12
Determining the time and date of when the computer was last shutdown
This information can be uncovered at the following path [Figure 13]:
WINDOWS/SYSTEM32/CONFIG/SOFTWARE/MICROSOFT/WINDOWS NT/CURRENT VERSION/PREFETCHER/EXIT TIME
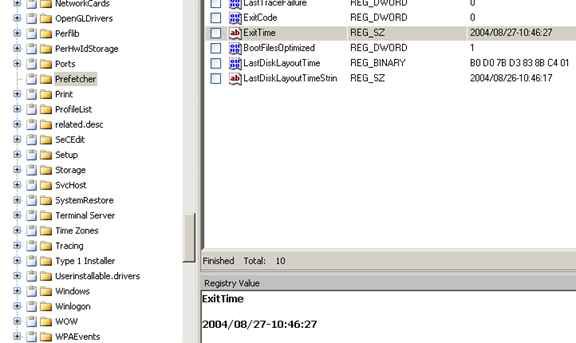
Figure 13
Determining the total number of accounts present on this computer
A total of 5 accounts were found [Figure 14]. This information can be found in the SAM file:
SAMSAMDomainsAccountUsersNames
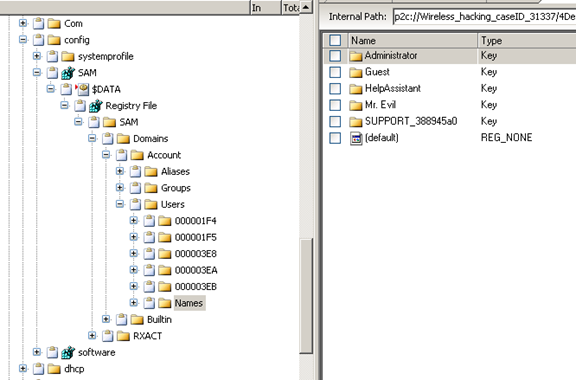
Figure 14
However, 4 of them are default Windows accounts and were never used. The one account mainly used, was that of 'Mr. Evil'. This information is suggested by the sub-keys found under 'Users' at the following path:
SAMSAMDomainsAccountUsers
Determining the last user who logged onto this computer
The system will obtain the last user who logged on from the key 'DefaultUserName'. This information can be uncovered from the following path [Figure 12]:
WINDOWS/SYSTEM32/CONFIG/SOFTWARE/MICROSOFT/WINDOWS NT/CURRENT VERSION/WINLOGON/DEFAULT USER NAME
Tying the Hacker's 'Handle' to his real name
We have seen above that the owner of this computer is 'Greg Schardt' and his username is 'Mr. Evil'. Now to prove that Greg Schardt is Mr. Evil, we need to perform extensive searches for files that may provide the needed evidence. In this case, we found the following file to be of aid:
C:Program FilesLook@LANirunin.ini

Figure 15
This file would help tie Greg Schardt to his hacker handle of 'Mr. Evil'. [Figure 15]
Determining the network card that was used on this computer
This information can be uncovered from the following path:
WINDOWS/SYSTEM32/CONFIG/SOFTWARE/NTREGISTRY/MICROSOFT/ WINDOWS NT/CURRENT VERSION/NETWORKCARDS/11/DESCRIPTION
And
WINDOWS/SYSTEM32/CONFIG/SOFTWARE/NTREGISTRY/MICROSOFT/ WINDOWS NT/CURRENT VERSION /NETWORKCARDS/2/DESCRIPTION
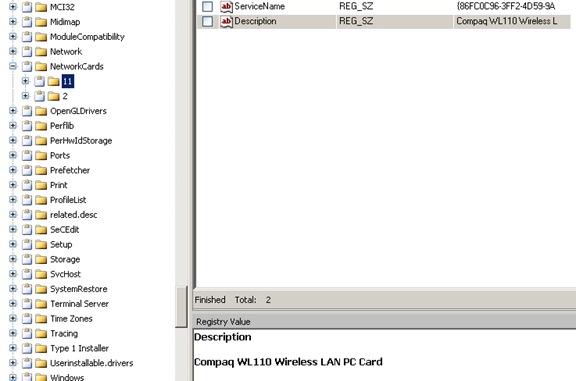
Figure 16
Hence the network card used was 'Compaq WL110·Wireless ·LAN PC·Card·' (Xircom ·CardBus·Ethernet·100 +Modem56(Ethernet Interface)·). [Figure 16]
Determining the physical and logical addresses used by the computer (MAC address and IP address)
This information can be uncovered at the following path:
C:Program FilesLook@LANirunin.ini

Figure 17
This file tells us that IP address was 192.168.1.111 and the MAC address is 0010a4933e09 [Figure 17]
Searching for programs/tools that aided in the crime (Wireless Hacking)
This evidence can be uncovered from many locations. For example, the registry path:
WINDOWS/SYSTEM32/CONFIG/SOFTWARE/MICROSOFT/WINDOWS/CURRENT VERSION/UNINSTALL
[Figure 18]
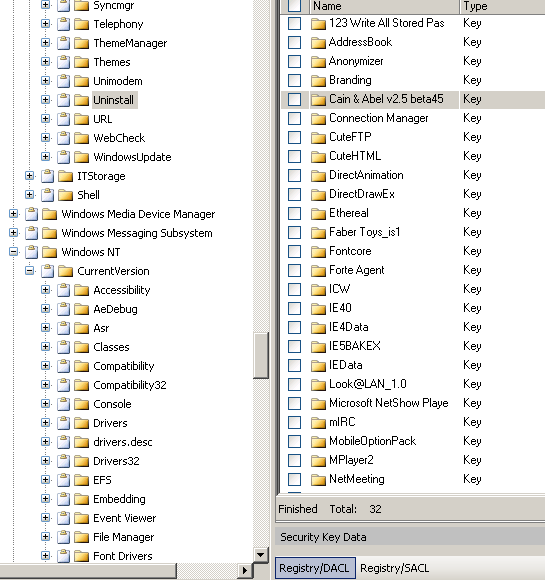
Figure 18
This path shows a variety of hacking tools installed on the computer.
Also see the 'My Documents' folder and notice the presence of several hacking tools and password cracking dictionaries. [Figure 19]
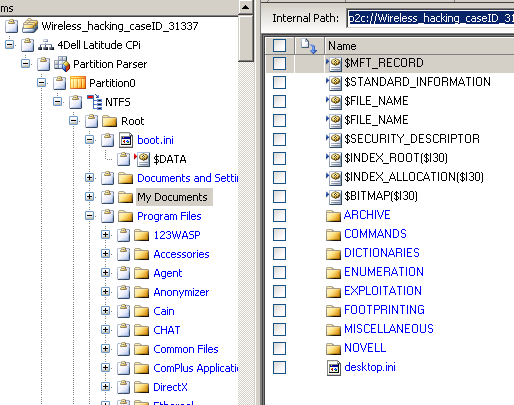
Figure 19
Also note that the 'Desktop' folder has links to several hacking tools.
Following are some of hacking tools that were found on the computer:
-
Cain & Abel v2.5 beta45 (password sniffer & cracker)
-
Ethereal (packet sniffer)
-
123 Write All Stored Passwords (finds passwords in registry)
-
Anonymizer (hides IP tracks when browsing)
-
Look&LAN_1.0 (network discovery tool)
-
NetStumbler (wireless access point discovery tool)
Determining the SMTP Email Address that was used on this computer
The email address used was whoknowsme@sbcglobal.net [Figure 20] and this information can be located at:
C:/PROGRAM FILES/AGENT/DATA/AGENT.INI

Figure 20
Note that the saved SMTP password is also recovered, this can be used for further investigation of the SMTP email account.
Determining the newsgroups that the computer's user has subscribed to
This information can be uncovered from the following path:
DOCUMENT AND SETTINGS/MR EVIL/LOCAL SETTINGS/APPLICATION DATA/IDENTITIES/MICROSOFT/OUTLOOK EXPRESS
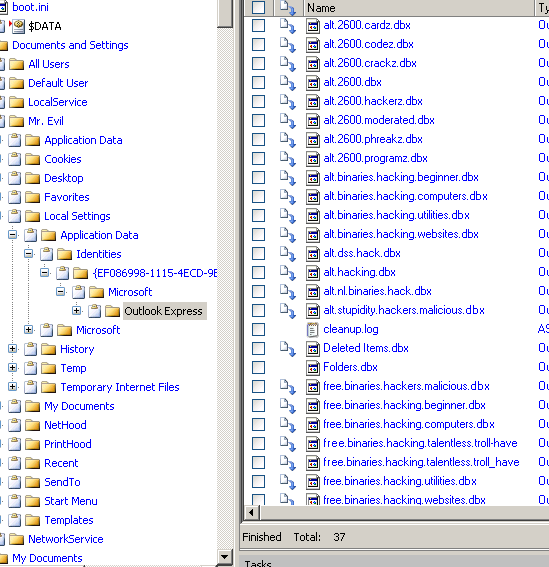
Figure 21
The user has subscribed to several 'hacking' newsgroups as can be seen from the evidence. [Figure 21]
Recovering chat related information from the IRC program (MIRC)
The following path would reveal IRC related information like the username, nickname, email, host etc [Figure 22]:
C:/PROGRAM FILES/MIRC/MIRC.INI

Figure 22
Furthermore, MIRC logs chat sessions at the following location:
C:/PROGRAM FILES/mIRC/LOGS
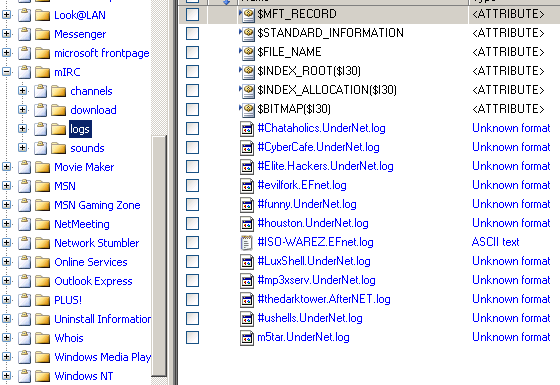
Figure 23
Again we observe a lot of hacking-related chat channels in the logs. [Figure 23]
Searching for the 'Ethereal' packet capture file
Earlier we have noticed the presence of the sniffing tool 'Ethereal' on this computer. Now the challenge is to locate the packet capture file. I say it is a 'challenge', because in this particular case, the saved packet capture file has no extension and hence proved to be incredibly hard to locate. It was eventually located at the following path [Figure 24]:
C:/DOCUMENTS AND SETTINGS/MR EVIL/INTERCEPTION
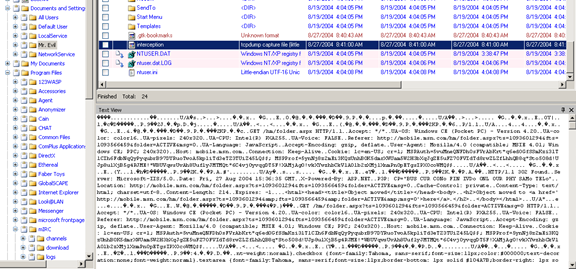
Figure 24
Even though this file has no extension, our first clue is the name of the file 'interception'. Further analysis of the file revealed that it is in fact the file used to save the packets captured.
Note: Remember that this file is where the captured packets were saved. Packets captured from whom? Packets captured from the victim's machine. Therefore, it reveals the websites that the victim was visiting at the time of sniffing.
Recovering information from the Recycle Bin
The Recycle Bin can be a useful location for the purpose of forensics investigations, since the evidence the hacker would want to get rid of would probably end up here (though experienced hackers would 'shred' the evidence rather than simply deleting).
C:/RECYCLER
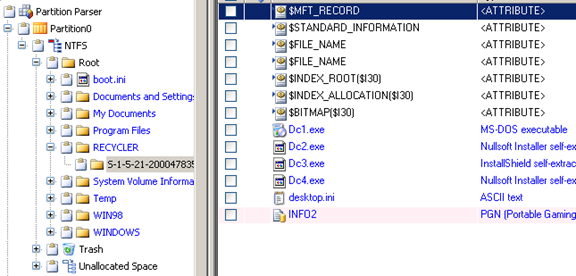
Figure 25
Six deleted files were found in the Recycle Bin, some of these are hacking tools. [Figure 25]
Determining the files that were actually reported as lost (deleted) by the file system
The files that were found in the Recycle Bin were not actually deleted. They were just moved there. To determine the files that are actually deleted, go to the following location:
C:/WINDOWS/SYSTEM32/WBEM/REPOSITORY/FS/
In P2 Commander, you can notice a 'crossed out' icon in front of the file name, and the name itself is gray.
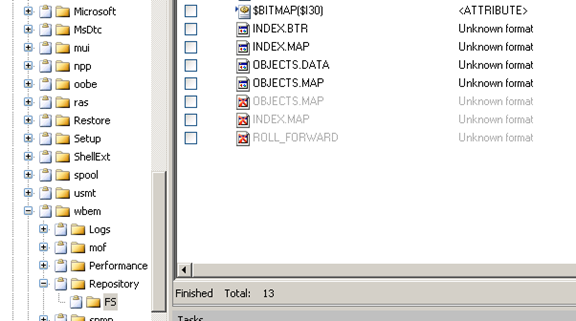
Figure 26
This would tell you that 3 files are actually deleted [Figure 26].
Conclusion
All inculpatory or exculpatory evidence must be properly marked and collected by the examiner to be presented in a court of law. The Chain of Evidence must be properly maintained if the evidence is to stand in court. In simple words this means that information about who handled the evidence, at what time, for what purpose, for what duration, etc should be maintained. When not under examination, the evidence should be kept in the Evidence locker at all times. Access to the evidence is only granted to personnel who are authorized. The reason for all of this is pretty obvious: Maintaining the integrity of the evidence at all times.
This paper focused on a particular case to give you a 'feel' of what computer forensics investigations are like. However, it is in no way comprehensive enough to cover the variety of problems and complications faced by the investigator. The investigator may run into problems like:
-
Limited knowledge: Forensics investigations require extensive knowledge of Operating Systems and their structure (for example, the Registry hives used to mine relevant information in this case require knowledgeable investigators who know where to look), programs, files, recovery of deleted files, etc. At certain points, an investigator may come across an unfamiliar Operating System and as a solution, may have to seek help from community experts who can tell where to look for certain information.
-
Break in the Chain of Evidence or Evidence Corruption: This is a serious issue. If the Chain of Evidence cannot be established, the evidence becomes inadmissible. Also, without a proof of integrity, evidence is deemed corrupted.
Computers Forensics is a vast field of study and includes topics like Processing Crime Scenes, Operating Systems and File Structures, Recovering Graphic Files and Defeating Steganography, Email Investigations, Mobile Device Investigations, Report Writing, Expert Testimony, etc. However, it is definitely captivating (you get to solve crimes!!) and challenging – your knowledge will be tested to the max, as each case is unique.


