Investigating the crime scene part 2: Recovering files with autopsy

For part one of this series, please click here.
So, in the previous part we saw how we can set up the environment for finding clues and also how to set up Autopsy. The previous part was a bit boring since there was no action at all, just some basic stuff, but in this part things will be different. We will go again through some basics (I know that going through theory is a boring thing to do), but that will help us in defining the rules of the scenario.
Also, I will mention the forensic procedures that we must make in order to preserve the state of the evidence. The number one rule in forensics is not just finding the clues, but preserving their state and not changing them at all through the whole procedure, which will save us from making the procedures again and again and again….. When we find evidence or clues, we must document them; I will show you how to do that professionally (at least I think that it will be professionally). Nah, I am just kidding, I will just make a simple documentation for the evidence, since the making of the documentation is different in every country or company and it is strongly depending on the law.

Basics, basics ….and again basics
In this part I will describe the architecture of the Hard Disk Drive that I will analyze. For this topic I took a Hard Disk Drive with the following specifications:
- Manufacturer: Hitachi Global
- Model: HDT725032VLA360
- Capacity: 320 GB
- RPM: 7200 RMP (Revolutions Per Minute)
- SATA 2.0 (3.0 Gbit/s)
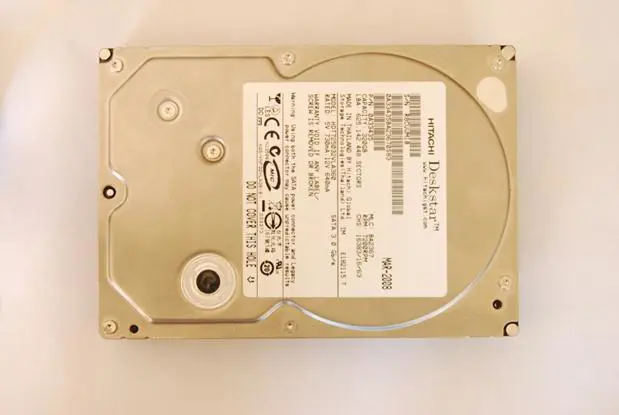
Figure 1. My HDD, I loved it (http://www.newegg.com/Product/Product.aspx?Item=N82E16822145129)
I bought this HDD five years ago, it's a bit old but it will serve well for forensic examinations. Just to know, I opened the HDD when I finished with this article - I had to find a way to get rid of it (just to know, you need special equipment to open a hard disk and for analyzing also, here is a video just to show you how to open a hard disk http://www.youtube.com/watch?v=Ul97jWv2PKY).
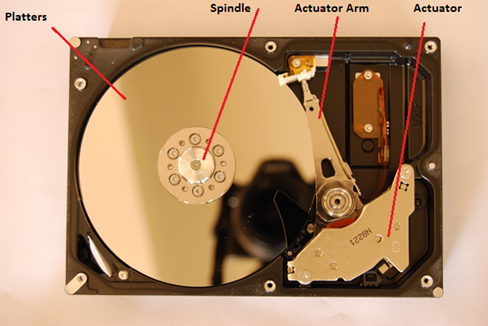
Figure 2. The day my hard disk died
So from here I just took apart some parts from the hard disk that I think are interesting to describe. The platters are used to store information in binary code, and each platter contains small magnetic regions used to store this information. By using the actuator arm, and with the head on it, the hard disk can read and write data on the platters by the process of magnetizing the ferromagnetic material.
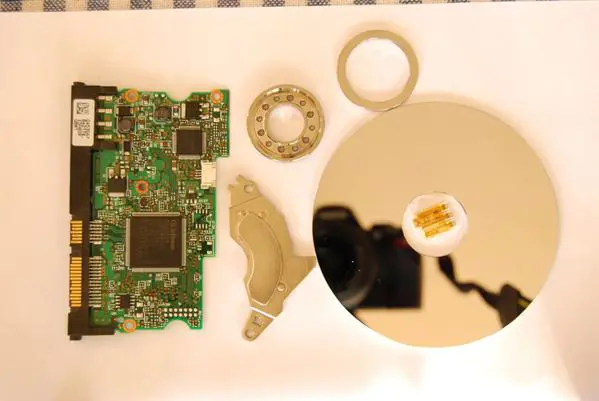
Figure 3. Farewell HDD
Going through the world of Autopsy…again
You work in a company for forensics and you receive a call from your customer's company that they have a compromised web server. The disaster recovery team in that company just discovered that everything on the server is deleted, so they have no idea what is going on. They also have tried to check the logs of the web server, but also the logs were deleted. They had made a clone of the HDD, and recovered their server to previous working state. They sent the copy to your company to check for any clue that might help tracking the enemy.
So our mission is to recover the files, and if possible to see through the logs which IP address was last active on the server, that might give us a clue in tracking the enemy.
Collecting evidence with Autopsy
So let's continue with Autopsy, from the previous part you probably had set the image for investigation.
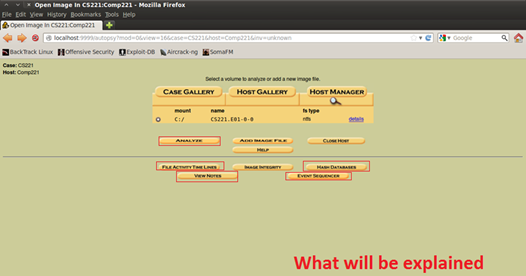
Figure 4. Disk image is set for examination
Click on the "details" link on the right to see what options we could get from the images.
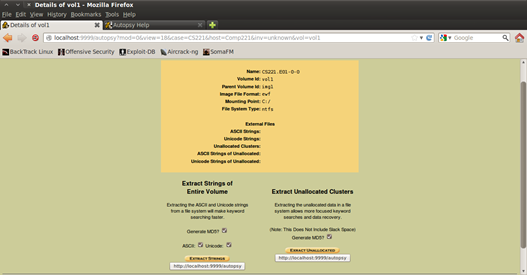
Figure 5. Details of the image file
Here you can preview the details of your image file/s, such as what is the format of the file, the id of the volume, mounting point and etc. There are two options (actions) that could be selected and performed on the hard disk. If you click on the "Extract Strings" as the description says, you will optimize the search with keywords by extracting ASCII and UNICODE keywords from the file and also generating MD5 for them. If you click on the option you will wait a lot, when I say a lot I mean a lot, I waited for around 30 minutes to finish that operation.
Also another optimization of the search and data recovery is "Extract Unallocated Clusters". What is allocated and unallocated space? When you delete a file from the Recycle Bin, you don't delete it permanently, you just set the data or the space as unallocated, which means that new data can be written on the same space. Allocated space is like a reserved space, opposite of unallocated.
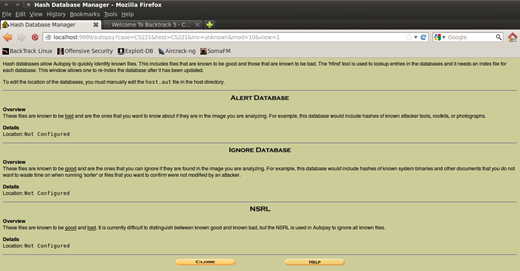
Figure 6. Hold on coz in the next step is Hash Databases
I don't know if you remember in the previous part, there was the part of configuring hash databases, where you can set the location for the Alert, Ignore and NSRL. The Alert database is for those files that make and perform malicious actions; thus, we want to avoid them of course; next is the Ignore database - with this database you want to mark those files that are system default and of course there is no meaning to waste time on analyzing them, but that depends on the scenario, and last is NSRL database where it doesn't matter if it is a good or bad file, for example, banning every file you don't want to waste your time on.
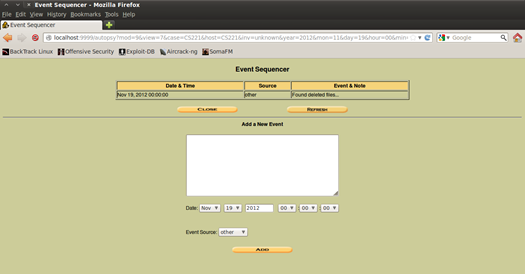
Figure 7. Keeping track of the evidence
The "Event Sequencer" could be found in the menu of options (bottom-right) when you open the host. The main reason why you will use this tool is documenting your clues or evidence that you have found and keeping track of them. Mainly this is a table of events, sorted by day and time. When you are adding a new event you must enter the notes for it, and also current time and date, the last step is to choose what is the source of the event (as if defining the type of event).

Figure 8. File Activity Timeline menu
The File Activity Timelines could be used to track the time when a file was last modified, moved, deleted, etc. Sometimes using the File Activity Timelines could be a problem, since the attacker could change the time easily and the tracking of the file could bring us to wrong results. There a lot of free tools to change the time of a file, I am not experienced at all for using any tool for changing the time since I didn't have the need for it, but if you try through Google search you will see that you can find tools to change the time easily.
So in order to create a timeline we need to create a "body" file first. A "body" file is a non-extension file that contains Meta data of the all the files of the disk images. By all files I mean files that are also deleted and that are floating alone in the unallocated space, followed by the files that exist and that are also floating in the allocated space (well by floating I mean they are somewhere in the disk space, not that they are really floating…JESUS). For every disk file system there is different information that is extracted. In the Autopsy's help and documentation, I found which information is extracted for each disk file system in UNIX and Windows:
For the UNIX file systems (EXT2FS & FFS) (description is taken from www.sleuthkit.org/autopsy/help/index.html):
- Modified: When the file data was last modified. This time can be modified using the utimes() function. This time is preserved in a 'tar' archive, so it is possible to have M-times of files prior to when they were introduced to the system.
- Accessed: When the file data was last accessed. This time can be modified using the utimes() function.
- Changed: When the file status (inode data) was last changed. This time can not be set using the utimes() function in UNIX (but it will be set when utimes() is used to modify other values).
For the FAT file system (description is taken from www.sleuthkit.org/autopsy/help/index.html) :
- Written: When the file was last written to. It is the ONLY required time in the FAT file system.
- Accessed: When the file was last accessed. In FAT, it is only accurate to the day (not minute). It is an optional value, so some Operating Systems may not update it.
- Created: When the file was created. It is also optional, so some Operating Systems may not update it. In fact, many Windows installations have a C-Time of 0 for directories such as C:Windows and C:Program Files.
And for the NTFS file system (description is taken from www.sleuthkit.org/autopsy/help/index.html):
- Written: When the file was last written to.
- Accessed: When the file was last accessed.
- Changed: When the MFT entry was last modified.
- Created: When the file was created.
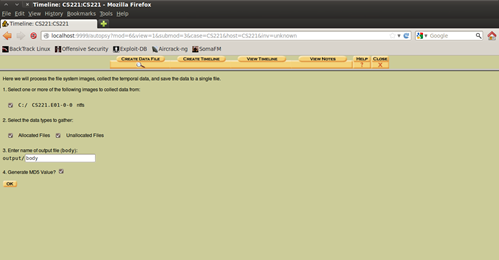
Figure 9. Creating a "body" file
So now, in order to create a Timeline first we need to create a "body" file. You can do that by clicking "Create Data File", and a menu with options will appear. The options are pretty simple to understand so I will skip explaining them.
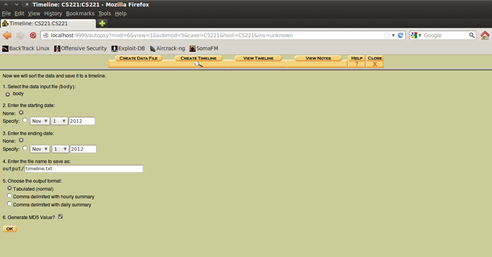
Figure 10. Creating Timeline
The next thing to do is to create the Timeline. That can be done by choosing the Create Timeline option in the menu. So after you've created the Timeline, the next thing you can do is to view the Timeline (click "View Timeline from the menu). By choosing "Summary", you can view the details for each file from the Disk Image. This might help in the part when we will be recovering deleted files, for viewing some additional information about them.
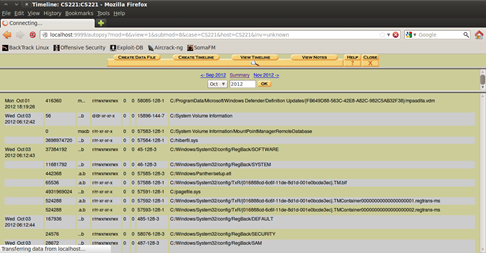
Figure 11. Viewing the Timeline
The next thing to do is to proceed to examination of the case, in the next section I will explain how can we use and combine the tools from Autopsy for examination and recovery of files.
Examination of files
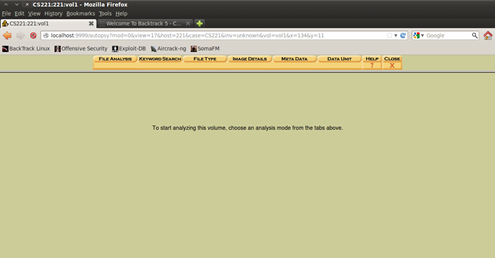
Figure 12. File analysis with Autopsy
After reviewing almost every interesting tool in Autopsy, I put the "File analysis" part as final. When going to the File Analysis tab, you will see all the files on the disk image.
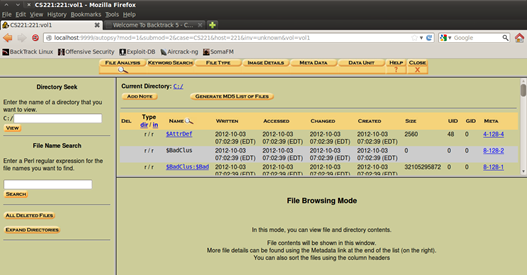
Figure 13. File analysis with Autopsy view of all files
Because I have information about the files that are deleted (their name and extension) I can easily find them using the search on the left, which offers using regular expressions that will make the searching even easier. File recovery is pretty easy with Autopsy, if you know where to search for them that is, but sometime it might be hard because the attacker could use techniques that might make the recovery pretty challenging.
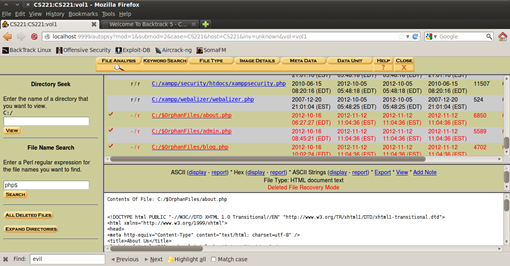
Figure 14. Searching for files by their filenames
When you open a file with Autopsy there are options that allow you to perform some actions to that file. As you can see there are options to view the file in ASCII, HEX and ASCII Strings, and also create a report that could be used to generate some information about the file like metadata, some general information, etc. Such an example of a generated report is the ASCII report that is displayed in figure 15.
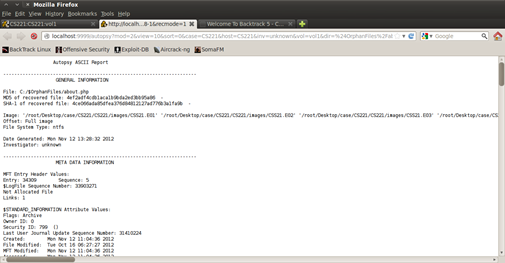
Figure 15. Making a file report by using report generator
Another and more detailed way of searching for files is the "Keyword Search" tab where you can specify the search by extracting the content of the image, in short, word search the parts where you already know where the files could be.
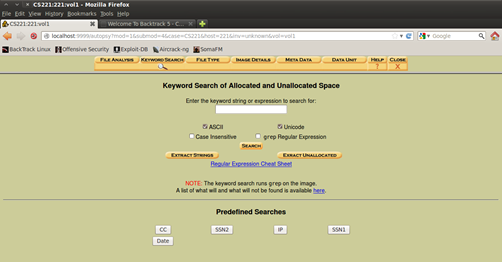
Figure 16. Keyword Search options
Also there is a Regular Expression Cheat Sheet which you can use if you do not have any knowledge about regular expressions.
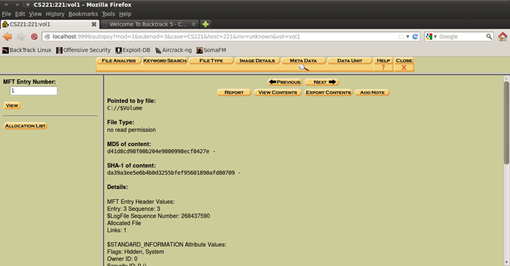
Figure 17. Extracting Meta Data information
You can also use the Master File Table if the file system is NTFS (like in this scenario) to see the metadata details about each file. It doesn't matter if it is deleted or not.
If you know on which entry of Master File Table the file is you can use that number to extract information about the file. The MFT file could be found in the directory where the Windows OS is installed in our scenario in "C:/$MFT". I usually use MFTView v1.1.0 to open the MFT file, which also can be used to find some valuable information about each file. You can download the tool from http://sandersonforensics.com/forum/content.php?133-MFTView. I hope you will find it useful someday.
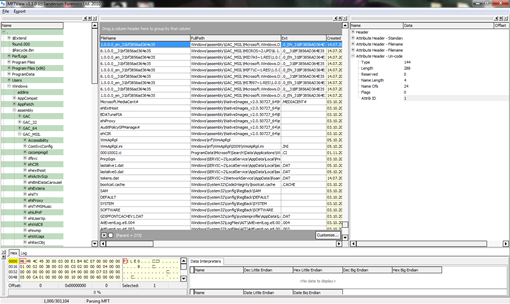
Figure 18. Interface of MFTview v1.1.0
During the recovery of the files, I found that the cause for deleting the files was a web script used for malicious purposes b374k-shell which for curiosity you can explore and find what possibilities it offers. The download link for the shell is http://code.google.com/p/b374k-shell/, be aware for what purposes you are using it for, this scenario was only made for educational purposes only.
So here are the details about the scenario, how I solved it (this will be like a report):
For this case the damage was caused by a malicious script (web shell) known as b374k-shell witch cause extraction of information which stored in the database. The script was uploaded using RFI vulnerability (Remote File Vulnerability), and the attacker, through successful uploading of the script in a short period of time, succeeded to extract and delete valuable information. The attacker also erased the whole directory of the web site, including the web logs of the server, which means that through privileged escalation the attacker gained full control of the server.
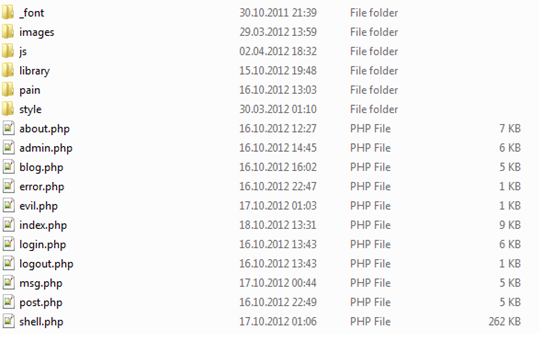
Figure 19. Deleted and recovered files
Conclusion
I know this is not the coolest CSI series, but I hope you know now how to use Autopsy. I just wanted to show you that Autopsy is the coolest tool for forensic investigation, it is pretty easy to learn and you will find it easy to use. Maybe I didn't uncover some details about the scenario, but that is the challenge for you to make your own scenario and use it for practice. Try some scenarios, invent some, with that you will learn how the hacker corrupts a host and how the forensic investigators use various techniques to recover and analyze fields.
Sources

CompTIA CySA+
Discover the latest salary trends for CompTIA CySA+ certified professionals in 2024. Learn what factors influence your earning potential in the cybersecurity field.

Cybercrime investigator
Cybercrime has hit record levels, with an expected $7 trillion USD to be made from cybercriminal activity by 2021. Investigating these sorts of crimes can be

EC-Council CEH
CEH v13 is the world's first AI-powered ethical hacking certification. Discover what's new, how it compares to v12/v11 and why it's a career game-changer.

CompTIA SecurityX
Explore the expert-level CompTIA SecurityX certification, what to expect on the exam, the career benefits and more.
