Android forensics labs
Exercise 1: Getting started with ADB
Objective:
"adb" is an essential tool for interacting with Android devices. We use this utility in multiple scenarios during our journey throughout the Android forensic investigation process. The objective of this exercise is to provide readers the hands-on experience of some popular adb commands that every Android forensic investigator should be aware of. This tool comes preinstalled with Android SDK and it is located in "platform-tools" directory of Android SDK. This is already added to "/usr/bin" folder of Santoku and hence we don't need any explicit setup to use this tool in Santoku.
We will begin this exercise with setting up an Android virtual device, which is required for practicing all the adb commands in this lab.
List of VMs used: This lab exercise makes use of Santoku Linux VM.
Tools: AVD Manager, ADB
Files used in this lab: sdcard.img, image.img
Steps to set up an Android Virtual Device:
As mentioned, we will begin this exercise by creating an emulator.
Navigate to "Santoku->Development Tools" and Click "Android SDK Manager". This looks as shown below.
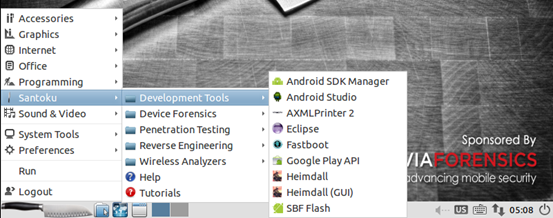
The above step will open up the following window.
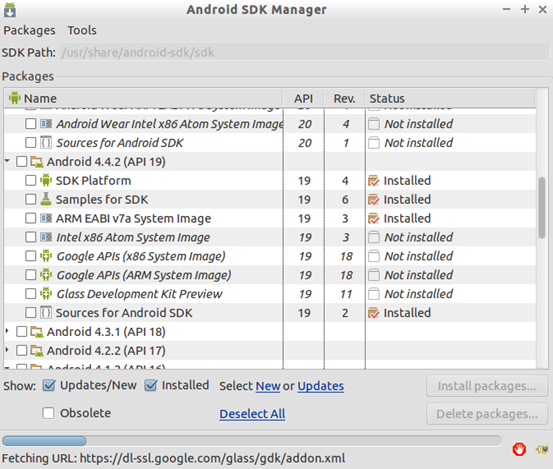
By default, Santoku consists of images of only a few Android versions. Depending on the case and Android version of your target device, we should download Android images to create an appropriate emulator.
In a later section, we will mount an image taken from a real device running Android 4.1.1. So, we are going to create an appropriate emulator that can mount this image (Android version >= 4.1.1).
If you notice the above figure, we have already installed "Android 4.4.2 ARM EABI v7a System Image" for this reason.
Once if everything is set, click "Tools" in the menu bar at the top of the window and then click "Manage AVDs" as shown below.
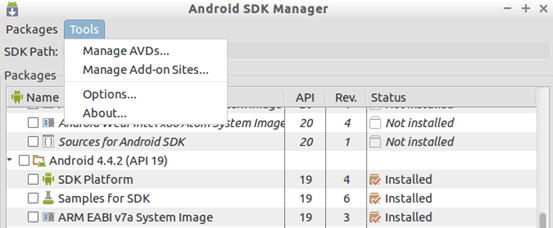
This will open up "Android Virtual Device(AVD) Manager" window as shown below.
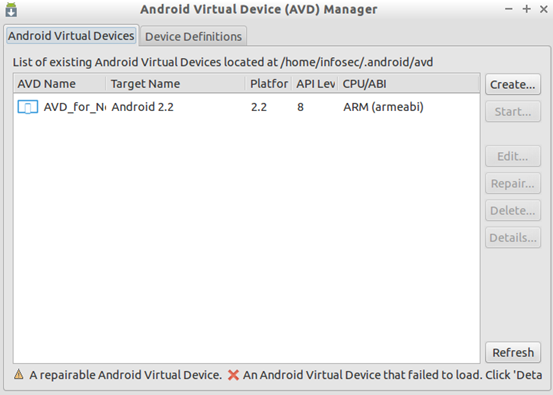
As you can see in the above figure, we already have one emulator configured. Now, let's create a new emulator with the specifications of our choice.
Click "Create" and you should see the following window.
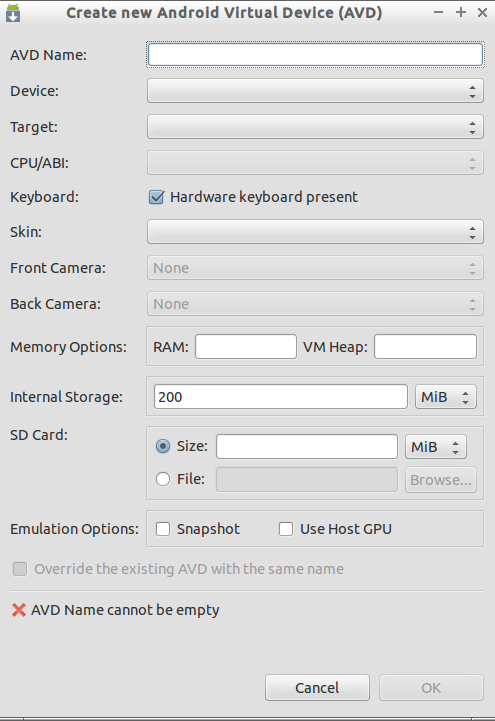
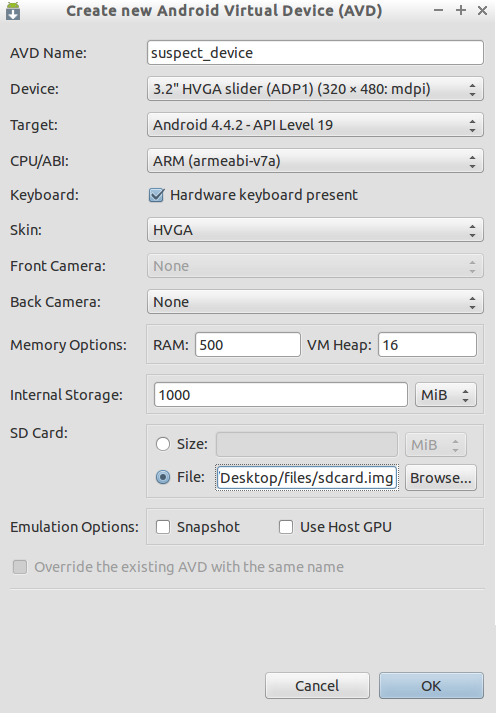
Now, let's choose the appropriate options as shown below.
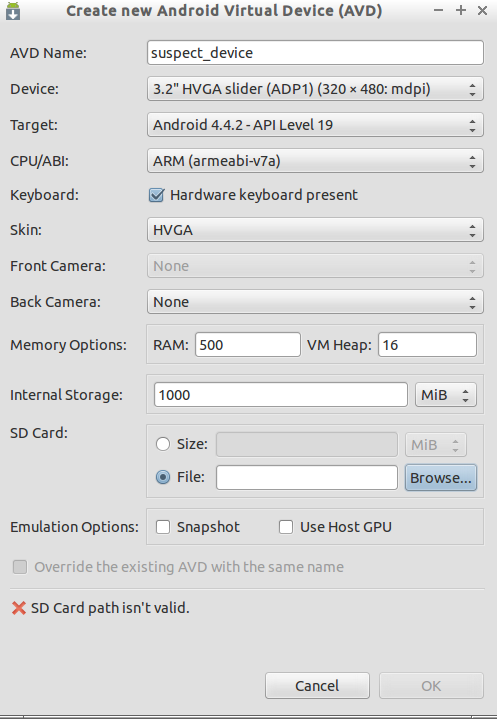
As you can see in the above figure, we have named our emulator "suspect_device." Then, we chose a device with "3.2-inch HVGA" to have an emulator with the smaller size. Then, we chose to have "Android 4.4.2-API Level 19" as our target. CPU is chosen as ARM. Internal Storage is 1000 MB. Finally, we need to provide SD Card options.
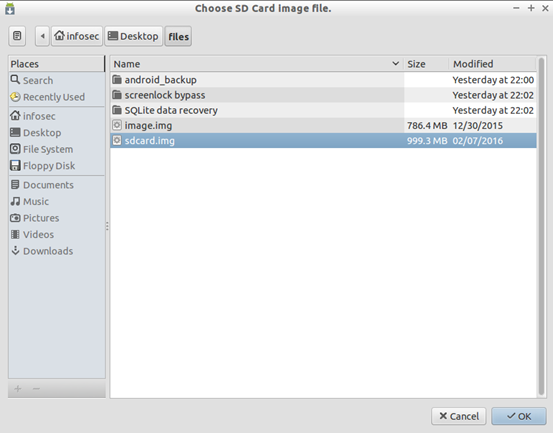
In the case, we are going to choose an SD Card image taken from a real Android device. The image is provided in the VM at the following location.
SD Card image location: " ~/Desktop/files/sdcard.img"
Click "Browse" in the above window to choose the SD Card image and choose it from the location mentioned above as shown in the figure below.
If you have done everything, you should see the following window after choosing everything properly.
Click "OK" and you should see the following confirmation dialogue.
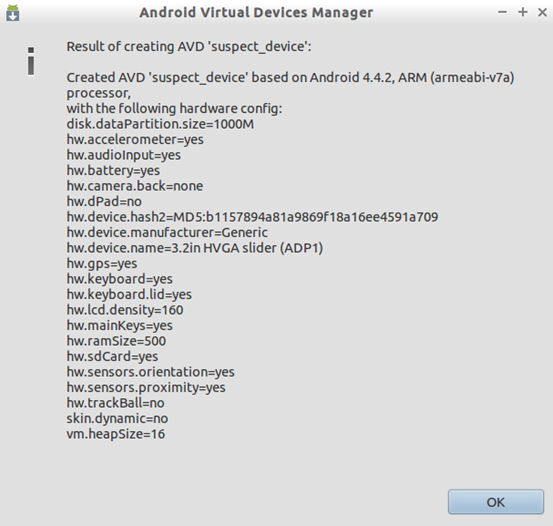
Cross check everything and click "OK" to complete the setup.
Once if you are done with the steps shown, you should see an additional Virtual Device as shown below.

Choose the newly created emulator and click "Start" button to start the emulator. You should see the following confirmation dialogue.
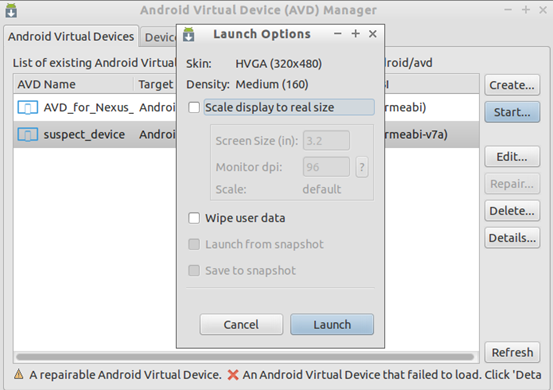
Click "Launch" and it starts the emulator showing the following progress bar.
Be patient and wait for a while as the emulator may take a longer time to launch when you do it for the first time. Once it is started, you should see an emulator as shown below.
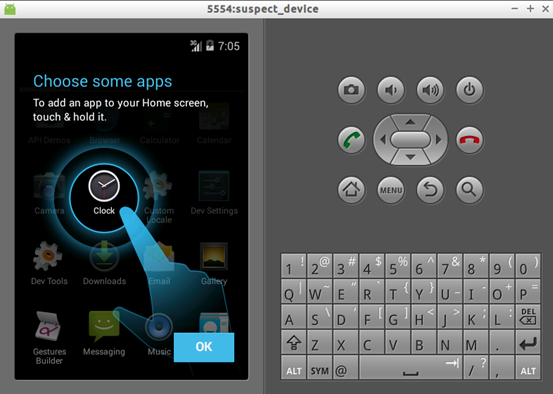
Congratulations! You have created your emulator with the specification of your choice.
Note: The device we just created merely contains nothing interesting inside its internal storage for forensic analysis purposes.
So let's see how to create an AVD with custom data partition taken from a real device for performing further analysis.
Emulating "user data" taken from a real device:
Create a new emulator once again by following the same steps but "do not start" it.
Once you create an emulator, navigate to its location on your file system. In Santoku, following is the location for all the AVDs created.

Navigate to "suspect_device.avd" folder and check the files as shown below.

When you create a new emulator, by default it contains a file called "userdata.img" within its directory as shown in the above figure.
Delete this "userdata.img" file using "rm" command as shown below.
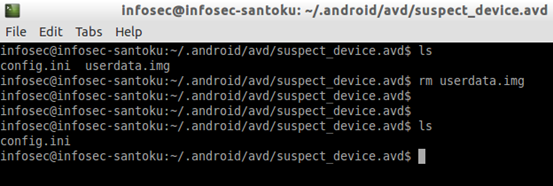
Now, get a new image file that is taken from a real device's "data partition" and pastes it in the same location where we deleted the
"userdata.img" file.

Using the above command, we are copying a file named "image.img" from "~/Desktop/files/" location to the location of our target AVD.
The command will take a while to complete, as the image usually is in a bigger size. Once the copying process is completed, the screen appears as shown below.

Note: Please make sure that the image file name in the destination directory is "userdata.img".
Navigate to the destination folder and make sure that the file is copied. You can check it by running "ls" command as shown below.

Once you are done with all the steps, open up your "Android Virtual Device Manager", where we created our emulator named "suspect_device" and start the modified emulator by clicking "Start" button.

Once again, it will show us a confirmation dialogue as shown below.
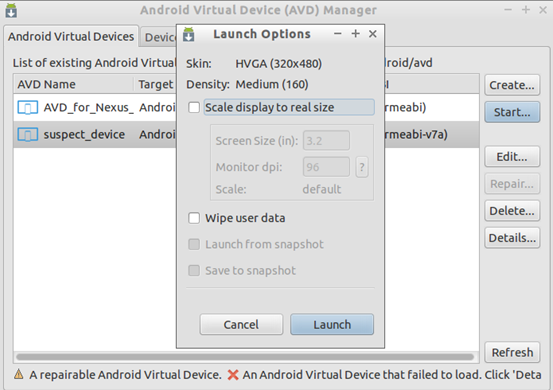
Click "Launch" and wait for few minutes. This time, do not wait till you see the "Android Home screen" as it may not display it due to the modified data partition. But, we can check if the custom "data partition" is mounted or not.
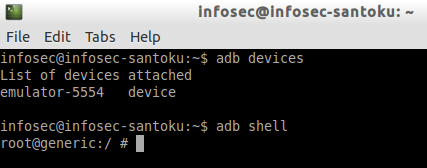
To do it, first check if the device is up and attached to adb using "adb devices" command.
This looks as shown below.
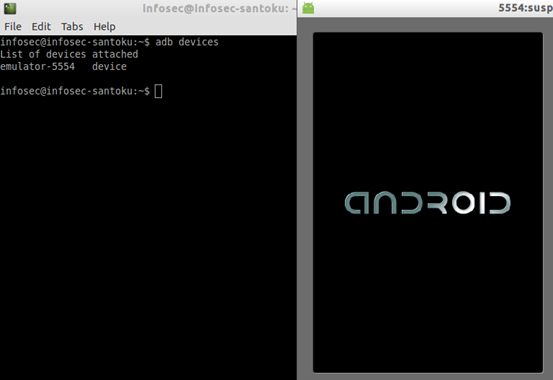
As you can see in the above figure, though the emulator appears to be loading it is already attached and detected by adb tool.
Note: we will see more details about "adb" and some of its useful commands in a later section.
Now, let's check if the "data partition" is mounted or not. We can do it by navigating to "/data/data/" directory on the emulator and see the listing of folders. If we find the folders with the app names that are on the real device (that are not from the newly created emulator), it means our image is properly mounted. The following figure shows the output listing of "/data/data/" folder.
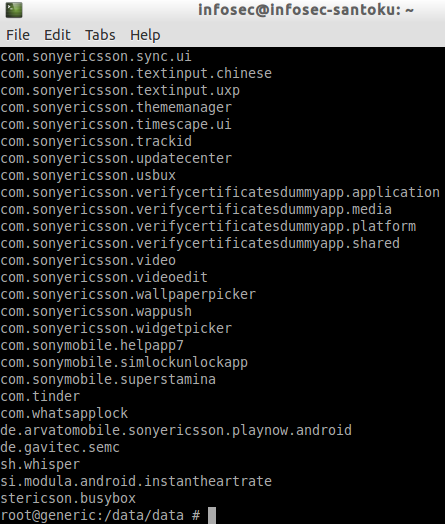
As you can see in the above figure, apps such as Tinder and WhatsApp lock are visible on the emulator. But, they are actually taken from the real device.
We can further go ahead and analyze this data partition. We will discuss more data analysis in a later exercise.
Getting started with ADB:
Checking the devices connected
We can use adb to list the devices that are connected to the workstation using the following command.
adb devices

As we can see in the above figure, there is an emulator running and attached.
Note: If you have connected a real device to the workstation and if adb is not listing your phone, please check if USB debugging is enabled on your phone. If it is not enabled, you need to enable it.
Getting a shell
We can use adb to get a shell on the emulator or device using the following command.
adb shell

The above command will get a shell on the connected device.
Command to get a shell on an emulator when a real device and emulator are connected
adb –e shell
Command to get a shell on a real device when a real device and emulator are connected
adb –d shell
Command to get a shell on a specific target when multiple devices/emulators are connected.
adb –s [name of the device]
Listing the packages
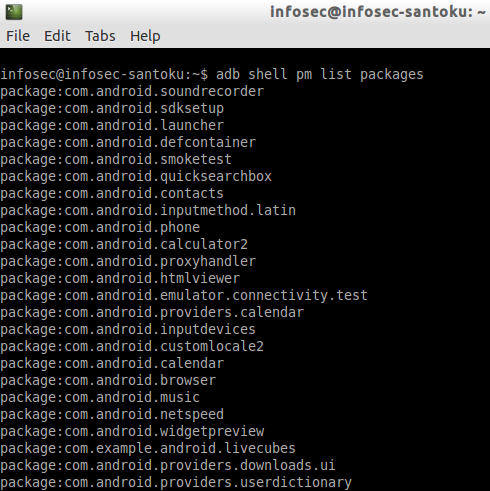
Once after getting a shell on an Android device using adb, we can interact with the device using various APIs available through the shell. "Listing the installed packages" is one such example which uses "pm," which stands for the package manager.
We can use the following command to list all the packages installed on the device.
pm list packages
Pushing files on to the device
We can push the data from the workstation to the device using the following syntax.
adb push [file on the local machine] [location on the device]
Let's see this in action. Create a file called "test.txt" in the current directory with some sample content inside it as shown below.

Let's move this file onto the emulator. Type in the following command.
adb push test.txt /data/local/tmp

Note: "/data/local/tmp" is one of the writable directories on Android devices.
Pulling files from the device
We can also use adb to pull files/data from the device to our workstation using the following syntax.
adb pull [file on the device]
Let us first delete the file test.txt from the current directory.

Now, type in the following command to pull the file located at "/data/local/tmp" directory on the device.
adb pull /data/local/tmp/test.txt

Installing apps using adb
As we have seen earlier in one of the previous sections of this chapter, we can also install apps using the following syntax.
adb install [/path_to_the_apkfile/filename.apk]
Let's install the AFLogical application (you can install any apk file).
This app is available in Santoku and thus, let's find out its location first.
Running the following command will filter the output and shows AFLogical app as shown below.

Now, let's install the app using the command shown below.

As we can see, we have successfully installed this app.
Note: If we install an app that is already installed on the target device/emulator, adb throws a failure error as shown below. The existing app has to be deleted before we proceed to install the app again.

Troubleshooting adb connections
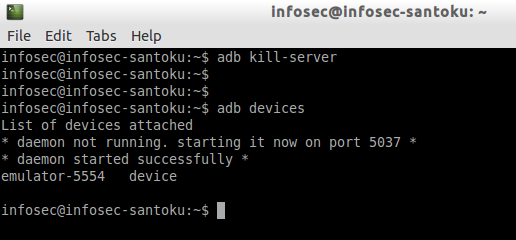
It is often seen that we face a problem of adb suddenly not recognizing your emulator even if it is up and running. To troubleshoot this, we can run the following command and try to get the list of devices once again as shown in the figure below. This will kill the adb daemon on the device, and it will be freshly started when we do this.
adb kill-server
Exercise 2: Understanding Android internals
Objective:
Android forensics is different from regular disk forensics because of various reasons. It supports various file systems, which are specific to Android. We may look for special data on Android Devices such as SMS, MMS, Emails, Call Logs, Contacts, photos, calendars, notes, browser history, GPS locations, passwords; Data stored on SD Cards, etc. Apart from this, we may also find interesting information by analyzing social networking applications.
To understand all of these concepts, it is important to understand the Android internals such as files systems, directory structures, how and where the data is stored on the devices before getting into Actual Forensics.
The main objective of this exercise is to provide readers an opportunity to understand the internals of Android.
This exercise contains various short exercises inside it.
List of VMs used: This lab exercise makes use of Santoku Linux VM.
Tools: ADB
Files used in this lab: NA
Steps:
Android Architecture
This section covers Android Architecture and various layers associated with Android Software Stack starting from Linux kernel to Applications. As shown in the figure below, Android architecture is divided into four different layers.
- Linux Kernel
- Libraries and Android Runtime
- Application Framework
- Applications
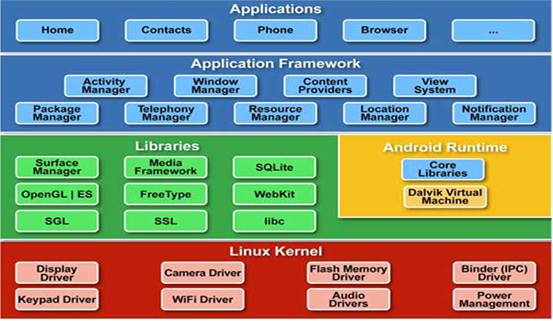
Figure 3
Linux Kernel:
Linux kernel is located at the bottom of the Android software stack as shown in the figure above. As mentioned earlier, Android runs on Linux Kernel. But this Linux system is different from traditional Linux machines we see. The traditional Linux kernel has been modified to give better performance in mobile environment. Linux kernel has to interact with all the hardware devices such as Bluetooth. Hence, it also contains all the hardware drivers. This layer also takes care of basic Operating System functions such as I/O management, process management, and memory management.
Quick Exercise: Android - Linux based Operating System
Open up a command prompt or terminal and type the following command.
adb shell

It opens up a shell on the device.
Now, if we execute any common Linux command, it should run since Android is based on Linux Kernel.
Let's run the command "ls" and observe the output.
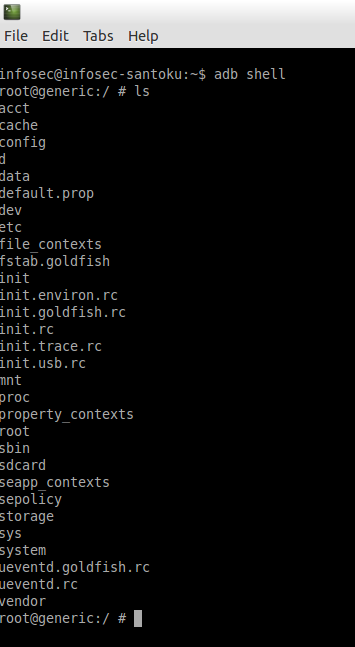
Quick Exercise: Checking the Linux kernel version of a device
Open up a terminal and type the following command.
adb shell

It opens up a shell on the device as shown in the above figure.
Now, if we execute the following command, it displays the kernel version as shown below.
cat /proc/version

Quick Exercise: Checking the Processor Information of a device
Open up a command prompt or terminal and type the following command.
adb shell

It opens up a shell on the device.
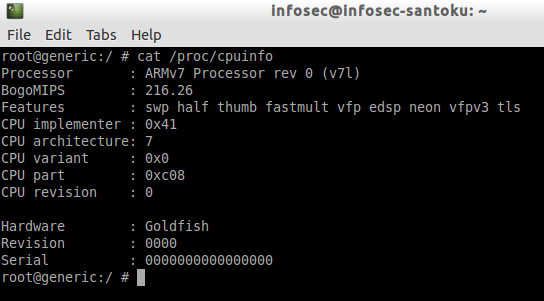
Now, if we execute the following command, it displays the CPU information as shown below.
cat /proc/cpuinfo
Libraries:
Android includes a set of C and C++ libraries. Developers with the help of "Application Framework" layer use these libraries. When developers use an API provided by Android, which may, in turn, go and interact with the libraries available in layer 2(from bottom).
Surface Manager: This manages the windows and screens and hence provides support for the display system.
Media Framework: This allows the use of various types of codecs for playback and recording of different media
SQLite: This provides support for data management in Apps
WebKit: This is the rendering engine to render the contents browsed by the android browser.
OpenGL: This is used for rendering 2D and 3D graphics on the screen.
SSL: Provides support for security.
Android Runtime:
This section, in turn, consists of two different components - Dalvik Virtual Machine and Core Libraries.
Dalvik Virtual Machine is a special kind of virtual machine for running android apps. In regular java programs, compiled ".java" code generates a ".class" file which will be run inside "Java Virtual machine". In the case of Android, it slightly changes as we go with an additional step to convert ".class" files into ".dx" files before running the application inside Dalvik Virtual machine.
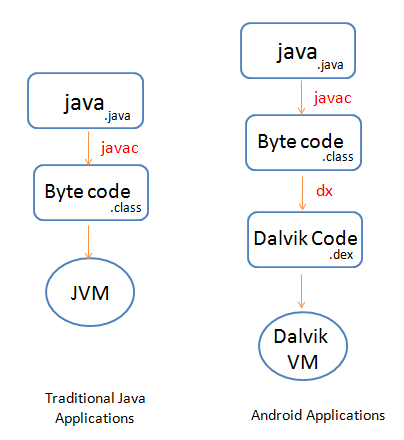
The above figure shows the difference between running traditional java applications and Android applications. This feature of running apps inside DVM provides additional security to application data. Core Libraries include APIs given by Android to provide features similar to what we have in traditional java APIs.
ART – The new Android Runtime
ART is a replacement for Dalvik Virtual Machine. ART has been first introduced in Android 4.4 as an optional runtime environment that could be chosen by the end user from developer options in the device. Google made it default from Android 5.0 (Lollipop). ART basically converts the application's bytecode to native machine code when installed on a user's device. This is what is known as ahead-of-time compilation. Before the introduction of ART, Dalvik used to convert the bytecode to native code at runtime on the fly when the app is run. This approach is known as JIT (Just-in-Time) approach. The benefit with ART is that app's bytecode doesn't need to be converted into machine code every time they start as it is done during the app installation process. This may cause some delay on the first run but provides drastic performance improvement from the next run.
Application Framework:
Application Framework is an important layer for Developers. This layer provides a rich set of java APIs to perform various tasks within an Android Application.
Let's take location manager as an example to understand Application framework. When a developer wants to read the location of a device through his app using GPS service, we will have to make use of Location Manager API in the Application.
Applications:
"Applications" is the layer with which users physically interact. This layer provides a set of inbuilt applications as well as applications downloaded from the Android Market (Play Store). There are some applications come preinstalled with the Operating System, which includes SMS, Contacts, and Browser, etc. Users can also download and install applications and use them further without any restrictions.
Android directory structure:
Android has got a directory structure specific to it. We can look at the directory structure of the device using "adb shell". The following figure shows the file system of the emulator we created earlier.
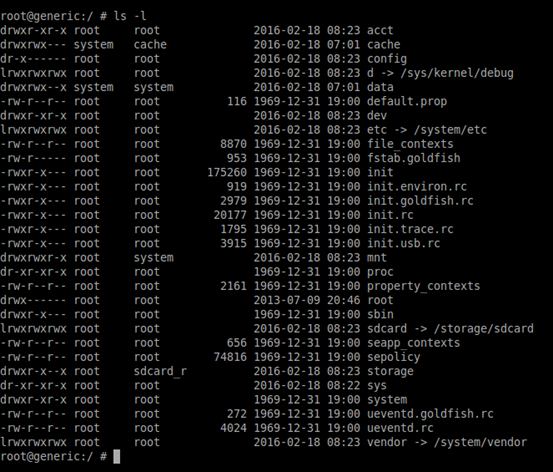
The above figure shows many files and folders within the root directory. The most important locations for a forensic analyst are /system, /data, /sdcard
/system : It contains operating system specific data.
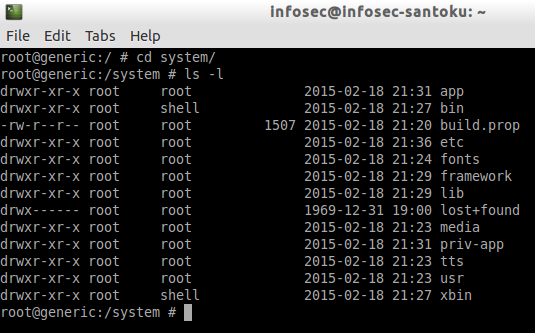
As we can see in the above figure, this directory contains various subdirectories to hold information about the system apps, fonts, libraries, executables, etc.
/data: It contains user specific data such as data stored by SMS application.
We can see the apk files of each application installed in "/data/app" directory. This requires root privileges, which mean a user without a rooted device, cannot see the contents of this directory. The following figure shows how each installed application's binary can be seen on the emulator.
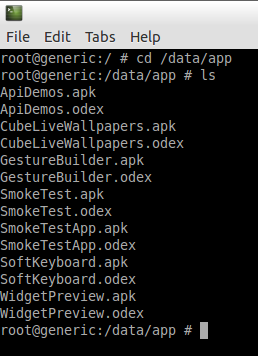
User data resides on "/data/data/[app package]/" directory. Due to security reasons, data in each directory cannot be accessed by other applications running on the same device.
/sdcard: sdcard is given for external storage. This is used to store user data such as images, music files, videos, etc.
Important Directories
When dealing with Android application data analysis, it is important to note that all the data associated with the user installed apps will be stored in /data/data/ location within which each application will have its own sandboxed container.
Example:
Android browser is named com.android.browser, data files are stored at /data/data/com.android.browser

Common Directories within each application's directory.
/data/data/<app package name>/
Android File systems
Having basic knowledge of Android file systems is always good before diving into android forensics. This is because; android has got support for various file systems. The main partition of the android file system is often partitioned as YAFFS2 (Yet Another Flash File System) in older versions of Android devices. This is replaced with ext4 starting from Gingerbread. YAFFS2 is specifically designed for embedded systems such as smartphones. It provides greater efficiency and performance.
To see the listing of supported file systems, we can use the following command on "adb shell."
"cat /proc/filesystems."
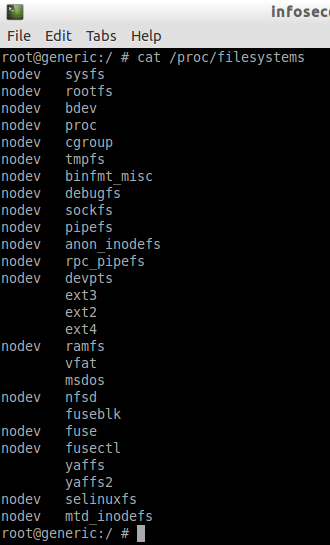
As we can see in the above figure, we got a list of file systems supported by the device. The "nodev" entry next to file system indicates that there is no physical device associated with that particular file system, thus making a "nodev" virtual file system. Android supports ext2, ext3, and ext4 file systems (used by Linux systems) and the vfat file system used by Windows-based systems. Since it is targeted for mobile devices, Android supports YAFFS and YAFFS2 file systems since it requires supporting NAND chips used in these devices.
Android's file system is divided into different partitions. In order to see the different partitions that are mounted on an Android device, we can get a shell on the device and execute the command "mount." This is shown in the following figure.
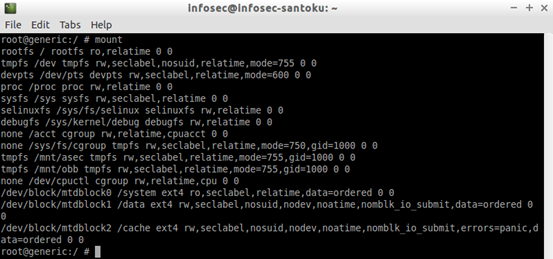
As we can see in the above figure, there are various partitions mounted on the device.
If we observe the above figure, there are few important file system partitions such as /system, /cache, /data using ext4 as their file system type rather than YAFFS. This is because YAFFS has got issues on dual core systems. Starting from Gingerbread, android has replaced YAFFS file system with ext4 as mentioned earlier.
Exercise 3: Bypassing screen locks
Objective:
It is often required for forensic investigators to bypass screen locks on Android devices to extract the data from it. Understanding the possibilities of breaking screen locks is really important. This exercise aims at providing some insights into the techniques commonly used in bypassing Android screen locks.
List of VMs used: This lab exercise makes use of Santoku Linux VM.
Tools: xxd, ADB, grep
Files used in this lab: AndroidGestureSHA1.txt, gesture.key, findpattern.sh, recover-android-pin.zip, password.key, locksettings.db
Steps:
Introduction:
Just like most of the other devices, Android devices have got screen lock mechanism to prevent unauthorized use of someone's device. Android devices usually have the following types of screen locks.
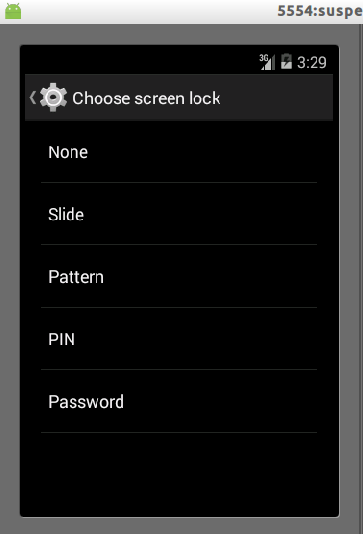
None : No screen lock
Slide : Move the slider to unlock the device
Pattern: Enter the right pattern connecting the dots to unlock the device.
PIN: enter the right number to unlock the device
Password: enter the right password (characters) to unlock the device.
As the first two types do not require any additional skills to bypass the screen lock, let's discuss the some of the techniques available to bypass the other three types of screen locks.
Setting up pattern lock/PIN:
Navigate to "Settings -> security -> screen lock" on your emulator and you should see the following screen.
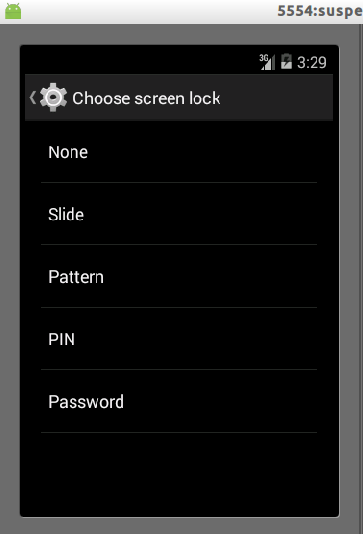
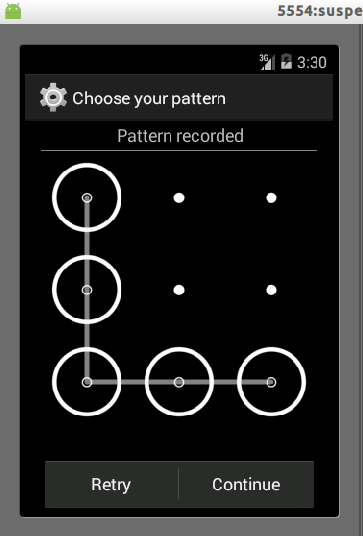
Let's first create pattern lock. Choose "Pattern" and should be greeted with the following screen, where you need to enter a pattern as shown in the figure below.
After entering, we will be prompted to enter the pattern once again to confirm it. Enter it again as shown below.
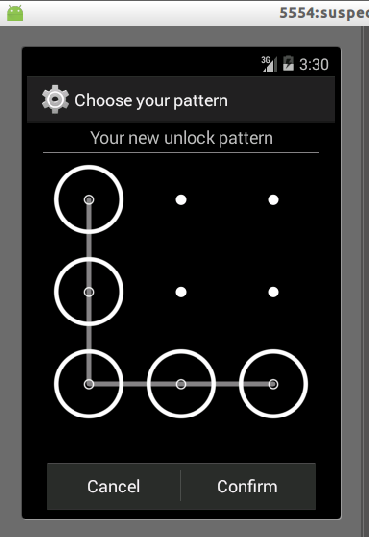
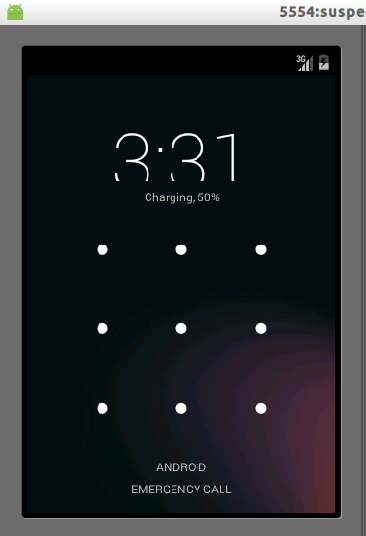
Now click "Confirm" and exit from this wizard by clicking on the back button of your emulator and lock the device by pressing power key of your emulator. Now, your device should be locked as shown below.
If you want to create a PIN, we can do it by clicking "PIN" and choosing a new PIN as shown below.
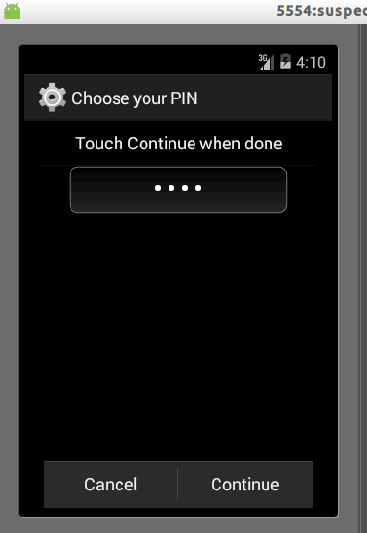
Click "Continue" and it will ask us to confirm the PIN as shown below. Enter it again.
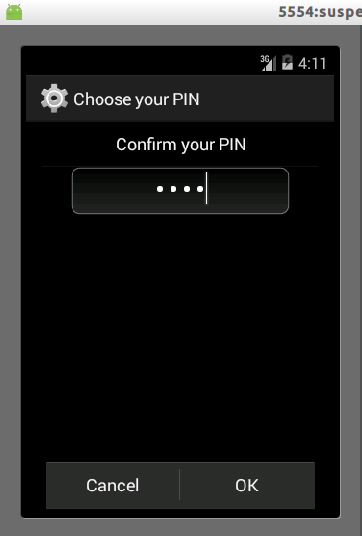
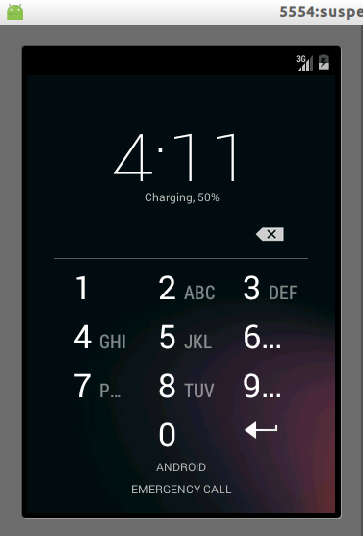
Now click "OK" and exit from this wizard by clicking on the back button of your emulator and lock the device by pressing power key of your emulator. Now, your device should be locked as shown below.
Bypassing pattern lock using adb:
Note: This technique requires the device to be rooted and USB debugging must be enabled if you attempt to do it on a real device.
The pattern on Android devices is a type of screen lock where the user requires connecting the right combination of dots as shown below.
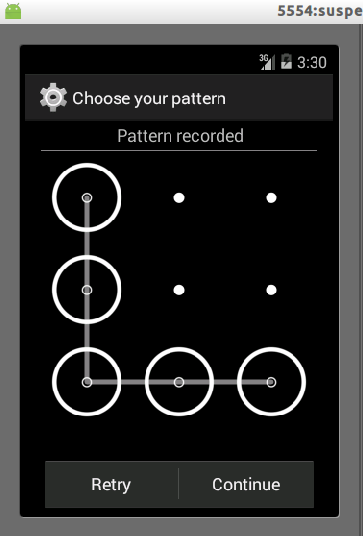
We can imagine those dots with numbers as shown below.
1
2
3
4
5
6
7
8
9
The above pattern, in this case, becomes 14789.
When a user sets the pattern, android hashes the input pattern value and stores it in a file called "gesture.key" located at "/data/system". This is accessible only to the root, and thus, we need root privileges in order to access this file.
There are two possibilities to bypass pattern locks on rooted devices.
- Remove gesture.key file
- Pull the gesture.key file and crack the SHA1 hash.
Quick Exercise: Removing gesture.key file:
Removing gesture.key file is as simple as getting a shell on the device and navigate to the location of "gesture.key" and run "rm" command as shown below.
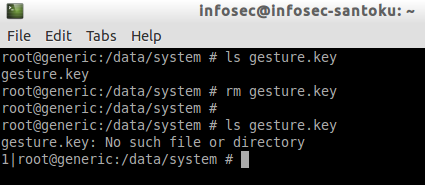
After removing the gesture.key file, as shown above, we should be able to login to the device by entering any pattern.
Quick Exercise: Cracking SHA1 hashes from the gesture.key file:
Goal: gesture.key file has been taken from a real device, and it's been provided with some additional files that are needed to crack the SHA-1 hash. Crack the hash and find the pattern.
Location of the gesture.key file in Santoku is as shown in the figure below.

Now, let's see how we can crack the hashes from gesture.key file.
As mentioned earlier, when a user sets a pattern, it is stored as SHA1 hash within the gesture.key file. Comparing this hash against a dictionary of all the possible hashes solves the problem.
following steps are followed on a real device to obtain gesture.key file from a real device which is rooted (You can do the same on an emulator too).
$adb shell
shell@android$su
root@android#cp /data/system/gesture.key /mnt/sdcard
The commands shown above will copy the gesture.key file onto the sdcard.
Now, we can pull this file onto your local machine using the following command.
$adb pull /mnt/sdcard/gesture.key
We can run the following command to crack the hash.
$ grep -i `xxd -p gesture.key` AndroidGestureSHA1.txt

As you can see in the figure above, we have cracked the pattern , which is 14789.
The above command checks the hash from gesture.key for a match in AndroidGestureSHA1.txt file, which consists of all the possible SHA1 hashes and their clear text.
We can also a write a tiny shell script to execute the same command as shown below.
$ cat findpattern.sh
grep -i `xxd -p gesture.key` AndroidGestureSHA1.txt
$
You can just place gesture.key and AndroidGestureSHA1.txt file along with this shell script and run it as shown below. It will result in the same.
$ sh findpattern.sh
14789;00 03 06 07 08;C8C0B24A15DC8BBFD411427973574695230458F0
$
Bypassing password/PIN using adb:
Note: This technique requires the device to be rooted and USB debugging must be enabled if you attempt to do it on a real device.
Goal: password.key and locksettings.db files have been taken from a real device, and they have been provided with some additional files that are needed to crack the PIN. Crack the hash and find the PIN.
Bypassing password/PIN require the same steps to be followed. However, this is not that straight forward as we have seen with pattern lock.
When a user creates a password/PIN, a hash will be created, and it will be stored in a file called "password.key" in "/data/system." Additionally, a random salt is generated and stored in a file called "locksettings.db" in "/data/system" path. It is required to use this hash and salt in order to brute force the PIN.
password.key and locksettings.db have to be pulled from their respective locations shown below. This also works with emulators.
/data/system/password.key
/data/system/locksettings.key
We can use the same steps that are used with gesture.key
Copy the files on to the sdcard
# cp /data/system/password.key /mnt/sdcard/
# cp /data/system/locksettings.db /mnt/sdcard/
Pull the files from sdcard
$ adb pull /mnt/sdcard/password.key
$ adb pull /mnt/sdcard/locksettings.dbNow, let's get the hash from password.key file. We can open password.key file using "cat" command and grab the hash as shown below.

Now, let's open up locksettings.db file using sqlite3 command line tool and get the salt.

It is stored in locksettings table and can be found at lockscreen.password_salt entry.
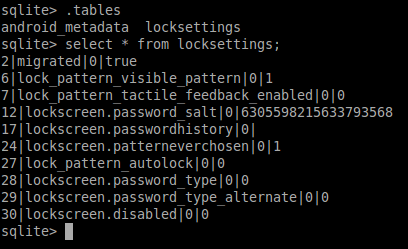
Notice the following line in the above figure showing the salt.
12|lockscreen.password_salt|0|6305598215633793568
We now have both the hash and salt. We need to brute force the PIN using these two.
Folks at http://www.cclgroupltd.com have written a nice python script, that can brute force the PIN using the hash and salt. This can be downloaded from the link below, and it is free.
http://www.cclgroupltd.com/product/android-pin-password-lock-tool/
This is already placed in Santoku at the following location with the name "recover-android-pin.zip".
"~/Desktop/files/screenlock bypass/Password&Pin/"
Navigate to the directory shown above and unzip the file using "unzip" utility as shown below.

Finally, run the following command using the BruteForceAndroidPin.py file.
Python BruteForceAndroidPin.py [hash] [salt] [max_length_of_PIN]
Running the above command will reveal the PIN as shown below.

The time required to crack this PIN depends on the complexity of the PIN set by the user.
Bypassing screen locks using CVE-2013-6271:
Note: This technique works only with Android devices prior to version 4.4.
USB debugging must be enabled.
No root required.
In 2013, Curesec disclosed a vulnerability that allowed the lock screen to be cleared without the appropriate user interaction on android devices. This is basically a vulnerability in com.android.settings.ChooseLockGeneric class. A user can send an intent to disable any type of screen lock. This is shown below
$ adb shell am start -n com.android.settings/com.android.settings.ChooseLockGeneric --ez confirm_credentials false --ei lockscreen.password_type 0 --activity-clear-task
Running the above command will disable the lock screen.
Exercise 4: Physical acquisition
Objective:
Similar to physical acquisition process in standard digital forensics, physical acquisition process on mobile devices creates a bit-by-bit copy of an entire file system. It creates a copy of the entire file system, which contains data present on a device including the deleted data and unallocated space. This means, if we get a physical image of a device, it is possible that we can recover deleted data as well. The objective of this exercise is to demonstrate the techniques to acquire a physical image from a device.
List of VMs used: This lab exercise makes use of Santoku Linux VM.
Tools: ADB, netcat
Files used in this lab: netcat binary(nc)
Steps:
Physical acquisition on Android devices is done using a variety of ways both using freely available tools as well as commercial tools. Most of the software-based tools require the device to be rooted in order to get the physical image of any of the mounted partitions on the device. This means, even commercial tools that provide physical dump will temporarily root the device and then acquire the physical dump.
Getting an image using "dd" is one of the most popular techniques available for rooted devices.
Imaging Android file system:
In this section, we will see how to perform data acquisition of Android file system partitions.
Note: in order to follow the below process, the device must be rooted if you're doing it on a real device. In our case, we are going to do it on the emulator that we have set up earlier.
We will use the popular "dd" tool to do our job. "dd" is present in Android by default in "/system/bin" location.
Now, let's look at the partition locations of our interest using the mount command.
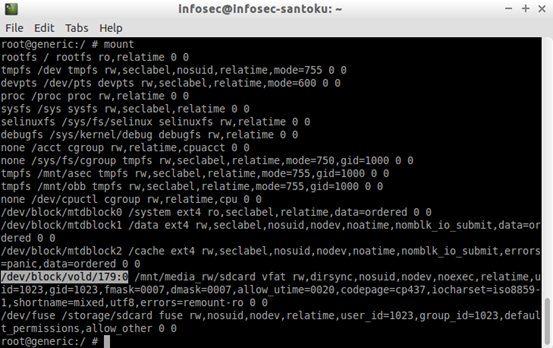
Following is the entry associated with "/system" partition.
/dev/block/mtdblock0
Following is the entry associated with "/data" partition from the above output.
/dev/block/mtdblock1
Following is the entry associated with "/sdcard" partition that is mounted.
/dev/block/vold/179:0
We can acquire physical dump of any of the partitions listed in the figure above, and the steps remain the same for any partition.
We are going to do it with the "/data" partition in this exercise.
So, let's use the following command to extract this particular partition using "dd".
dd if=/dev/block/mtdblock1 of=/mnt/sdcard/output.img
The above command is explained below.
if = input file
of = output file to be created
output.img = name of the output image to be created and we are saving it on the sdcard.
We can even specify the block size using the option "bs" in dd.
Once after finishing the above process, we can pull this file out using adb pull command.
Below screenshot shows the command to pull the image onto our workstation using adb pull command.
adb pull /mnt/sdcard/output.img
Now, we can use this image to do our further analysis on the device.
Warning: The above process may create an overwrite condition if we do not carefully choose a new SD Card as destination location rather than overwriting the suspect's SD Card.
Transferring the image directly on to the local machine using netcat.
You can download it from the following link.
http://www.netmite.com/android/mydroid/external/netcat/
In our case, netcat binary for Android has already been provided in the following location inside Santoku.
"~/Desktop/files/binaries"

The above process we used is writing the output image onto the SD Card. We are pulling it on the local machine at a later point in time.
What if you want to transfer the image onto your local machine directly without writing it onto the SD card? That can be done using netcat binary.
This section shows the steps to acquire an image using dd and then transferring it to the local machine using netcat instantly. Let's create an image of the SD Card using netcat.
First, push the netcat binary onto the device's "/data/local/tmp" directory using "adb push" as shown in the figure below.

Get a shell on the device and check if it is uploaded. Also, make sure that executable permissions are given to the netcat binary.

Now, run mount command on the device once again to check the location of "/sdcard" partition.
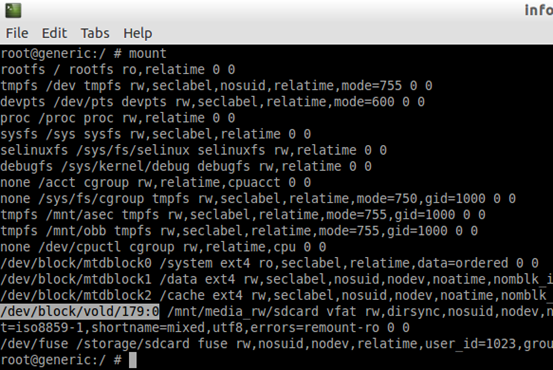
The following entry from mount command's output shows the partition associated with "/sdcard".
/dev/block/vold/179:0
Run the following command on your local machine in order to forward the local port 8888 to remote port 8888.

This means, any connection that comes on to your local machine on port 8888 will be redirected to port 8888 on the android device.
Now, login to your android device and run the following dd command.

Basically, we are taking the input from the "/sdcard" partition and piping it to netcat, which is running on port 8888 of your android device.
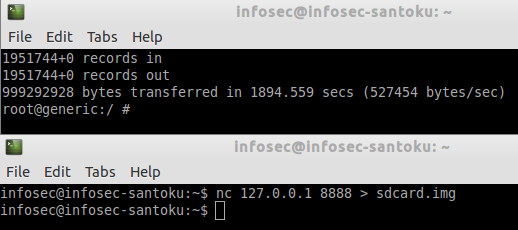
Now, run the following command on your Santoku to read the output of dd command using netcat and save it as sdcard.img

This will take some time to complete, and it looks as shown below during the process.

Once it is finished you should see the following output and sdcard.img file will be placed in your local machine inside the current directory where you are running netcat.
Exercise 5: Analysis of the SD Card data on the emulator
Objective:
The objective of this exercise is to use an emulator to show how we can analyze the live data on a mounted SD Card image taken from a real device. This is shown using an imaginary bribery case
List of VMs used: This lab exercise makes use of Santoku Linux VM.
Tools: ADB, xxd, strings
Files used in this lab: sdcard.img
Goal:
A sample SD Card image has been acquired from a suspect's device, and it is given to you for analysis. We have seen how to mount it in an emulator in "Exercise 1." Now, analyze it and see if you find any interesting artifacts from it.
Steps:
During the lab setup phase, we have created an emulator with custom SD card image file taken from the suspect. Let's analyze it to see if we can find anything interesting in it.
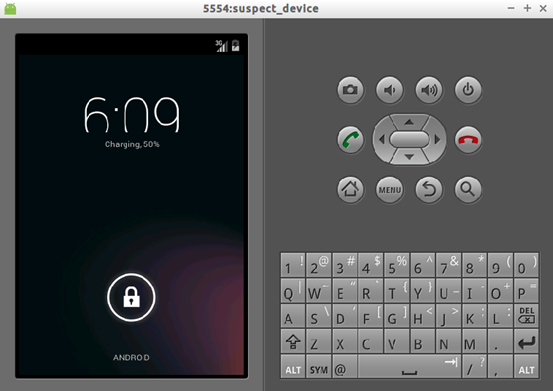
First, get a shell on the emulator using adb.
Now, navigate to the "sdcard" folder and list down the contents as shown below.
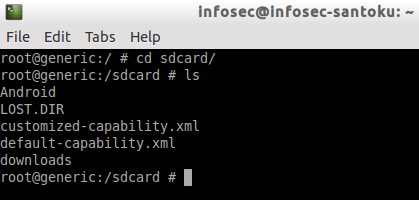
The above figure has a downloads folder. Let's see if we can find anything interesting inside it.
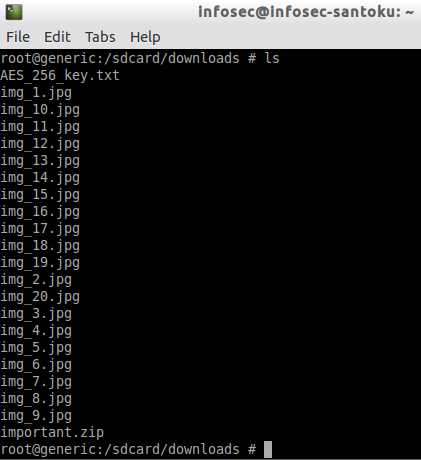
Interesting! It appears to have a zip file with the name "important.zip". Let's pull it out and see if we can find anything interesting. We can pull the file onto the local machine as shown below.

Now unzip the file using "unzip" utility.

It appears to be a ".dat" file. Let's first run "strings" command against it and see if it has any interesting strings.
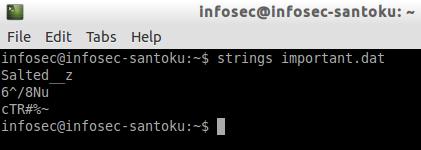
Nothing interesting. Let's use "xxd" tool to view this file. "xxd" tool can be used similar to hex editors but right at the command line. It comes preinstalled in most of the Linux distributions and hence Santoku.
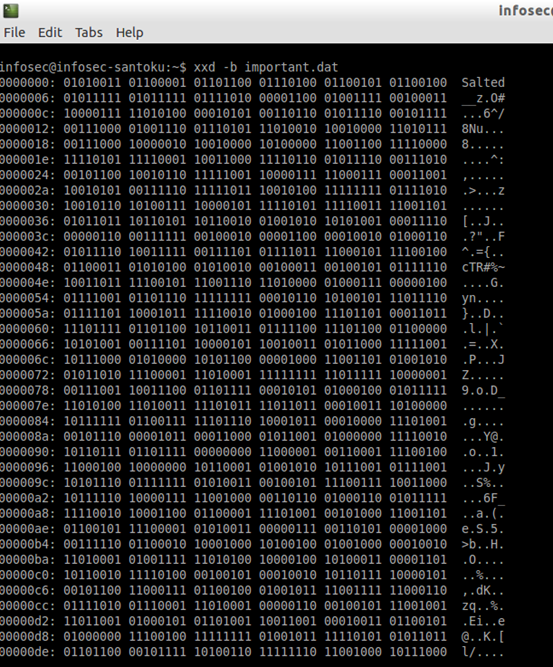
Bad news! It seems like an encrypted file.
Exploring the contents of downloads folder once again reveals that there is a file called AES_256_key.txt.
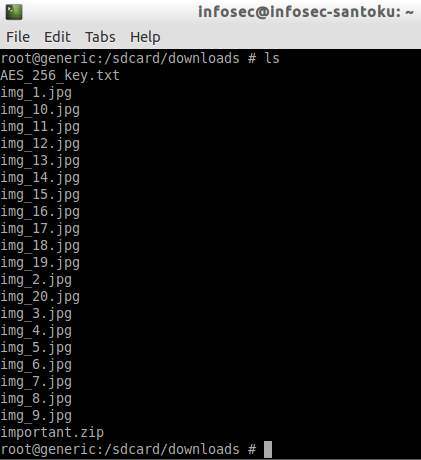
This is possibly the decryption key for this file. Luckily, the file name is AES_256_key.txt. This made our job easier as it is indicating that the encryption algorithm used could be "AES 256". Otherwise, there is no way to tell for sure that the file is AES-encrypted.
Let's pull it on to the local machine.

Opening up the contents of this file will reveal the following.

Well, let's try to decrypt the file using this key.
We have various options to decrypt this file. OpenSSL tool comes preinstalled with most of the Linux distributions, and we can try to decrypt this file using it as shown below.

-in : To specify the input file
-out : To specify the output file
-d : To decrypt the file
-aes256 : To use this algorithm
-k : To specify the key
Let's check the contents of the decrypted.txt file.
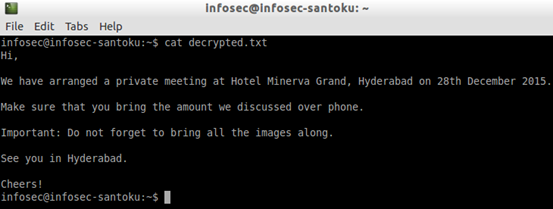
Excellent! We have successfully decrypted the encrypted message.
Interesting! Suspect seems to have some communication with some other party. This message also reveals a message highlighted as "important." The message "Don't forget to bring all the images along" shows that there may be some information in the images. Let's explore the "downloads" folder further and see if we can get anything interesting related to this.
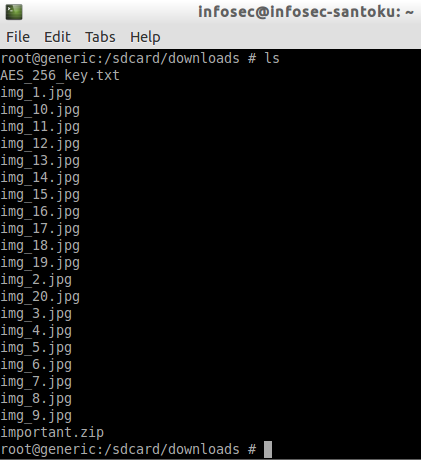
If you notice the "downloads" folder using "ls" command, there are many pictures inside it. Let's pull them one by one and let's see what they have inside it.

Opening the img_1.jpg file shows the following.

Nothing interesting! After viewing all the images, it is clear that all the images are also the same but with different file names.
Let's explore this directory once again using "ls –l" command.
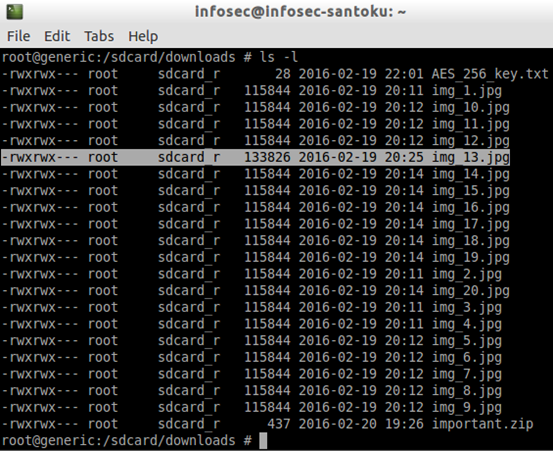
If we closely observe the above output, the highlighted image is larger than all the other images in terms of size. This looks suspicious. Let's pull it out using adb.

Run "strings" command against it as shown below.

After exploring the strings command output for a while, scrolling down to the end of the output reveals the following.
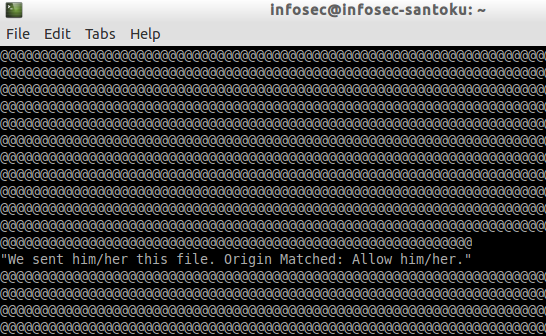
It appears that the party that the suspect is dealing with has sent this image, inside which they have hidden text. This is possible to verify his authenticity of the suspect while they met.
This evidence confirms that img_13.jpg file is used to confirm the authenticity of the person they are dealing with.
Exercise 6: Acquiring and analyzing android backups
Objective:
"adb backup" is a popular technique that is commonly used by many tools including commercial ones such as Oxygen forensics. Usually, we cannot recover deleted data using Logical acquisition. But this is not true with backups. It is possible to get SQLite databases out, and we can recover deleted data from them. The best part is, this technique doesn't require root privileges. Since these backup based techniques do not require the device to be rooted, they are more valuable when it comes to real world forensic investigations where the suspect's device cannot/shouldn't be rooted.
So, the objective of this exercise is to use an emulator to show how we can take backups from devices and then how we can analyze them later.
List of VMs used: This lab exercise makes use of Santoku Linux VM.
Tools: ADB, abe.jar, sqlite3
Files used in this lab: chatlock.ab, sms.ab, abe.jar, adb
Steps:
This section is going make use of a tool called "abe.jar." This tool is required to convert backup files into tar archives.
We can download the android backup extractor (abe) tool from the link below.
http://sourceforge.net/projects/adbextractor/files/latest/download
This is already placed in "~/Desktop/files/binaries/" folder in Santoku.
Now, run the following command to get the backup from the device. Make sure that the device is unlocked before you run the command.

if you notice the above figure, "adb" binary that comes with Santoku appears to have a problem with performing "adb backup" operation. A stable adb binary that can perform the backup operation is placed in
"~/Desktop/files/binaries/" folder in Santoku. You can check it as shown below.

Now, using this stable adb binary, run the same command as shown below. Do not forget to add "./" to run adb so that adb binary from the current working directory will be executed.

The following table shows various options that we can use with adb backup.
When you run the above command, the device will show the following screen asking for user confirmation.
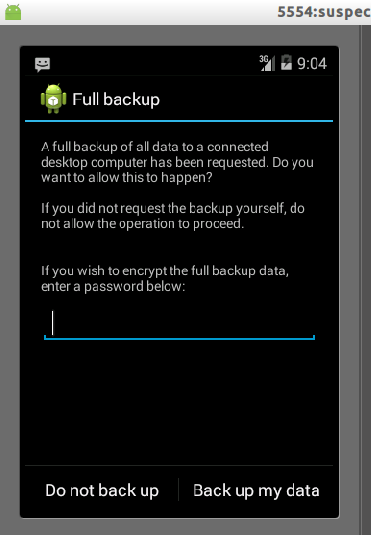
Click "Back up my data" and wait for a while to get the backup into your current folder.
If you observe the device during the backup process, you can see various applications' data being backed up.
Once the backup is acquired, we should see the command being completed as shown below.

We can cross check if it is there in your current location.

As we can see, we have got the backup.ab file. This is in Android Backup format, which is understandable only to the device. We should now convert this backup file into a format that can be used by us.
The next step is to convert the .ab file into a .tar archive. We can do it using "abe.jar" file that is available in "~/Desktop/files/binaries/" folder in Santoku.
The following help command shows options that can be used with abe.jar tool.
$ java -jar abe.jar --help
Android backup extractor v20151102
Cipher.getMaxAllowedKeyLength("AES") = 128
Strong AES encryption not allowed, MaxKeyLenght is < 256
Please install Java Cryptography Extension (JCE) Unlimited Strength Jurisdiction Policy Files 7 or 8
http://www.oracle.com/technetwork/java/javase/downloads/jce-7-download-432124.html
http://www.oracle.com/technetwork/java/javase/downloads/jce8-download-2133166.html
Usage:
info: abe [-debug] [-useenv=yourenv] info <backup.ab> [password]
unpack: abe [-debug] [-useenv=yourenv] unpack <backup.ab> <backup.tar> [password]
pack: abe [-debug] [-useenv=yourenv] pack <backup.tar> <backup.ab> [password]
pack 4.4.3+: abe [-debug] [-useenv=yourenv] pack-kk <backup.tar> <backup.ab> [password]
If -useenv is used, yourenv is tried when password is not given
If -debug is used, information and passwords may be shown
If the filename is `-`, then data is read from standard input or written to standard output
$
Let's run the following command to extract the contents from .ab file and then write them into a .tar file.

Now, we have got the tar file in the above step. Let's create a temporary directory called "workbench" on the Desktop. This is because we are going to extract the tar file in the next step, which may produce many files into the working directory. This can be done as shown below.

Now, copy the tar archive into the temporary folder created. This is shown below.

Let's extract the contents of this into the current directory using the following command.
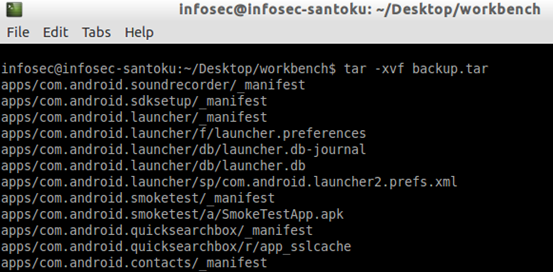
Nice! The contents have been extracted, and there are two folders created with the name "apps" and "shared". This is shown below.

"apps" folder consists of application specific data. When we create a backup using "-shared" option we see "shared" folder, which contains external storage files for each volume. Usually, /shared/0/ is the default shared volume.
Exploring the "shared" folder shows the contents of the SD Card as shown below.

Now, explore "apps" folder. Navigating to "apps" directory will show the following content. As you can notice, all the applications that are backed up are located here.
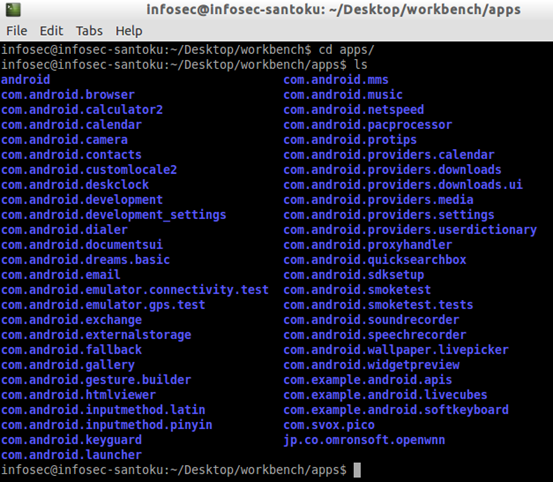
Note: If the developer of an application explicitly disables backup using AndroidManifest.xml file, we cannot get a backup of that app.
Now, let's navigate to "com.android.browser" app and see if we can see its data that is locally stored.

As we can see in the above figure, there are few folders within the app directory. Following is the description for each of these apps.
_manifest – AndroidManifest.xml file of the app.
a - contains apk file
db – contains .db files used by the application.
f – folder used to store the files.
sp – stores shared preferences xml files.
r – holds views, logs, etc.,
Let's navigate to "db" folder and see if we can find any interesting information inside it.

There is a file called browser2.db. Let's explore its contents by connecting to it using the sqlite3 client. This is shown below.

The above figure shows that there is a table called "history." This holds the contents of browser history.
Querying this table will reveal all the URLs browsed by the suspect as shown below.

Quick exercise: Whatsapp chatlock analysis
Goal: You have been given with a backup file called chatlock.ab. All the messaging apps on the suspect's device are locked with an app, and they require a PIN to view most of these chatting apps as they were locked by this chatlock app. Analyze the chatlock.ab file and find the PIN inside it.
Chatlock.ab file is located in "~/Desktop/files/backup/" folder. Navigate to this directory and convert this backup file to tar archive as shown below.
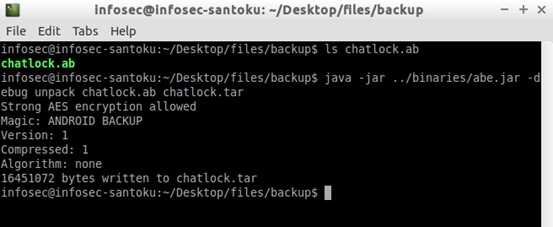
Let's cross check to see if the tar archive has been created as shown below.

Extract the contents of tar archive as shown below.
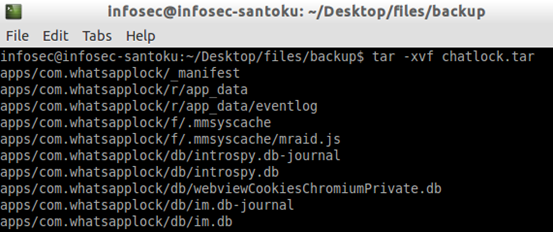
Navigating to the app com.WhatsApp lock inside "apps" folder, will reveal the following.

As you can see in the above figure, there are multiple folders within the app directory.
Let's check the shared preferences of the app by navigating to "sp" folder.
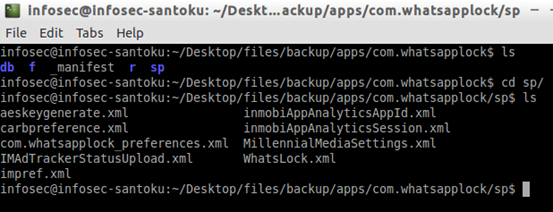
There are a couple of interesting files. Exploring the contents of com.whatsapplock_preferences.xml file reveals the PIN - 1234 used by the suspect for his WhatsApp chat lock application.

Quick exercise: Analyzing SMS database from backup
Goal: You have been given with a backup file called sms.ab. Analyze the sms.ab file and explore the contents inside it.
Similar to WhatsApp chat lock application we discussed, let's explore SMS application to see if we can find anything interesting.
sms.ab file is located in "~/Desktop/files/backup/" folder. Navigate to this directory and convert this backup file to tar archive as shown below.
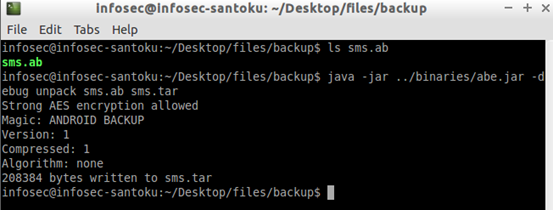
Let's cross check to see if the tar archive has been created as shown below.

Extract the contents of tar archive as shown below.
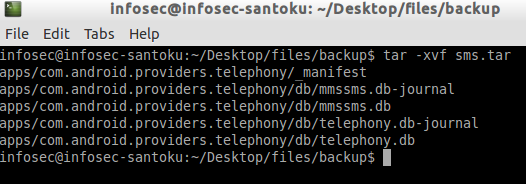
Navigate to com.android.providers.telephony folder within "apps" directory and explore the "db" folder.

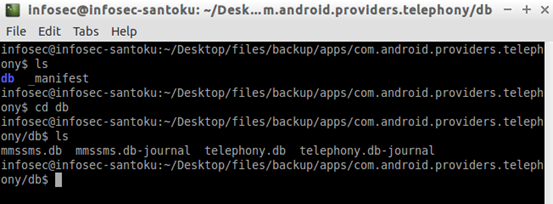
As you can see in the above figure, there is a file called mmssms.db inside this "db" folder.
Let's open this file using SQLite3 and run ".tables" command to check the table names.
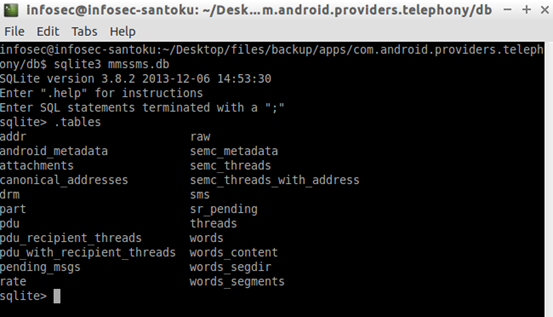
As you can see in the above figure, we have got "sms" table. We can query it as shown below.
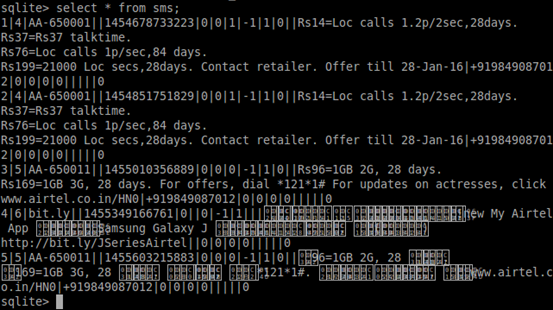
Nice! We have got the contents of the SMS table.
Exercise 7: Logical acquisition
Objective:
Logical extraction acquires information from the device using the original equipment manufacturer application programming interface for synchronizing the phone's contents with a personal computer.
Logical Acquisition is the process of extracting data that is accessible to the users of the device and hence it cannot acquire deleted data or the data in unallocated space. The above statement has limitations in some cases (We can recover deleted data from an SQLite database that is acquired using logical acquisition).
So, the objective of this exercise is to use an emulator to show how we can perform logical acquisition using the tools available in Santoku Linux.
List of VMs used: This lab exercise makes use of Santoku Linux VM.
Tools: ADB, AFLogical, sqlite3
Files used in this lab: NA
Steps:
Extracting Logical Data using "adb pull":
In this section, we will learn the techniques to extract sensitive data from an android device using adb. This doesn't really require root privileges to extract most of the sensitive data. But, having root access will always be an advantage to extract more data from the device. In this section, we are going to use "adb pull" command to extract sensitive data from the device. We will also use some popular logical acquisition tools, which already exist.
As discussed in one of our previous exercises, it is important to know where and how the data is stored in the device. Generally, all the data related to apps installed will reside in /data/data directory. Examining this directory for individual applications will give a lot of information to the examiner. To start examining the data of our interest, we should know that each application has a unique package name under which it stores all its data on the device.
As an example, "Facebook" app has the package name "com.facebook.katana". Now, to examine this application, we need to get into the following directory "/data/data/com.facebook.katana/".
Generally, apps store their data in several forms, which are shown below.
- Shared Preferences
- SQLite Databases
- Internal Storage
- External Storage
Before you proceed, make sure that the emulator is up and running.

Extracting SMS:
Let's go ahead and fetch SMS for analysis. We are going to use "adb pull" command to do this.
Inbuilt SMS application has the package name "com.android.providers.telephony".
Let's use the following command to pull all the files under this package.
adb pull /data/data/com.android.providers.telephony/ ~/Desktop/workbench/
/data/data/com.android.providers.telephony – source location
~/Desktop/workbench/- destination location
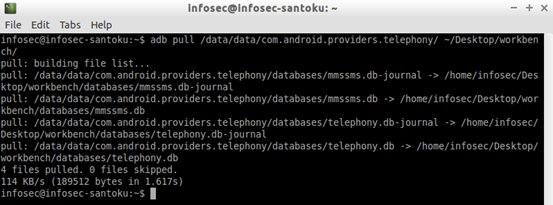
As we can see in the above figure, adb pull command went ahead and fetched all the files inside the specified package name.
The extracted data may contain "databases" and "shared_prefs". "databases" directory contains the SQLite database files, which contain SMS.
So, let's go ahead and dig deeper to see the contents of the files inside "databases" directory.

As we can see, the above figure contains a file named "mmssms.db." Usually, SQLite database files will have the extension ".sqlite" or ".db". There may be cases where SQLite database files have no extension.
Let's open mmssms.db file using "SQLite3" command line tool as shown below.
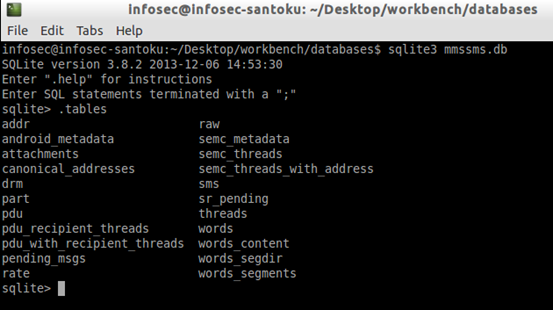
As you can see in the above figure, there are a couple of interesting tables out there. We can see the contents of any table using standard SQL commands.
Extracting Browser History:
Similar to how we have extracted SMS from inbuilt SMS app databases, we can extract the browser history just by using the path of the browser app. Android Browser app usually stores its history in an SQLite database file named "browser2.db". This is usually located at "com.android.browser/databases".
So, let's go ahead and pull this database file to view its contents.
To do this, we can use adb with the following command.
adb pull /data/data/com.android.browser/databases/ ~/Desktop/workbench/
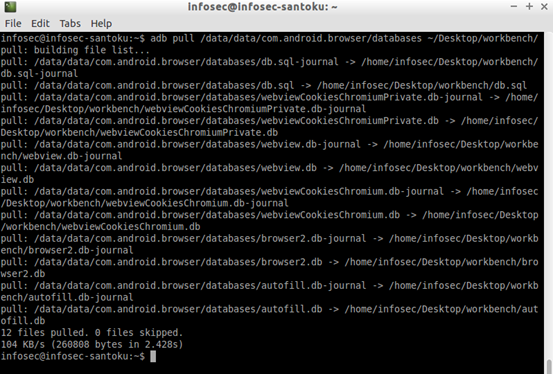
The above command fetched our required "browser2.db" file. Once again, we can use "sqlite3" command line tool to connect to the database file as shown below.
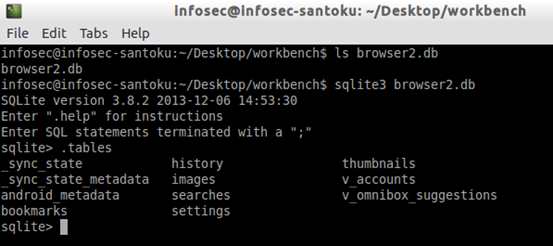
Let's now view the contents of the history table.

The above figure shows the contents of "history" table in "browser2.db" file.
Similarly, we can extract other data from the device using adb.
Data extraction with AFLogical:
According to their official website, "AFLogical is a top-rated free Android forensics tool developed by viaForensics. AFLogical performs a logical acquisition of any Android device running Android 1.5 or later. The extracted data is saved to the examiner's SD Card in csv format making it simple to extract and analyze Android data."
Three versions of AFLogical are available:
- viaExtract
- AFLogical OSE
- AFLogical LE
viaExtract:
AFLogical is available as a part of viaforensics' proprietary Android forensics software, viaExtract. viaExtract offers a more thorough forensic analysis of Android devices.
AFLogical Law Enforcement (LE):
The AFLogical Law Enforcement edition is able to pull all logical data from an Android device, however, does not contain the viaExtract GUI interface.
AFLogical Open Source Edition (OSE):
AFLogical Open Source Edition is a free version of viaforensics' software available through Google Code. It pulls all available MMS, SMS, Contacts, and Call Logs from your Android device.
This section focuses on demonstrating the effectiveness of AFLogical Open Source Edition (OSE).
Below are the steps to be followed.
AFLogical Open Source Edition is available in Santoku.
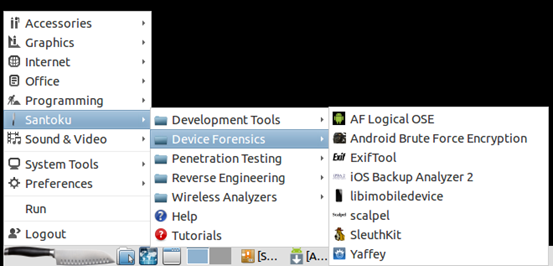
When you click the above button, you should see the following screen.

So, make sure that the emulator is up and running.
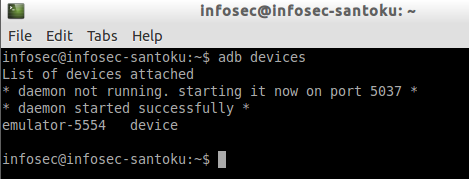
This exercise shows you the step-by-step procedure to manually use AF Logical OSE tool to extract the data from the emulator.
Use the following command to find the location of AF Logical OSE apk file.

Now, it's time to install the APK file on your target device. This is shown below.

Once after running the above command, you should see the agent installed on the target device. This looks as shown below.
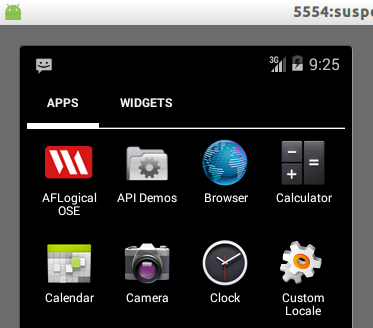
The above figure shows the successful installation of AFLogical on the target device. Now, launch the app and select whichever data you want to extract. In the following figure, we have chosen SMS and CallLogs.
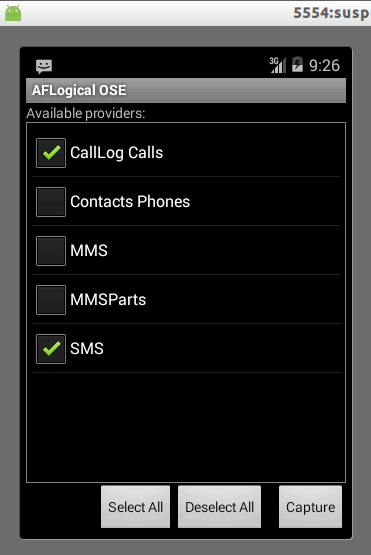
Once after selecting appropriate options, click "Capture" and you should see the following screen.
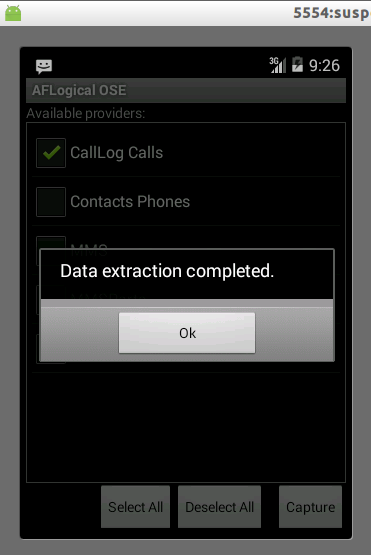
As shown in the above figure, AFLogical shows a message after successfully completing the extraction process. It also saves the report to the SD card within the folder named "forensics" as shown below.

We can pull the report from the device using various ways. Let's use adb to pull it out.

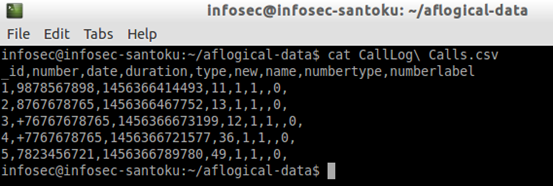
As shown in the above figure, AFLogical has saved the report in csv format. We have successfully pulled SMS.csv and CallLog Calls.csv files.
The following figure shows the contents of SMS.csv file

The following figure shows the contents of contacts.csv file
Exercise 8: SQLite data recovery
Objective:
With the growing mobile phones, SQLite databases contain a great amount of data due to the fact that most of the mobile apps use SQLite databases for their local data storage needs. Recovering deleted data from SQLite databases is always a necessary task during a forensics examination.
So, the objective of this exercise is to show data recovery from SQLite databases.
List of VMs used: This lab exercise makes use of Santoku Linux VM.
Tools: sqlparse.py, strings
Files used in this lab: downloads.db, sqlparse.py
Steps:
SQLite data recovery using sqlparse.py:
SQLite databases store deleted data within the database itself. So, this particular python script tries to get deleted from the SQLite databases specifically by exploring unallocated and free blocks within the database file.
"sqlparse.py" tool and downloads.db file have been provided in Santoku VM under "~/Desktop/files/SQLite data recovery/" directory.
Recovering deleted data from downloads database.
1. Run the python script with –h flag for help
$ python sqlparse_v1.1.py -h
Usage: Parse deleted records from an SQLite file into a TSV File or text file
Examples:
-f /home/sanforensics/smsmms.db -o report.tsv
-f /home/sanforensics/smssms.db -r -o report.txt
Options:
-h, --help show this help message and exit
-f smsmms.db, --file=smsmms.db
sqlite database file
-o output.tsv, --output=output.tsv
Uutput to a tsv file. Strips white space, tabs and
non-printable characters from data field
-r, --raw Optional. Will out put data field in a raw format and
text file.
$
2. Now cross check the contents of downloads.db to make sure that it doesn't have any live data.

As you can see in the above figure, now all the data has been deleted.
4. Now, run the following command to recover the deleted data back.

-f – to specify the input file
-r – to output data field in raw format
-o – output file
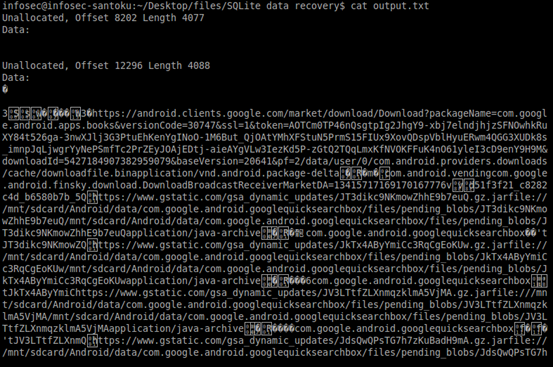
Running the above command will create a new file with the name "output.txt".
We can see the contents of this file to check if the deleted data has been recovered. This looks as shown below.
SQLite data recovery using "strings."
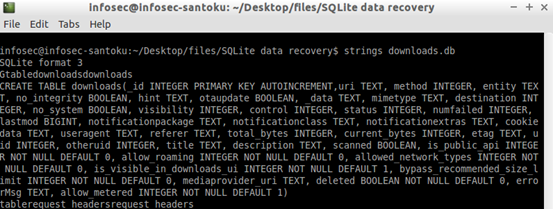
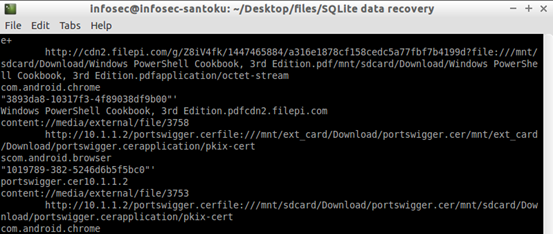
Another interesting yet easy way to recover data from SQLite databases is running strings command on the database file. This will show all the data from the database in a clear manner as shown below.
Exercise 9: File carving using Scalpel
Objective:
This exercise discusses how we can carve files from raw images. Specifically, we are going to do it using a tool called scalpel, which is preinstalled in Santoku.
Carving deals with the raw data on the media and doesn't use the file system structure during its process. Carving makes use of the internal structure of a file. A file is a block of stored information like an image in a JPEG file. Header-footer carving is one of the simplest ways of carving. It searches through the raw data for the file types you wish to carve. File carving not only uses header and footer values but also the identifier strings and size to search block by block.
List of VMs used: This lab exercise makes use of Santoku Linux VM.
Tools: scalpel
Files used in this lab: image.img
Steps:
Perform file carving on the data partition acquired from the android device and get JPEG images.
1. Determine the location of your target image file. It is located at the following location.
In this exercise, the following is the location of the image.
"~/files/images/image.img"
2. Now, we need to modify the configuration file of scalpel tool slightly.
Scalpel configuration file is located at "/etc/scalpel/scalpel.conf".
Check the file permissions of this file as shown in the figure below.

Well, we do not have permissions to write to this file. So, open up scalpel.conf file with "sudo" using any of your favorite text editors as shown below.

Uncomment the line where you find "jpg" as shown below.
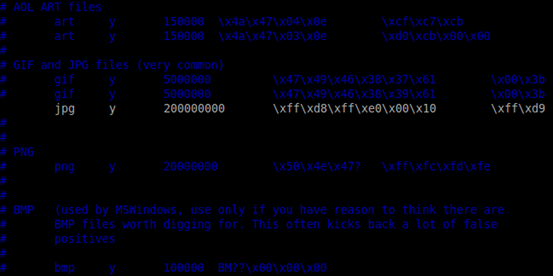
This is to ensure that JPEG files will be carved when you run scalpel.
3. Run scalpel using the following command
scalpel ~/files/images/image.img –o ~/files/images/output/
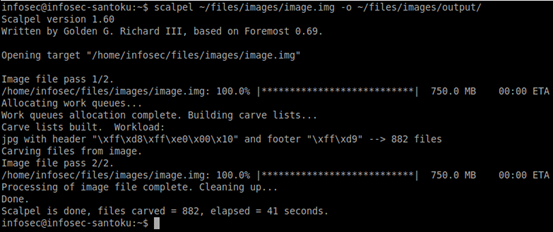
The above command takes "image.img" file as input and saves the output in the path specified using "–o."
4. Once completed, we should see the following images carved in the "output" directory.
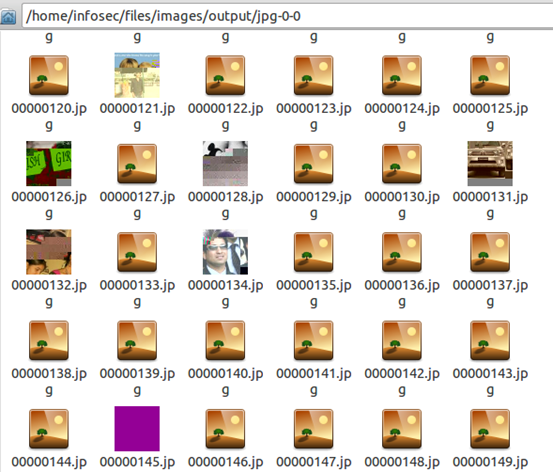
We can even open any of these files to view them.


