Snort Rule Writing for the IT professional: Part 2

Welcome back to my series on Snort rule writing.
In my first installment, we covered the basic syntax of a simple rule. We established the fundamental framework for all Snort rules by laying a simple template. This template breaks the rule into two basic components, (1) the rule header and (2) the rule options.
Learn Network Security Fundamentals
It's important to note that the Snort rule abides by a simple logic. First, a potentially malicious packet must meet the threshold of having all the components of the rule header evaluate to true before any of the components of the options section are even considered. If we can stop or alert on a potential attack with the rule header alone- all the better- as the header evaluation by the Snort detection engine requires only a few CPU cycles and is very efficient.
If we need to examine the payload of the packet, this requires far more CPU cycles and is far less efficient. Against today's sophisticated cyber attacks, in most cases we will need to delve deeper into the packet to determine whether it particularly came from someone with ill intentions.
In this installment, we will look at a slightly more complex example of a Snort rule in an attempt to explain some of the various fields in the options section of a real, live Snort rule. We will use a rule that focuses its detection on the TCP and IP header to illustrate how these header fields can be used for intrusion detection. This particular rule comes from Sourcefire's VRT rules and illustrates more of the complexities of Snort rules, hopefully without overwhelming the novice. You can find this rule among the scan-rules in your Snort rules directory, which usually resides at /etc/snort/rules.
Our rule example
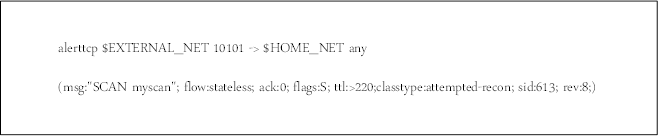
Please reference my first post "Snort Rule Writing for the IT Professional" for a brief tutorial on the structure of the header. Just to recap though: alert is the action, tcp is the protocol, $EXTERNAL_NET is a variable configured in the snort.conf file which contains a definition of the external network, 10101 is the source port, -> indicates traffic moving toward the destination address or variable, $HOME_NET is a variable defined in the snort.conf file which defines the internal/protected network and finally, any indicates any destination port.
In this tutorial, I want to focus on the options section of the rule and introduce some new options. Previously, we addressed the msg option, and in this particular rule's case, it sends a message to the IDS operator "SCAN myscan". The fields after the message will all be new to us.
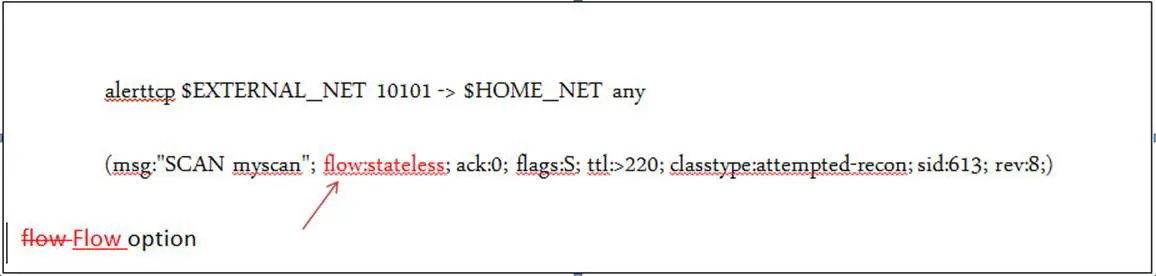
The very next field in the options section is the flow option. This enables us to define a flow state for the traffic on our IDS. Just like a firewall that can track state, e.g. a stateful firewall, we are able to define whether we want to look for traffic that has an established connection. We can look for "established" or "stateless" sessions. In our example here, we followed the keyword flow with stateless which means that this rule will apply without considering the state of the TCP session. Other options here include, established, no stream, stream only, to_client, to_server, from_client and from_server. The table below summarizes these flow options arguments.
Flow option arguments

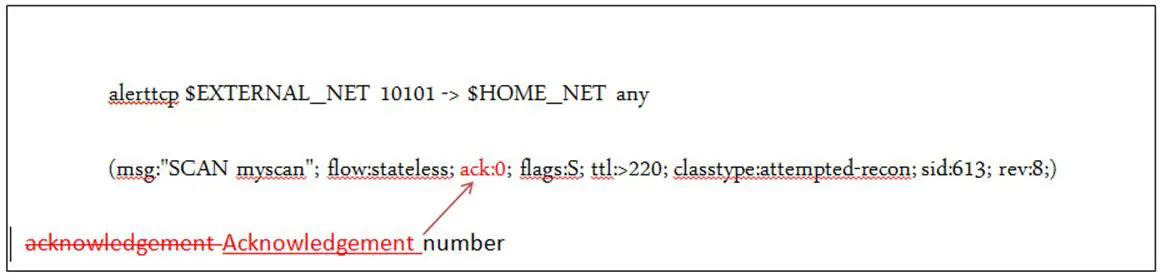
The next field after the flow is ack. It's important not to confuse this with theTCP flag ACK. Here we are looking at the acknowledgement number that is sent back by the TCP packet recipient to the sender. This is how the TCP protocol can be certain that the packet was received. If the sender does not receive the acknowledgement number of the packet, the packet is then resent.
Nmap and other port scanners are capable of sending scanning packets that have the acknowledgement number set to zero (0). By looking for packets with an acknowledgement or ack field set to zero, we are looking for packets that aren't RFC compliant and are probably coming from a scanning program like Nmap.
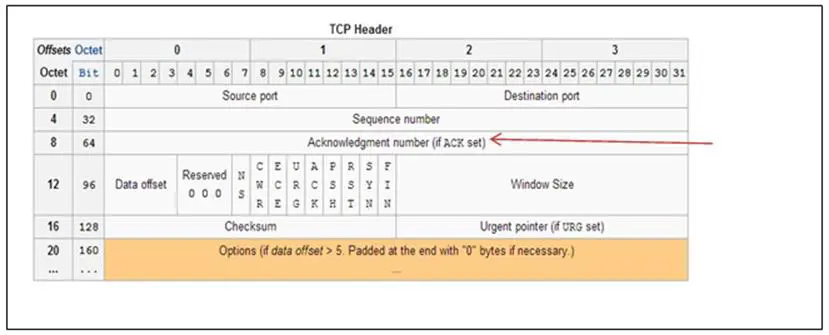
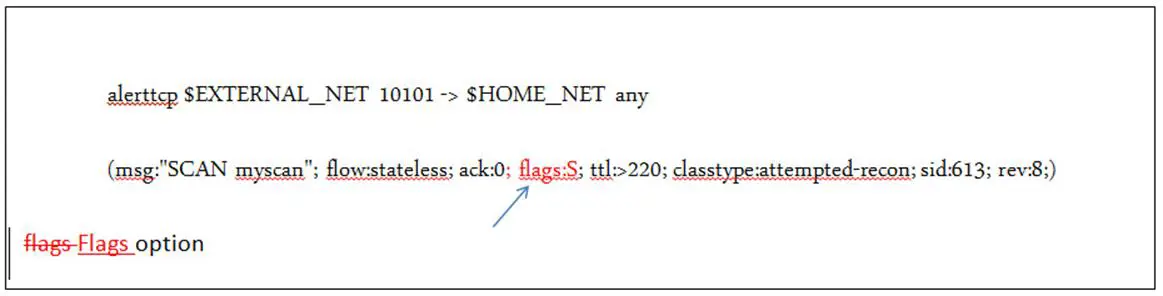
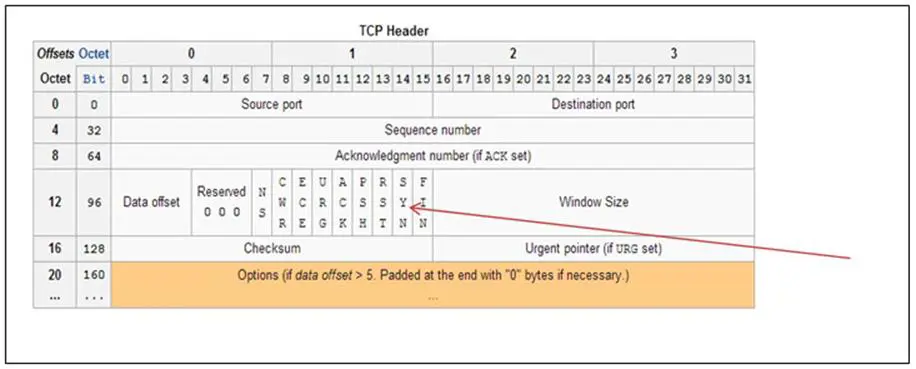
Next, we can see in the options area the couplet flags:S. This is the flags option field. We can designate and look for any flags or any combination of flags in the TCP header. In this case, we are looking for packets with the S or SYN flag set. Remember that the TCP header has a one byte field, or 8 bits, to designate each of the eight flags. So, for the first packet in a TCP 3-way handshake, the second to last bit will be turned on or has a value of one (1), indicating a SYN flag. We can check for these flags by using the keyword flags.
For instance, we might want to look for flags that should never appear on the wire in a normal RFC compliant communication, as they are likely coming from someone with less than good intentions toward our network and data. Many scanning tools such as Nmap and Hping are capable of crafting non-compliant packets in an attempt to gather information about our network through the recon or scanning process. By sending these non-compliant packets, they can decipher whether a port is open or closed.
An example might be a packet with both a SYN and FIN flag set (this would both open and close a connection). The flag keyword can be very useful in detecting scanning or reconnaissance activities on your network. The following table provides the arguments of the flags keyword.
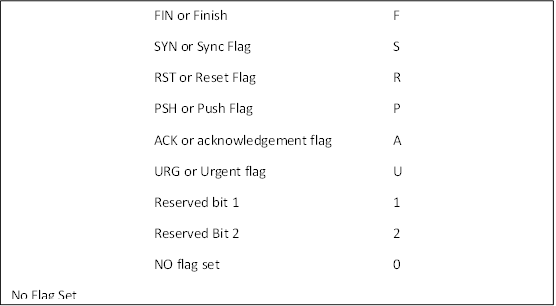
Flags option arguments
In addition, we can use the !, +, and the * operators in the flags option. These can be used for negation (!S, packets without the SYN flag set), to create a logical AND (S+F, packets with BOTH the SYN and FIN flags set) or to create a logical OR statement (S*F, either the SYN or FIN flag is set).
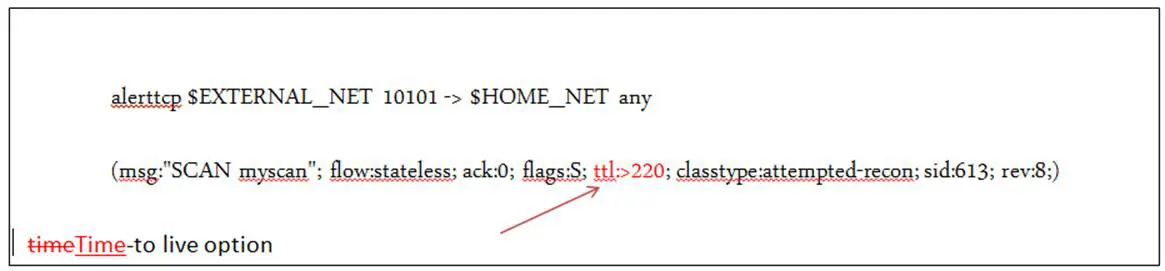
In the last of our packet conditions, we can see the couplet ttl>220. Once again, we set a condition for probable malicious packets that have a time-to-live (TTL) greater than 220. This option was originally used to attempt to identify traceroute reconnaissance attempts. Here we are looking for packets with the time to live set to greater than 220. We can also use the operators <, =, <= and >=. I won't belabor you with examples of these operators as I believe their use is self-evident.
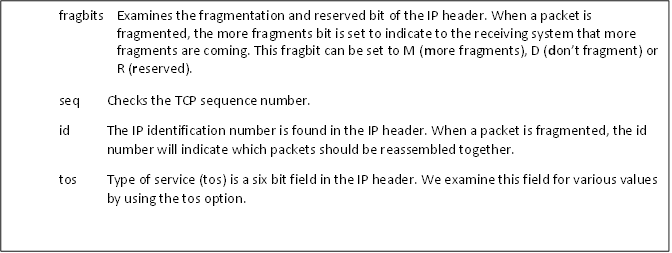
These four options, flow, ack, flag and ttl all examine the TCP or the IP header of the packet. As such, they are relatively efficient and use just a few CPU cycles, unlike say, delving into the payload and examining all the data there. Snort has a number of other options that examine fields in the TCP or IP header that may indicate a malicious packet. A few of these are listed below.
TCP and IP Header Fields
Metadata
Now that we have examined all of the fields in this rule that provide the conditions for the alert, we will move on to the metadata. In our rule, the metadata follows the option ttl:>221. This metadata is superfluous to the process of identifying malicious traffic and instead provides information to the operator regarding the type of malicious traffic, the rule number, and the version of the rule. This can all be critical information in trying to decipher what has actually taken place in your network and the management of your rules.
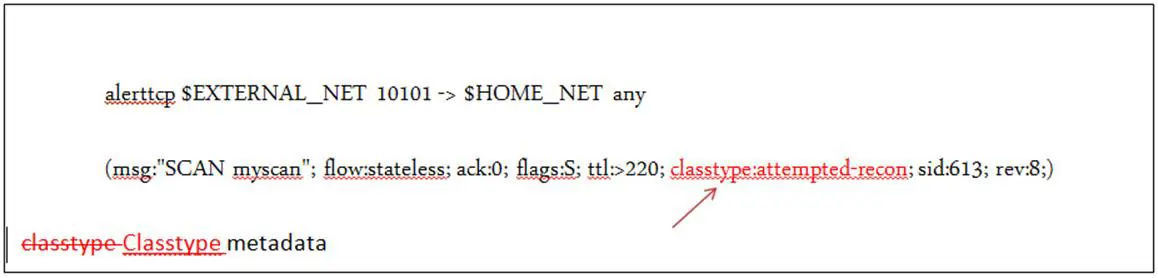
The first of these metadata is classtype. This is a classification system established by Sourcefire to classify the type of malicious traffic that the rule is designed to detect. In our sample rule, the classtype is set to "attempted-recon" or in order words: someone is doing reconnaissance on our network. They are probably trying to gather information before an attack. This is something we would likely want to know, but in this era of nearly nonstop reconnaissance, this rule will likely generate an excess of alerts on your system.
As organized cybercrime, APT and even script kiddies have an automated scanning or reconnaissance system, this rule is likely to be triggered often. In any case, this is a relatively low priority and doesn't represent an actual malicious packet or attack, but simply someone in the information gathering stage.
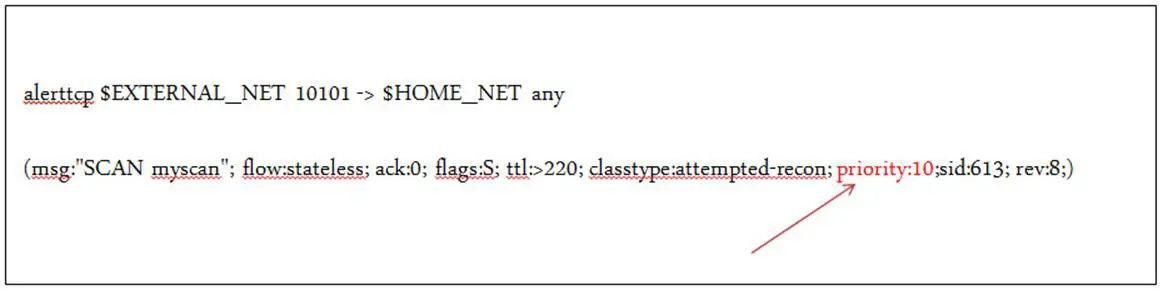
Snort has a system of prioritizing these classtypes so that alerts can be viewed and categorized by the level of threat they represent to your network. This enables us to filter out alerts that may be less threatening and only view or act upon the most threatening types of packets. Although Snort classifies each type of attack with a default priority, this default priority may be overridden by using the priority keyword in the rule and assigning a priority different from the default value. The lower the priority number, the higher the threat. The table below classifies each the classtypes with its default priority.
High Priority Medium Priority Low Priority
Just one classtype has a very low priority: tcp-connection. Our sample rule is classified as an attempted-recon, making it a medium priority. If we wanted to change its priority to say, very low, then we could simply re-write the rule as below.
Following the classtype option, we can see another couplet "sid:613". The sid is an acronym for Snort ID. Each rule in the Snort ruleset has a unique ID that enables output modules or log scanners to identify the rule that triggered the alert or the packet log. The only argument to this keyword is the rule number. It's important to note that rules that you write yourself should be saved in the local-rules directory (/etc/snort/rules/local-rules) and given an SID greater than 1,000,000. Snort uses the following convention for numbering Snort rules.
Snort rule identification system
Finally, we have the rev keyword. This indicates a revision of the rule. Each time the rule is revised or updated, the revision number is incremented by one. This helps us track the evolution of our rules. As we can see, this is the eighth revision of this rule.
I hope this information was helpful and instructive. In my next installment, we will examine an increasingly complex rule. Look for more analysis on the ever important "content" keyword as we examine rules that alert us on malicious data in the payload of the packet, which can get very sophisticated.
Learn Network Security Fundamentals

CompTIA CySA+
Discover the latest salary trends for CompTIA CySA+ certified professionals in 2024. Learn what factors influence your earning potential in the cybersecurity field.

Cybercrime investigator
Cybercrime has hit record levels, with an expected $7 trillion USD to be made from cybercriminal activity by 2021. Investigating these sorts of crimes can be

EC-Council CEH
CEH v13 is the world's first AI-powered ethical hacking certification. Discover what's new, how it compares to v12/v11 and why it's a career game-changer.

CompTIA SecurityX
Explore the expert-level CompTIA SecurityX certification, what to expect on the exam, the career benefits and more.
