Sniffing Network Traffic on Android

Introduction
There has been a lot of talk about how to connect your laptop though the Android network and use the bandwidth that you're already paying for. Usually, this requires setting up an access point on an Android device and connecting to it with the laptop. On some devices you have to root the phone to be able to do that, but on newer devices this functionality is already included in the Android itself and we don't even need to install a special application anymore. All we need to do is configure the access point in settings and connect to it.
Learn Network Security Fundamentals
In this article we won't talk about how to connect your laptop to the Android access point, but rather the opposite. We'll be connecting the Android device to the laptop-enabled access point. But why would we do that? The main reason is not related to using the network over the phone (quite the contrary: the laptop should have a valid Internet connection already). We're doing it because we want to sniff everything the Android device sends and receives over the network. There are a couple of ways to achieve that. One of them is to set a specific application to use a proxy, but the application has to support that setting, and most of them don't. Another option is to use a system-wide proxy, so all Internet communication goes through it, but that method isn't as reliable as the option we'll be using. We'll set up an access point on our laptop and connect to it via the mobile phone. We need to be aware that there are other options for sniffing the traffic from the Android device, like changing the IP tables on the phone, but they all require a rooted phone, which we don't want. We want to use the Android device without rooting it and blowing our warranty.
Option 1: Changing the Proxy Settings
The first thing we need to do when trying to sniff the communication of the specific application on the Android is to connect the Android phone and a laptop to a local area network. This way, both devices will obtain the IP address from the same local host network. In our case we're going to use the IP address range 192.168.1.0/24. Additionally, we also have to set-up a Burp proxy on our laptop, so we'll be able to intercept requests made by the Android phone. To set up Burp, we must first download it and start it; it should automatically start listening on a predefined port, which is 8080. If this port is already in use it will use another port, but it doesn't really matter which port it chooses right now, because we're going to configure it ourselves anyway. First, let's start up Burp and check if it starts to listen on the appropriate port. We can do that with the use of the netstat command in Linux. The actual command we have to run is shown below:
[bash]
# netstat -landtp | grep java
tcp6 0 0 127.0.0.1:8080 :::* LISTEN 31423/java
We can see that Burp is listening on the default predefined port 8080, but there's also one interesting thing; it's listening on 127.0.0.1 address. This is the local host address, so the Android device, which has a different IP, won't be able to connect to it. We need to configure Burp to use global IP address 0.0.0.0, which is used to listen for traffic on all interfaces, not just the local host lo interface. In order to do that, we must go to Proxy--Options under Burp, which will look like the picture below:
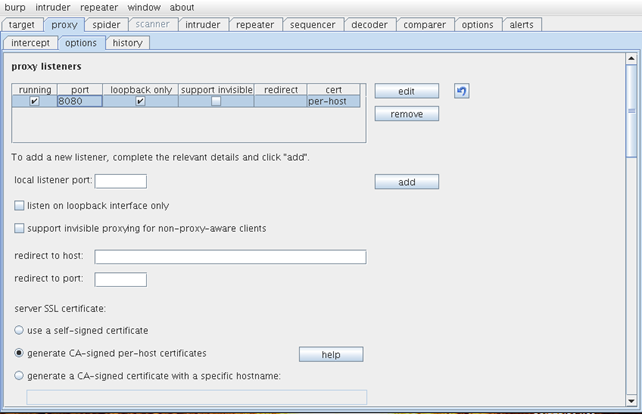
We can see that Burp is successfully listening on the port 8080, as we already saw. There's also a check in the loopback only option. This is exactly the option we need to disable. First, we must stop the proxy on port 8080; we can do this by clicking on the check box icon in the running column. After that the Burp proxy will stop and we will be able to load the configuration by clicking on the button edit. The configuration options will then look as follows:
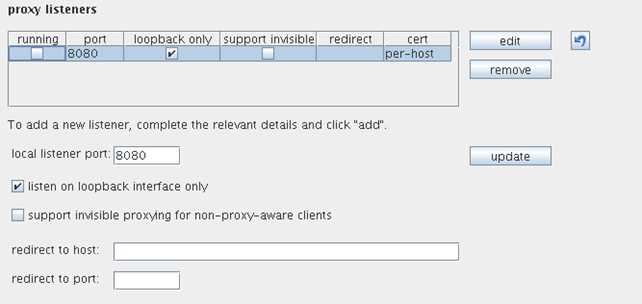
Now we must disable the "listen on loopback interface only" option and click on the update button. Burp will then ask us if we really want to start listening on all interfaces and we must press yes. Then we must restart the Burp proxy by enabling it in the running column. The Burp proxy should then be listening on all interfaces, which means we'll be able to connect to it from the Android phone. Let's check if the Burp proxy is really listening on all interfaces, with the same netstat command we already used. The output of the command is shown below:
[bash]
# netstat -landtp | grep java
tcp6 0 0 :::8080 :::* LISTEN 31423/java
Great, Burp is now listening on port 8080 on all interfaces. Remember that you can as easily change the port to a number of your liking, so you don't have to use 8080 if you don't like or if you already have some other service listening on that port.
Now we need to configure our Android phone to use a proxy. We can do that by changing the settings of the network we're already connected to. In order to that that, we need to open the Wireless settings and enter the advanced options for the currently connected network. After that we'll be able to see the "Proxy settings," where we need to select "Manual". Then we need to enter the IP address of our laptop computer and the port 8080 we configured Burp to use. Then save the settings.
After that we can start any application we want and, if we're lucky, some packets will start flowing through Burp. We first started the Gmail application, but it didn't work. This is because some applications don't honor the proxy being set in the network settings, so it doesn't really work for all applications, but it does for some. Next we started an application that we won't mention by name, and we received some traffic in Burp. The traffic can be seen on the picture below:
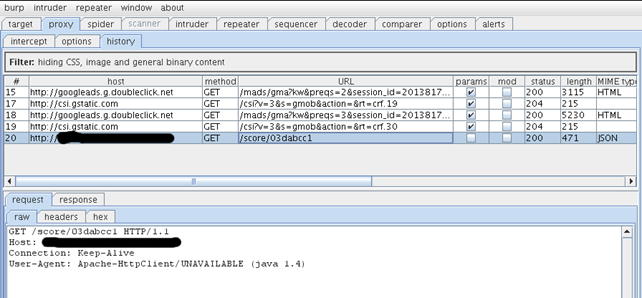
Cool. The first four packets are being sent because the application uses advertisements that are being downloaded from Google servers. And the last packet is actually the application-specific packet that sends a score of some kind on the server. We are also beginning to understand the API interface that the application uses to expose its features to the clients. We can also see the headers that are being generated when the GET request is being sent over the network.
This is all right, but so what? We can only sniff HTTP protocol and it only works for some applications, while we can't sniff the traffic being sent by other applications. You might say that this is lame, but it actually isn't; later we'll talk about techniques which we can use to sniff the HTTP traffic from every application out there, no matter which API functions it uses to bypass the proxy settings. Wait, isn't Burp able to intercept the HTTP and HTTPS traffic? So why are we only able to intercept HTTP traffic? Yes, Burp is able to intercept both clear text HTTP protocol and encrypted HTTPS protocol. The idea is that, when an application on Android tries to use the HTTPS, it first checks the certificate chain, which must be signed by the trusted certificate authority to be able to continue. For example: if we visit some HTTPS link in the Opera web browser, the web browser will display a warning saying that the web site is using a certificate that can't be trusted and give us the choice to choose whether we would like to continue browsing or cancel the request. If we continue browsing, we're essentially trusting the invalid certificate, which means in such cases that we'll be able to intercept traffic using the encrypted HTTPS protocol. But this is a web browser, which should ask the users of they want to continue browsing, because a lot of web sites today use non-signed certificate that can be trusted. Thus we need to be able to continue browsing.
But this isn't so easy with various other applications. What if some web application is trying to send a GET request through the encrypted HTTPS protocol using some API function call that's natively supported by the Android? Well, in such cases, that function doesn't have the means to ask the user if he wants to trust the certificate or not; it just succeeds or fails, depending on how the applications was programmed to behave. If the function call accepts the invalid non-signed certificate, then everything will still work and we will be able to intercept traffic through HTTPS; but the default option is to not trust the non-signed certificate and most applications use the default option. Why would anyone enable the less secure non-default option that, first of all, isn't secure and, second of all, requires more work? There's only one reason: the programmer of that application doesn't want to pay for the trusted certificate, but he still wants to send all the data over the encrypted HTTPS tunnel. But really, how many Android programmers like that are out there? Not many, which is why most of the applications will have default settings that reject the invalid non-signed certificate immediately. Therefore, we can conclude that intercepting the HTTPS traffic for most applications will be a little more difficult that just using a proxy.
Option 2: Adding the Burp's CA Certificate
In the previous section we said that HTTPS intercepting is possible in some applications, but we can't intercept the traffic successfully, because Burp presents a non-signed certificate to the application. Since the default behavior doesn't allow the application to use non-signed certificate, those errors will cause the application to fail and the requests will not be sent over the encrypted HTTPS tunnel.
Here we're going to extract the CA self-signed certificate that Burp uses from Burp and add it to the Android's certificate store. This way, we'll force the Android system to trust that certificate and connect to Burp without alerting the user about certificate not being trusted. The CA certificate is regenerated every time we restart Burp. Every time we make an encrypted connection to some host on the internet, Burp then generates another server certificate and signs it with the previously created CA certificate. Thus, if we add the CA certificate to the certificate store on the Android device, the connection to Burp will be trusted and we will also be able to intercept HTTPS traffic between android device and target web application.
First we have to export the CA certificate from Burp. We can do that by first setting up the proxy in Firefox or some other browser and then visiting an HTTPS-enabled web site. At that point, the web browser will present a warning notifying us that the certificate is not trusted. We need to add exception for that certificate and export it at the same time. To export the certificate, we must view the details of the certificate, which can be seen in the picture below:
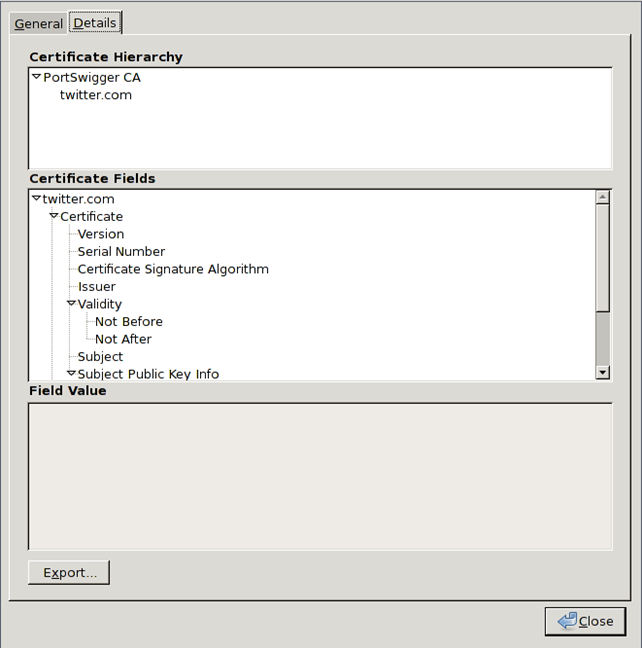
We can see that we selected the PortSwigger CA certificate and exported it. If we save the certificate into the file PortSwiggerCA and output its contents, we will get something like this:
[bash]
# cat PortSwiggerCA
-----BEGIN CERTIFICATE-----
MIICxDCCAi2gAwIBAgIEUI2pETANBgkqhkiG9w0BAQUFADCBijEUMBIGA1UEBhML
UG9ydFN3aWdnZXIxFDASBgNVBAgTC1BvcnRTd2lnZ2VyMRQwEgYDVQQHEwtQb3J0
U3dpZ2dlcjEUMBIGA1UEChMLUG9ydFN3aWdnZXIxFzAVBgNVBAsTDlBvcnRTd2ln
Z2VyIENBMRcwFQYDVQQDEw5Qb3J0U3dpZ2dlciBDQTAeFw0xMjEwMjgyMTUyMTda
Fw0zMjEwMjMyMTUyMTdaMIGKMRQwEgYDVQQGEwtQb3J0U3dpZ2dlcjEUMBIGA1UE
CBMLUG9ydFN3aWdnZXIxFDASBgNVBAcTC1BvcnRTd2lnZ2VyMRQwEgYDVQQKEwtQ
b3J0U3dpZ2dlcjEXMBUGA1UECxMOUG9ydFN3aWdnZXIgQ0ExFzAVBgNVBAMTDlBv
cnRTd2lnZ2VyIENBMIGfMA0GCSqGSIb3DQEBAQUAA4GNADCBiQKBgQCoXLjIpRJh
Sh/DbmhUCJErTgANPnoBBhfj97P6Gaya3BP+7NfzT670INyK2o5iS3FtSI78OZJ1
Sjgmg1jpycSqAPuOWS76kqrLiu+FaMAIAzYfIbei68wnPEAIflIA5AQpbSd5A4eF
ldOhRYTz5VfTJxvy388KFkqHi6JD+lnSSQIDAQABozUwMzASBgNVHRMBAf8ECDAG
AQH/AgEAMB0GA1UdDgQWBBTDazkycGJQkgV6GdPacarqRrMISDANBgkqhkiG9w0B
AQUFAAOBgQCiLCy7AQHpWLq1W2DANmrybMmSUFXqcOMZei/xb/61LS4NjoVIQ4Fm
1OWLSJX/t00P+fS0Xk/5+vnWgIE+WP8Z9l6eWzNu/7EU6GCm1vECZ2X+XycD8wgB
hZv17D+I0mFcHJFQtgq2sranJ+7oITkXOhcpwJ2+6+aTPDoUkp2AlQ==
-----END CERTIFICATE-----
This is the CA certificate that we need to import into the Android certificate store. To do that, we need to connect the phone to our system and copy the certificate to SDCARD on the Android phone. We can do that with the command below:
[bash]
# adb push PortSwiggerCA /sdcard/
22 KB/s (1038 bytes in 0.045s)
The CA certificate will then be stored in the SDCARD on the Android phone. To add it to the certificate store, we need to go to Preferences--Security and select "Install from device storage". When clicking on that entry, it will say that there is no valid certificate present on the SDCARD. But how is that possible? We just pushed the certificate from our computer to the SDCARD. The problem is that this process looks only for the file extensions to find the certificates and we pushed the default certificate to the SDCARD without the file extension. To bypass that limitation, we need to save the certificate as PortSwiggerCA.crt, push it to the Android SD card again and rescan the storage device. Now the CA certificate is found and we can simply import it into the certificate store by clicking on OK button. The process will then open a Toast message saying that the PortSwiggerCA certificate was successfully installed.
After that, we can start a web browser and try to visit an HTTPS-enabled web site. Upon opening the HTTPS URL, the Android will be able to verify the trust of the certificate presented by Burp and the web site will open normally. Additionally we will be able to see all the HTTPS traffic flowing through the internet in a Burp proxy.
Since Burp creates a new CA certificate every time we restart it, it's way better to create a new CA certificate manually, load it into Burp and also onto the Android device; then we will always be able to intercept HTTPS traffic as long as Burp will use the created CA certificate. We can follow the instructions presented here [1] to create the CA certificate manually. Basically, we need to execute the following commands to create the CA certificate:
[bash]
# openssl genrsa -des3 -out ca.key 4096
# openssl req -new -x509 -days 1000 -key ca.key -out ca.crt
This will create the CA certificate named ca.crt, which we need to import into our Android device. We can push it into the SDCARD as we did before and add it to the certificate store. By doing that we will be able to sign any server certificate with our CA certificate and the Android device will always trust the server certificate, because it trusts the CA certificate.
Next, we also need to create the server certificate signed by the previously created CA certificate, which we'll be using in Burp. To do that we must execute the commands below, again taken from [1]:
[bash]
# openssl genrsa -des3 -out server.key 4096
# openssl req -new -key server.key -out server.csr
# openssl x509 -req -days 1000 -in server.csr -CA ca.crt -CAkey ca.key -set_serial 01 -out server.crt
# openssl pkcs12 -export -out server.p12 -in server.crt -inkey server.key
The certificate will be stored in a file named server.p12, which is the server certificate we need to configure Burp with (signed by the previously created CA certificate). To configure Burp to use that certificate, we must open Proxy--Options and configure the "server SSL certificate" options as shown in the picture below:
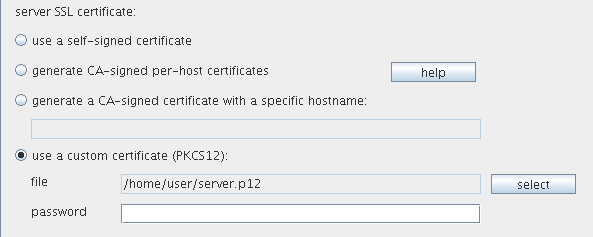
Of course, we must also provide the password for the server certificate. The important thing we need to remember is the Common Name (CN) that we used when creating the server certificate. It is only that domain that we'll be able to sniff without the warning message that the certificate is not valid. So why did we go through the hassle of creating our own certificates if we still need to recreate the server certificate and import it into Burp for each domain in the testing scope? The answer is quite simple: because we don't need to recreate the CA certificate every time. We created the CA certificate, imported it into the certificate store on an Android phone and now our system trusts every server certificate, which is signed by that CA certificate. This is why we don't ever need to transfer another CA certificate to the phone and install it; all we need to do is create another server certificate with appropriate CN on our computer and configure Burp to use it.
All we need to do from now on is to create a new server certificate for the domain we would like to test, sign it with the CA certificate, and import it into Burp. We don't need to configure anything else on the Android.
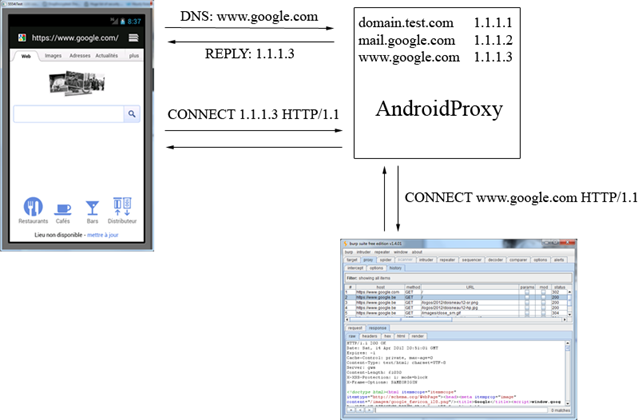
If we're going to extensively sniff HTTP/HTTPS traffic from the Android device, it's better to set up AndroidProxy, which is a program that sits between the Android device and our Burp proxy and makes it easy to intercept HTTPS traffic by sending the domain name instead of the IP address to our proxy. It does this by intercepting all DNS requests and rewriting the CONNECT command, passing the domain name to it, rather than IP address. This should be done before the requests reach the Burp proxy, which uses the CONNECT directive to associate the correct IP address with the DNS hostname.
A picture taken from the homepage of the AndroidProxy project on the Google Code, which explains this a little further, is presented below:
Option 2: Using a Linux Access Point
We'll be setting up the access point via the hostapd wireless host AP daemon. First we need to install it via our default package manager on the Linux system. The hostapd daemon adds a configuration file /etc/hostapd/hostapd.conf, which contains the default configuration variables shown below:
[bash]
# cat /etc/hostapd/hostapd.conf | grep -v ^# | grep -v ^$
interface=wlan0
logger_syslog=-1
logger_syslog_level=2
logger_stdout=-1
logger_stdout_level=2
dump_file=/tmp/hostapd.dump
ctrl_interface=/var/run/hostapd
ctrl_interface_group=0
ssid=test
hw_mode=g
channel=1
beacon_int=100
dtim_period=2
max_num_sta=255
rts_threshold=2347
fragm_threshold=2346
macaddr_acl=0
auth_algs=3
ignore_broadcast_ssid=0
wmm_enabled=1
wmm_ac_bk_cwmin=4
wmm_ac_bk_cwmax=10
wmm_ac_bk_aifs=7
wmm_ac_bk_txop_limit=0
wmm_ac_bk_acm=0
wmm_ac_be_aifs=3
wmm_ac_be_cwmin=4
wmm_ac_be_cwmax=10
wmm_ac_be_txop_limit=0
wmm_ac_be_acm=0
wmm_ac_vi_aifs=2
wmm_ac_vi_cwmin=3
wmm_ac_vi_cwmax=4
wmm_ac_vi_txop_limit=94
wmm_ac_vi_acm=0
wmm_ac_vo_aifs=2
wmm_ac_vo_cwmin=2
wmm_ac_vo_cwmax=3
wmm_ac_vo_txop_limit=47
wmm_ac_vo_acm=0
eapol_key_index_workaround=0
eap_server=0
own_ip_addr=127.0.0.1
We can see that we're used the wlan0 interface on the channel number 1 and the SSID access point name is test. Start the hostapd:
[plain]
# /etc/init.d/hostapd start
* Caching service dependencies ...
* Service `hostapd' needs non existent service `net.wlan0'
* ERROR: hostapd needs service(s) net.wlan0
To bypass this error we need to symling the net.lo to the net.wlan, because the above error message said that the net.wlan0 doesn't exists. This way we can simply bypass the above check. To create the symbol, execute this command:
[plain]
# ln -s /etc/init.d/net.lo /etc/init.d/net.wlan0
Afterwards we need to start the net.wlan0, which we can do with the following command:
[plain]
# /etc/init.d/net.wlan0 start
* Bringing up interface wlan0
* Starting wpa_supplicant on wlan0 ...
* Starting wpa_cli on wlan0 ...
* Backgrounding ... ...
* WARNING: net.wlan0 has started, but is inactive
Okay, the wlan0 interface card is inactive., Hmmmm … why? It's because we haven't edited the /etc/conf.d/net yet and added the appropriate settings for the wlan0 interface card. We need to add something as follows to the /etc/conf.d/net configuration file:
[plain]
modules_wlan0=( "!iwconfig !wpa_supplicant" )
config_wlan0=( "10.1.2.1 netmask 255.255.255.0" )
Then we can restart the wlan0 init script, which can be done with the command below:
[bash]
# /etc/init.d/net.wlan0 restart
* Caching service dependencies ...
* Bringing down interface wlan0
* Removing addresses
* Stopping wpa_cli on wlan0 ...
* Stopping wpa_supplicant on wlan0 ...
* Bringing up interface wlan0
* You are using a bash array for config_wlan0.
* This feature will be removed in the future.
* Please see net.example for the correct format for config_wlan0.
* 10.1.2.1 ...
SIOCSIFFLAGS: Operation not possible due to RF-kill
* ERROR: net.wlan0 failed to start
What's happening? There was some error informing us that operation is not possible because of the RF-kill. If we install the rfkill program we can inspect the settings of wireless devices. First let's list all available wireless devices:
[bash]
# rfkill list all
0: hci0: Bluetooth
Soft blocked: no
Hard blocked: no
1: phy0: Wireless LAN
Soft blocked: yes
Hard blocked: no
The wireless card is soft blocked? This is probably the reason we're getting the above error. To unblock the wireless card we can execute this command:
[bash]
# rfkill unblock all
# rfkill list all
0: hci0: Bluetooth
Soft blocked: no
Hard blocked: no
1: phy0: Wireless LAN
Soft blocked: no
Hard blocked: no
With the first command we unblocked all the wireless devices, but because only the wireless card was blocked, only the wifi was actually unblocked. Then we presented the wireless devices again; we can see that the wireless card isn't blocked anymore, which is good. We can try restarting the wlan0 init script again. This time there are no errors and the net.wlan0 init script works fine, which can be seen below:
[bash]
# /etc/init.d/net.wlan0 restart
* Bringing up interface wlan0
* You are using a bash array for config_wlan0.
* This feature will be removed in the future.
* Please see net.example for the correct format for config_wlan0.
* 10.1.2.1 ...
The wlan0 interface card now has the 10.1.2.1 IP set accordingly to the /etc/conf.d/net configuration file. We can display the information about the wlan0 interface card with the following command:
[bash]
# ifconfig wlan0
wlan0 Link encap:Ethernet HWaddr 00:26:c6:21:cf:1a
inet addr:10.1.2.1 Bcast:10.1.2.255 Mask:255.255.255.0
UP BROADCAST MULTICAST MTU:1500 Metric:1
RX packets:47740 errors:0 dropped:0 overruns:0 frame:0
TX packets:48220 errors:0 dropped:0 overruns:0 carrier:0
collisions:0 txqueuelen:1000
RX bytes:36288822 (34.6 MiB) TX bytes:12441625 (11.8 MiB)
The inet addr says that the IP address is 10.1.2.1, which is correct, and the Mask is 255.255.255.0, which is also correct. The route in the routing table has also been correctly added:
[bash]
# route -n
Kernel IP routing table
Destination Gateway Genmask Flags Metric Ref Use Iface
10.1.2.0 0.0.0.0 255.255.255.0 U 0 0 0 wlan0
We need to set up the DHCP server. We can do that by using the dnsmasq, which provides DHCP and DNS services. First we need to install and configure the dnsmasq. We won't go into the installation part of the dnsmasq, as you can probably just install it with your default package manager.
Then we need to start the DHCP server, which we can do simply by executing this command:
[bash]
# /etc/init.d/dhcpcd start
* Caching service dependencies ...
* Starting DHCP Client Daemon ...
After that we can simply start hostapd, which will provide us with the access point we can connect to. When the mobile phone is connected to our AP, we simply need to forward the packets out to the internet and optionally intercept them. Probably the whole point of doing this is intercepting the data, which is why we probably will be intercepting the data. We won't describe that here, because it's out of the scope of the article, since we only wanted to show how to connect the phone in ways that we're able to use for intercepting the traffic.
Conclusion
We showed various ways we can use to intercept the traffic from an Android phone on the computer, which allows us to inspect and modify the traffic. The easiest part is to sniff for the HTTP and HTTPS traffic, but most of the applications will use that, so we're pretty much covered. The first thing to do when trying to intercept the traffic is to set the proxy in the application itself, if it supports one. Most of the time, the applications don't support proxying, which is why we'll need to set a global proxy on an Android phone. But some applications bypass the proxy, so we need different methods to still be able to intercept the traffic. One of them we briefly described (but didn't provide too much detail) is to connect our phone to an arbitrary access point that we set up on our computer. That way all the traffic will be flowing through our AP upon connecting to it. Remember that those are just a few ways to intercept the traffic, but there are many other techniques as well. One of them is to set up a sniffer on the actual router and then connect the phone to our home router, which is quite elegant and easy solution. There is no unique recipe how to intercept the data from the Android applications, but it can be done as we showed above.
References:
Learn Network Security Fundamentals
[1] Self-signed Certificates in Burp, accessible on http://un-excogitate.org/archives/2009/02/28/self-signed-certificates-in-burp/.

CompTIA CySA+
Discover the latest salary trends for CompTIA CySA+ certified professionals in 2024. Learn what factors influence your earning potential in the cybersecurity field.

Cybercrime investigator
Cybercrime has hit record levels, with an expected $7 trillion USD to be made from cybercriminal activity by 2021. Investigating these sorts of crimes can be

EC-Council CEH
CEH v13 is the world's first AI-powered ethical hacking certification. Discover what's new, how it compares to v12/v11 and why it's a career game-changer.

CompTIA SecurityX
Explore the expert-level CompTIA SecurityX certification, what to expect on the exam, the career benefits and more.
