Threat modeling: Technical walkthrough and tutorial
Threat modeling tutorial: What to know before you begin
Threat modeling is an exercise designed to help an organization identify potential threats and cybersecurity risks within their organization and systems. This is an essential first step toward designing defenses and solutions to help eliminate or reduce these risks. Threat modeling is a four-step process:
- Create the design
- Apply zones of trust
- Discover threats with STRIDE
- Explore mitigations and controls
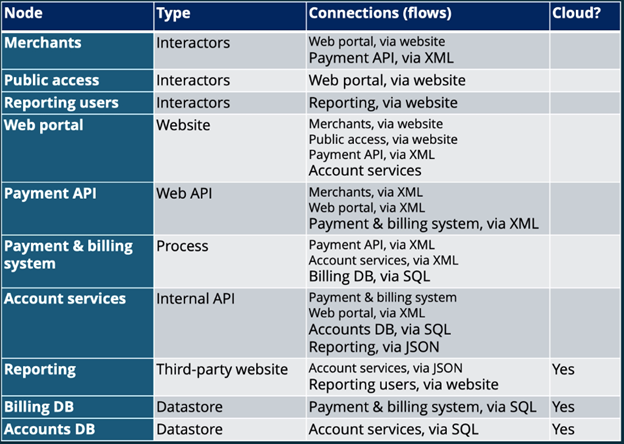
The table below outlines the nodes and connections in the scenario used in this walkthrough.
Learn Threat Modeling
1. Design the threat model
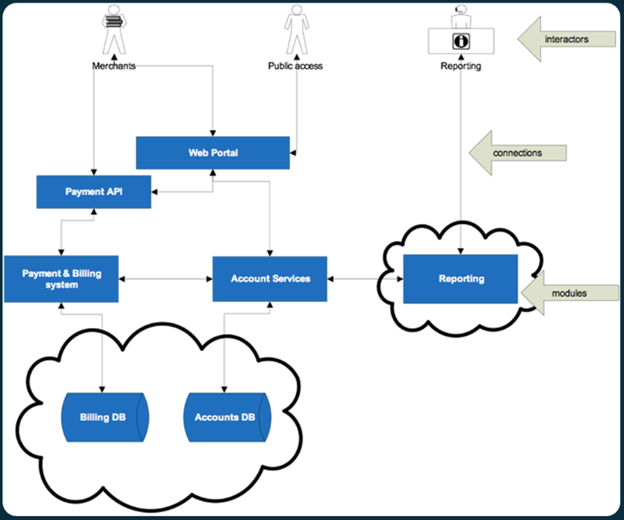
The first step in the threat modeling process is designing the threat model. This stage involves diagramming the various interactors and nodes within the modeled ecosystem and identifying the links and data flows between these various parties and systems.
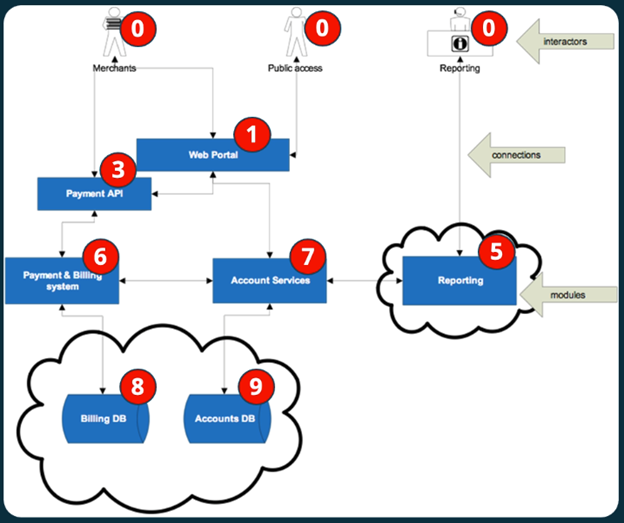
The image above shows a sample diagram derived from the table shown previously. This diagram has three types of content:
- Interactors: These are the people who will interact with the systems. These interactors may have different duties or user stories and each is included separately within the diagram.
- Modules: A module is a component of the system under test. This can include applications (like a web portal or payment API) and other endpoints or systems within the environment.
- Connections: Connections are links between interactors and modules. This includes interactor-module flows (like the use of a web portal) and module-module flows (such as an application querying a database).
Developing this diagram is a crucial first step in the threat modeling process. It provides a visual representation of the system being assessed and the trust relationships between various actors and systems.
2. Apply zones of trust
The next step in the threat modeling process is identifying and labeling zones of trust within the diagram.
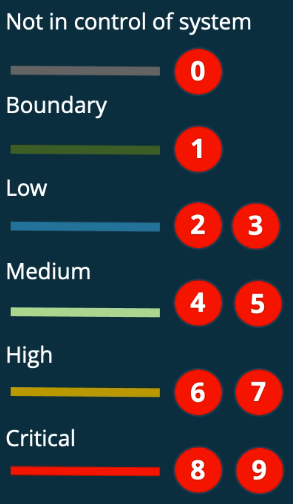
The image above shows the two different ways in which the threat model should be labeled. It includes a general scale of criticality (from “not in control of system” to critical) and a more specific 0-9 scale of criticality.
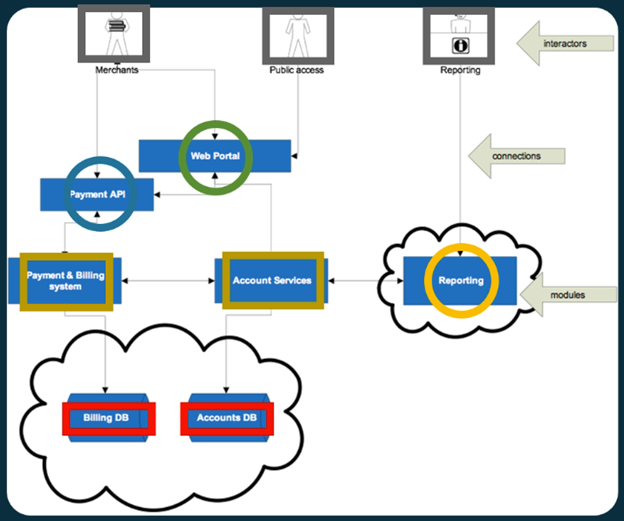
The first step in this stage of the process is labeling the diagram based upon criticality, as shown in the image above. As shown above, these various nodes are labeled based on the criticality of the data and functionality that they embody. For example, the organization’s databases are “critical” because they store sensitive information commonly protected by data privacy laws. At the other extreme, the interactors within the system are labeled at the lowest level of sensitivity: “not in control of the system”.
After performing this first, rougher labeling of criticality, a second pass should be performed to assign numerical criticality values to the various nodes within the system. This enables an organization to differentiate between the sensitivity of different systems with a higher granularity.
3. Discover threats with STRIDE
The third stage of the threat modeling process is identifying potential threats with a threat modeling framework. A number of different threat models exist, and organizations can select one to perform this step.
In this exercise, we’ll be using the STRIDE threat model, which was created by Microsoft employees. This threat model labels threats based upon their goals and impacts to the target:
- Spoofing: Masquerading as another user or system.
- Tampering: Modifying data on a system or network.
- Repudiation: Denying that you did something that you did.
- Information disclosure: Providing unauthorized access to sensitive data.
- Denial of Service: Degrading or destroying a system’s ability to provide services.
- Elevation of privileges: Gaining the ability to do something that you are not authorized to do.
These different labels can be applied based upon the features of the threat diagram:
- Spoofing: Nodes where an interactor labeled “not in control of system” connects to any other node.
- Tampering: Flows between a less critical and more critical interactor or module.
- Repudiation: Any node where both spoofing and tampering are applicable.
- Information disclosure: Any flows from a more critical to a less critical node.
- Denial of Service: Any nodes or flows where an interactor labeled “not in control of system” connects to any other node.
- Elevation of privilege: Any node that is connected to a less-critical node.
Flows
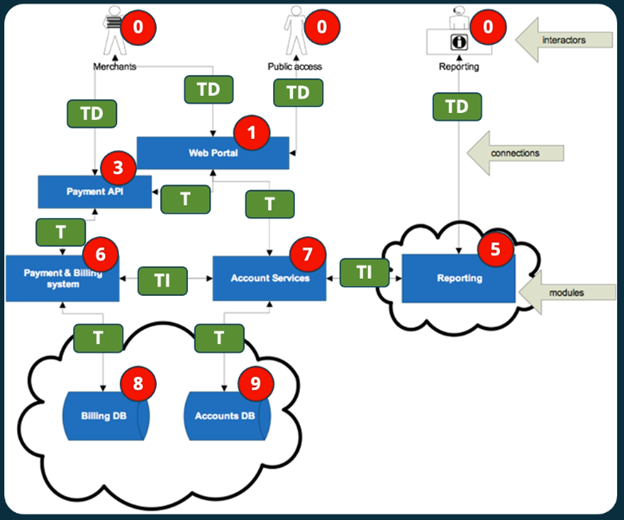
Three of the STRIDE threat categories apply to network flows:
- Tampering: Less-critical to more-critical
- Information disclosure: More-critical to less-critical
- Denial of Service: “Not in control of system” to any other
The image above shows the threat diagram labeled with these three types of threats. Tampering is a risk in most communication flows, while information disclosure and Denial of Service are only applicable in certain cases.
Nodes
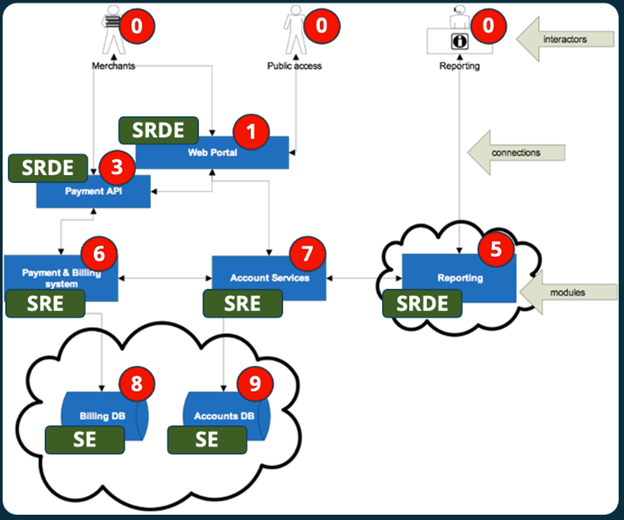
For the nodes within the threat diagram, the following STRIDE threats can be applied:
- Spoofing: “Not in control of system” to any other
- Repudiation: Spoofing + tampering
- Denial of Service: “Not in control of system” to any other
- Elevation of privilege: Less-critical to more-critical
The image above shows the threat diagram labeled with these threats. As shown, spoofing and elevation of privileges are generally applicable, while repudiation and Denial of Service are only threats in particular cases.
4. Explore mitigations and controls
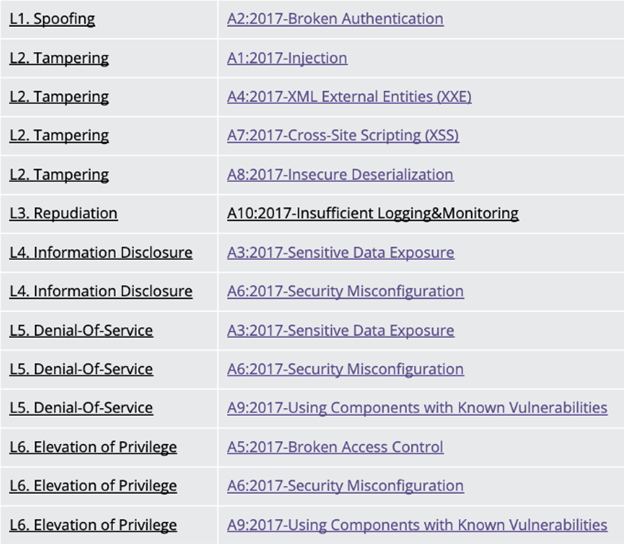
The final stage of the threat modeling process is identifying methods for addressing the threats discovered through the rest of the exercise. In this walkthrough, we’ll map the threats from the STRIDE threat model to the OWASP Top Ten list of web application vulnerabilities.
The table above shows the OWASP vulnerabilities that map to each of the six threats outlined in the STRIDE threat model. As shown, some threats have multiple different OWASP vulnerabilities, while others have only one.
In this stage of the exercise, the goal is to identify the OWASP vulnerabilities that are most applicable to each of the STRIDE threats labeled on the threat diagram. Use the following labels for selected mitigations recommended by OWASP:
- Injection
- The preferred option is to use a safe API, which avoids the use of the interpreter entirely or provides a parameterized interface, or migrate to use Object Relational Mapping Tools (ORMs).
- 1.2 Use positive or “whitelist” server-side input validation. This is not a complete defense, as many applications require special characters, such as text areas or APIs for mobile applications.
- Broken Authentication
- Where possible, implement multi-factor authentication to prevent automated, credential stuffing, brute force and stolen credential reuse attacks.
- Use a server-side, secure, built-in session manager that generates a new random session ID with high entropy after login. Session IDs should not be in the URL, be securely stored and invalidated after logout, idle and absolute timeouts.
- Sensitive Data Exposure
- Encrypt all data in transit with secure protocols such as TLS with perfect forward secrecy (PFS) ciphers, cipher prioritization by the server and secure parameters. Enforce encryption using directives like HTTP Strict Transport Security (HSTS).
- Store passwords using strong adaptive and salted hashing functions with a work factor (delay factor), such as Argon2, scrypt, bcrypt or PBKDF2.
- XML External Entities
- Whenever possible, use less complex data formats such as JSON and avoid serialization of sensitive data.
- Verify that XML or XSL file upload functionality validates incoming XML using XSD validation or similar.
- Broken Access Control
- With the exception of public resources, deny by default.
- Implement access control mechanisms once and re-use them throughout the application, including minimizing CORS usage.
- Security Misconfiguration
- A segmented application architecture that provides effective, secure separation between components or tenants, with segmentation, containerization or cloud security groups (ACLs).
- Cross-Site Scripting (XSS)
- Escaping untrusted HTTP request data based on the context in the HTML output (body, attribute, JavaScript, CSS or URL) will resolve Reflected and Stored XSS vulnerabilities. The OWASP Cheat Sheet ‘XSS Prevention’ has details on the required data escaping techniques.
- Insecure Deserialization
- Implementing integrity checks such as digital signatures on any serialized objects to prevent hostile object creation or data tampering.
- Using Components with Known Vulnerabilities
- Only obtain components from official sources over secure links. Prefer signed packages to reduce the chance of including a modified, malicious component.
- Insufficient Logging & Monitoring
- Ensure that logs are generated in a format that can be easily consumed by centralized log management solutions.
- Ensure high-value transactions have an audit trail with integrity controls to prevent tampering or deletion, such as append-only database tables or similar.
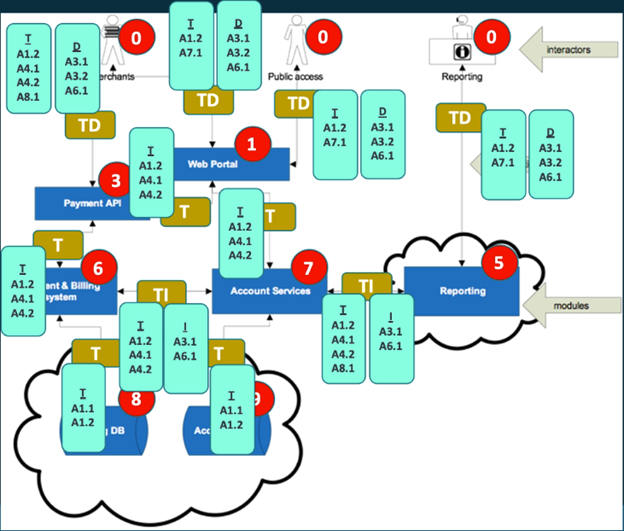
As with before, this labeling can be broken up into flows and nodes.
Flows
Data flows within an ecosystem can suffer from three different types of threats: Tampering, Information Disclosure and Denial of Service. At this stage, the specific mitigations detailed above should be applied to the threat diagram, based on the details of the flow in question.
The image above shows the various flows within the threat diagram, labeled with the corresponding OWASP vulnerabilities. The labels in the brown boxes are the STRIDE labels, while the green boxes refer to specific OWASP mitigations outlined above.
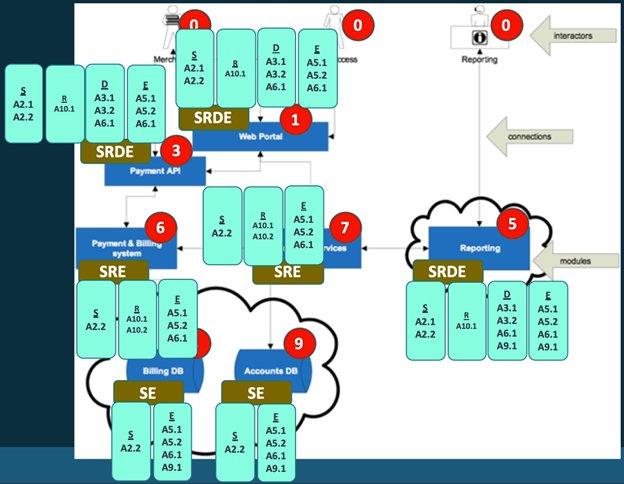
Nodes
Nodes within the threat diagram can be impacted by Spoofing, Repudiation, Denial of Service and Elevation of Privilege.
The image above shows the threat diagram with the specific mitigations to the node-specific threats labeled above.
Learn Threat Modeling
Applying the threat modeling process
This walkthrough provided an example of how to apply the threat modeling process to an organization’s complete network infrastructure. However, it is also possible to apply threat modeling in other cases, such as the individual components within an application. Doing so is an essential first step in developing security requirements and defenses against cyber threats and risks.
Sources
The Threats to Our Products, Microsoft
OWASP Top Ten 2017, OWASP
6 OF THE MOST POPULAR THREAT MODELING METHODOLOGIES, EC-Council

