Achieving Anonymity with Tor Part 2: Proxies and DNS servers
1. Using Burp with Tor
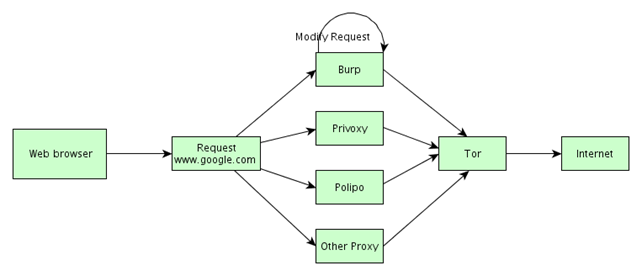
So far we've looked at how to set up our web browser to use Privoxy, which in turn uses Tor to achieve anonymity on the Internet. But what if we want to intercept requests with Burp? To help us better understand what's really going on, the picture below represents the chain of nodes that each request (and response) must go through in order to be able to use the proxy (in our case Burp) over the Tor network:

We can see that each request from the web browser first goes into some proxy (in our case Burp), which allows us to do something with it – in most cases all we want to do is to look up the GET/POST parameters and modify them a bit. The request is then passed to Tor's anonymous network (which is already part of the Internet, but we're representing the Internet in its own node for clarity).
Now we have a basic picture how it should all work together, but we still have to configure all of the components to work nicely together. First we have to install and start Burp Suite, which we won't describe here, since you should already know how to do that, or you wouldn't be reading this article. When Burp is started, we should see the port 8080 open and in LISTEN state:
# netstat -lntup

tcp6 0 0 127.0.0.1:8080 :::* LISTEN 4315/java
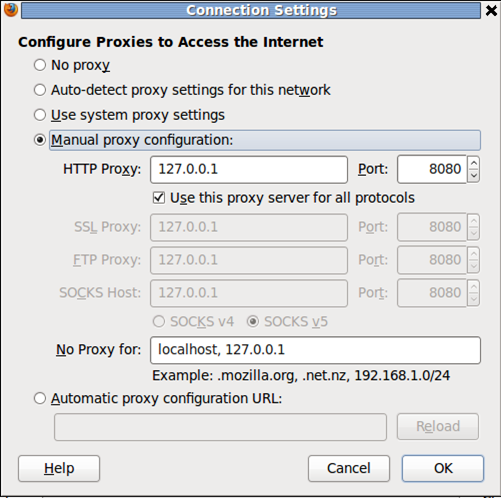
Since the web browser should send all requests to Burp first, we need to configure our web browser to use Burp instead of Privoxy. The Firefox settings are presented in the picture below:

We can see that we set Firefox to route all packets through Burp proxy, running at host 127.0.0.1 on port 8080.
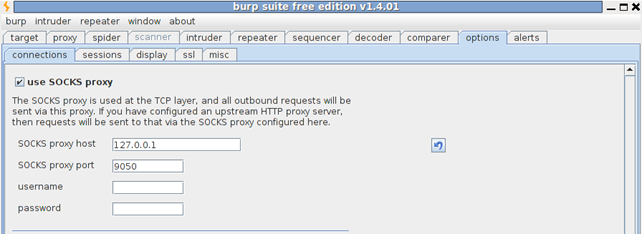
Afterwards we need to configure Burp to use SOCKS proxy, which is started and configured by Tor. SOCKS proxy works at a lower level than HTTP proxy, thus being able to forward not only HTTP requests. SOCKS is basically a TCP proxy, which can proxy all TCP connections through it, thus not being application specific; the application only needs to be capable of tunneling its data through SOCKS proxy. We can configure Burp to use SOCKS in the Burp Options under "use SOCKS proxy". The picture below demonstrates that:

We can see that we configured Burp to use SOCKS proxy running on host 127.0.0.1 (localhost) on port 9050. If we look at the ports in a LISTENing state again, we can see that port 9050 matches our Tor service:
# netstat -lntup

tcp 0 0 127.0.0.1:9050 0.0.0.0:* LISTEN 8520/tor
So what have we done so far? We've configured the web browser to use Burp proxy on port 8080, which in turn uses SOCKS proxy on port 9050, thus successfully being able to complete the proxy chain and browse the Internet anonymously, while still having the advantage of being able to modify requests with Burp.
2. Configuring Tor to Resolve Hostnames Securely
In the previous Tor article we mentioned the types of SOCKS proxies and certain Tor configuration variables that we can use in the torrc configuration file. We also discussed why it is important to resolve hostnames securely, so we won't repeat ourselves: check out part 1{link}if anything is unclear. But so far, we haven't yet discussed how to actually configure Tor to resolve hostnames securely. This is what we'll do here.
The following solutions are available when we want to resolve hostnames securely:
A: Use SOCKS4a
Not every application supports SOCKS4a, so this solution doesn't really solve the problem, because we want a universal solution that works with all applications.
B: Torify hostname resolution
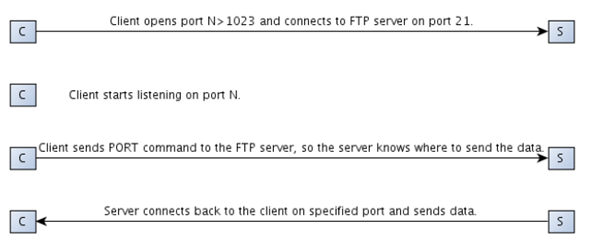
We can try to torify the DNS resolution application that we use. But we have to be careful, because some applications were not built with anonymity in mind. Some protocols, like FTP (active/passive mode), send the IP address itself in the data section of the FTP, thus making it very hard to anonymize. This happens in active mode of the data transfer in FTP. The following picture summarizes the initialization of the FTP transfer:

We can see all the steps needed to start sending the data from server to client. This doesn't seem like much, if we don't pay attention. In step C, we can see that client sends PORT command, which is the root of our problems when try to anonymize it. The PORT command uses a format like the following:
PORT x,x,x,x,y,y where x's represent the client's IP and y's represent the chosen port that will be used for data transfer. So in this case the client revealed its IP address and broke the anonymity. It's cases like that we must watch out for when trying to torify an application.
This doesn't directly relate to DNS resolution scheme, but we're mentioning it here anyway, since we're already talking about torifying an application.
C: Use tor-resolve
With tor-resolve we can get the IP address of the hostname very easily. All we need to do is run the program with the specified hostname, like the following:
# tor-resolve www.google.com 127.0.0.1:9050
This command says that we want to get the IP address of a hostname www.google.com, and we want to use the Tor SOCKS proxy running at host 127.0.0.1 on port 9050, which is the default host:port combination, but we specified it anyway, for clarity.
D: Use local TorDNS DNS server
The local DNS server can be set up, which will forward all DNS requests through Tor network. Tor provides a built-in DNS server, which can be configured by adding some configuration variables to the /etc/tor/torrc configuration file. More specifically, we need to add the following configuration variables:
DNSPort 53
AutomapHostsOnResolve 1
To test whether the TorDNS works, we can use dig command to query our DNS server for an IP address. We can use the following command to send a DNS request to TorDNS, asking it to resolve the hostname www.google.com:
# dig @localhost -p 53 www.google.com
To ensure that all DNS requests are really being tunneled through our local DNS server, we also need to change the /etc/resolv.conf to point to the 127.0.0.1:53 DNS server, so all applications on the configured machine will use TorDNS DNS server for hostname to IP resolution. If we do that, we'll notice a little bit of a delay when querying the hostname that is not in cache yet, but with today's Internet connections this shouldn't be a problem. If that bothers us, we could set-up a local caching nameserver that would remember the hostname and their corresponding IP addresses. On Linux there's a program called dnsmasq, which is a lightweight DHCP and caching DNS server, which accepts DNS queries and answers them directly from local cache or forwards then to a real DNS server. A good explanation of this can be found on [1].
We also need to ensure that /etc/resolv.conf isn't changed the next time the dhclient or dhcpcd programs are run. To disable dhclient changes to the resolv.conf with its own nameservers, we must delete the domain-name, domain-name-servers and domain-search from the request directive in /etc/dhcp3/dhclient.conf configuration file. To disable dhcpcd changes to the resolv.conf, we need to delete domain_name, domain_name_servers and domain_server from the /etc/dhcpcd.conf configuration file. If we have both of the programs installed, it's probably best to change both files accordingly.
3. Which Proxy to Choose
There are quite a few proxies available that we could use, but most of the community uses either Privoxy or Polipo. There are a couple of reasons why you should rather use Polipo than Privoxy and are described in detail here: Privoxy vs Polipo. To summarize, these are the reasons why it is better to use Polipo:
- Privoxy lacks HTTP 1.1 pipelining.
- Privoxy caches most requested objects.
- Privoxy needs to transfer the entire page to parse it and show it to the user. This means that user experience in Privoxy is much worse, since the user constantly waits for the whole webpage's data to be transferred from the server, before being shown to the user.
But there is another question we need to ask ourselves. Why do we even need HTTP proxy, if we can use Tor's SOCKS proxy right from the web browser? The answer is as follows: usually the web browser's SOCKS proxy uses some default configuration variables that don't tolerate Tor as well as Privoxy or Polipo can. The main annoyance would be timeouts, which happen very frequently if we use Tor's SOCKS proxy directly.
4. Tor Hidden Services: How I Can Stay Anonymous and Host My Own Server in Tor Network
Tor hidden services use the hostname that ends with the .onion domain. That TLD (Top Level Domain) cannot be used over the normal Internet; its corresponding hostnames can only be used over Tor network, which knows how to resolve them into hidden IP addresses.
Let's see what happens if we try to resolve a hostname of DuckDuckGo, which is a search engine used to search for websites in Tor anonymous network. Let's use both the dig and tor-resolve commands, like this:
# tor-resolve 3g2upl4pq6kufc4m.onion 127.0.0.1:9050
# dig @localhost -p 53 3g2upl4pq6kufc4m.onion
Both commands report the IP address of 127.192.0.10. From this we can gather that IP address belongs to localhost, since all IP addresses 127.0.0.0/24 are conserved for localhost, although 127.0.0.1 is most commonly used. This effectively anonymizes web servers in Tor network, so we can't track them down. There's quite a bit more to this story than just resolution of .onion domains, but we won't go into to much detail right now – we'll leave that for one of the future articles.
5. Tor Logging Options
If we installed Vidalia, then our logs can be seen in the "Message Log", but if we don't use Vidalia, getting logs is a little trickier. If everything is already set up and working, we can probably get the logs by looking into the /var/log/tor/ directory. The following command displays the logs as they appear on the screen:
# tail -f /var/log/tor/tor
But there are also various logging options we can configure in the /etc/tor/torrc configuration file. The relevant configuration variables are the following:
Log minSeverity-maxSeverity stderr|stdout|syslog
Sends all messages between minimal severity and maximum severity to one of the output channels: standard error, standard output or syslog.
Log minSeverity-maxSeverity file <filename>
Sends all messages between minimal severity and maximum severity to a file named <filename>.
Severity levels are the following: debug, info, notice, warn and err. Good configuration options are presented here:
Log notice-err file /var/log/tor/tor
This effectively logs all messages to a file /var/log/tor/tor.
4. Tor Advanced Configuration Options
HTTPProxy
- Configure Tor to make directory requests through host:port specified by this configuration variable.
HTTPProxyAuthenticator
- Specifies the username and password used to authenticate to HTTP proxy.
HTTPSProxy
- Configure Tor to make all SSL connection requests through host:port specified by this configuration variable.
HTTPSProxyAuthenticator
- Specifies the username and password used to authenticate to HTTPS proxy.
Socks4Proxy
- Configure Tor to make all connections through SOCKS 4 proxy at host:port.
Socks5Proxy
- Configure Tor to make all connections through SOCKS 5 proxy at host:port.
Socks5ProxyUsername
- Specify the username used to authenticate to SOCKS 5 proxy.
Socks5ProxyPassword
- Specify the password used to authenticate to SOCKS 5 proxy.
KeepAlivePeriod
- Specify the time that Tor uses to send keepalives to keep the connection open.
ControlPort
- Specifies the port on which we can connect to Tor and control it. If 'auto' value is used, Tor will automatically choose a port for us, otherwise the specified port is used.
NewCircuitPeriod
- Consider building a new circuit every N seconds (default: 30 seconds).
Configuration options that are relevant to the SOCKS proxy in Tor network are the following:
SocksPort:
- On which port number SOCKS proxy will listen for incoming connections.
SocksListenAddress
- On which IP SOCKS proxies will listen for incoming connections.
SocksTimeout
- How much time Tor can try establishing a circuit before timing out (default 2 minutes).
We really should understand the last three configuration variables, since they are very important, because SOCKS proxy is mandatory as an entry point to Tor network.
5. Conclusion
In the next series we'll take a look at the Torbutton and tsocks to see how to anonymize ourselves on the Internet. We'll describe how to use an application over Tor network even when it doesn't have support for SOCKS proxy server; we'll do that by using tsocks to tunnel traffic over the Tor network nevertheless.
References:
[1] How to install and configure dnsmasq, accessible on http://www.iceflatline.com/2010/02/how-to-install-and-configure-dnsmasq/.


