Dockerizing a Sample GUI Application: Case Study

The goal for this article is a sprint from never using Docker to using it to deploy a GUI application that only has a console deployment pattern for Docker.
Why would you want to Dockerize your application? Several reasons. LXC is certainly more powerful, but it also requires significantly more understanding of what's going on. To quote someone who saw both a Docker and an LXC implementation of the same application:

FREE role-guided training plans
"That LXC stuff is scary and hard to read." – source unnamed.
Use cases:
-
Use a given tool across many platforms.
-
Deploy a Linux application to OS X without as many abstraction layers.
-
-
Use a given tool in the cloud.
-
Deploy an application to AWS or some other cloud provider. SSH in and grab the single application it is designed to run with xvfb or some desktop parts.
-
-
Distribute a given tool with frozen dependencies that doesn't affect the base OS.
-
A tool that was written for and not updated to newer libraries, as those libraries are deprecated, and the OS reaches EOL.
-
-
Rapid deployment of a given tool-set with no pain to the end user.
-
Compile these 30 dependencies, install these unsigned packages, and/or run it all in a VM or chroot.
-
-
Use some library that clashes with everything in the universe and is a pain in the butt to install.
-
Oracle Java vs OpenJDK or Eclipse development environments.
-
-
Docker.io auto-builds of a pseudo-vm to distribute your application.
-
Check references for further reading on that part.
-
So, it's all the rage at the moment. Let's go ahead and do it with a simple application. We can do it with something I've already contributed a decent amount of time to dockerizing the GUI and adding some helper scripts to launch things.
Building a Docker container:
Just use whatever Linux deployment environment your tool is built on. Don't fight with dependency issues and versioning. Ideally, all applications would be using the latest and greatest library versions. Let's not focus on that though.
In the case of w3af, the target deployment environment is the older 12.04 Ubuntu LTS with the older pygtk toolkit. At over 130,000 lines of python code, it would take a significant amount of time to port it to pygi/python+Gtk3 with introspection, and each dependency upgrade would need testing. So let's just keep the "old stuff" and shovel it in to a container.
Getting started:
The most basic docker container starts with a Dockerfile that looks something like this:
FROM ubuntu:12.04
MAINTAINER Some Name <some.email@example.com>
RUN echo "Hello from Docker.io"
Note: You can't use single quotes in a Dockerfile. Since Docker is opinionated about using JSON for everything, and JSON only honors single quotes in very specific circumstances... be careful. It won't error out on you until it's far too late and you have to spend a significant amount of time rebuilding.
Let's give that container a try. In a terminal, run:
mkdir -p ~/ISI/docker_tutorial
cd ~/ISI/docker_tutorial
echo "FROM ubuntu:12.04
MAINTAINER Some Name <some.email@example.com>
RUN echo "Hello from Docker.io"
ENTRYPOINT ["/bin/bash"]" > Dockerfile
`docker build -t ISItut .`
That next to last command tells Docker to use the current directory as the base for the build of the instance and to tag it as ISItut. We use names and tags for everything so that in the future, when we write scripts to use the containers, we have something easy with which to identify the container or image. Suffice it to say, it's easier to refer to things by name than something like "17ffe97a0fa8".
You should be in a root shell for your docker container. Next we can exit, make sure it's stopped. And examine what each part did. Just `exit` like you would out of any sub-shell.
`docker stop -f ISITutorial`
Now let's examine the Dockerfile in whole. FROM tells Docker to use Ubuntu version 12.04 as the base image. The MAINTAINER is a person with an email address you can ping with problems. RUN just lets you run commands as root inside the container. The initial assumption is that root can't escape the container. Note that if you use the USER directive, you can modify who is running the following commands inside the container. ENTRYPOINT tells Docker what to do when the container is run. So, if you want a single purpose container that runs in interactive mode, this makes sense. If, however, you have a multipurpose container, you want to run the container as a service, or you want to pass a GUI application over SSH, then you probably want to use CMD and run the container Dockerized with an exposed SSH service instead.
Note/Pro-tip:
You DON'T need to run the Docker command as root. I see it all the time, and it's absolutely unnecessary if you're not accessing hardware devices directly. It just submits commands to the Docker daemon, and there's no need to be root there.
So, now we have the most basic of Dockerfiles. Let's keep going. What about that ENTRYPOINT to CMD switch I talked about a moment ago? Let's do that now. Open your Dockerfile in your text editor of choice and make sure it now looks like this:
FROM ubuntu:12.04
MAINTAINER Some Name <some.email@example.com>
RUN apt-get -y update
RUN apt-get -y upgrade
RUN apt-get -y dist-upgrade
RUN apt-get install -y openssh-server
#You might want to change this if you ever plan to deploy to the cloud...
RUN echo "root:toor" | chpasswd
EXPOSE 22
Removing old images:
Now that we changed some things, it would be nice to keep our pile of docker images and containers clean. `docker rm` removes containers and `docker rmi` removes images.
Remove the old images:
`docker rm ISITutorial`
`docker rmi ISItut`
Rebuild:
`cd ~/ISItut/docker_tutorial`
` docker build -t ISItut .`
It will again take some time to build. This is the downside of using containers. Initial builds can take some time if you don't build incremental images and keep forking them. The -d switch makes sure it runs in daemon mode and releases our terminal.
Now that we have one built, it would be nice to see data about it. In the terminal:
docker images – gives you a list of images you have downloaded or built.
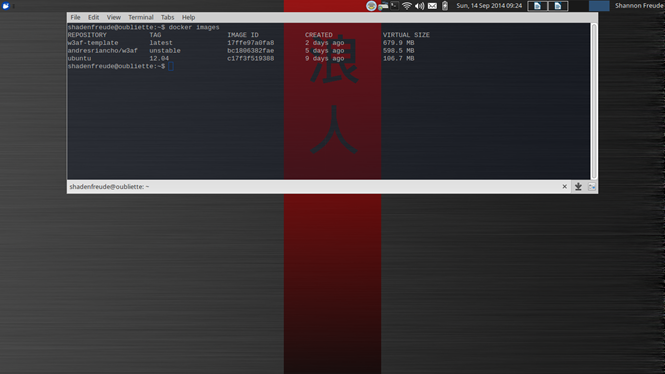
docker ps -a – gives you a list of containers you've created from those images.
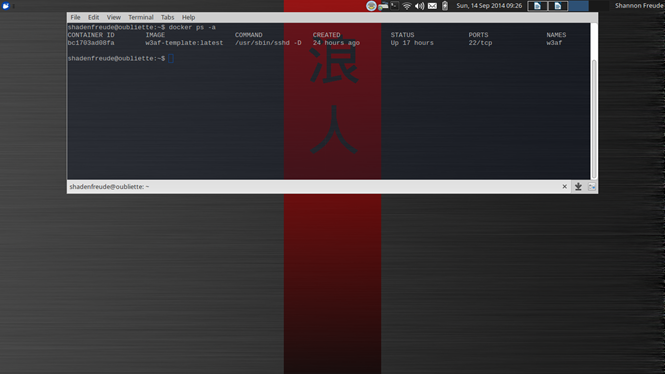
docker inspect name-or-container-id – gives you a detailed view on a given container with a not insignificant amount of JSON.
Now we can access the SSH daemon on the docker container locally. If we want to do that, we simply check the IP of the running container with `docker inspect ISITutorial | grep IPAddress`. Alternately, we could feed the array and JSON to a Python script instead of grepping it. We'll do that later. For now, we'll do it manually. `docker inspect` dumps the configuration for a given container.
`docker inspect ISITutorial | grep IPAddress`
This tells us the IP address of the container on the local bridged network.
`ssh -X root@ip-address`
This says "Forward X applications over my connection to the IP address ip-address as user root".
After accepting the SSH host key and providing our "toor" password, we are in a terminal. If we had the necessary libraries installed, then we could launch a GUI application and it would appear on our desktop.
Now that we know we can do it, let's drop out of that session with exit or Ctrl-D. We want to stop our docker instance and delete it, so we can enter:
`docker stop -f ISITutorial`
`docker rm ISITutorial`
`docker rmi ISItut`
This says, stop the ISITutorial container. Also, delete the ISITutorial instance and the ISItut image. It's possible there will be other unnamed instances in your deployment. You can delete them by hash-looking container-ids instead of name. Remember when I said name things? Yeah, name things.
Moving along, let's actually get the app deployed. What are the installation instructions as of now? They look something like:
- Install core binary dependencies.
- Run the application.
- Run the auto-generated dependency installation scripts.
-
Wash, rinse, repeat until you find all the required dependencies.
So, we need to apt-get install some stuff. After testing, we might need to install more stuff. I'll save you that pain, and just give you the apt-get line you're after. We were just at it as a RUN line in our Dockerfile, which now looks like this:
RUN apt-get install -y python-dev git python-lxml wget libssl-dev
The dependency installer that comes with w3af uses pip. Let's make sure that's installed now as well:
RUN wget https://bootstrap.pypa.io/get-pip.py
RUN python get-pip.py
Finally, we're getting somewhere. At this point we could add in the tool we're trying to Dockerize. When we do, we could probably stand to add some folder structure:
RUN mkdir /root/w3af
WORKDIR /root/w3af
RUN git clone --depth 1 https://github.com/andresriancho/w3af.git
WORKDIR /root/w3af/w3af
There. Now we have the source tree. We made a directory for the w3af application to reside within. We cloned the repository. Then we told Docker it should operate future RUN commands from that folder.
The tool author was kind enough to provide a dependency installer. Let's use it too:
RUN /root/w3af/w3af/w3af_console; true
RUN sed "s/sudo apt-get/apt-get -y/g" -i /tmp/w3af_dependency_install.sh
RUN sed "s/sudo pip/pip/g" -i /tmp/w3af_dependency_install.sh
RUN /tmp/w3af_dependency_install.sh
This tells Docker to run the console tool and pay no attention to its return code. If Docker gets a retval that indicates no success, it stops building an image. The sed lines are just stripping sudo off the commands since we're already root. The last line runs the dependency installer.
If you're following along, your Dockerfile should look something like this:
FROM ubuntu:12.04
MAINTAINER Some Name <some.email@example.com>
RUN apt-get -y update
RUN apt-get -y upgrade
RUN apt-get -y dist-upgrade
RUN apt-get install -y openssh-server
RUN mkdir /var/run/sshd
#You might want to change this if you ever plan to deploy to the cloud...
RUN echo "root:toor" | chpasswd
RUN apt-get install -y python-dev git python-lxml wget libssl-dev
RUN wget https://bootstrap.pypa.io/get-pip.py
RUN python get-pip.py
RUN mkdir /root/w3af
WORKDIR /root/w3af
RUN git clone --depth 1 https://github.com/andresriancho/w3af.git
WORKDIR /root/w3af/w3af
RUN /root/w3af/w3af/w3af_console; true
RUN sed "s/sudo apt-get/apt-get -y/g" -i /tmp/w3af_dependency_install.sh
RUN sed "s/sudo pip/pip/g" -i /tmp/w3af_dependency_install.sh
RUN /tmp/w3af_dependency_install.sh
EXPOSE 22
CMD [ "/usr/sbin/sshd", "-D" ]
Note that EXPOSE and CMD are moved to the end. It's cleaner that way.
You could run this Dockerfile now, and it would be able to launch the console version of the tool after logging in to the instance. That's not really any fun though. Let's keep going.
Note: If you do test it now, it's going to take a significant amount of time based on your Internet connection speed.
Now what about GUI libraries? Well this source https://www.stgraber.org/2014/02/09/lxc-1-0-gui-in-containers/ indicates that these three libraries will get Chromium working in LXC. Good enough for Chromium and not directly linked seems like a good place to start. It's probably a little heavier than it needs to be, but it is quite simple. Let's do it.
RUN apt-get install -y ubuntu-artwork dmz-cursor-theme ca-certificates
Now that we have the probable base GUI components, we can add the application specific GUI components that we install from packages to the same installation line.
RUN apt-get install -y ubuntu-artwork dmz-cursor-theme ca-certificates xdot python-gtk2 python-gtksourceview2
Again, the tool author was kind enough to provide a dependency installer. Let's use it too:
RUN /root/w3af/w3af/w3af_gui ; true
RUN sed "s/sudo apt-get/apt-get -y/g" -i /tmp/w3af_dependency_install.sh
RUN sed "s/sudo pip/pip/g" -i /tmp/w3af_dependency_install.sh
RUN /tmp/w3af_dependency_install.sh
Finally, we're almost there. Maybe we can add shared storage and saved application preferences. Let's look at creating everything we need to have shared preferences folders. If you're on OS X or Windows, this gets painful because we have to write a layer to handle the boot2docker requirement. We'll test on Linux.
On your host OS create your shares wherever you wish, I'm using opt.
sudo mkdir -p /opt/w3af/w3af_shared
sudo mkdir -p /opt/w3af/.w3af
sudo chown -R someuser:somegroup /opt/w3af
chmod -R u+s /opt/w3af
chmod -R g+s /opt/w3af
The first two lines create the folders we want to use. The -p option is for recursively making directories. Setting the sticky bit is to try and preserve file permissions in those folders, so we don't wind up not being able to read the shared data without sudo. In order to share folders, we simply change our 'run' line that generates the container to tell docker what folders, files, etc we want mapped to where. It looks like this:
docker run -d --name ISITutorial -v /opt/w3af/.w3af:/home/w3af/.w3af -v /opt/w3af/w3af-shared:/home/w3af/w3af-shared ISItut
So, -v local-uri:in-container-uri. Now we should have a functional Dockerfile. We can spin it up and test. If you've been following along your Dockerfile looks something like this:
FROM ubuntu:12.04
MAINTAINER Some Name <some.email@example.com>
RUN apt-get -y update
RUN apt-get -y upgrade
RUN apt-get -y dist-upgrade
RUN apt-get install -y openssh-server
RUN mkdir /var/run/sshd
#You might want to change this if you ever plan to deploy to the cloud...
RUN echo "root:toor" | chpasswd
RUN apt-get install -y python-dev git python-lxml wget libssl-dev
RUN wget https://bootstrap.pypa.io/get-pip.py
RUN python get-pip.py
RUN mkdir /root/w3af
WORKDIR /root/w3af
RUN git clone --depth 1 https://github.com/andresriancho/w3af.git
WORKDIR /root/w3af/w3af
RUN /root/w3af/w3af/w3af_console; true
RUN sed "s/sudo apt-get/apt-get -y/g" -i /tmp/w3af_dependency_install.sh
RUN sed "s/sudo pip/pip/g" -i /tmp/w3af_dependency_install.sh
RUN /tmp/w3af_dependency_install.sh
RUN apt-get install -y ubuntu-artwork dmz-cursor-theme ca-certificates xdot python-gtk2 python-gtksourceview2
RUN /root/w3af/w3af/w3af_gui ; true
RUN sed "s/sudo apt-get/apt-get -y/g" -i /tmp/w3af_dependency_install.sh
RUN sed "s/sudo pip/pip/g" -i /tmp/w3af_dependency_install.sh
RUN /tmp/w3af_dependency_install.sh
EXPOSE 22
CMD [ "/usr/sbin/sshd", "-D" ]
Now let's add a couple of helper scripts, so we can easily launch w3af_console and w3af_gui. Remember when we talked about naming/tagging all the things and feeding the JSON to Python? Let's do that now. Save each of the following in your text editor of choice and give them executable permissions with `chmod +x`.
w3af_console:
import subprocess, json
stdout = subprocess.check_output( "docker inspect w3af", shell=True)
ip_address = json.loads(stdout)[0]["NetworkSettings"]["IPAddress"]
subprocess.call(["ssh", "-X", "root@" + ip_address, "/root/w3af/w3af/w3af_console"])
w3af_gui:
import subprocess, json
stdout = subprocess.check_output( "docker inspect w3af", shell=True)
ip_address = json.loads(stdout)[0]["NetworkSettings"]["IPAddress"]
subprocess.call(["ssh","-X", "root@" + ip_address, "/root/w3af/w3af/w3af_gui"])
These two scripts just:
- Import JSON and subprocess, so we have the necessary dependencies
- Grab the IPAddress field out of the JSON Docker inspect gives us
-
Run an SSH session to the container specifying the command to be run
And there we have it: A working GUI application wrapped in a Docker container that we can access via SSH. The only thing left to do is helper scripts to configure passing through boot2docker virtualbox VMs for non-Linux platforms. On the other hand, remember when we talked about using it to isolate dependency and bug shells to single platforms as much as possible? Well...

Get your guide to the top-paying certifications
With more than 448,000 U.S. cybersecurity job openings annually, get answers to all your cybersecurity salary questions with our free ebook!
So all those Mac OS X installation bugs in the w3af bug tracker? Yeah, they could be gone. Just spin up a Docker instance, install quartz, and it works on Mavericks via SSH forwarding of X11. Yay for isolating all the things.

- 12 pre-built training plans
- Employer-requested skills
- Personalized, hands-on training
In this series
- Dockerizing a Sample GUI Application: Case Study
- CompTIA CySA+ Salary: What to expect in 2025
- How to become a cybercrime investigator
- CEH version comparison: V12 to V13 evolution guide
- SecurityX (CASP+) certification: Overview and career path [2025 update]
- Network+ certification: Overview and career path [2025 update]
- ISC2 CSSLP certification overview: What you need to know
- ISC2 CGRC: Overview & career path
- CRISC certification: Overview & career path [updated 2021]
- PMP certification: Overview and career path [updated 2021]
- ISACA CDPSE certification: Overview of the new ISACA privacy certification
- CGEIT certification: Overview and career path [updated 2021]
- What is a cyber range?
- Microsoft azure certification: Overview And career path
- CEH salary guide: What Certified Ethical Hackers really earn
- Average SecurityX (CASP+) salary [2025 update]
- CompTIA Network+ certification — A 2025 salary analysis
- CompTIA CySA+ exam (CSO-003): Your guide
- CCSP salary: How much can you make as a cloud security professional?
- Average Security+ salary (2025): Your guide to a prosperous cybersecurity career
- Average CGRC (Certified in Governance, Risk and Compliance) salary
- CRISC Frequently Asked Questions (FAQ) [updated 2022]
- Average CSSLP Salary in 2021
- ISACA CDPSE exam details and process
- How To Become CGEIT Certified – Certification Requirements [updated 2021]
- How to pick the best cyber range for your cybersecurity training needs and budget
- CEH exam eligibility: Application process & requirements guide
- SecurityX (CASP+) frequently asked questions (FAQ) [2025 update]
- CISSP domains overview: Your complete preparation guide
- CCSP exam and CBK changes in August 2024
- Comprehensive guide to CompTIA Security+ domains (2025)
- Average CRISC Salary [2023 update]
- CGRC certification job titles and career outlook
- ISC2 CSSLP exam details and process
- ISACA CDPSE certification exam: Overview of domains
- An Introduction to the PMP: Exam Details and Process [updated 2021]
- CGEIT certification exam: overview of domains [Updated 2021]
- 10 Success Tips: How to Pass Your Certified Ethical Hacker (CEH) Exam
- Network+: Exam details and process [2025 update]
- SecurityX (CASP+): Exam details and process [2025 update]
- How to become CCSP certified: Certification requirements
- Certified in Risk & Information Systems Control (CRISC) Exam Overview [updated 2022]
- ISC2 CGRC exam details and process
- Best CSSLP study resources and training materials
- ISACA CDPSE domain 1: Privacy governance
- 10 Tips for PMP Certification Exam Success [updated 2021]
- CGEIT certification exam details and process [updated 2021]
- Certified Ethical Hacker (CEH) study guides & resources [updated 2025]
- CompTIA SecurityX resources: Videos, books, tests and more!
- How to get the CompTIA Network+ certification: Requirements and step-by-step instructions [2025 update]
- CySA+ exam objectives: The 4 domains that will be covered
Get certified and advance your career!
- Exam Pass Guarantee
- Live instruction
- CompTIA, ISACA, ISC2, Cisco, Microsoft and more!
CompTIA CySA+
Discover the latest salary trends for CompTIA CySA+ certified professionals in 2024. Learn what factors influence your earning potential in the cybersecurity field.

Cybercrime investigator
Cybercrime has hit record levels, with an expected $7 trillion USD to be made from cybercriminal activity by 2021. Investigating these sorts of crimes can be

EC-Council CEH
CEH v13 is the world's first AI-powered ethical hacking certification. Discover what's new, how it compares to v12/v11 and why it's a career game-changer.

CompTIA SecurityX
Explore the expert-level CompTIA SecurityX certification, what to expect on the exam, the career benefits and more.
