Which Weapon Should I Choose for Web Penetration Testing? 2.0

Introduction
This is the second edition of "Which weapon should I choose for Web Penetration Testing?" I hope that you liked the first edition. The same rule applies to this edition: if you have a favorite tool for penetration testing that you want to share with other users, add its name and link in the comments. These were the requests for this edition: Acunetix and Arachni.

11 courses, 8+ hours of training
Keep in mind that you will use these tools for targets that you have permission to perform testing on. Don't do stupid things, because you might get yourself into trouble. Have fun with this edition!

-
Official website: http://www.acunetix.com/
-
License: Trial Version
-
Additional Information: Popular tool for penetration testing
-
Tested version: Version 8.0 Build 20130205
When you first open Acunetix, it offers a lot of tools and options. On the left you can see a tree display of tools and options grouped in four sections: Tools, Web Services, Configuration, and General.
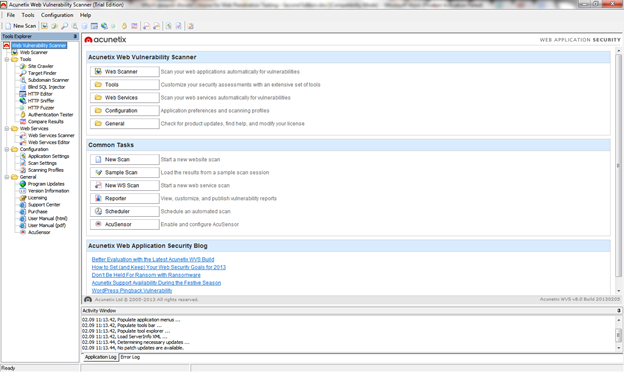
Figure 1. Acunetix user interface
When you click on one (for example, click on Tools) there is a nice description of each tool that is a part of that group. In the group, every tool has similar or different row.
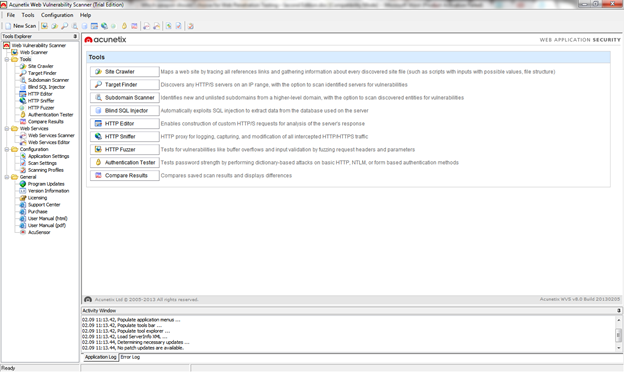
Figure 2. Tools grouping
The "Tools" group consists of the following tools:
1. Site Crawler - Maps a website by tracing all references links and gathering information about every discovered site file (such as scripts with inputs with possible values, file structure)
2. Target Finder - Discovers any HTTP/S servers on an IP range, with the option to scan identified servers for vulnerabilities
3. Subdomain Scanner - Identifies new and unlisted subdomains from a higher-level domain, with the option to scan discovered entities for vulnerabilities
4. Blind SQL Injector - Automatically exploits SQL injection to extract data from the database used on the server
5. HTTP Editor - Enables construction of custom HTTP/S requests for analysis of the server's response
6. HTTP Sniffer - HTTP proxy for logging, capturing, and modifying all intercepted HTTP/HTTPS traffic
7. HTTP Fuzzer - Tests for vulnerabilities such as buffer overflows and input validation by fuzzing request headers and parameters
8. Authentication Tester - Tests password strength by performing dictionary-based attacks on basic HTTP, NTLM, or form-based authentication methods
9. Compare Results - Compares saved scan results and displays differences
I will not explain all the tools in detail, because there are a lot of them, I will leave that to you. But you should that know Acunetix has a very good feature that I like the most: when performing a test with one tool, at the same time you can perform a test with a different tool. Acunetix allows you to run different tools at the same time, which is awesome. Combining these tools enables you to enhance your testing and when you are done with the scanning process you can exploit the vulnerability in order to rate its severity.

Figure 3. Performing a scan
You can start the scan process by clicking the top-left icon, labeled "New Scan." When you do this, a new window will appear where you can customize the scan session.
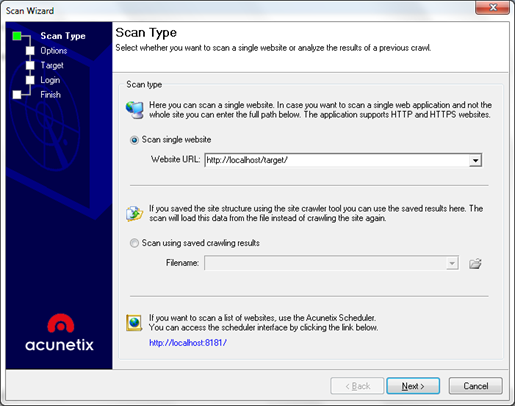
Figure 4. Scanning process – defining the target
The first step of the scanning session is defining the target. Here, as an option, you can use the results of the web crawler in order to perform the scan on already defined web links of your web application.
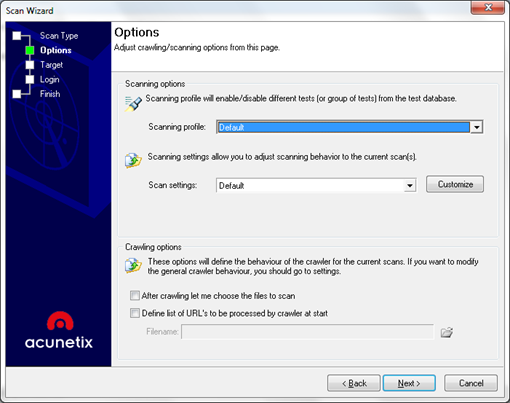
Figure 5. Scanning process – defining scanning profiles
Most of the professional scanning tools have an option to define scanning profiles, where you choose the profile by the type of the scan you want to perform on your web application. The customization of the scanning profiles can be found on the left grouping on the main screen (Configuration -> Scanning Profiles).
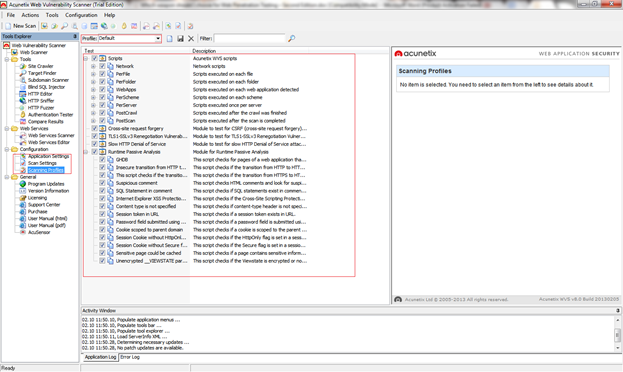
Figure 6. Defining custom profiles
Here you can make new profiles or modify the default profiles that Acunetix offers.
Let's get back to the scanning. On the third step of the scanning process, we can see information about the targets web server and technologies used.
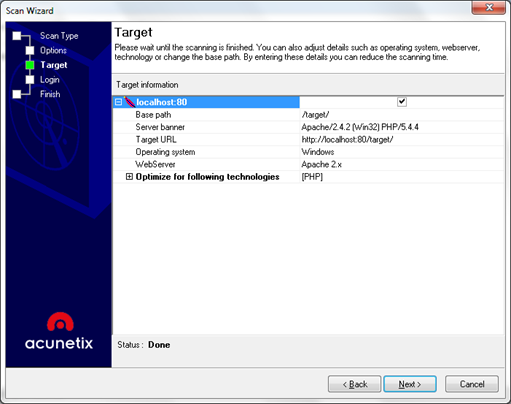
Figure 7. Scanning process – previewing the target technologies
The next step is defining the forms input. If there are forms that use cookies and sessions in your web application, they also can be exploited. Here you can simulate the login process that will enable Acunetix to have information about the authentication.
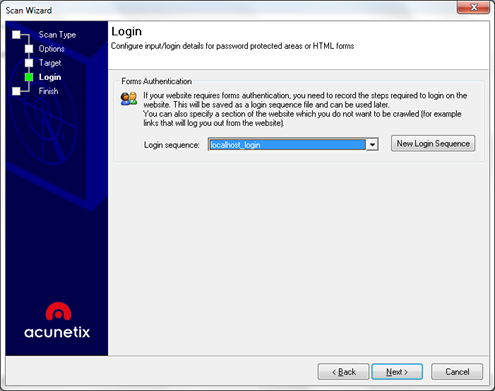
Figure 8. Scanning process – defining login forms
By clicking the finish button, you can end the configuration and start the scanning process.
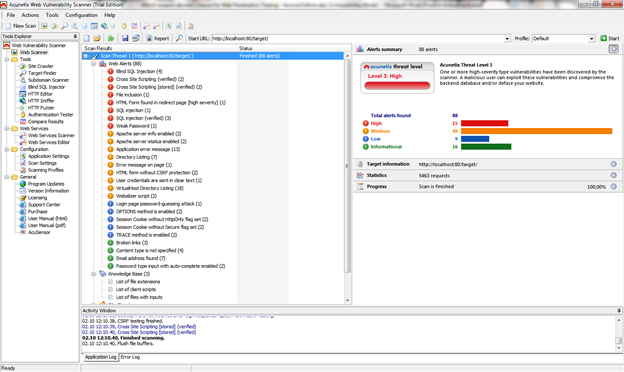
Figure 9. Scanning process – detecting vulnerabilities
From Figure 9 you can see that the scanning results are divided into four groups by the level of severity: High, Medium, Low and Informational.
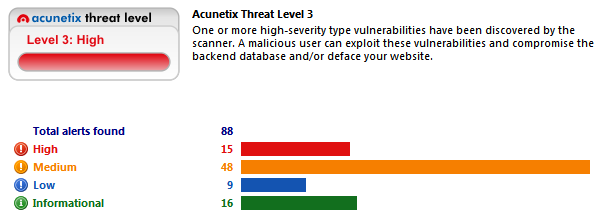
Figure 10. Results grouping
The last thing you can do when you are finished with the scanning is to fix the vulnerabilities. Acunetix offer great information about the type of vulnerability, the cause for it and also some additional information and links for how to fix it.
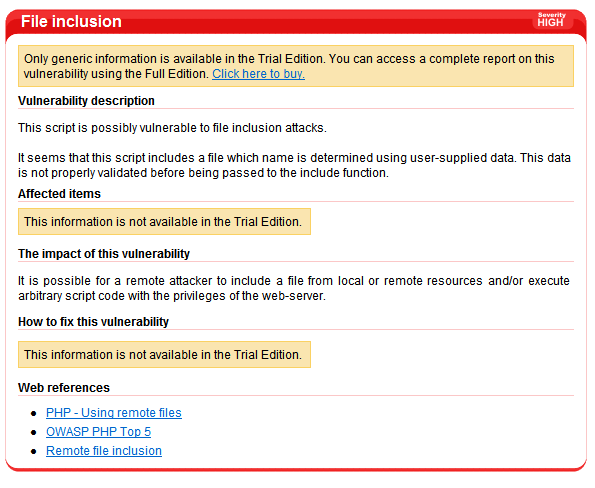
Figure 11. Information about vulnerabilities
I think that is enough about Acunetix, from here I leave it to you to explore the additional features of this great tool.
Pros:
-
Great site, full of information about current popular vulnerabilities
-
Lots of tools
-
Well organized and pretty simple to use
-
Great investment
Cons:
-
No report generator in the trial version
-
The causes for vulnerabilities are not described in the trial version
-
Lots of licenses without a description (Are all options available if you have a license?)

-
Official website: http://arachni-scanner.com/
-
License: GNU General Public License, version 2
-
Additional Information: Results in different format
-
Tested version: v0.4.1.3

Figure 12. Arachni menu
As I read from the Wiki, Arachni has two interfaces (if I am wrong, tell me by leaving a comment): CLI (command-line interface) and web interface. The CLI and the Web interface together with all plug-ins are written in Ruby. In order to start the Web interface of Arachni type in the terminal "arachni_web_autostart" or "arachni http://localhost/" for automated scan (this command uses the terminal/console interface and scanning will be done with all the modules).
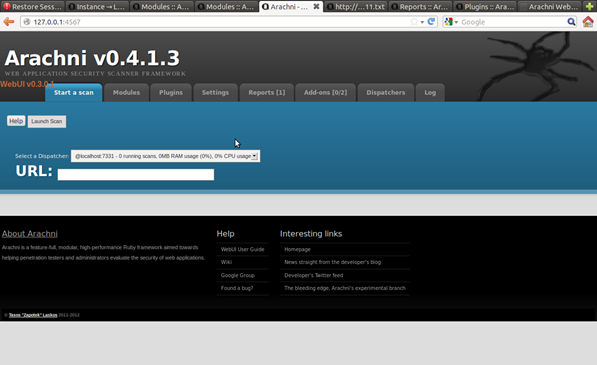
Figure 13. Scanning a target
Performing a scan is the simplest step to make; you just need to click on "Start a scan." During the scanning process you can preview the status of the current process (crawling or scanning) with a list of discovered vulnerabilities. When the scanning process ends, you will get a notification that the report with the results is available.
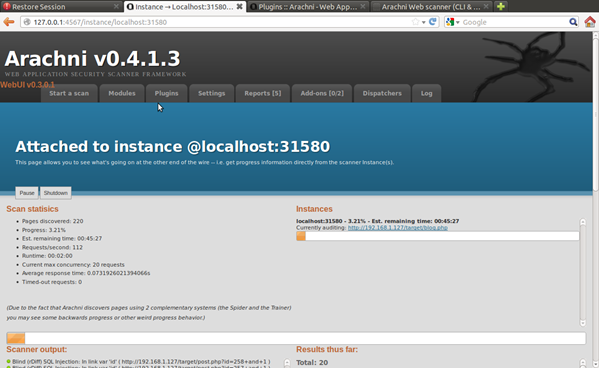
Figure 14. Scanning a target
Before starting the scanning process, you need to enable certain modules in order to perform a scan. By choosing which modules will be used, you define the type of testing. For example you may want to scan for XSS (Cross-Site Scripting) or SQL injections, or just information gathering, or maybe all of them combined.
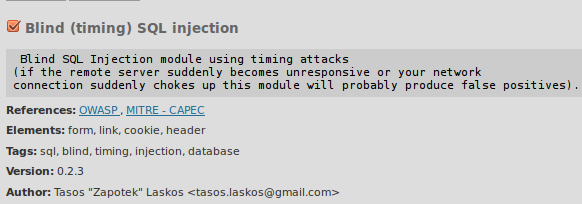
Figure 15. Example of a module
In Figure 15 there is an example of what a module looks like. As you can see, the sample module has a very nice description such as information for the type of the module (References), elements that are used to find vulnerabilities (Elements), information about the module type (Tags), version of the module (Version), and its author. In order to use a module, you just need to check it .
.
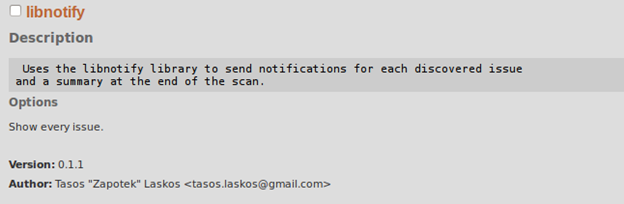
Figure 16. Example of a plugin
The role of the plug-ins is to add additional options to the whole scanning process. The plugins have Description and Options fields that must be filled in order to use properly.
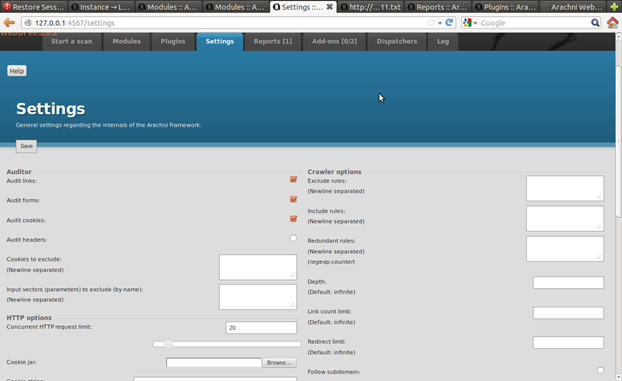
Figure 17. Settings tab
In setting, you can adjust the scanning process to your needs. You can limit the number of request, adjust the crawler, set a proxy, etc.
In Arachni you can have multiple parallel scanning processes running at the same time; this feature is pretty awesome. If you have multiple processes that are working at the same time, you can view them in "Dispatchers."
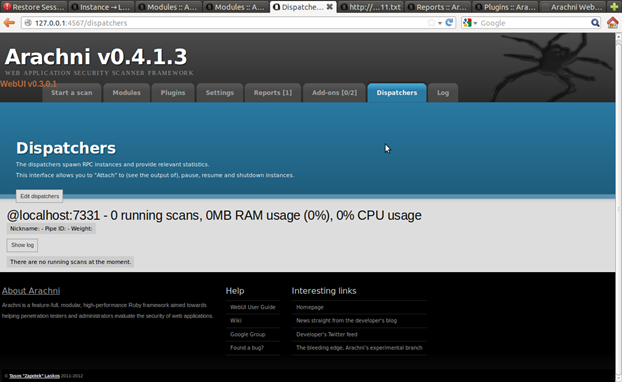
Figure 18. Dispatchers – display of running processes
Here you can Attach or Stop the running process. By clicking Attach you can view the scanning process, as displayed in Figure 14.
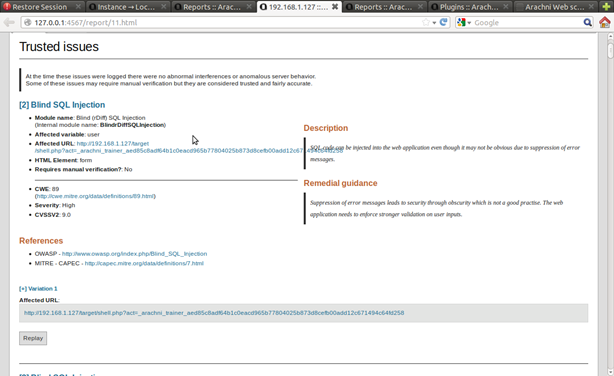
Figure 19. Sample of output – information about found vulnerability
The last thing i am going to explain is the result overview (Results), which is my favorite feature. Here you can view the scanning results in different output formats.
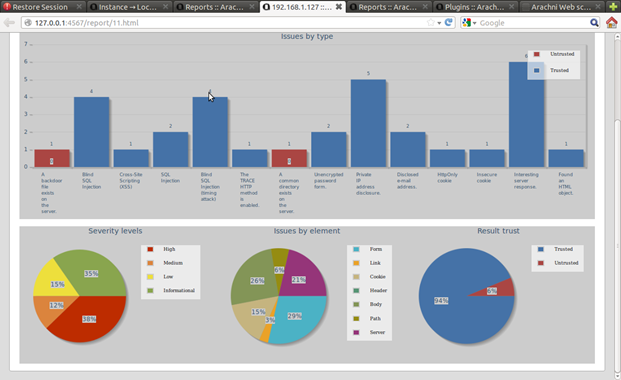
Figure 20. Statistical overview of the scanning report
The HTML output is something special. The results displayed with blue and red are false-positive. There is separate graph where the vulnerabilities are marked by severity (severity levels graph), and also a separate graph that marks vulnerabilities by source (issue by element graph).
Also I have noticed that there is a plug-in in the report that detects backdoors--quite surprising, right! :D
Pros:
-
Is this tool made by only one person? That's w00t, WOW.
-
You know it is pretty awesome for a free program
-
Results in different output formats (but it would be a good idea to offer the PDF format, too)
-
Nice on-site wiki with description of how to use
-
Easy and simple to use
-
Lots of plugins
Cons:
-
Doesn't scan a particular directory (scanner continues on the base URL)
-
Needs more community support
-
No scanning profiles
Conclusion
These were the requests from my readers from the previous edition; I hope they like my review. If you have a request or a tool you have coded send a link of it by commenting on this article.
11 courses, 8+ hours of training
References


Learn how to secure systems with 11 courses from Infosec Skills instructor and #1 best-selling author Ted Harrington.
- Hack your system
- Establish your threat model
- Spend wisely
- And more
In this series
- Which Weapon Should I Choose for Web Penetration Testing? 2.0
- CompTIA CySA+ Salary: What to expect in 2025
- How to become a cybercrime investigator
- CEH version comparison: V12 to V13 evolution guide
- SecurityX (CASP+) certification: Overview and career path [2025 update]
- Network+ certification: Overview and career path [2025 update]
- ISC2 CSSLP certification overview: What you need to know
- ISC2 CGRC: Overview & career path
- CRISC certification: Overview & career path [updated 2021]
- PMP certification: Overview and career path [updated 2021]
- ISACA CDPSE certification: Overview of the new ISACA privacy certification
- CGEIT certification: Overview and career path [updated 2021]
- What is a cyber range?
- Microsoft azure certification: Overview And career path
- CEH salary guide: What Certified Ethical Hackers really earn
- Average SecurityX (CASP+) salary [2025 update]
- CompTIA Network+ certification — A 2025 salary analysis
- CompTIA CySA+ exam (CSO-003): Your guide
- CCSP salary: How much can you make as a cloud security professional?
- Average Security+ salary (2025): Your guide to a prosperous cybersecurity career
- Average CGRC (Certified in Governance, Risk and Compliance) salary
- CRISC Frequently Asked Questions (FAQ) [updated 2022]
- Average CSSLP Salary in 2021
- ISACA CDPSE exam details and process
- How To Become CGEIT Certified – Certification Requirements [updated 2021]
- How to pick the best cyber range for your cybersecurity training needs and budget
- CEH exam eligibility: Application process & requirements guide
- SecurityX (CASP+) frequently asked questions (FAQ) [2025 update]
- CISSP domains overview: Your complete preparation guide
- CCSP exam and CBK changes in August 2024
- Comprehensive guide to CompTIA Security+ domains (2025)
- Average CRISC Salary [2023 update]
- CGRC certification job titles and career outlook
- ISC2 CSSLP exam details and process
- ISACA CDPSE certification exam: Overview of domains
- An Introduction to the PMP: Exam Details and Process [updated 2021]
- CGEIT certification exam: overview of domains [Updated 2021]
- 10 Success Tips: How to Pass Your Certified Ethical Hacker (CEH) Exam
- Network+: Exam details and process [2025 update]
- SecurityX (CASP+): Exam details and process [2025 update]
- How to become CCSP certified: Certification requirements
- Certified in Risk & Information Systems Control (CRISC) Exam Overview [updated 2022]
- ISC2 CGRC exam details and process
- Best CSSLP study resources and training materials
- ISACA CDPSE domain 1: Privacy governance
- 10 Tips for PMP Certification Exam Success [updated 2021]
- CGEIT certification exam details and process [updated 2021]
- Certified Ethical Hacker (CEH) study guides & resources [updated 2025]
- CompTIA SecurityX resources: Videos, books, tests and more!
- How to get the CompTIA Network+ certification: Requirements and step-by-step instructions [2025 update]
- CySA+ exam objectives: The 4 domains that will be covered
Get certified and advance your career!
- Exam Pass Guarantee
- Live instruction
- CompTIA, ISACA, ISC2, Cisco, Microsoft and more!
CompTIA CySA+
Discover the latest salary trends for CompTIA CySA+ certified professionals in 2024. Learn what factors influence your earning potential in the cybersecurity field.

Cybercrime investigator
Cybercrime has hit record levels, with an expected $7 trillion USD to be made from cybercriminal activity by 2021. Investigating these sorts of crimes can be

EC-Council CEH
CEH v13 is the world's first AI-powered ethical hacking certification. Discover what's new, how it compares to v12/v11 and why it's a career game-changer.

CompTIA SecurityX
Explore the expert-level CompTIA SecurityX certification, what to expect on the exam, the career benefits and more.
